
Operating Instructions
Page 1
Operating Instructions Maintenance Guide 1 Replacing Consumables and Maintenance Kit 2 Cleaning and Adjusting the Printer 3 Paper and Other Media 4 Troubleshooting 5 Appendix For safe and correct use of this machine, please be sure to read the Safety Information in the Setup Guide before you use it.
Operating Instructions Maintenance Guide 1 Replacing Consumables and Maintenance Kit 2 Cleaning and Adjusting the Printer 3 Paper and Other Media 4 Troubleshooting 5 Appendix For safe and correct use of this machine, please be sure to read the Safety Information in the Setup Guide before you use it.

Operating Instructions
Page 4
... and Adjusting the Printer Cautions to Take When Cleaning 29 Cleaning the Registration Roller 30 Cleaning the DustProof Glass 31 Adjusting the Color Registration 32 Auto Adjust...32 Adjusting the Fuser for Thick Paper 33 Test Sheet Samples 35 Adjusting Image Density 36 Adjusting Tray Registration 37 3. Replacing Consumables and Maintenance Kit Using the...
... and Adjusting the Printer Cautions to Take When Cleaning 29 Cleaning the Registration Roller 30 Cleaning the DustProof Glass 31 Adjusting the Color Registration 32 Auto Adjust...32 Adjusting the Fuser for Thick Paper 33 Test Sheet Samples 35 Adjusting Image Density 36 Adjusting Tray Registration 37 3. Replacing Consumables and Maintenance Kit Using the...

Operating Instructions
Page 7
By pushing the screw top into the screwdriver, you can work without having to its original position inside the front cover. ZHXH170J Note ❒ After using the screwdriver, return it to worry about dropping the screw. Replacing Consumables and Maintenance Kit Using the Screwdriver The screwdriver supplied is used for attaching options and is located inside of the front cover. 1 1.
By pushing the screw top into the screwdriver, you can work without having to its original position inside the front cover. ZHXH170J Note ❒ After using the screwdriver, return it to worry about dropping the screw. Replacing Consumables and Maintenance Kit Using the Screwdriver The screwdriver supplied is used for attaching options and is located inside of the front cover. 1 1.

Operating Instructions
Page 8
... collection site. R CAUTION: • Keep toner (used or unused) and er (A), open flame. B Remove the toner cartridge for the color you can print in the order of the print- es differs depending on the upper right cover of magenta (M), cyan (C), yellow (Y), and black..." from the printer driver. A While pushing the lock button on paper type, size, contents, and settings. Note ❒ A combination of used toner. Toner dust is flammable and will ignite when exposed to an open the upper right cover (B). Replacing Consumables and Maintenance Kit Replacing the Toner...
... collection site. R CAUTION: • Keep toner (used or unused) and er (A), open flame. B Remove the toner cartridge for the color you can print in the order of the print- es differs depending on the upper right cover of magenta (M), cyan (C), yellow (Y), and black..." from the printer driver. A While pushing the lock button on paper type, size, contents, and settings. Note ❒ A combination of used toner. Toner dust is flammable and will ignite when exposed to an open the upper right cover (B). Replacing Consumables and Maintenance Kit Replacing the Toner...

Operating Instructions
Page 10
Replacing Consumables and Maintenance Kit Important ❒ Do not install and remove toner cartridges repeatedly. " appears on the display: Loading Toner... ZDJH042J Please wait while the toner loads. The following message appears on the display. 4 Important ❒ To avoid malfunction, do not turn off the power while "Loading Toner... This could result in toner leak. 1 G Close the upper right cover.
Replacing Consumables and Maintenance Kit Important ❒ Do not install and remove toner cartridges repeatedly. " appears on the display: Loading Toner... ZDJH042J Please wait while the toner loads. The following message appears on the display. 4 Important ❒ To avoid malfunction, do not turn off the power while "Loading Toner... This could result in toner leak. 1 G Close the upper right cover.

Operating Instructions
Page 12
... cover. Important ❒ Attach the duplex reversal unit after detaching the 2 tray finisher from the printer. C Close the duplex reversal unit by raising it slowly using both hands, and push it in place. Replacing Consumables and Maintenance Kit Opening and Closing the Duplex Reversal Unit 1 There are times when you may need to...
... cover. Important ❒ Attach the duplex reversal unit after detaching the 2 tray finisher from the printer. C Close the duplex reversal unit by raising it slowly using both hands, and push it in place. Replacing Consumables and Maintenance Kit Opening and Closing the Duplex Reversal Unit 1 There are times when you may need to...

Operating Instructions
Page 14
.... Position the fuser oil unit 1 as shown, and then slowly pull seal (A) out. ZHXHK041J Note ❒ Be sure to avoid oil leakage. 8 Replacing Consumables and Maintenance Kit G I Pull the lever down slightly, and Take the fuser oil unit out of fuser oil unit. Finally, hold the up- Put the unit in a stable...
.... Position the fuser oil unit 1 as shown, and then slowly pull seal (A) out. ZHXHK041J Note ❒ Be sure to avoid oil leakage. 8 Replacing Consumables and Maintenance Kit G I Pull the lever down slightly, and Take the fuser oil unit out of fuser oil unit. Finally, hold the up- Put the unit in a stable...

Operating Instructions
Page 16
cording to local regulations. 10 Replacing Consumables and Maintenance Kit P Plug in the power cable, and then turn on the power. Note 1 ❒ If you dispose of used fuser oil unit by yourself, dispose ac-
cording to local regulations. 10 Replacing Consumables and Maintenance Kit P Plug in the power cable, and then turn on the power. Note 1 ❒ If you dispose of used fuser oil unit by yourself, dispose ac-

Operating Instructions
Page 18
Replacing Consumables and Maintenance Kit F Remove the photoconductor unit you can see the entire green handle. ZDJX701J B Hold the hook... the adhesive tape at the top and bottom of the unit. For black, remove the upper left 1 one , and for color, remove the three on the upper right of the photoconductor unit. C Lift and hold the green handle at - ZHXH490J G ...unit quickly might cause it to the right, as shown. For black, install one , and for color, install all three. ZHXH890J Important ❒ Pulling out the photoconduc- The green hook is located on the right.
Replacing Consumables and Maintenance Kit F Remove the photoconductor unit you can see the entire green handle. ZDJX701J B Hold the hook... the adhesive tape at the top and bottom of the unit. For black, remove the upper left 1 one , and for color, remove the three on the upper right of the photoconductor unit. C Lift and hold the green handle at - ZHXH490J G ...unit quickly might cause it to the right, as shown. For black, install one , and for color, install all three. ZHXH890J Important ❒ Pulling out the photoconduc- The green hook is located on the right.

Operating Instructions
Page 20
Wait until it stops. Important ❒ To avoid malfunction, do not turn on the display: Calibrating... The following message appears on the power. ZDJH041J L Plug in the power cable, and then turn off the power during calibration. 14 Replacing Consumables and Maintenance Kit J Turn the green lever clockwise. 1 ZHXH420J K Slowly close the front cover by pushing the two areas on the left and right. The printer starts calibration.
Wait until it stops. Important ❒ To avoid malfunction, do not turn on the display: Calibrating... The following message appears on the power. ZDJH041J L Plug in the power cable, and then turn off the power during calibration. 14 Replacing Consumables and Maintenance Kit J Turn the green lever clockwise. 1 ZHXH420J K Slowly close the front cover by pushing the two areas on the left and right. The printer starts calibration.

Operating Instructions
Page 22
... unit is the same for all four colors. ZHXH550J Important ❒ Pulling out the development unit quickly might cause it to replace, and then pull it come into the green tab in front of the bag. ZHXH540J F Remove the development unit. Replacing Consumables and Maintenance Kit The development units are attached in the...
... unit is the same for all four colors. ZHXH550J Important ❒ Pulling out the development unit quickly might cause it to replace, and then pull it come into the green tab in front of the bag. ZHXH540J F Remove the development unit. Replacing Consumables and Maintenance Kit The development units are attached in the...

Operating Instructions
Page 24
Wait until these stop. Please Wait Important ❒ To avoid malfunction, do not turn on the display, and initial adjustments begin. Replacing Consumables and Maintenance Kit K Slowly close the front cover by pushing the two areas on the left and right. 1 ZDJH041J L Plug in the power cable, and then turn off the power during adjustments. 18 "Please Wait " appears on the power.
Wait until these stop. Please Wait Important ❒ To avoid malfunction, do not turn on the display, and initial adjustments begin. Replacing Consumables and Maintenance Kit K Slowly close the front cover by pushing the two areas on the left and right. 1 ZDJH041J L Plug in the power cable, and then turn off the power during adjustments. 18 "Please Wait " appears on the power.

Operating Instructions
Page 26
..., and then remove the grip securing the fuser oil unit. ZHXH810J Important ❒ Do not touch the inside of fire or burns. Replacing Consumables and Maintenance Kit G Pull the lever down on a surface. K Install the fuser oil unit removed in stepI in the new fusing unit. ZHXH033J R CAUTION: • Touch only the...
..., and then remove the grip securing the fuser oil unit. ZHXH810J Important ❒ Do not touch the inside of fire or burns. Replacing Consumables and Maintenance Kit G Pull the lever down on a surface. K Install the fuser oil unit removed in stepI in the new fusing unit. ZHXH033J R CAUTION: • Touch only the...

Operating Instructions
Page 28
.... 22 B Push in the grips on both sides of the printer, as shown. plug the power cable. The dustproof filter is attached to the black development unit. When replacing the black development unit, also replace the dustproof filter. Replacing Consumables and Maintenance Kit Replacing the Dustproof Filter 1 The dustproof filter is attached to...
.... 22 B Push in the grips on both sides of the printer, as shown. plug the power cable. The dustproof filter is attached to the black development unit. When replacing the black development unit, also replace the dustproof filter. Replacing Consumables and Maintenance Kit Replacing the Dustproof Filter 1 The dustproof filter is attached to...

Operating Instructions
Page 30
... from inside the printer. ZDJH228J E Slowly remove the used waste toner bottle from flames. ZHXH590J Important ❒ Be sure to remove the waste toner bottle horizontally. B Slowly open the front cover by pulling down from the two areas on the display, replace the waste toner bottle. Replacing Consumables and Maintenance Kit Replacing the...
... from inside the printer. ZDJH228J E Slowly remove the used waste toner bottle from flames. ZHXH590J Important ❒ Be sure to remove the waste toner bottle horizontally. B Slowly open the front cover by pulling down from the two areas on the display, replace the waste toner bottle. Replacing Consumables and Maintenance Kit Replacing the...

Operating Instructions
Page 32
... cable and interface cable. Replace Feed Roller (Type H) Note ❒ The following illustrations are replacing the paper feed rollers of each unit. Replacing Consumables and Maintenance Kit Replacing the Paper Feed Rollers 1 If "Replace Feed Roller (Type H)" appears on the display, replace all paper trays from the tray. amples of replacing the...
... cable and interface cable. Replace Feed Roller (Type H) Note ❒ The following illustrations are replacing the paper feed rollers of each unit. Replacing Consumables and Maintenance Kit Replacing the Paper Feed Rollers 1 If "Replace Feed Roller (Type H)" appears on the display, replace all paper trays from the tray. amples of replacing the...

Operating Instructions
Page 34
Note ❒ If you (A). Insert the roller onto the front shaft until they stop. Replacing Consumables and Maintenance Kit J Hold the new paper feed roller A with its pin towards you are replacing the paper feed rollers of the optional 2000sheet Large Capacity Tray, load the stocks removed in step B into the printer until it clicks into place (B). 1 ZERH090E K Slowly slide all trays back into the tray. 28
Note ❒ If you (A). Insert the roller onto the front shaft until they stop. Replacing Consumables and Maintenance Kit J Hold the new paper feed roller A with its pin towards you are replacing the paper feed rollers of the optional 2000sheet Large Capacity Tray, load the stocks removed in step B into the printer until it clicks into place (B). 1 ZERH090E K Slowly slide all trays back into the tray. 28
Operating Instructions
Page 107
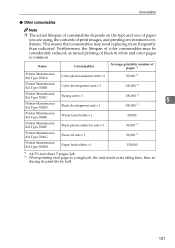
... of pages *1 Printer Maintenance Kit Type 7000A Color photoconductor unit × 3 50,000 *2 Printer Maintenance Kit Type 7000B Color development unit × 3 100,000 *2 Printer Maintenance Kit Type 7000C Fusing unit × 1 100,000 *2 5 Printer Maintenance Kit Type 7000D Black development unit × 1 100,000 *2 Printer Maintenance Kit Type 3800E Waste toner bottle × 1 50,000 Printer Maintenance Kit Type 7000F Black photoconductor unit × 1 50,000 *2 Printer Maintenance Kit Type 7000G Fuser...
... of pages *1 Printer Maintenance Kit Type 7000A Color photoconductor unit × 3 50,000 *2 Printer Maintenance Kit Type 7000B Color development unit × 3 100,000 *2 Printer Maintenance Kit Type 7000C Fusing unit × 1 100,000 *2 5 Printer Maintenance Kit Type 7000D Black development unit × 1 100,000 *2 Printer Maintenance Kit Type 3800E Waste toner bottle × 1 50,000 Printer Maintenance Kit Type 7000F Black photoconductor unit × 1 50,000 *2 Printer Maintenance Kit Type 7000G Fuser...

Operating Instructions
Page 108
... 37 Appendix, 97 B Bypass Tray Custom Size, 58 Paper Type, 59 C Cleaning and Adjusting the Printer, 29 Cleaning the DustProof Glass, 31 Cleaning the Registration Roller, 30 Color Adjustment Checking the Test Sheet, 35 Consumables, 100 D Data In indicator, 75 Detaching the 2 Tray ...Printer Does Not Print, 74 R Remove Misfed Paper Duplex Unit, 87 Finisher, 85 Fusing Unit, 83 Internal Path, 82 Mailbox, 84 Paper Tray, 87 Removing Jammed Staples, 91 Removing Misfed Paper, 81 Removing Misfed Paper into the Duplex Feed Unit, 88 Removing Punch-hole Chips, 95 Replacing Consumables and Maintenance Kit...
... 37 Appendix, 97 B Bypass Tray Custom Size, 58 Paper Type, 59 C Cleaning and Adjusting the Printer, 29 Cleaning the DustProof Glass, 31 Cleaning the Registration Roller, 30 Color Adjustment Checking the Test Sheet, 35 Consumables, 100 D Data In indicator, 75 Detaching the 2 Tray ...Printer Does Not Print, 74 R Remove Misfed Paper Duplex Unit, 87 Finisher, 85 Fusing Unit, 83 Internal Path, 82 Mailbox, 84 Paper Tray, 87 Removing Jammed Staples, 91 Removing Misfed Paper, 81 Removing Misfed Paper into the Duplex Feed Unit, 88 Removing Punch-hole Chips, 95 Replacing Consumables and Maintenance Kit...


