
Setup Guide
Page 17
... Guide Board Open this cover when accessing the inside of the printer. 3. AGN044S 5. Fusing Unit Lock Levers Lift these levers when replacing the fusing unit. 8. Registration Roller Feeds the paper. Transfer Roller Cover Open this unit. 2. If it becomes dirty, clean ..."Replace Toner Cartridge" appears on the panel display, replace this cover when replacing a transfer roller. 6. Inside Inside 1 1. Transfer Roller When "Replace Maintenance Kit" appears on the panel display, replace this roller. 7. When "Replace Maintenance Kit" appears on the panel display, replace this unit....
... Guide Board Open this cover when accessing the inside of the printer. 3. AGN044S 5. Fusing Unit Lock Levers Lift these levers when replacing the fusing unit. 8. Registration Roller Feeds the paper. Transfer Roller Cover Open this unit. 2. If it becomes dirty, clean ..."Replace Toner Cartridge" appears on the panel display, replace this cover when replacing a transfer roller. 6. Inside Inside 1 1. Transfer Roller When "Replace Maintenance Kit" appears on the panel display, replace this roller. 7. When "Replace Maintenance Kit" appears on the panel display, replace this unit....
Maintenance Manual
Page 3
... Replacing the Maintenance Kit 32 Before Replacing...32 Replacing the Friction Pad 33 Replacing the Transfer Roller 35 Replacing the Paper Feed Rollers 37 Replacing the Fusing Unit 39 3. Troubleshooting Error & Status Messages on the Control Panel 53 Printer Does Not Print 59 Checking the port connection 61 Other Printing Problems 63 Additional Troubleshooting...
... Replacing the Maintenance Kit 32 Before Replacing...32 Replacing the Friction Pad 33 Replacing the Transfer Roller 35 Replacing the Paper Feed Rollers 37 Replacing the Fusing Unit 39 3. Troubleshooting Error & Status Messages on the Control Panel 53 Printer Does Not Print 59 Checking the port connection 61 Other Printing Problems 63 Additional Troubleshooting...

Maintenance Manual
Page 36
...not risk electric shock by handling the power cord or plug with gloves) See p.35 "Replacing the Transfer Roller". • Paper Feed Roller × 3 See p.37 "Replacing the Paper Feed Rollers". Pulling the cord causes wear and tear that can result in burns. ❒ Wait at least ... or electric shock. • Wait at the same time. Not allowing the printer to the following message appears on the display: • Transfer Roller (with wet hands. 2 R CAUTION: • The inside of this printer be- Replace Maintenance Kit • Fusing Unit See p.39 "Replacing the Fusing...
...not risk electric shock by handling the power cord or plug with gloves) See p.35 "Replacing the Transfer Roller". • Paper Feed Roller × 3 See p.37 "Replacing the Paper Feed Rollers". Pulling the cord causes wear and tear that can result in burns. ❒ Wait at least ... or electric shock. • Wait at the same time. Not allowing the printer to the following message appears on the display: • Transfer Roller (with wet hands. 2 R CAUTION: • The inside of this printer be- Replace Maintenance Kit • Fusing Unit See p.39 "Replacing the Fusing...
Maintenance Manual
Page 39
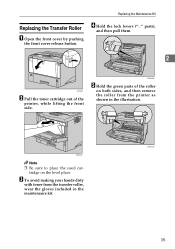
... lifting the front side. C To avoid making your hands dirty with toner from the printer as shown in the maintenance kit. 35 tridge on both sides, and then remove the roller from the transfer roller, wear the gloves included in the illustration. ZKGM210E AGN022S Note ❒ Be sure to ...place the used car- D Hold the lock levers (" " parts), and then pull them. 2 AGN020S B Pull the toner cartridge out of the roller on the level place....
... lifting the front side. C To avoid making your hands dirty with toner from the printer as shown in the maintenance kit. 35 tridge on both sides, and then remove the roller from the transfer roller, wear the gloves included in the illustration. ZKGM210E AGN022S Note ❒ Be sure to ...place the used car- D Hold the lock levers (" " parts), and then pull them. 2 AGN020S B Pull the toner cartridge out of the roller on the level place....

Maintenance Manual
Page 40
... stops. 2 ZKGM220E Important ❒ Do not insert the roller on the back of the socket, or the printer might be damaged. ❒ Insert the metallic part of the roller on the left and right side indentations. ZKGM221E Note ❒ When the transfer roller is set, the transfer roller cover will return to its original position automatically. If...
... stops. 2 ZKGM220E Important ❒ Do not insert the roller on the back of the socket, or the printer might be damaged. ❒ Insert the metallic part of the roller on the left and right side indentations. ZKGM221E Note ❒ When the transfer roller is set, the transfer roller cover will return to its original position automatically. If...

Maintenance Manual
Page 61
work connection. Remove Misfeed Duplex Unit / Open Duplex Unit Cover There is misfeed in the printer. Remove Misfeed Internal Path / Open Front Cover There is ready to replace the maintenance kit (friction pad, paper feed roller, transfer roller and fusing Unit). exit cover. See p.70 "When "Remove Misfeed Paper Tray" Appears". Replace the new maintenance...
work connection. Remove Misfeed Duplex Unit / Open Duplex Unit Cover There is misfeed in the printer. Remove Misfeed Internal Path / Open Front Cover There is ready to replace the maintenance kit (friction pad, paper feed roller, transfer roller and fusing Unit). exit cover. See p.70 "When "Remove Misfeed Paper Tray" Appears". Replace the new maintenance...

Maintenance Manual
Page 86
...) are not covered by warranty. Appendix Maintenance Kit ❖ Maintenance Kit Type 610 Name Average printable number of pages *1 Fusing Unit 90,000 pages Transfer Roller Paper Feed Roller × 3 Friction Pad × 3 90,000 pages 90,000 pages 90,000 pages *1 A4, 3% test chart Note ❒ The actual number of pages to...
...) are not covered by warranty. Appendix Maintenance Kit ❖ Maintenance Kit Type 610 Name Average printable number of pages *1 Fusing Unit 90,000 pages Transfer Roller Paper Feed Roller × 3 Friction Pad × 3 90,000 pages 90,000 pages 90,000 pages *1 A4, 3% test chart Note ❒ The actual number of pages to...

Maintenance Manual
Page 93
...50 Appendix, 79 B Bluetooth Interface Unit Type C, 88 C Cleaning the Friction Pad, 44 Cleaning the Paper Feed Roller, 45 Cleaning the Printer, 43 Cleaning the Registration Roller, 47 Consumables, 81 D Display panel, messages, 53 Duplex Unit AD610, 86 E Envelope Feeder Type 610, 86...Printer Does Not Print, 59 R Registration Roller, 47 Remove Misfed Paper Duplex Unit, 76 Internal Path, 71 Paper Exit Cover, 73 Paper Tray, 70 Removing Misfed Paper, 69 Replacing Consumables and Maintenance Kit, 29 Replacing the Maintenance Kit, 32 Friction Pad, 33 Fusing Unit, 39 Paper Feed Roller, 37 Transfer Roller...
...50 Appendix, 79 B Bluetooth Interface Unit Type C, 88 C Cleaning the Friction Pad, 44 Cleaning the Paper Feed Roller, 45 Cleaning the Printer, 43 Cleaning the Registration Roller, 47 Consumables, 81 D Display panel, messages, 53 Duplex Unit AD610, 86 E Envelope Feeder Type 610, 86...Printer Does Not Print, 59 R Registration Roller, 47 Remove Misfed Paper Duplex Unit, 76 Internal Path, 71 Paper Exit Cover, 73 Paper Tray, 70 Removing Misfed Paper, 69 Replacing Consumables and Maintenance Kit, 29 Replacing the Maintenance Kit, 32 Friction Pad, 33 Fusing Unit, 39 Paper Feed Roller, 37 Transfer Roller...

Maintenance Manual
Page 94
S Specifications, 83 Specifying a paper type Bypass Tray, 23 Optional Paper Feed Unit, 18 Tray 1, 18 Specifying custom size paper Bypass Tray, 22 Optional Paper Feed Unit, 17 Specifying standard size paper Bypass Tray, 20 Optional Paper Feed Unit, 13 Tray 1, 13 Storing Paper, 8 Switching between Paper Trays, 28 T Thick Paper, 9 Toner Cartridge, 29, 81 Transfer Roller, 35, 82 Troubleshooting, 53 90 GB GB G116-8606A
S Specifications, 83 Specifying a paper type Bypass Tray, 23 Optional Paper Feed Unit, 18 Tray 1, 18 Specifying custom size paper Bypass Tray, 22 Optional Paper Feed Unit, 17 Specifying standard size paper Bypass Tray, 20 Optional Paper Feed Unit, 13 Tray 1, 13 Storing Paper, 8 Switching between Paper Trays, 28 T Thick Paper, 9 Toner Cartridge, 29, 81 Transfer Roller, 35, 82 Troubleshooting, 53 90 GB GB G116-8606A


