
Operating Instructions
Page 1
For safe and correct use, be sure to read the Safety Information in the "Copy Reference" before you use this machine and keep it handy for future reference. DDST Unit Type A / Type B Operating Instructions Printer / Scanner Reference 1 Getting Started 2 Installing the Software 3 Using the Printer Function 4 Using the TWAIN Scanner Function 5 Troubleshooting 6 Appendix Read this manual carefully before using the machine.
For safe and correct use, be sure to read the Safety Information in the "Copy Reference" before you use this machine and keep it handy for future reference. DDST Unit Type A / Type B Operating Instructions Printer / Scanner Reference 1 Getting Started 2 Installing the Software 3 Using the Printer Function 4 Using the TWAIN Scanner Function 5 Troubleshooting 6 Appendix Read this manual carefully before using the machine.
Operating Instructions
Page 3
For particular functions, see the relevant parts of the manual. Note ❒ Manuals provided are specific to machine type. ❒ Adobe Acrobat Reader is necessary to view the manuals as a PDF file. ❖ General Settings...paper trays, Key Operator Tools, etc.), and troubleshooting. ❖ Network Guide Describes procedures for configuring the machine and computers in a network environment. ❖ Copy Reference Describes operations, functions, and troubleshooting for the machine's printer/scanner function. i Manuals for This Machine The following manuals describe the ...
For particular functions, see the relevant parts of the manual. Note ❒ Manuals provided are specific to machine type. ❒ Adobe Acrobat Reader is necessary to view the manuals as a PDF file. ❖ General Settings...paper trays, Key Operator Tools, etc.), and troubleshooting. ❖ Network Guide Describes procedures for configuring the machine and computers in a network environment. ❖ Copy Reference Describes operations, functions, and troubleshooting for the machine's printer/scanner function. i Manuals for This Machine The following manuals describe the ...
Operating Instructions
Page 4
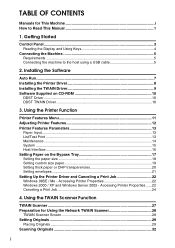
... Windows Server 2003 - Using the Printer Function Printer Features Menu 11 Adjusting Printer Features 12 Printer Features Parameters 13 Paper Input...13 List/Test Print ...13 Maintenance...14 System ...15 Host Interface...16 Setting Paper on CD-ROM 10 DDST Driver...10 DDST TWAIN Driver 10 3. Accessing Printer Properties ... Connecting the Machine 5 Requirements ...5 Connecting the machine to Read This Manual 1 1. TABLE OF CONTENTS Manuals for Using the Network TWAIN Scanner 28 TWAIN Scanner Screen 28 Setting Originals 29 Placing Originals ...29 Scanning Originals 32 ii
... Windows Server 2003 - Using the Printer Function Printer Features Menu 11 Adjusting Printer Features 12 Printer Features Parameters 13 Paper Input...13 List/Test Print ...13 Maintenance...14 System ...15 Host Interface...16 Setting Paper on CD-ROM 10 DDST Driver...10 DDST TWAIN Driver 10 3. Accessing Printer Properties ... Connecting the Machine 5 Requirements ...5 Connecting the machine to Read This Manual 1 1. TABLE OF CONTENTS Manuals for Using the Network TWAIN Scanner 28 TWAIN Scanner Screen 28 Setting Originals 29 Placing Originals ...29 Scanning Originals 32 ii
Operating Instructions
Page 5
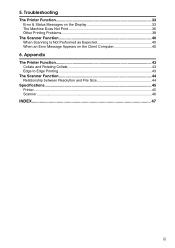
Appendix The Printer Function 43 Collate and Rotating Collate 43 Edge to Edge Printing 43 The Scanner Function 44 Relationship between Resolution and File Size 44 Specifications...45 Printer...45 Scanner...46 INDEX...47 iii Troubleshooting The Printer Function 33 Error & Status Messages on the Display 33 The Machine Does Not Print 36 Other Printing Problems 38 The Scanner Function 40 When Scanning Is Not Performed as Expected 40 When an Error Message Appears on the Client Computer 40 6. 5.
Appendix The Printer Function 43 Collate and Rotating Collate 43 Edge to Edge Printing 43 The Scanner Function 44 Relationship between Resolution and File Size 44 Specifications...45 Printer...45 Scanner...46 INDEX...47 iii Troubleshooting The Printer Function 33 Error & Status Messages on the Display 33 The Machine Does Not Print 36 Other Printing Problems 38 The Scanner Function 40 When Scanning Is Not Performed as Expected 40 When an Error Message Appears on the Client Computer 40 6. 5.
Operating Instructions
Page 9
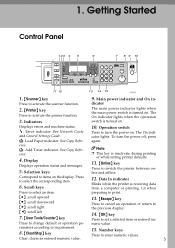
... data from a computer or printing. Press to activate the printer function. 3. Press to enter numeric values. Number keys Press to change default or operation pa- Main power indicator and On in- See Network Guide and General Settings Guide. D: Add Toner indicator. See... Copy Reference. 4. Data In indicator Blinks while the printer is inactivate during printing or while setting printer defaults. 11. {Online} key Press to items on . rameters according to activate the scanner function. Press...
... data from a computer or printing. Press to activate the printer function. 3. Press to enter numeric values. Number keys Press to change default or operation pa- Main power indicator and On in- See Network Guide and General Settings Guide. D: Add Toner indicator. See... Copy Reference. 4. Data In indicator Blinks while the printer is inactivate during printing or while setting printer defaults. 11. {Online} key Press to items on . rameters according to activate the scanner function. Press...
Operating Instructions
Page 11
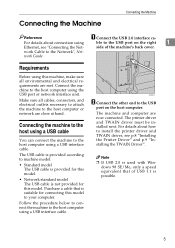
work Guide. Make sure all environmental and electrical requirements are met. Follow the procedure below to connect the machine to the Network", Net- The printer driver and TWAIN driver must be installed next. Purchase a cable that of the machine's back cover. The machine and computer are... close at hand. work Cable to the host computer using the USB port or network interface unit. Note ❒ If USB 2.0 is suitable for this ...
work Guide. Make sure all environmental and electrical requirements are met. Follow the procedure below to connect the machine to the Network", Net- The printer driver and TWAIN driver must be installed next. Purchase a cable that of the machine's back cover. The machine and computer are... close at hand. work Cable to the host computer using the USB port or network interface unit. Note ❒ If USB 2.0 is suitable for this ...
Operating Instructions
Page 13
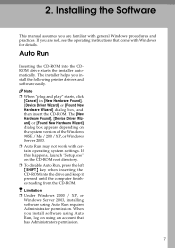
... of the Windows 98SE / Me / 200 / XP, or Windows Server 2003. ❒ Auto Run may not work with Windows for details. Installing the Software This manual assumes you install the following printer drivers and software easily. Auto Run Inserting the CD-ROM into the...Run requires Administrator permission. When you are familiar with general Windows procedures and practices. Limitation ❒ Under Windows 2000 / XP, or Windows Server 2003, installing software using an account that come with certain operating system settings. Note ❒ When "plug and play" starts, click [Cancel...
... of the Windows 98SE / Me / 200 / XP, or Windows Server 2003. ❒ Auto Run may not work with Windows for details. Installing the Software This manual assumes you install the following printer drivers and software easily. Auto Run Inserting the CD-ROM into the...Run requires Administrator permission. When you are familiar with general Windows procedures and practices. Limitation ❒ Under Windows 2000 / XP, or Windows Server 2003, installing software using an account that come with certain operating system settings. Note ❒ When "plug and play" starts, click [Cancel...
Operating Instructions
Page 14
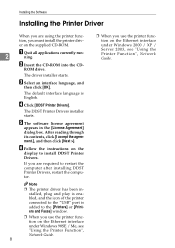
... on the Ethernet interface under Windows 98SE / Me, see "Using the Printer Function", Network Guide. 8 ❒ When you use the printer function on the Ethernet interface under Windows 2000 / XP / Server 2003, see "Using the Printer Function", Network Guide. After reading through its contents, click [I accept the agreement.], and then click [Next >]. A Quit all applications currently...
... on the Ethernet interface under Windows 98SE / Me, see "Using the Printer Function", Network Guide. 8 ❒ When you use the printer function on the Ethernet interface under Windows 2000 / XP / Server 2003, see "Using the Printer Function", Network Guide. After reading through its contents, click [I accept the agreement.], and then click [Next >]. A Quit all applications currently...

Operating Instructions
Page 16
...DDST drivers are some CD-ROMs that comes with this machine. This allows the computer to scan an original on the CD-ROM that come with the machine via a printer lan- guage. ❖ System requirements Operating system • Microsoft Windows 98SE • ...Microsoft Windows Me • Windows 2000 • Windows XP • Windows Server 2003 Hard disk space • 80 MB or more • Connection Ethernet/USB 10 To use the machine as a network TWAIN scanner...
...DDST drivers are some CD-ROMs that comes with this machine. This allows the computer to scan an original on the CD-ROM that come with the machine via a printer lan- guage. ❖ System requirements Operating system • Microsoft Windows 98SE • ...Microsoft Windows Me • Windows 2000 • Windows XP • Windows Server 2003 Hard disk space • 80 MB or more • Connection Ethernet/USB 10 To use the machine as a network TWAIN scanner...
Operating Instructions
Page 17
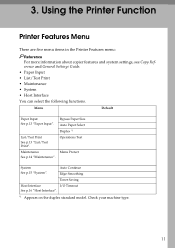
... "Paper Input". Maintenance See p.14 "Maintenance". Check your machine type. 11 Auto Continue Edge Smoothing Toner Saving Host Interface I/O Timeout See p.16 "Host Interface". *1 Appears on the duplex standard model. 3. Using the Printer Function Printer Features Menu There are five menu items in the Printer Features menu: Reference For more information about copier features...
... "Paper Input". Maintenance See p.14 "Maintenance". Check your machine type. 11 Auto Continue Edge Smoothing Toner Saving Host Interface I/O Timeout See p.16 "Host Interface". *1 Appears on the duplex standard model. 3. Using the Printer Function Printer Features Menu There are five menu items in the Printer Features menu: Reference For more information about copier features...
Operating Instructions
Page 18
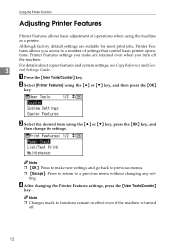
ting. For details about copier features and system settings, see Copy Reference and Gen- 3 eral Settings Guide. B Select [Printer Features] using the machine as a printer. A Press the {User Tools/Counter} key. Note ❒ {OK}: Press to a number of operations when using the {U}... machine. Note ❒ Changes made to a previous menu without changing any set- Using the Printer Function Adjusting Printer Features Printer Features allows basic adjustment of settings that control basic printer operations. C Select the desired item using the {U} or {T} key, press the {OK} ...
ting. For details about copier features and system settings, see Copy Reference and Gen- 3 eral Settings Guide. B Select [Printer Features] using the machine as a printer. A Press the {User Tools/Counter} key. Note ❒ {OK}: Press to a number of operations when using the {U}... machine. Note ❒ Changes made to a previous menu without changing any set- Using the Printer Function Adjusting Printer Features Printer Features allows basic adjustment of settings that control basic printer operations. C Select the desired item using the {U} or {T} key, press the {OK} ...
Operating Instructions
Page 19
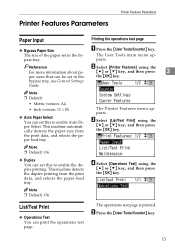
... detects the paper size from the print data, and selects the paper feed tray. Reference For more information about pa- The Printer Features menu appears. B Select [Printer Features] using the {U} or {T} key, and then press 3 per sizes that can print the operations test page. This ...You can be set in the the {OK} key. bypass tray, see General Settings Guide. The User Tools main menu appears. Printer Features Parameters Printer Features Parameters Paper Input Printing the operations test page ❖ Bypass Paper Size The size of the paper set in the bypass tray...
... detects the paper size from the print data, and selects the paper feed tray. Reference For more information about pa- The Printer Features menu appears. B Select [Printer Features] using the {U} or {T} key, and then press 3 per sizes that can print the operations test page. This ...You can be set in the the {OK} key. bypass tray, see General Settings Guide. The User Tools main menu appears. Printer Features Parameters Printer Features Parameters Paper Input Printing the operations test page ❖ Bypass Paper Size The size of the paper set in the bypass tray...
Operating Instructions
Page 20
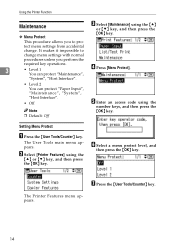
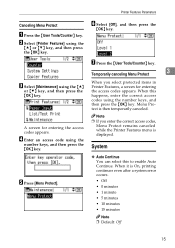
...Enter an access code using the number keys, and then press the {OK} key. Setting Menu Protect A Press the {User Tools/Counter} key. B Select [Printer Features] using the {U} or {T} key, and then press the ❖ Menu Protect {OK} key. F Select a menu protect level, and then press ...the {OK} key. The Printer Features menu appears. 14 "System", "Host Interface". • Level 2 You can protect "Maintenance", D Press [Menu Protect]. tect menu settings from accidental change...
...Enter an access code using the number keys, and then press the {OK} key. Setting Menu Protect A Press the {User Tools/Counter} key. B Select [Printer Features] using the {U} or {T} key, and then press the ❖ Menu Protect {OK} key. F Select a menu protect level, and then press ...the {OK} key. The Printer Features menu appears. 14 "System", "Host Interface". • Level 2 You can protect "Maintenance", D Press [Menu Protect]. tect menu settings from accidental change...
Operating Instructions
Page 21
...Enter an access code using the {U} or {T} key, and then press the {OK} key. When it is then temporarily canceled. B Select [Printer Features] using the number keys, and then press the {OK} key. Temporarily canceling Menu Protect 3 C Select [Maintenance] using the number keys,...; Off • 0 minutes • 1 minute • 5 minutes • 10 minutes • 15 minutes Note ❒ Default: Off 15 Printer Features Parameters Canceling Menu Protect A Press the {User Tools/Counter} key. System ❖ Auto Continue You can select this happens, enter the correct access...
...Enter an access code using the {U} or {T} key, and then press the {OK} key. When it is then temporarily canceled. B Select [Printer Features] using the number keys, and then press the {OK} key. Temporarily canceling Menu Protect 3 C Select [Maintenance] using the number keys,...; Off • 0 minutes • 1 minute • 5 minutes • 10 minutes • 15 minutes Note ❒ Default: Off 15 Printer Features Parameters Canceling Menu Protect A Press the {User Tools/Counter} key. System ❖ Auto Continue You can select this happens, enter the correct access...
Operating Instructions
Page 22
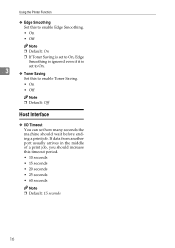
If data from another port usually arrives in the middle of a print job, you should wait before ending a print job. Using the Printer Function ❖ Edge Smoothing Set this to enable Edge Smoothing. • On • Off Note ❒ Default: On ❒ If Toner Saving is set to ...
If data from another port usually arrives in the middle of a print job, you should wait before ending a print job. Using the Printer Function ❖ Edge Smoothing Set this to enable Edge Smoothing. • On • Off Note ❒ Default: On ❒ If Toner Saving is set to ...
Operating Instructions
Page 23
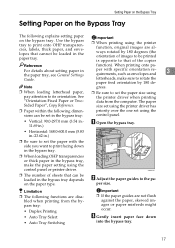
...paper with specific orientation requirements, such as envelopes and 3 letterheads, make the paper setting using the printer driver when printing data from the bypass tray: • Duplex Printing • Auto Tray Select... set the paper size using the control panel or printer driver. per with the side you want to set using the printer function, original images are not flush against the paper... that cannot be loaded in the paper tray. Important ❒ When printing using the printer driver has ❒ Paper within the following dimensions can be loaded in the bypass tray...
...paper with specific orientation requirements, such as envelopes and 3 letterheads, make the paper setting using the printer driver when printing data from the bypass tray: • Duplex Printing • Auto Tray Select... set the paper size using the control panel or printer driver. per with the side you want to set using the printer function, original images are not flush against the paper... that cannot be loaded in the paper tray. Important ❒ When printing using the printer driver has ❒ Paper within the following dimensions can be loaded in the bypass tray...
Operating Instructions
Page 24
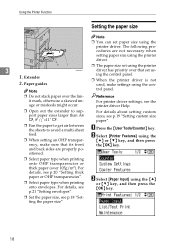
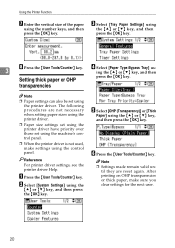
ing the control panel. ❒ When the printer driver is not used, make sure that set paper size using the printer driver. For details about setting custom sizes, see p.20 "Setting thick paper or OHP transparencies". ❒ Select paper type when printing onto envelopes. A Press the {User Tools/...Counter} key. Paper guides Note ❒ The paper size set using the printer AAW020S1 driver has priority over that its front and back sides are not ...
ing the control panel. ❒ When the printer driver is not used, make sure that set paper size using the printer driver. For details about setting custom sizes, see p.20 "Setting thick paper or OHP transparencies". ❒ Select paper type when printing onto envelopes. A Press the {User Tools/...Counter} key. Paper guides Note ❒ The paper size set using the printer AAW020S1 driver has priority over that its front and back sides are not ...
Operating Instructions
Page 25
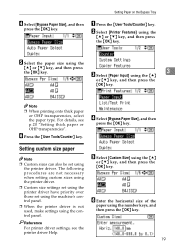
...D Select [Bypass Paper Size], and then press the {OK} key. E Select [Custom Size] using the printer driver. Note ❒ When printing onto thick paper or OHP transparencies, select the paper type. Setting custom size paper Note ❒ Custom sizes can also be set using the machine's control panel. ...❒ When the printer driver is not used, make settings using the {U} or {T} key, and then ...
...D Select [Bypass Paper Size], and then press the {OK} key. E Select [Custom Size] using the printer driver. Note ❒ When printing onto thick paper or OHP transparencies, select the paper type. Setting custom size paper Note ❒ Custom sizes can also be set using the machine's control panel. ...❒ When the printer driver is not used, make settings using the {U} or {T} key, and then ...
Operating Instructions
Page 26
.... ❒ Paper size settings set using the printer driver have priority over those set using the {U} or {T} key, and then press the {OK} key. 3 H Press the {User Tools/Counter} key. D Select [Paper Type:Bypass Tray] us- The following procedures are reset again. After printing on OHP transparencies or thick paper, make settings...
.... ❒ Paper size settings set using the printer driver have priority over those set using the {U} or {T} key, and then press the {OK} key. 3 H Press the {User Tools/Counter} key. D Select [Paper Type:Bypass Tray] us- The following procedures are reset again. After printing on OHP transparencies or thick paper, make settings...
Operating Instructions
Page 27
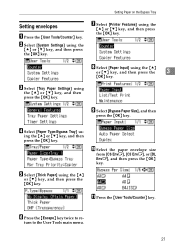
... or {T} key, and then press the {OK} key. Setting Paper on the Bypass Tray Setting envelopes A Press the {User Tools/Counter} key. D Select [Paper Type:Bypass Tray] us- J Select the paper envelope size from [C6 EnvL], [C5 EnvL], or [DL EnvL], and then press the {OK} key. F Press the... {Escape} key twice to the User Tools main menu. 21 ing the {U} or {T} key, and then press the {OK} key. G Select [Printer Features] using the {U} or {T} key, and then press the {OK} key. turn to re- H Select [Paper Input] using the {U} or {T} key, and then press...
... or {T} key, and then press the {OK} key. Setting Paper on the Bypass Tray Setting envelopes A Press the {User Tools/Counter} key. D Select [Paper Type:Bypass Tray] us- J Select the paper envelope size from [C6 EnvL], [C5 EnvL], or [DL EnvL], and then press the {OK} key. F Press the... {Escape} key twice to the User Tools main menu. 21 ing the {U} or {T} key, and then press the {OK} key. G Select [Printer Features] using the {U} or {T} key, and then press the {OK} key. turn to re- H Select [Paper Input] using the {U} or {T} key, and then press...