R10 User Guide
Page 13
... (Recover File 144 Viewing on a Television 145 4 Direct Printing 147 Direct Print Function 147 Connecting the Camera to the Fn (Function) Button (Set Fn Button 162 Changing the ISO Auto-High Setting (ISO Auto... Length (Step Zoom 161 Assigning a Function to a Printer 148 Printing Still Images 149 Printing One or All Still Images 149 Printing Several Still Images 151 5 Changing Camera Settings 153 Setup Menu 153 Using the Setup Menu 154... Confirmation Time (LCD Confirm 168 Using the Auto Resize Zoom (Digital Zoom Img 169 Assigning Functions to the ADJ./OK Button (ADJ Btn.
... (Recover File 144 Viewing on a Television 145 4 Direct Printing 147 Direct Print Function 147 Connecting the Camera to the Fn (Function) Button (Set Fn Button 162 Changing the ISO Auto-High Setting (ISO Auto... Length (Step Zoom 161 Assigning a Function to a Printer 148 Printing Still Images 149 Printing One or All Still Images 149 Printing Several Still Images 151 5 Changing Camera Settings 153 Setup Menu 153 Using the Setup Menu 154... Confirmation Time (LCD Confirm 168 Using the Auto Resize Zoom (Digital Zoom Img 169 Assigning Functions to the ADJ./OK Button (ADJ Btn.

R10 User Guide
Page 16
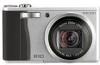
Rechargeable Battery Battery Charger AV Cable Used to a computer or Direct Printcompatible printer. Packing List Open the package and make sure all the items are using the camera for the first time, read this section. Handstrap Warranty 14 If you are included. * The actual appearance of items included may differ. USB Cable (Mini B cable) Used to connect the camera to view your images on the bottom face of the camera. RICOH R10 The serial number of the camera is provided on a TV.
Rechargeable Battery Battery Charger AV Cable Used to a computer or Direct Printcompatible printer. Packing List Open the package and make sure all the items are using the camera for the first time, read this section. Handstrap Warranty 14 If you are included. * The actual appearance of items included may differ. USB Cable (Mini B cable) Used to connect the camera to view your images on the bottom face of the camera. RICOH R10 The serial number of the camera is provided on a TV.

R10 User Guide
Page 149
...; Your printer must be printed quickly and easily from a camera to "Press the ADJ./OK button" indicate that you should press directly down , left or right direction. Direct Printing 4 Direct Printing Instructions in the up, down on the button. Direct Print Function The Direct Print standard enables direct printing from your digital camera without...
...; Your printer must be printed quickly and easily from a camera to "Press the ADJ./OK button" indicate that you should press directly down , left or right direction. Direct Printing 4 Direct Printing Instructions in the up, down on the button. Direct Print Function The Direct Print standard enables direct printing from your digital camera without...
R10 User Guide
Page 150
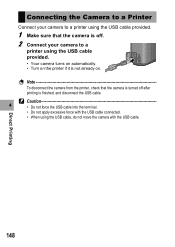
... the USB cable. Note To disconnect the camera from the printer, check that the camera is off after printing is not already on. Direct Printing 148 Connecting the Camera to a Printer Connect your camera to a printer using the USB cable provided. 1 Make sure that the camera is turned off . 2 Connect your camera to a printer using the USB cable provided. •...
... the USB cable. Note To disconnect the camera from the printer, check that the camera is off after printing is not already on. Direct Printing 148 Connecting the Camera to a Printer Connect your camera to a printer using the USB cable provided. 1 Make sure that the camera is turned off . 2 Connect your camera to a printer using the USB cable provided. •...

R10 User Guide
Page 151
... no SD memory card is loaded or from the camera with a PictBridgecompatible printer. Finish 1 File All Files Select Direct Printing 149 Note If a [Printer Error.] message appears during printing. Printing One or All Still Images 1 Check that the printer is ready 4 to print. • The [...Do not disconnect the USB cable during image transfer, check the printer status and take the appropriate action. • If a computer connection message appears even though the camera is connected to the printer, reconnect the camera and press the ADJ./OK button within 2 seconds. Printing ...
... no SD memory card is loaded or from the camera with a PictBridgecompatible printer. Finish 1 File All Files Select Direct Printing 149 Note If a [Printer Error.] message appears during printing. Printing One or All Still Images 1 Check that the printer is ready 4 to print. • The [...Do not disconnect the USB cable during image transfer, check the printer status and take the appropriate action. • If a computer connection message appears even though the camera is connected to the printer, reconnect the camera and press the ADJ./OK button within 2 seconds. Printing ...

R10 User Guide
Page 152
... Description Paper Size Sets the paper size. Paper Type Sets the paper type. Selects whether to the printer is not yet established. Selects whether to conserve toner by the Ricoh printer connected to print the file name. Only one copy is printed even if you selected more than one.... Print Size Sets the print image size. Optimize Image Selects whether to optimize the image data (still image) prior to the camera. Each item is established, [Connecting...] disappears and [Direct Print] appears. File Name Print Selects whether to the camera. 8 Press the ADJ./OK button !"
... Description Paper Size Sets the paper size. Paper Type Sets the paper type. Selects whether to the printer is not yet established. Selects whether to conserve toner by the Ricoh printer connected to print the file name. Only one copy is printed even if you selected more than one.... Print Size Sets the print image size. Optimize Image Selects whether to optimize the image data (still image) prior to the camera. Each item is established, [Connecting...] disappears and [Direct Print] appears. File Name Print Selects whether to the camera. 8 Press the ADJ./OK button !"

R10 User Guide
Page 153
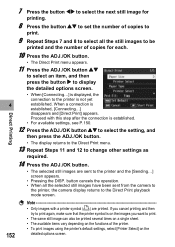
to set the next time the camera is connected to the printer, select [Cancel]. 10 Press the ADJ./OK button. • The selected still images ...Print playback mode screen and printing starts. to increase the number of copies, or press the button " to the printer, press the MENU button when the screen in Step 7 is displayed. Prnt Fil Forward 151 Note • ...To specify the settings as the default settings next time the camera is connected to decrease the number of copies. When the screen at the right appears, press the ADJ./ OK...
to set the next time the camera is connected to the printer, select [Cancel]. 10 Press the ADJ./OK button. • The selected still images ...Print playback mode screen and printing starts. to increase the number of copies, or press the button " to the printer, press the MENU button when the screen in Step 7 is displayed. Prnt Fil Forward 151 Note • ...To specify the settings as the default settings next time the camera is connected to decrease the number of copies. When the screen at the right appears, press the ADJ./ OK...
R10 User Guide
Page 154
... 7 and 8 to select all the selected still images have been sent from the camera to the printer, the camera display returns to the Direct Print playback mode screen. Proceed with a printer symbol ( ) are sent to the printer and the [Sending...] screen appears. • Pressing the DISP. button cancels the ...an item, and then press the button $ to display the detailed options screen. • When [Connecting...] is displayed, the connection to the printer is on the detailed options screen. 7 Press the button #$ to select the next still image for each. 10 Press the ADJ./OK button...
... 7 and 8 to select all the selected still images have been sent from the camera to the printer, the camera display returns to the Direct Print playback mode screen. Proceed with a printer symbol ( ) are sent to the printer and the [Sending...] screen appears. • Pressing the DISP. button cancels the ...an item, and then press the button $ to display the detailed options screen. • When [Connecting...] is displayed, the connection to the printer is on the detailed options screen. 7 Press the button #$ to select the next still image for each. 10 Press the ADJ./OK button...

R10 User Guide
Page 176
.... Note To continue using interval shooting, the [Auto Power Off] setting is connected to a computer or printer. • When using the camera after auto power off turned the camera off function does not work when the camera is disabled and the auto power off , press the POWER button to select [Auto Power Off] and...
.... Note To continue using interval shooting, the [Auto Power Off] setting is connected to a computer or printer. • When using the camera after auto power off turned the camera off function does not work when the camera is disabled and the auto power off , press the POWER button to select [Auto Power Off] and...