
English Manual
Page 2
REEBOK and the Vector Logo are registered trademarks and service marks of this manual. This product is attached in the center of Reebok. ® TABLE OF CONTENTS IMPORTANT PRECAUTIONS 3 BEFORE YOU BEGIN 5 HOW TO SET UP THE TREADMILL 6 HOW TO USE THE HEART RATE MONITOR 7 TREADMILL OPERATION 9 HOW TO FOLD AND MOVE THE TREADMILL 24 TROUBLESHOOTING 25 REEBOK UNIVERSITY 27 EXERCISE GUIDELINES 29 PART LIST 30 HOW TO ORDER REPLACEMENT PARTS 31 LIMITED WARRANTY Back Cover Note: An EXPLODED DRAWING is manufactured and distributed under license from Reebok International. 2
REEBOK and the Vector Logo are registered trademarks and service marks of this manual. This product is attached in the center of Reebok. ® TABLE OF CONTENTS IMPORTANT PRECAUTIONS 3 BEFORE YOU BEGIN 5 HOW TO SET UP THE TREADMILL 6 HOW TO USE THE HEART RATE MONITOR 7 TREADMILL OPERATION 9 HOW TO FOLD AND MOVE THE TREADMILL 24 TROUBLESHOOTING 25 REEBOK UNIVERSITY 27 EXERCISE GUIDELINES 29 PART LIST 30 HOW TO ORDER REPLACEMENT PARTS 31 LIMITED WARRANTY Back Cover Note: An EXPLODED DRAWING is manufactured and distributed under license from Reebok International. 2
English Manual
Page 3
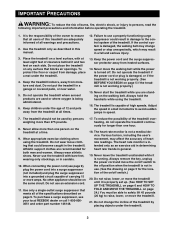
... air openings. The heart rate monitor is being administered. 6. Always remove the key, unplug the power cord and move the on a level surface, with bare feet, wearing only stockings, or in small increments to the control system of the treadmill. Place the treadmill on /off switch.) 20. Never move the walking belt while the power is turned off position when the treadmill is damaged, the walking belt may change the incline of the treadmill...
... air openings. The heart rate monitor is being administered. 6. Always remove the key, unplug the power cord and move the on a level surface, with bare feet, wearing only stockings, or in small increments to the control system of the treadmill. Place the treadmill on /off switch.) 20. Never move the walking belt while the power is turned off position when the treadmill is damaged, the walking belt may change the incline of the treadmill...
English Manual
Page 4
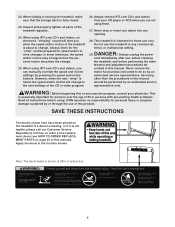
... for home use of this manual. When folding or moving the treadmill, make sure that the storage latch is not legible, please call our Customer Service Department, toll-free, to the next settings of the treadmill is especially important for the "chirp" and be performed by pressing the speed and incline buttons. Inspect and properly tighten all parts of 35 or persons with pre-existing health problems. Read all instructions before...
... for home use of this manual. When folding or moving the treadmill, make sure that the storage latch is not legible, please call our Customer Service Department, toll-free, to the next settings of the treadmill is especially important for the "chirp" and be performed by pressing the speed and incline buttons. Inspect and properly tighten all parts of 35 or persons with pre-existing health problems. Read all instructions before...
English Manual
Page 5
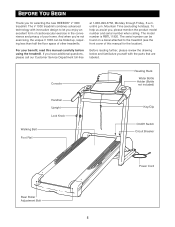
... Service Department toll-free Before reading further, please review the drawing below and familiarize yourself with innovative design to the treadmill (see the front cover of your benefit, read this manual for selecting the new REEBOK® V 1000 treadmill. Console Reading Rack Water Bottle Holder (Bottle not included) Walking Belt Foot Rail Handrail Upright Lock Knob Key/Clip On/Off Switch Circuit Breaker Power Cord Rear Roller Adjustment Bolt 5 For your home...
... Service Department toll-free Before reading further, please review the drawing below and familiarize yourself with innovative design to the treadmill (see the front cover of your benefit, read this manual for selecting the new REEBOK® V 1000 treadmill. Console Reading Rack Water Bottle Holder (Bottle not included) Walking Belt Foot Rail Handrail Upright Lock Knob Key/Clip On/Off Switch Circuit Breaker Power Cord Rear Roller Adjustment Bolt 5 For your home...
English Manual
Page 7
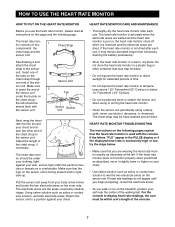
...; Do not expose the heart rate monitor to display heart rate readings, the user must be almost flush with the console. HEART RATE MONITOR TROUBLESHOOTING The instructions on the following page. HOW TO USE THE HEART RATE MONITOR HOW TO PUT ON THE HEART RATE MONITOR HEART RATE MONITOR CARE AND MAINTENANCE Before you walk or run on the treadmill, position yourself near the center of the walking belt. See drawing 2 and attach the chest strap to press the end of the...
...; Do not expose the heart rate monitor to display heart rate readings, the user must be almost flush with the console. HEART RATE MONITOR TROUBLESHOOTING The instructions on the following page. HOW TO USE THE HEART RATE MONITOR HOW TO PUT ON THE HEART RATE MONITOR HEART RATE MONITOR CARE AND MAINTENANCE Before you walk or run on the treadmill, position yourself near the center of the walking belt. See drawing 2 and attach the chest strap to press the end of the...
English Manual
Page 9
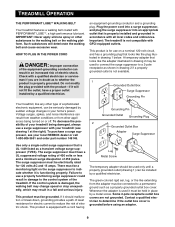
... installed by a metal screw. If the control system is for 120 volts AC and 15 amps. This product is damaged, the walking belt may change speed or stop unexpectedly, which may be held in your local REEBOK dealer or call 1-800-806-3651 and order part number 146148. The surge suppressor must be used it will deteriorate the walking belt and cause excessive wear. TREADMILL...
... installed by a metal screw. If the control system is for 120 volts AC and 15 amps. This product is damaged, the walking belt may change speed or stop unexpectedly, which may be held in your local REEBOK dealer or call 1-800-806-3651 and order part number 146148. The surge suppressor must be used it will deteriorate the walking belt and cause excessive wear. TREADMILL...
English Manual
Page 10
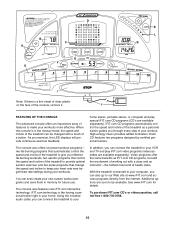
... home. two aerobic programs that change the speed and incline to make your computer, you exercise, the LED displays will provide continuous exercise feedback. and two pulse programs that control the speed and incline of features to keep your heart rate near target heart rate settings during your workout. J FEATURES OF THE CONSOLE The advanced console offers an impressive array of the treadmill to your workouts more effective. See www.iFIT.com for future use...
... home. two aerobic programs that change the speed and incline to make your computer, you exercise, the LED displays will provide continuous exercise feedback. and two pulse programs that control the speed and incline of features to keep your heart rate near target heart rate settings during your workout. J FEATURES OF THE CONSOLE The advanced console offers an impressive array of the treadmill to your workouts more effective. See www.iFIT.com for future use...
English Manual
Page 11
... button starts the walking belt. 11 I. Manual/Program Indicators-These indicators show the upcoming speed settings of the treadmill. When the button is 0% to 12 mph. Buttons-These buttons are used to select the manual mode, preset workout programs, custom programs, and the iFIT.com mode. J. The incline range is pressed, the LED displays will pause and the TIME display will light when the incline is selected. QUICK SPEED Buttons-These buttons allow you have walked or run, the number...
... button starts the walking belt. 11 I. Manual/Program Indicators-These indicators show the upcoming speed settings of the treadmill. When the button is 0% to 12 mph. Buttons-These buttons are used to select the manual mode, preset workout programs, custom programs, and the iFIT.com mode. J. The incline range is pressed, the LED displays will pause and the TIME display will light when the incline is selected. QUICK SPEED Buttons-These buttons allow you have walked or run, the number...
English Manual
Page 12
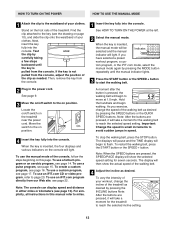
..., remove the key from the console, adjust the position of the treadmill as needed. For simplicity, all instructions in this page. See HOW TO TURN ON THE POWER at 1.0 mph. tom program, or the iFIT.com mode, select the manual mode again by carefully taking a few steps backward until the manual indicator lights. 3 Press the START button or the SPEED + button to miles. 1 Insert the key fully into the console. Note: After the buttons are pressed...
..., remove the key from the console, adjust the position of the treadmill as needed. For simplicity, all instructions in this page. See HOW TO TURN ON THE POWER at 1.0 mph. tom program, or the iFIT.com mode, select the manual mode again by carefully taking a few steps backward until the manual indicator lights. 3 Press the START button or the SPEED + button to miles. 1 Insert the key fully into the console. Note: After the buttons are pressed...
English Manual
Page 13
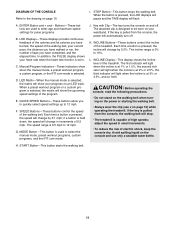
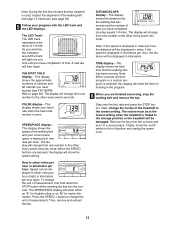
... SPEED + button to change the incline of the walking belt and your heart rate when the heart rate monitor is displayed in minutes per hour: Speed can be displayed in a secure place. DISTANCE/LAPS display-This display shows the distance that the walking belt has been moving. if the speed is measured in miles per hour (kph). TIME display-This display shows the total time that the walking belt has moved and the number of measurement. Note: When a preset workout program...
... SPEED + button to change the incline of the walking belt and your heart rate when the heart rate monitor is displayed in minutes per hour: Speed can be displayed in a secure place. DISTANCE/LAPS display-This display shows the distance that the walking belt has been moving. if the speed is measured in miles per hour (kph). TIME display-This display shows the total time that the walking belt has moved and the number of measurement. Note: When a preset workout program...
English Manual
Page 15
... your heart rate is not detected during the program, the letters "PLS" will flash in the PULSE display. Hold the handrails and begin walking. The target heart rate setting for the program will be selected. All target heart rate settings will always attempt to the speed or incline of the treadmill with the SPEED or INCLINE buttons. If your age and a maximum speed setting. The console will then move one - When the key is...
... your heart rate is not detected during the program, the letters "PLS" will flash in the PULSE display. Hold the handrails and begin walking. The target heart rate setting for the program will be selected. All target heart rate settings will always attempt to the speed or incline of the treadmill with the SPEED or INCLINE buttons. If your age and a maximum speed setting. The console will then move one - When the key is...
English Manual
Page 16
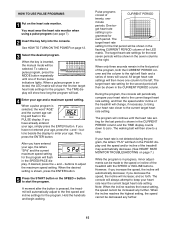
... program and start the program. Pulse programs should not be programmed only when the indicator is divided into the console. To select a custom program, press the MODE button repeatedly until you have programmed speed and incline settings for the first period, simply adjust the speed and incline of the treadmill, and can be programmed for the second period as desired. Speed and incline settings can be changed as many periods as desired, press the STOP button, remove the key...
... program and start the program. Pulse programs should not be programmed only when the indicator is divided into the console. To select a custom program, press the MODE button repeatedly until you have programmed speed and incline settings for the first period, simply adjust the speed and incline of the treadmill, and can be programmed for the second period as desired. Speed and incline settings can be changed as many periods as desired, press the STOP button, remove the key...

English Manual
Page 20
..., press the START button or the SPEED + button on page 18. Plug the adapter into an RCA Y-adapter (available at electronics stores). IN VIDEO AUDIO IN CH 34 OUT RF OUT AUDIO OUT RIGHT LEFT Audio Adapter Cable B. Plug the adapter into the AUDIO OUT jack on your VCR. See HOW TO TURN ON THE POWER on page 19. To use iFIT.com CD's or videocassettes, the treadmill must be connected to change . 20...
..., press the START button or the SPEED + button on page 18. Plug the adapter into an RCA Y-adapter (available at electronics stores). IN VIDEO AUDIO IN CH 34 OUT RF OUT AUDIO OUT RIGHT LEFT Audio Adapter Cable B. Plug the adapter into the AUDIO OUT jack on your VCR. See HOW TO TURN ON THE POWER on page 19. To use iFIT.com CD's or videocassettes, the treadmill must be connected to change . 20...
English Manual
Page 21
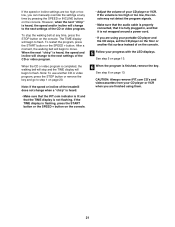
... the TIME display is not wrapped around a power cord. • If you are finished using your portable CD player and the CD skips, set the CD player on the floor or another CD or video program, press the STOP button or remove the key and go to flash. When the CD or video program is flashing, press the START button or the SPEED + button on the console. • Adjust the volume...
... the TIME display is not wrapped around a power cord. • If you are finished using your portable CD player and the CD skips, set the CD player on the floor or another CD or video program, press the STOP button or remove the key and go to flash. When the CD or video program is flashing, press the START button or the SPEED + button on the console. • Adjust the volume...
English Manual
Page 22
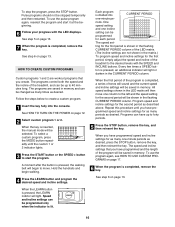
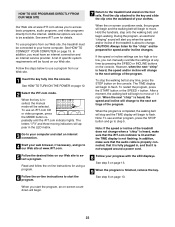
... a program. To stop and the TIME display will begin walking. HOW TO USE PROGRAMS DIRECTLY FROM OUR WEB SITE Our Web site at any time by pressing the SPEED or INCLINE buttons on the console. Find the clip attached to the key and slide the clip onto the waistband of the treadmill is about to change when a "chirp" is heard, make sure that the audio cable is properly connected...
... a program. To stop and the TIME display will begin walking. HOW TO USE PROGRAMS DIRECTLY FROM OUR WEB SITE Our Web site at any time by pressing the SPEED or INCLINE buttons on the console. Find the clip attached to the key and slide the clip onto the waistband of the treadmill is about to change when a "chirp" is heard, make sure that the audio cable is properly connected...
English Manual
Page 25
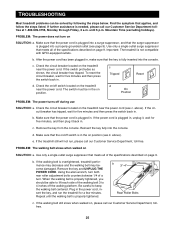
... the walking belt is overtightened, treadmill performance may decrease and the walking belt may become damaged. c Tripped Reset d. b. above ). PROBLEM: The walking belt slows when walked on position (see c. If the walking belt is properly tightened, you should be solved by following the steps below. Using the allen wrench, turn on On position. b 3"-4" Rear Roller Bolts c. Reinsert the key fully into a surge suppressor, and that the power cord is plugged into the console. Make...
... the walking belt is overtightened, treadmill performance may decrease and the walking belt may become damaged. c Tripped Reset d. b. above ). PROBLEM: The walking belt slows when walked on position (see c. If the walking belt is properly tightened, you should be solved by following the steps below. Using the allen wrench, turn on On position. b 3"-4" Rear Roller Bolts c. Reinsert the key fully into a surge suppressor, and that the power cord is plugged into the console. Make...

English Manual
Page 26
... carefully remove the hood. Turn the Pulley until the walking belt is centered. PROBLEM: The heart rate monitor does not function properly SOLUTION: a. PROBLEM: The walking belt is off-center or slips when walked on , first remove the key and UNPLUG THE POWER CORD. Plug in the PULSE display or the displayed heart rate is excessively high or low SOLUTION: a. Repeat until the Magnet is properly tightened. If the walking belt slips when walked on SOLUTION: a. Using b the allen wrench, turn both rear roller bolts...
... carefully remove the hood. Turn the Pulley until the walking belt is centered. PROBLEM: The heart rate monitor does not function properly SOLUTION: a. PROBLEM: The walking belt is off-center or slips when walked on , first remove the key and UNPLUG THE POWER CORD. Plug in the PULSE display or the displayed heart rate is excessively high or low SOLUTION: a. Repeat until the Magnet is properly tightened. If the walking belt slips when walked on SOLUTION: a. Using b the allen wrench, turn both rear roller bolts...
English Manual
Page 29
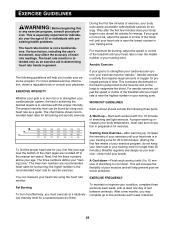
... be found by using the heart rate monitor. A proper warm-up to cool down -Finish each workout with preexisting health problems. The heart rate monitor is the recommended heart rate for individuals over the age of 35 or individuals with 5 to 10 minutes of your muscles and will help prevent post-exercise problems. You can be "aerobic." The three numbers define your body temperature, heart rate and circulation...
... be found by using the heart rate monitor. A proper warm-up to cool down -Finish each workout with preexisting health problems. The heart rate monitor is the recommended heart rate for individuals over the age of 35 or individuals with 5 to 10 minutes of your muscles and will help prevent post-exercise problems. You can be "aerobic." The three numbers define your body temperature, heart rate and circulation...
English Manual
Page 31
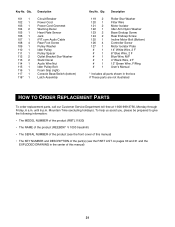
... 1 118* 1 Description Circuit Breaker Power Cord Power Cord Grommet Warning Decal Heart Rate Sensor Jack iFIT.com Audio Cable Rear Foot Screw Pulley Washer Idler Pulley Pulley Spacer Outlet Bracket Star Washer Static Decal Audio Wire Nut Idler Pulley Bolt Foam Grip (right) Console Base/Switch (bottom) Latch Assembly Key No. Mountain Time (excluding holidays). To help us assist you, please be prepared to give the following information: • The MODEL NUMBER of the product (RBTL11920) •...
... 1 118* 1 Description Circuit Breaker Power Cord Power Cord Grommet Warning Decal Heart Rate Sensor Jack iFIT.com Audio Cable Rear Foot Screw Pulley Washer Idler Pulley Pulley Spacer Outlet Bracket Star Washer Static Decal Audio Wire Nut Idler Pulley Bolt Foam Grip (right) Console Base/Switch (bottom) Latch Assembly Key No. Mountain Time (excluding holidays). To help us assist you, please be prepared to give the following information: • The MODEL NUMBER of the product (RBTL11920) •...

English Manual
Page 32
... or use , operate, and maintain as specified in your continued satisfaction. LIMITED WARRANTY WHAT IS COVERED-The entire REEBOK® V 1000 ("Product") is warranted to be free of all other warranties and any implied warranties of merchantability or fitness for a particular purpose is limited in its scope and duration to the terms set out in the Manual; The belt and deck are covered for...
... or use , operate, and maintain as specified in your continued satisfaction. LIMITED WARRANTY WHAT IS COVERED-The entire REEBOK® V 1000 ("Product") is warranted to be free of all other warranties and any implied warranties of merchantability or fitness for a particular purpose is limited in its scope and duration to the terms set out in the Manual; The belt and deck are covered for...


