

English Manual
Page 1
... ON THE WEB: www.reebokservice.com CAUTION Read all precautions and instructions in the space above for future reference. If you have questions, or if parts are damaged or missing, DO NOT CONTACT THE STORE; CALL TOLL-FREE: 1-877-994-4999 Mon.-Fri. 6 a.m.-6 p.m. Serial Number Decal QUESTIONS? USER'S MANUAL Keep this...
... ON THE WEB: www.reebokservice.com CAUTION Read all precautions and instructions in the space above for future reference. If you have questions, or if parts are damaged or missing, DO NOT CONTACT THE STORE; CALL TOLL-FREE: 1-877-994-4999 Mon.-Fri. 6 a.m.-6 p.m. Serial Number Decal QUESTIONS? USER'S MANUAL Keep this...

English Manual
Page 2
This product is missing or illegible, see the front cover of Reebok. Note: The decal(s) may not be shown at actual size. REEBOK and the Vector Logo are registered trademarks and service marks of this manual and request a free replacement...license from Reebok International. 2 TABLE OF CONTENTS WARNING DECAL PLACEMENT 2 IMPORTANT PRECAUTIONS 3 BEFORE YOU BEGIN 4 PART IDENTIFICATION CHART 5 ASSEMBLY 6 FCC INFORMATION 11 HOW TO USE THE EXERCISE BIKE 12 MAINTENANCE AND TROUBLESHOOTING 22 EXERCISE GUIDELINES 23 PART LIST 24 EXPLODED DRAWING 26 ORDERING REPLACEMENT PARTS Back ...
This product is missing or illegible, see the front cover of Reebok. Note: The decal(s) may not be shown at actual size. REEBOK and the Vector Logo are registered trademarks and service marks of this manual and request a free replacement...license from Reebok International. 2 TABLE OF CONTENTS WARNING DECAL PLACEMENT 2 IMPORTANT PRECAUTIONS 3 BEFORE YOU BEGIN 4 PART IDENTIFICATION CHART 5 ASSEMBLY 6 FCC INFORMATION 11 HOW TO USE THE EXERCISE BIKE 12 MAINTENANCE AND TROUBLESHOOTING 22 EXERCISE GUIDELINES 23 PART LIST 24 EXPLODED DRAWING 26 ORDERING REPLACEMENT PARTS Back ...
English Manual
Page 3
Before beginning any worn parts immediately. 3 This is especially important for foot protection. 3. The exercise bike should not be used by or through the use only. Place the exercise bike on the exercise bike. The pulse sensor is intended only as described in this manual. 8. Always keep your physician. ICON assumes no responsibility for home...
Before beginning any worn parts immediately. 3 This is especially important for foot protection. 3. The exercise bike should not be used by or through the use only. Place the exercise bike on the exercise bike. The pulse sensor is intended only as described in this manual. 8. Always keep your physician. ICON assumes no responsibility for home...
English Manual
Page 4
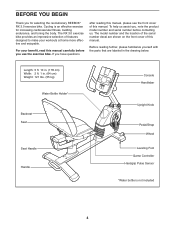
...manual, please see the front cover of features designed to make your benefit, read this manual. Before reading further, please familiarize yourself with the parts that are shown on the front cover of the serial number decal are labeled in . (64 cm) Weight: 121 lbs. (55 kg...Upright Knob Pedal/Strap Wheel Leveling Foot Game Controller Handgrip Pulse Sensor *Water bottle is an effective exercise for selecting the revolutionary REEBOK® RX 3.0 exercise bike. For your workouts at home more effective and enjoyable. The model number and the location of this manual carefully before you ...
...manual, please see the front cover of features designed to make your benefit, read this manual. Before reading further, please familiarize yourself with the parts that are shown on the front cover of the serial number decal are labeled in . (64 cm) Weight: 121 lbs. (55 kg...Upright Knob Pedal/Strap Wheel Leveling Foot Game Controller Handgrip Pulse Sensor *Water bottle is an effective exercise for selecting the revolutionary REEBOK® RX 3.0 exercise bike. For your workouts at home more effective and enjoyable. The model number and the location of this manual carefully before you ...
English Manual
Page 5
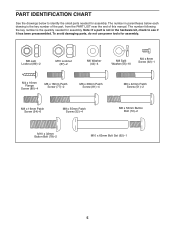
... CHART See the drawings below each drawing is the key number of the part, from the PART LIST near the end of this manual. Note: If a part is the quantity needed for assembly. M8 Jam Locknut (89)-2 M10 Locknut (87)-2 M6 Washer (44)-4 M8 Split Washer (55)-10 M4 x 8mm Screw (92)-1 ... key number is not in parentheses below to see if it has been preassembled. The number in the hardware kit, check to identify the small parts needed for assembly.
... CHART See the drawings below each drawing is the key number of the part, from the PART LIST near the end of this manual. Note: If a part is the quantity needed for assembly. M8 Jam Locknut (89)-2 M10 Locknut (87)-2 M6 Washer (44)-4 M8 Split Washer (55)-10 M4 x 8mm Screw (92)-1 ... key number is not in parentheses below to see if it has been preassembled. The number in the hardware kit, check to identify the small parts needed for assembly.
English Manual
Page 6
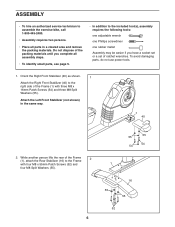
... 55 52 ASSEMBLY • To hire an authorized service technician to assemble the exercise bike, call 1-800-445-2480. • Assembly requires two persons. • Place all assembly steps. • To identify small parts, see page 5. • In addition to the included tool(s), assembly requires the following... tools: one adjustable wrench one Phillips screwdriver one rubber mallet Assembly may be easier if you complete all parts in the same way. 1 40 2. Do not dispose of the packing materials until you have a socket set or a set of ...
... 55 52 ASSEMBLY • To hire an authorized service technician to assemble the exercise bike, call 1-800-445-2480. • Assembly requires two persons. • Place all assembly steps. • To identify small parts, see page 5. • In addition to the included tool(s), assembly requires the following... tools: one adjustable wrench one Phillips screwdriver one rubber mallet Assembly may be easier if you complete all parts in the same way. 1 40 2. Do not dispose of the packing materials until you have a socket set or a set of ...
English Manual
Page 11
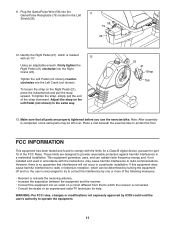
... the Right Pedal (21) clockwise into an outlet on , the user is marked with the limits for help. Make sure that all parts are designed to part 15 of the FCC Rules. Tighten the Left Pedal (not shown) counterclockwise into the Game/Pulse Receptacle (79) located in a residential ...installation. These limits are properly tightened before you use the exercise bike. Plug the Game/Pulse Wire (58) into the Left Crank (not shown). ...
... the Right Pedal (21) clockwise into an outlet on , the user is marked with the limits for help. Make sure that all parts are designed to part 15 of the FCC Rules. Tighten the Left Pedal (not shown) counterclockwise into the Game/Pulse Receptacle (79) located in a residential ...installation. These limits are properly tightened before you use the exercise bike. Plug the Game/Pulse Wire (58) into the Left Crank (not shown). ...
English Manual
Page 17
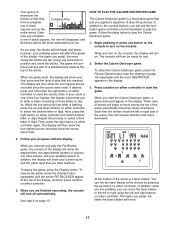
... select the desired letter or digit. HOW TO PLAY THE CALORIE DESTROYER GAME The Calorie Destroyer game is a laser blaster. Begin pedaling or press any part of a stacked block reaches the top of drones will begin to start the Calorie Destroyer game, a game arena will use . 2. The console will turn off...
... select the desired letter or digit. HOW TO PLAY THE CALORIE DESTROYER GAME The Calorie Destroyer game is a laser blaster. Begin pedaling or press any part of a stacked block reaches the top of drones will begin to start the Calorie Destroyer game, a game arena will use . 2. The console will turn off...
English Manual
Page 22
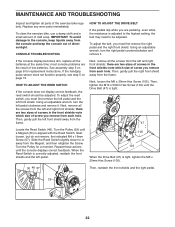
... a damp cloth and a small amount of the exercise bike regularly. CONSOLE TROUBLESHOOTING HOW TO ADJUST THE DRIVE BELT If...Next, loosen the M6 x 20mm Hex Screw (105). Turn the Pulley for replacement instructions. Replace any worn parts immediately. To adjust the reed switch, you must first remove the left pedal and the left pedal. 105 103... pedaling, even while the resistance is aligned with the Reed Switch. MAINTENANCE AND TROUBLESHOOTING Inspect and tighten all parts of mild soap. IMPORTANT: To avoid damage to be adjusted. Using an adjustable wrench, turn the left...
... a damp cloth and a small amount of the exercise bike regularly. CONSOLE TROUBLESHOOTING HOW TO ADJUST THE DRIVE BELT If...Next, loosen the M6 x 20mm Hex Screw (105). Turn the Pulley for replacement instructions. Replace any worn parts immediately. To adjust the reed switch, you must first remove the left pedal and the left pedal. 105 103... pedaling, even while the resistance is aligned with the Reed Switch. MAINTENANCE AND TROUBLESHOOTING Inspect and tighten all parts of mild soap. IMPORTANT: To avoid damage to be adjusted. Using an adjustable wrench, turn the left...

English Manual
Page 23
..., do not keep your heart rate in preparation for longer than 20 minutes.) Breathe regularly and deeply as a guide to make exercise a regular and enjoyable part of your heart rate as you to use stored fat calories for prolonged periods of heart rate readings. Remember, proper nutrition and adequate rest are...
..., do not keep your heart rate in preparation for longer than 20 minutes.) Breathe regularly and deeply as a guide to make exercise a regular and enjoyable part of your heart rate as you to use stored fat calories for prolonged periods of heart rate readings. Remember, proper nutrition and adequate rest are...
English Manual
Page 24
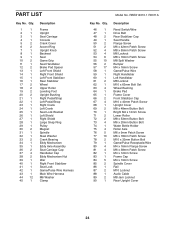
... Carriage Cap Handlebar Cap Eddy Mechanism Nut Idler Right Front Stabilizer Seat Lock Game/Pulse Wire Harness Main Wire Harness M6 Washer Clamp Model No. PART LIST Key No. RBEX14010.1 R0311A Key No. Qty. 46 1 47 1 48 2 49 1 50 2 51 2 52 4 53 4 54 6 55 10 56 2 57 17 58 1 59 1 60...
... Carriage Cap Handlebar Cap Eddy Mechanism Nut Idler Right Front Stabilizer Seat Lock Game/Pulse Wire Harness Main Wire Harness M6 Washer Clamp Model No. PART LIST Key No. RBEX14010.1 R0311A Key No. Qty. 46 1 47 1 48 2 49 1 50 2 51 2 52 4 53 4 54 6 55 10 56 2 57 17 58 1 59 1 60...

English Manual
Page 25
... the back cover of this manual. *These parts are subject to change without notice. Qty. M10 x 50mm Hex Screw M6 x 15mm Shoulder Screw M6 x 20mm Hex Screw M6 Washer Motor Bracket Resistance Motor ...
... the back cover of this manual. *These parts are subject to change without notice. Qty. M10 x 50mm Hex Screw M6 x 15mm Shoulder Screw M6 x 20mm Hex Screw M6 Washer Motor Bracket Resistance Motor ...
English Manual
Page 28
...• the name of the product (see the front cover of this manual) • the key number and description of the replacement part(s) (see the front cover of this warranty is warranted for a particular purpose are made must register this product to freight damage, abuse,... charge. The warranty extended hereunder is under warranty, the customer will be the customerʼs responsibility. ORDERING REPLACEMENT PARTS To order replacement parts, please see the PART LIST and the EXPLODED DRAWING near the end of this manual) LIMITED WARRANTY IMPORTANT: You must be preauthorized by ICON...
...• the name of the product (see the front cover of this manual) • the key number and description of the replacement part(s) (see the front cover of this warranty is warranted for a particular purpose are made must register this product to freight damage, abuse,... charge. The warranty extended hereunder is under warranty, the customer will be the customerʼs responsibility. ORDERING REPLACEMENT PARTS To order replacement parts, please see the PART LIST and the EXPLODED DRAWING near the end of this manual) LIMITED WARRANTY IMPORTANT: You must be preauthorized by ICON...


