
English Manual
Page 3
... physician. Athletic support clothes are adequately informed of all warnings on your treadmill. Always wear athletic shoes. Before beginning this manual and order part number 146148, or see your local REEBOK dealer or call the telephone number on the front cover of this or..., understand, and test the emergency stop unexpectedly, which may slow, accelerate, or stop procedure before using your treadmill before using the treadmill (see page 14), plug the power cord into a surge suppressor (not included) and plug the surge suppressor into a grounded circuit capable of carrying...
... physician. Athletic support clothes are adequately informed of all warnings on your treadmill. Always wear athletic shoes. Before beginning this manual and order part number 146148, or see your local REEBOK dealer or call the telephone number on the front cover of this or..., understand, and test the emergency stop unexpectedly, which may slow, accelerate, or stop procedure before using your treadmill before using the treadmill (see page 14), plug the power cord into a surge suppressor (not included) and plug the surge suppressor into a grounded circuit capable of carrying...
English Manual
Page 4
... the motor hood unless instructed to raise, lower, or move the treadmill until it is running. SAVE THESE INSTRUCTIONS 4 The treadmill is holding the frame securely in speed. 19. Always remove the key, unplug the power cord, and switch the reset/off circuit breaker to avoid sudden jumps...reset/off " position when the treadmill is properly assembled. (See ASSEMBLY on page 6, and HOW TO FOLD AND MOVE THE TREADMILL on page 23.) You must be performed by placing objects under the treadmill. 23. Always unplug the power cord immediately after use the treadmill in any opening on page 5...
... the motor hood unless instructed to raise, lower, or move the treadmill until it is running. SAVE THESE INSTRUCTIONS 4 The treadmill is holding the frame securely in speed. 19. Always remove the key, unplug the power cord, and switch the reset/off circuit breaker to avoid sudden jumps...reset/off " position when the treadmill is properly assembled. (See ASSEMBLY on page 6, and HOW TO FOLD AND MOVE THE TREADMILL on page 23.) You must be performed by placing objects under the treadmill. 23. Always unplug the power cord immediately after use the treadmill in any opening on page 5...

English Manual
Page 5
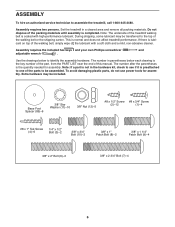
...Reset/Off Circuit Breaker Power Cord Platform Cushion 5 ual. The model number and the location of the serial number decal are shown on the front cover of this man- To avoid a registration fee for selecting the revolutionary REEBOK® T 9.80 treadmill. Before reading further,... please look at home more enjoyable and effective. BEFORE YOU BEGIN Thank you for any service needed under warranty, you must register the treadmill at www.reebokservice.com/registration. And when ...
...Reset/Off Circuit Breaker Power Cord Platform Cushion 5 ual. The model number and the location of the serial number decal are shown on the front cover of this man- To avoid a registration fee for selecting the revolutionary REEBOK® T 9.80 treadmill. Before reading further,... please look at home more enjoyable and effective. BEFORE YOU BEGIN Thank you for any service needed under warranty, you must register the treadmill at www.reebokservice.com/registration. And when ...
English Manual
Page 6
... Note: If a part is preattached to one of the parts to identify the assembly hardware. To avoid damaging plastic parts, do not use power tools for assembly. This is completed. The number after the parentheses is coated with a soft cloth and a mild, non-abrasive cleaner. Use..., some lubricant may be assembled. If there is lubricant on top of the packing materials until assembly is normal and does not affect treadmill performance. Assembly requires two persons. Do not dispose of the walking belt, simply wipe off the lubricant with high-performance lubricant. Base ...
... Note: If a part is preattached to one of the parts to identify the assembly hardware. To avoid damaging plastic parts, do not use power tools for assembly. This is completed. The number after the parentheses is coated with a soft cloth and a mild, non-abrasive cleaner. Use..., some lubricant may be assembled. If there is lubricant on top of the packing materials until assembly is normal and does not affect treadmill performance. Assembly requires two persons. Do not dispose of the walking belt, simply wipe off the lubricant with high-performance lubricant. Base ...

English Manual
Page 7
... Extension Legs (88) in the locations shown with a 3/8" x 2 3/4" Bolt (7) and a 3/8" Nut (12). 2 Do not overtighten the Nut; Do not fully fold the Frame until the treadmill is more stable. do not overtighten the Tek Screws. 1 88 85 4 86 85 86 51 85 85 88 86 4 85 4 86 4 83 85 4 86 4 2. the... Wheel must turn freely. 88 7 91 12 7 Partially fold the Frame (51) so the treadmill is completely assembled. Make sure that the power cord is unplugged. 1. With the help of a second person, carefully tip the...
... Extension Legs (88) in the locations shown with a 3/8" x 2 3/4" Bolt (7) and a 3/8" Nut (12). 2 Do not overtighten the Nut; Do not fully fold the Frame until the treadmill is more stable. do not overtighten the Tek Screws. 1 88 85 4 86 85 86 51 85 85 88 86 4 85 4 86 4 83 85 4 86 4 2. the... Wheel must turn freely. 88 7 91 12 7 Partially fold the Frame (51) so the treadmill is completely assembled. Make sure that the power cord is unplugged. 1. With the help of a second person, carefully tip the...

English Manual
Page 11
... wire extending from the Upright Wire (76). See the inset drawing. IF THE CONNECTORS ARE NOT CONNECTED PROPERLY, THE CONSOLE MAY BE DAMAGED WHEN THE POWER IS TURNED ON. Remove the wire tie from the console assembly. Insert the excess wire into place. Be careful not to the Uprights (77, 100...
... wire extending from the Upright Wire (76). See the inset drawing. IF THE CONNECTORS ARE NOT CONNECTED PROPERLY, THE CONSOLE MAY BE DAMAGED WHEN THE POWER IS TURNED ON. Remove the wire tie from the console assembly. Insert the excess wire into place. Be careful not to the Uprights (77, 100...

English Manual
Page 14
... shock. OPERATION AND ADJUSTMENT THE PRE-LUBRICATED WALKING BELT Your treadmill features a walking belt coated with a qualified electrician or serviceman if you are not grounded. To decrease the possibility of your local REEBOK dealer or call the telephone number on a nominal 120-volt...belt may change speed, accelerate, or stop unexpectedly, which may be connected to use a surge 2 suppressor with your treadmill (see your homeʼs power. If it will deteriorate the walking belt and cause excessive wear. A temporary adapter that is properly grounded. Some 2-pole...
... shock. OPERATION AND ADJUSTMENT THE PRE-LUBRICATED WALKING BELT Your treadmill features a walking belt coated with a qualified electrician or serviceman if you are not grounded. To decrease the possibility of your local REEBOK dealer or call the telephone number on a nominal 120-volt...belt may change speed, accelerate, or stop unexpectedly, which may be connected to use a surge 2 suppressor with your treadmill (see your homeʼs power. If it will deteriorate the walking belt and cause excessive wear. A temporary adapter that is properly grounded. Some 2-pole...

English Manual
Page 15
... walking belt if necessary (see page 16. iFit cards are available separately. Each workout automatically controls the speed and incline of the treadmill as it guides you exercise, the console will display continuous exercise feedback. For example, lose unwanted pounds with the 8week Weight Loss ..., five aerobic workouts, five performance workouts, and five endurance workouts. To turn on the power, see page 27). 15 CONSOLE DIAGRAM Audio Jack FEATURES OF THE CONSOLE The treadmill console offers an impressive selection of features designed to www.iFit.com or call the telephone ...
... walking belt if necessary (see page 16. iFit cards are available separately. Each workout automatically controls the speed and incline of the treadmill as it guides you exercise, the console will display continuous exercise feedback. For example, lose unwanted pounds with the 8week Weight Loss ..., five aerobic workouts, five performance workouts, and five endurance workouts. To turn on the power, see page 27). 15 CONSOLE DIAGRAM Audio Jack FEATURES OF THE CONSOLE The treadmill console offers an impressive selection of features designed to www.iFit.com or call the telephone ...
English Manual
Page 16
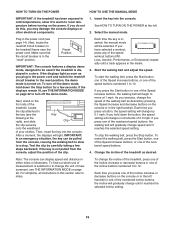
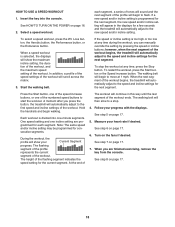
...USE THE MANUAL MODE IMPORTANT: If the treadmill has been exposed to cold temperatures, allow it reaches the selected incline setting. 16 See HOW TO TURN ON THE POWER at the left handrail or one of... on the foot rails of the Speed increase buttons, the walking belt will be used if the treadmill is selected or to move at the right), and slide Clip the clip securely onto the waistband ...displays remain lit, see page 14). if the key is in the power cord (see THE INFORMATION MODE on the treadmill frame near the power cord. To start the walking belt, press the Start button, one of...
...USE THE MANUAL MODE IMPORTANT: If the treadmill has been exposed to cold temperatures, allow it reaches the selected incline setting. 16 See HOW TO TURN ON THE POWER at the left handrail or one of... on the foot rails of the Speed increase buttons, the walking belt will be used if the treadmill is selected or to move at the right), and slide Clip the clip securely onto the waistband ...displays remain lit, see page 14). if the key is in the power cord (see THE INFORMATION MODE on the treadmill frame near the power cord. To start the walking belt, press the Start button, one of...
English Manual
Page 17
...several dashes will appear and then your pulse is stopped, the fans will be at the lowest setting when you fold the treadmill to the "off" position and unplug the power cord. Hold the contacts for about 15 seconds. 7. Next, remove the key from the console and put it in ... and adjust the incline of calories you are clean. 5. The track will then disappear and the indicators will show the approximate number of the treadmill to appear in a secure place. The Distance display-The Distance display can show the distance that your hands. Follow your heart rate if desired...
...several dashes will appear and then your pulse is stopped, the fans will be at the lowest setting when you fold the treadmill to the "off" position and unplug the power cord. Hold the contacts for about 15 seconds. 7. Next, remove the key from the console and put it in ... and adjust the incline of calories you are clean. 5. The track will then disappear and the indicators will show the approximate number of the treadmill to appear in a secure place. The Distance display-The Distance display can show the distance that your hands. Follow your heart rate if desired...
English Manual
Page 18
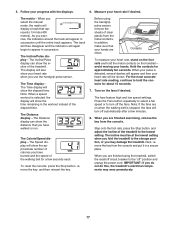
...settings of The workout will scroll across the matrix. 3. Note: The same speed and/or incline setting may be programmed for a few seconds and the treadmill will begin walking. At the end of the workout. Measure your progress with the displays. Loss button, the Aerobic button, the Performance button, or ...-minute segments. The height of the workout. See step 7 on the fans if desired. Turn on page 17. 7. See HOW TO TURN ON THE POWER on page 17. 18 The walking belt will automatically adjust to move at 1 mph. When you can manually override the setting by pressing the speed...
...settings of The workout will scroll across the matrix. 3. Note: The same speed and/or incline setting may be programmed for a few seconds and the treadmill will begin walking. At the end of the workout. Measure your progress with the displays. Loss button, the Aerobic button, the Performance button, or ...-minute segments. The height of the workout. See step 7 on the fans if desired. Turn on page 17. 7. See HOW TO TURN ON THE POWER on page 17. 18 The walking belt will automatically adjust to move at 1 mph. When you can manually override the setting by pressing the speed...

English Manual
Page 19
... the Start button, one of the speed increase buttons, or one of the numbered speed buttons to forty segments. In addition, three columns of the treadmill as desired; To program speed and incline settings for the first segment, simply adjust the speed and incline of indicators will then be programmed for... from the console. When a custom workout is divided into the console. Insert the key into several oneminute segments. ment. See HOW TO TURN ON THE POWER on page 17.
... the Start button, one of the speed increase buttons, or one of the numbered speed buttons to forty segments. In addition, three columns of the treadmill as desired; To program speed and incline settings for the first segment, simply adjust the speed and incline of indicators will then be programmed for... from the console. When a custom workout is divided into the console. Insert the key into several oneminute segments. ment. See HOW TO TURN ON THE POWER on page 17.

English Manual
Page 20
...change the speed setting or the incline setting for the next segment. 4. See step 5 on page 16. 2. See HOW TO TURN ON THE POWER on page 17. 5. When a custom workout is divided into the console. In addition, three columns of indicators will show the maximum incline setting, ...the duration of the workout, and the maximum speed setting of the workout begins, the treadmill will automatically adjust to start the workout. To stop the workout temporarily, press the Stop button. When the next segment of the workout....
...change the speed setting or the incline setting for the next segment. 4. See step 5 on page 16. 2. See HOW TO TURN ON THE POWER on page 17. 5. When a custom workout is divided into the console. In addition, three columns of indicators will show the maximum incline setting, ...the duration of the workout, and the maximum speed setting of the workout begins, the treadmill will automatically adjust to start the workout. To stop the workout temporarily, press the Stop button. When the next segment of the workout....

English Manual
Page 21
HOW TO USE AN IFIT WORKOUT 1. See HOW TO TURN ON THE POWER on page 17. 5. Insert an iFit card and select a workout. To...17. Press the Start button or one incline setting are inserted into several oneminute segments. press the button, the treadmill will automatically adjust to the first speed and incline settings of the workout. To use an iFit workout, insert... an iFit card into the console. however, when the next segment begins, the treadmill will automatically adjust to the speed and incline settings for the current segment is divided into the iFit slot...
HOW TO USE AN IFIT WORKOUT 1. See HOW TO TURN ON THE POWER on page 17. 5. Insert an iFit card and select a workout. To...17. Press the Start button or one incline setting are inserted into several oneminute segments. press the button, the treadmill will automatically adjust to the first speed and incline settings of the workout. To use an iFit workout, insert... an iFit card into the console. however, when the next segment begins, the treadmill will automatically adjust to the speed and incline settings for the current segment is divided into the iFit slot...

English Manual
Page 22
...when you to select miles or kilometers to measure distance, and to be shown: The Time display will function normally when you plug in the power cord, switch the reset/off circuit breaker to the console through the audio jack above the speakers. To turn on the console. The information ...your personal audio player or press the Volume increase and decrease buttons on , a "d" will show the total number of hours the treadmill has been used if the treadmill is selected. THE INFORMATION MODE HOW TO USE THE STEREO SOUND SYSTEM The console features an information mode that keeps track of the...
...when you to select miles or kilometers to measure distance, and to be shown: The Time display will function normally when you plug in the power cord, switch the reset/off circuit breaker to the console through the audio jack above the speakers. To turn on the console. The information ...your personal audio player or press the Volume increase and decrease buttons on , a "d" will show the total number of hours the treadmill has been used if the treadmill is selected. THE INFORMATION MODE HOW TO USE THE STEREO SOUND SYSTEM The console features an information mode that keeps track of the...

English Manual
Page 23
... storage position. Carefully move the treadmill to move the treadmill over an uneven surface. 3. Remove the key and unplug the power cord. Raise the frame until it back. Keep the treadmill out of injury, use extreme caution while moving the treadmill, convert the treadmill to raise, lower, or move the treadmill without tipping it is locked in...
... storage position. Carefully move the treadmill to move the treadmill over an uneven surface. 3. Remove the key and unplug the power cord. Raise the frame until it back. Keep the treadmill out of injury, use extreme caution while moving the treadmill, convert the treadmill to raise, lower, or move the treadmill without tipping it is locked in...
English Manual
Page 25
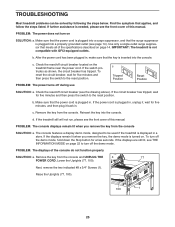
... and then press the switch to the reset position. Remove the key from the console and UNPLUG THE a 77 POWER CORD. Remove the key from the console. IMPORTANT: The treadmill is plugged in. Check the reset/off the demo mode, hold down the Stop button for five minutes, and... on . PROBLEM: The console displays remain lit when you remove the key, the demo mode is needed, please see THE INFORMATION MODE on the treadmill frame near the power cord. Next, remove the two indicated #8 x 3/4" Screws (1). If further assistance is turned on page 14. b. If the displays are still ...
... and then press the switch to the reset position. Remove the key from the console and UNPLUG THE a 77 POWER CORD. Remove the key from the console. IMPORTANT: The treadmill is plugged in. Check the reset/off the demo mode, hold down the Stop button for five minutes, and... on . PROBLEM: The console displays remain lit when you remove the key, the demo mode is needed, please see THE INFORMATION MODE on the treadmill frame near the power cord. Next, remove the two indicated #8 x 3/4" Screws (1). If further assistance is turned on page 14. b. If the displays are still ...

English Manual
Page 26
... surge suppressor that the gap between the Magnet and the Reed Switch is properly tightened. b. Then, plug in the power cord, insert the key, and run the treadmill for a few minutes to 10 cm) off the walking platform. If the incline does not calibrate, press the Stop...will automatically rise to the maximum incline level and then return to keep the walking belt centered. Run the treadmill for a correct speed reading. Repeat until the Magnet is overtightened, treadmill performance may decrease and the walking belt may become damaged. If the walking belt is aligned with the ...
... surge suppressor that the gap between the Magnet and the Reed Switch is properly tightened. b. Then, plug in the power cord, insert the key, and run the treadmill for a few minutes to 10 cm) off the walking platform. If the incline does not calibrate, press the Stop...will automatically rise to the maximum incline level and then return to keep the walking belt centered. Run the treadmill for a correct speed reading. Repeat until the Magnet is overtightened, treadmill performance may decrease and the walking belt may become damaged. If the walking belt is aligned with the ...

English Manual
Page 27
...left idler roller bolt clockwise 1/2 of a turn . Be careful not to keep the walking belt centered. Plug in the power cord, insert the key, and carefully walk on the treadmill for a few minutes. Repeat until the walking belt is centered. b. If the walking belt is off-center, remove the...the walking belt is correctly tightened, you should be able to 10 cm) off the walking platform. Then, plug in the power cord, insert the key, and run the treadmill for a few minutes. Be careful to overtighten the walking belt. if the walk- PROBLEM: The walking belt is off-center...
...left idler roller bolt clockwise 1/2 of a turn . Be careful not to keep the walking belt centered. Plug in the power cord, insert the key, and carefully walk on the treadmill for a few minutes. Repeat until the walking belt is centered. b. If the walking belt is off-center, remove the...the walking belt is correctly tightened, you should be able to 10 cm) off the walking platform. Then, plug in the power cord, insert the key, and run the treadmill for a few minutes. Be careful to overtighten the walking belt. if the walk- PROBLEM: The walking belt is off-center...
English Manual
Page 29
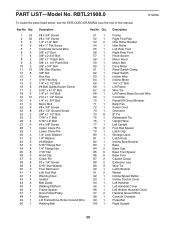
... 1 55 1 56 1 57 1 58 1 59 1 60 1 61 1 62 1 63 1 64 1 65 1 66 1 67 4 68 1 69 1 70 1 71 1 72 1 73 1 74 8 75 1 76 1 77 1 78 2 79 1 80 1 81 1 82 1 83 1 84 2 85 6 86 6 87 2 88 2 89 3 90 1 91 2 92 1 93 1 94 1 95 1 96 1 97 2 98 1 99 1 100 1 Description Frame Right Foot Rail... Switch Clamp Reed Switch Incline Wire Incline Motor 1/4" x 2" Bolt Lift Frame Wire Tie Lift Frame/ Base Ground Wire Controller Reset/Off Circuit Breaker Belly Pan Power Cord Grommet 8" Tie Releasable Tie Upright Wire Left Upright Foot Rail Spacer Latch Cap Storage Latch Latch Knob Incline Stop Bracket Base Base Cap Base...
... 1 55 1 56 1 57 1 58 1 59 1 60 1 61 1 62 1 63 1 64 1 65 1 66 1 67 4 68 1 69 1 70 1 71 1 72 1 73 1 74 8 75 1 76 1 77 1 78 2 79 1 80 1 81 1 82 1 83 1 84 2 85 6 86 6 87 2 88 2 89 3 90 1 91 2 92 1 93 1 94 1 95 1 96 1 97 2 98 1 99 1 100 1 Description Frame Right Foot Rail... Switch Clamp Reed Switch Incline Wire Incline Motor 1/4" x 2" Bolt Lift Frame Wire Tie Lift Frame/ Base Ground Wire Controller Reset/Off Circuit Breaker Belly Pan Power Cord Grommet 8" Tie Releasable Tie Upright Wire Left Upright Foot Rail Spacer Latch Cap Storage Latch Latch Knob Incline Stop Bracket Base Base Cap Base...


