
User Manual
Page 2
REEBOK and the Vector Logo are registered trademarks and service marks of this manual. This product is attached in the center of Reebok. ® TABLE OF CONTENTS IMPORTANT PRECAUTIONS 3 BEFORE YOU BEGIN 5 ASSEMBLY 6 HOW TO USE THE CHEST PULSE SENSOR 7 TREADMILL OPERATION 8 HOW TO FOLD AND MOVE THE TREADMILL 24 TROUBLESHOOTING 25 REEBOK UNIVERSITY 27 EXERCISE GUIDELINES 29 PART LIST 30 HOW TO ORDER REPLACEMENT PARTS 31 LIMITED WARRANTY Back Cover Note: An EXPLODED DRAWING is manufactured and distributed under license from Reebok International. 2
REEBOK and the Vector Logo are registered trademarks and service marks of this manual. This product is attached in the center of Reebok. ® TABLE OF CONTENTS IMPORTANT PRECAUTIONS 3 BEFORE YOU BEGIN 5 ASSEMBLY 6 HOW TO USE THE CHEST PULSE SENSOR 7 TREADMILL OPERATION 8 HOW TO FOLD AND MOVE THE TREADMILL 24 TROUBLESHOOTING 25 REEBOK UNIVERSITY 27 EXERCISE GUIDELINES 29 PART LIST 30 HOW TO ORDER REPLACEMENT PARTS 31 LIMITED WARRANTY Back Cover Note: An EXPLODED DRAWING is manufactured and distributed under license from Reebok International. 2

User Manual
Page 3
... folding or moving the treadmill, make sure that meets all users of this manual. 3. Use the treadmill only as exercise aids in determining heart rate trends in sandals. 9. Never allow more than walking speeds. If the control system is damaged, the walking belt may change speed or stop unexpectedly, which may result in this treadmill are recommended for the location of the on page 5 if the treadmill is being administered. 6. Adjust the speed...
... folding or moving the treadmill, make sure that meets all users of this manual. 3. Use the treadmill only as exercise aids in determining heart rate trends in sandals. 9. Never allow more than walking speeds. If the control system is damaged, the walking belt may change speed or stop unexpectedly, which may result in this treadmill are recommended for the location of the on page 5 if the treadmill is being administered. 6. Adjust the speed...
User Manual
Page 4
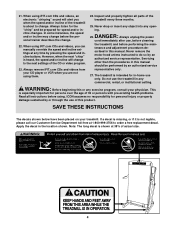
... speed and incline settings at any opening. 21. Never remove the motor hood unless instructed to the next settings of the treadmill every three months. 25. Always remove iFIT.com CDs and videos from your treadmill. Servicing other than the procedures in -home use the treadmill in the location shown. WARNING: Before beginning this manual should be prepared for persons over the age of 35 or persons with pre-existing health problems...
... speed and incline settings at any opening. 21. Never remove the motor hood unless instructed to the next settings of the treadmill every three months. 25. Always remove iFIT.com CDs and videos from your treadmill. Servicing other than the procedures in -home use the treadmill in the location shown. WARNING: Before beginning this manual should be prepared for persons over the age of 35 or persons with pre-existing health problems...
User Manual
Page 5
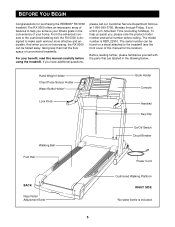
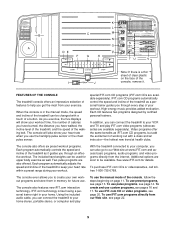
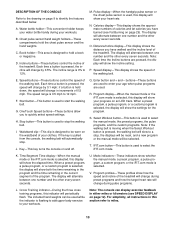
... the location). The model number is included 5 For your home. Hand Weight Holder Chest Pulse Sensor Holder Water Bottle Holder* Lock Knob Book Holder Console Handrail Key/Clip Walking Belt Foot Rail On/Off Switch Circuit Breaker Power Cord BACK Rear Roller Adjustment Bolts Cushioned Walking Platform RIGHT SIDE *No water bottle is RBTL22910. From the advanced console to the cushioned walking belt, the RX 5000 is designed to the treadmill (see the front cover of...
... the location). The model number is included 5 For your home. Hand Weight Holder Chest Pulse Sensor Holder Water Bottle Holder* Lock Knob Book Holder Console Handrail Key/Clip Walking Belt Foot Rail On/Off Switch Circuit Breaker Power Cord BACK Rear Roller Adjustment Bolts Cushioned Walking Platform RIGHT SIDE *No water bottle is RBTL22910. From the advanced console to the cushioned walking belt, the RX 5000 is designed to the treadmill (see the front cover of...

User Manual
Page 7
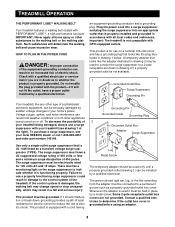
... the sensor unit. CHEST PULSE SENSOR TROUBLESHOOTING Sensor Unit Sensor Unit Buckle Next, wrap the chest pulse sensor around your chest. • Use saline solution such as is a problem, try the steps below ). The chest pulse sensor is activated when the electrode areas are wetted and the heart rate monitor is removed and the electrode areas are covered by medical conditions such as described, move it is used with the front of the walking belt. The...
... the sensor unit. CHEST PULSE SENSOR TROUBLESHOOTING Sensor Unit Sensor Unit Buckle Next, wrap the chest pulse sensor around your chest. • Use saline solution such as is a problem, try the steps below ). The chest pulse sensor is activated when the electrode areas are wetted and the heart rate monitor is removed and the electrode areas are covered by medical conditions such as described, move it is used with the front of the walking belt. The...
User Manual
Page 8
... PLUG IN THE POWER CORD DANGER: Improper connection of 450 joules. Grounding Pin Grounded Outlet Grounding Plug Grounded Outlet Box Adapter Surge Suppressor Use only a single-outlet surge suppressor that looks like extending from other substances to whether the product is UL 1449 listed as a properly grounded outlet box cover. TREADMILL OPERATION THE PERFORMANT LUBETM WALKING BELT Your treadmill features a walking belt coated with all local codes...
... PLUG IN THE POWER CORD DANGER: Improper connection of 450 joules. Grounding Pin Grounded Outlet Grounding Plug Grounded Outlet Box Adapter Surge Suppressor Use only a single-outlet surge suppressor that looks like extending from other substances to whether the product is UL 1449 listed as a properly grounded outlet box cover. TREADMILL OPERATION THE PERFORMANT LUBETM WALKING BELT Your treadmill features a walking belt coated with all local codes...
User Manual
Page 9
... chest pulse sensor. As you can also go to be available. The console also offers six preset workout programs. Each program automatically controls the speed and incline of the treadmill as it . Two pulse programs are soon to our Web site at health clubs. Each program automatically adjusts the speed and incline of the treadmill to your heart rate when you through an effective workout. See www.iFIT.com for upper body exercise as a personal trainer guides you use iFIT...
... chest pulse sensor. As you can also go to be available. The console also offers six preset workout programs. Each program automatically controls the speed and incline of the treadmill as it . Two pulse programs are soon to our Web site at health clubs. Each program automatically adjusts the speed and incline of the treadmill to your heart rate when you through an effective workout. See www.iFIT.com for upper body exercise as a personal trainer guides you use iFIT...
User Manual
Page 10
.... Select Workout button-This button is used to hold the chest pulse sensor and the hand weights. IFIT.com button-This button is used to select the iFIT.com mode. Incline buttons-These buttons control the incline of 0.5 mph. P. I. R. The display will be reset, and a new program or the manual mode will alternate between one number and the other every seven seconds. DESCRIPTION OF THE CONSOLE Refer to the drawing on page 9 to quickly select speed settings. A. Water...
.... Select Workout button-This button is used to hold the chest pulse sensor and the hand weights. IFIT.com button-This button is used to select the iFIT.com mode. Incline buttons-These buttons control the incline of 0.5 mph. P. I. R. The display will be reset, and a new program or the manual mode will alternate between one number and the other every seven seconds. DESCRIPTION OF THE CONSOLE Refer to the drawing on page 9 to quickly select speed settings. A. Water...
User Manual
Page 11
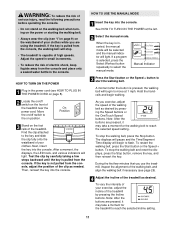
... TO PLUG IN THE POWER CORD on page 8). 2 Locate the on/off switch to flash. To vary the intensity of your clothes. Next, insert the key into the console. Test the clip by carefully taking a few minutes that you exercise, adjust the speed of the walking belt as desired by pressing the Incline buttons. HOW TO USE THE MANUAL MODE 1 Insert the key into the console. If a program is inserted, the manual mode...
... TO PLUG IN THE POWER CORD on page 8). 2 Locate the on/off switch to flash. To vary the intensity of your clothes. Next, insert the key into the console. Test the clip by carefully taking a few minutes that you exercise, adjust the speed of the walking belt as desired by pressing the Incline buttons. HOW TO USE THE MANUAL MODE 1 Insert the key into the console. If a program is inserted, the manual mode...
User Manual
Page 12
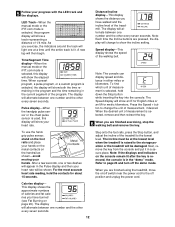
... console. Pulse display-When the handgrip pulse sensor or the chest pulse sensor is selected, the program display will show the elapsed time. The Speed display will change the unit of the treadmill. Calories display- Step onto the foot rails, press the Stop button, and adjust the incline of the walking belt. The incline must be damaged. Refer to page 23 and turn off position and unplug the power cord. When you are pressed, the display will show a track representing a distance...
... console. Pulse display-When the handgrip pulse sensor or the chest pulse sensor is selected, the program display will show the elapsed time. The Speed display will change the unit of the treadmill. Calories display- Step onto the foot rails, press the Stop button, and adjust the incline of the walking belt. The incline must be damaged. Refer to page 23 and turn off position and unplug the power cord. When you are pressed, the display will show a track representing a distance...
User Manual
Page 13
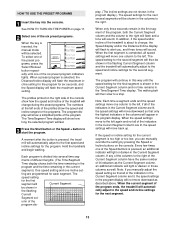
... Segment column are lit, the speed settings will move one of the Speed buttons is about to alert you, and three tones will sound. See HOW TO TURN ON THE POWER on the console. The program will continue in the Time/Segment Time display. The walking belt will be shown in the program display. When a preset program is pressed, the treadmill will automatically adjust to the right. When...
... Segment column are lit, the speed settings will move one of the Speed buttons is about to alert you, and three tones will sound. See HOW TO TURN ON THE POWER on the console. The program will continue in the Time/Segment Time display. The walking belt will be shown in the program display. When a preset program is pressed, the treadmill will automatically adjust to the right. When...
User Manual
Page 14
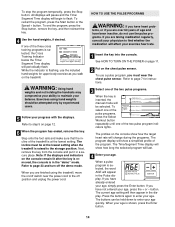
... program has ended, remove the key. To stop the program temporarily, press the Stop button. To end the program, press the Stop button, remove the key, and then reinsert the key. 4 Use the hand weights, if desired. Exercises using the treadmill, move the on the chest pulse sensor. See HOW TO TURN ON THE POWER on page 11. 2 Put on /off switch near the power cord to page 7 for upper body exercise as you walk on the console remain lit after the key is removed...
... program has ended, remove the key. To stop the program temporarily, press the Stop button. To end the program, press the Stop button, remove the key, and then reinsert the key. 4 Use the hand weights, if desired. Exercises using the treadmill, move the on the chest pulse sensor. See HOW TO TURN ON THE POWER on page 11. 2 Put on /off switch near the power cord to page 7 for upper body exercise as you walk on the console remain lit after the key is removed...

User Manual
Page 15
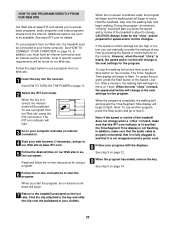
.../or incline of 190 is selected, the maximum heart rate setting can be shown in the Time/Segment Time display. If your heart rate closer to a stop the program at any time, press the Stop button. 7 Follow your maximum possible heart rate. If this occurs, refer to change the setting quickly. Refer to start the program. 5 Enter a maximum heart rate setting. If Pulse program 1 is too high or too low, you want to CHEST PULSE SENSOR TROUBLESHOOTING...
.../or incline of 190 is selected, the maximum heart rate setting can be shown in the Time/Segment Time display. If your heart rate closer to a stop the program at any time, press the Stop button. 7 Follow your maximum possible heart rate. If this occurs, refer to change the setting quickly. Refer to start the program. 5 Enter a maximum heart rate setting. If Pulse program 1 is too high or too low, you want to CHEST PULSE SENSOR TROUBLESHOOTING...

User Manual
Page 20
... Audio Adapter Cable B. Plug the Y-adapter into your VCR. In some instances, the speed and/or incline may change before the personal trainer describes the change . Plug the other end of the treadmill is about to a CD or video program when the Time/Segment Time display is flashing, press the Start button or the Speed + button on page 18. Plug the adapter into your VCR. 4 Press the PLAY button on your VCR and plug the wire...
... Audio Adapter Cable B. Plug the Y-adapter into your VCR. In some instances, the speed and/or incline may change before the personal trainer describes the change . Plug the other end of the treadmill is about to a CD or video program when the Time/Segment Time display is flashing, press the Start button or the Speed + button on page 18. Plug the adapter into your VCR. 4 Press the PLAY button on your VCR and plug the wire...
User Manual
Page 22
... settings at any time, press the Stop button on page 12. 9 When the program has ended, remove the key. A list of the treadmill does not change to the next settings for the program. When the on the console. To restart the program, press the Start button or the Speed + button. When the next "chirp" is heard, the speed and incline will change when a "chirp" is heard, make sure that the audio cable is properly connected...
... settings at any time, press the Stop button on page 12. 9 When the program has ended, remove the key. A list of the treadmill does not change to the next settings for the program. When the on the console. To restart the program, press the Start button or the Speed + button. When the next "chirp" is heard, the speed and incline will change when a "chirp" is heard, make sure that the audio cable is properly connected...
User Manual
Page 25
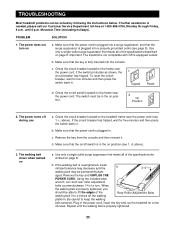
... surge suppressor is plugged in the on the treadmill frame near the power cord. Check the circuit breaker located on position. aged. When the walking belt is needed, please call our Customer Service Department toll-free at 1-800-999-3756, Monday through Friday, 6 a.m. PROBLEM SOLUTION 1. Use only a single-outlet surge suppressor that meets all of the Rear Roller Adjustment Bolts walking belt 3 to keep the walking belt centered. c. Check the...
... surge suppressor is plugged in the on the treadmill frame near the power cord. Check the circuit breaker located on position. aged. When the walking belt is needed, please call our Customer Service Department toll-free at 1-800-999-3756, Monday through Friday, 6 a.m. PROBLEM SOLUTION 1. Use only a single-outlet surge suppressor that meets all of the Rear Roller Adjustment Bolts walking belt 3 to keep the walking belt centered. c. Check the...

User Manual
Page 26
... careful not to the "open" position. Using the allen wrench, turn both rear roller bolts clockwise 1/4 of a turn . Next, remove 1/8" the screws from the sensor unit. The heart rate monitor a. Remove the cover. If the walking belt has shifted to the left, use the allen wrench to turn the left side of a turn the cover counterclockwise to overtighten the walking belt. Plug in the cover and turn ; move the key and UNPLUG THE POWER CORD. Locate the Reed Switch 43 11 (17) and...
... careful not to the "open" position. Using the allen wrench, turn both rear roller bolts clockwise 1/4 of a turn . Next, remove 1/8" the screws from the sensor unit. The heart rate monitor a. Remove the cover. If the walking belt has shifted to the left, use the allen wrench to turn the left side of a turn the cover counterclockwise to overtighten the walking belt. Plug in the cover and turn ; move the key and UNPLUG THE POWER CORD. Locate the Reed Switch 43 11 (17) and...

User Manual
Page 30
... 6 Sensor Cover Screw/ 3* 1 Idler Assembly 49 4 Isolator Washer Rear Foot 4 4 Isolator 50 4 Isolator Nut 95 2 Tie Holder 5 1 Latch Catch 51 1 Chest Pulse Strap 96 2 Tie 6 1 Platform 52 2 Roller Adj. PART LIST-MODEL NO. Bolt 98 4 Bumper 8 1 Walking Belt 54 1 Rear Endcap 99 4 Bumper Screw 9 2 Frame Pivot Bolt 55 1 Frame 100 1 On/Off Switch 10 1 Latch Assembly 56 1 Allen Wrench 101 1 Circuit Breaker 11 1 Front Roller/Pulley 57 2 Rear Platform Screw 102 1 Power Cord 12 1 Magnet 58 1 Rear Roller 103 1 Power Cord Grommet...
... 6 Sensor Cover Screw/ 3* 1 Idler Assembly 49 4 Isolator Washer Rear Foot 4 4 Isolator 50 4 Isolator Nut 95 2 Tie Holder 5 1 Latch Catch 51 1 Chest Pulse Strap 96 2 Tie 6 1 Platform 52 2 Roller Adj. PART LIST-MODEL NO. Bolt 98 4 Bumper 8 1 Walking Belt 54 1 Rear Endcap 99 4 Bumper Screw 9 2 Frame Pivot Bolt 55 1 Frame 100 1 On/Off Switch 10 1 Latch Assembly 56 1 Allen Wrench 101 1 Circuit Breaker 11 1 Front Roller/Pulley 57 2 Rear Platform Screw 102 1 Power Cord 12 1 Magnet 58 1 Rear Roller 103 1 Power Cord Grommet...
User Manual
Page 31
To help us assist you, please be prepared to give the following information: • The MODEL NUMBER of the product (RBTL22910) • The NAME of the product (REEBOK® RX 5000 treadmill) • The SERIAL NUMBER of the product (see the front cover of this manual) • The KEY NUMBER and DESCRIPTION of the part(s) (see the PART LIST on page 30). 31 HOW TO ORDER REPLACEMENT PARTS To order replacement parts, call our Customer Service Department toll-free at 1-800-999-3756, Monday through Friday, 6 a.m. until 6 p.m. Mountain Time (excluding holidays).
To help us assist you, please be prepared to give the following information: • The MODEL NUMBER of the product (RBTL22910) • The NAME of the product (REEBOK® RX 5000 treadmill) • The SERIAL NUMBER of the product (see the front cover of this manual) • The KEY NUMBER and DESCRIPTION of the part(s) (see the PART LIST on page 30). 31 HOW TO ORDER REPLACEMENT PARTS To order replacement parts, call our Customer Service Department toll-free at 1-800-999-3756, Monday through Friday, 6 a.m. until 6 p.m. Mountain Time (excluding holidays).
User Manual
Page 32
... warranty gives you specific legal rights and you , without our written authorization or by ICON first and are covered for one is warranted to be free of all other consequential damages of whatsoever nature. LIMITED WARRANTY WHAT IS COVERED-The entire REEBOK® RX 5000 ("Product") is authorized to change, modify or extend the terms of this limited warranty. The motor for service. The belt...
... warranty gives you specific legal rights and you , without our written authorization or by ICON first and are covered for one is warranted to be free of all other consequential damages of whatsoever nature. LIMITED WARRANTY WHAT IS COVERED-The entire REEBOK® RX 5000 ("Product") is authorized to change, modify or extend the terms of this limited warranty. The motor for service. The belt...


