
English Manual
Page 1
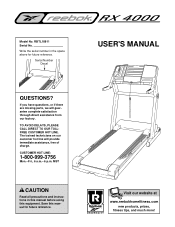
RBTL18911 Serial No. Write the serial number in this manual before using this manual for future reference. Serial Number Decal ® USER'S MANUAL QUESTIONS? MST CAUTION Read all precautions and instructions in the space above for future reference. CUSTOMER HOT LINE: 1-800-999-3756 Mon.-Fri., 6 a.m.- 6 p.m. Visit our ...
RBTL18911 Serial No. Write the serial number in this manual before using this manual for future reference. Serial Number Decal ® USER'S MANUAL QUESTIONS? MST CAUTION Read all precautions and instructions in the space above for future reference. CUSTOMER HOT LINE: 1-800-999-3756 Mon.-Fri., 6 a.m.- 6 p.m. Visit our ...

English Manual
Page 2
This product is attached in the center of Reebok. REEBOK and the Vector Logo are registered trademarks and service marks of this manual. ® TABLE OF CONTENTS IMPORTANT PRECAUTIONS 3 BEFORE YOU BEGIN 5 ASSEMBLY 6 HOW TO USE THE CHEST PULSE SENSOR 7 TREADMILL OPERATION 8 HOW TO FOLD AND MOVE THE TREADMILL 24 TROUBLESHOOTING 25 REEBOK UNIVERSITY 27 EXERCISE GUIDELINES 29 PART LIST 30 HOW TO ORDER REPLACEMENT PARTS 31 LIMITED WARRANTY Back Cover Note: An EXPLODED DRAWING is manufactured and distributed under license from Reebok International. 2
This product is attached in the center of Reebok. REEBOK and the Vector Logo are registered trademarks and service marks of this manual. ® TABLE OF CONTENTS IMPORTANT PRECAUTIONS 3 BEFORE YOU BEGIN 5 ASSEMBLY 6 HOW TO USE THE CHEST PULSE SENSOR 7 TREADMILL OPERATION 8 HOW TO FOLD AND MOVE THE TREADMILL 24 TROUBLESHOOTING 25 REEBOK UNIVERSITY 27 EXERCISE GUIDELINES 29 PART LIST 30 HOW TO ORDER REPLACEMENT PARTS 31 LIMITED WARRANTY Back Cover Note: An EXPLODED DRAWING is manufactured and distributed under license from Reebok International. 2
English Manual
Page 3
... the treadmill with at a time. 8. Exercises using hand weights should be able to safely lift 45 pounds (20 kg) to maintain your local REEBOK dealer or call 1-800-8063651 and order part number 146148. 11. The pulse sensors are standing on page 5 if the treadmill is turned off switch... from heated surfaces. 3. Do not put the treadmill in a fall and serious injury. 2. Place the treadmill on any surface that all users of this manual. 12. Do not place the treadmill on a level surface, with bare feet, wearing only stockings, or in general. 18. Never allow more amps. The...
... the treadmill with at a time. 8. Exercises using hand weights should be able to safely lift 45 pounds (20 kg) to maintain your local REEBOK dealer or call 1-800-8063651 and order part number 146148. 11. The pulse sensors are standing on page 5 if the treadmill is turned off switch... from heated surfaces. 3. Do not put the treadmill in a fall and serious injury. 2. Place the treadmill on any surface that all users of this manual. 12. Do not place the treadmill on a level surface, with bare feet, wearing only stockings, or in general. 18. Never allow more amps. The...

English Manual
Page 4
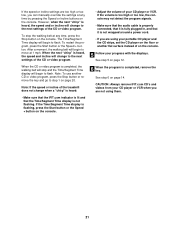
...or incline may change . 22. However, when the next "chirp" is heard, the speed and/or incline will alert you can manually override the speed and incline settings at 38% of this or any commercial, rental, or institutional setting. tenance and adjustment procedures de- ...scribed in this manual. Servicing other than the procedures in this manual should be prepared for personal injury or property damage sustained by an authorized service representative only. 27. Apply the...
...or incline may change . 22. However, when the next "chirp" is heard, the speed and/or incline will alert you can manually override the speed and incline settings at 38% of this or any commercial, rental, or institutional setting. tenance and adjustment procedures de- ...scribed in this manual. Servicing other than the procedures in this manual should be prepared for personal injury or property damage sustained by an authorized service representative only. 27. Apply the...
English Manual
Page 5
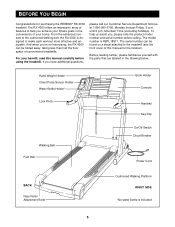
... Circuit Breaker Power Cord BACK Rear Roller Adjustment Bolts Cushioned Walking Platform RIGHT SIDE *No water bottle is RBTL18911. For your benefit, read this manual for purchasing the REEBOK® RX 4000 treadmill. To help you 're not exercising, the RX 4000 can be folded away, taking less than half the floor... questions, please call our Customer Service Department toll-free at 1-800-999-3756, Monday through Friday, 6 a.m. The RX 4000 offers an impressive array of this manual carefully before calling.
... Circuit Breaker Power Cord BACK Rear Roller Adjustment Bolts Cushioned Walking Platform RIGHT SIDE *No water bottle is RBTL18911. For your benefit, read this manual for purchasing the REEBOK® RX 4000 treadmill. To help you 're not exercising, the RX 4000 can be folded away, taking less than half the floor... questions, please call our Customer Service Department toll-free at 1-800-999-3756, Monday through Friday, 6 a.m. The RX 4000 offers an impressive array of this manual carefully before calling.
English Manual
Page 9
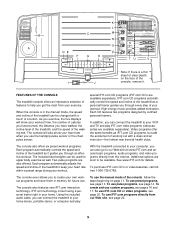
..., or computer and play iFIT.com video programs (videocassettes are soon to be available. Additional options are available separately). To use the manual mode of the treadmill as iFIT.com CD programs, but add the excitement of a button. Each CD features two programs designed by ... B A K L C M N O DE P F G H Q R S TU V Note: If there is like having a personal trainer right in your home. When the console is in the manual mode, the speed and incline of the treadmill can be changed with a touch of working out with a class and an instructor-the hottest new trend...
..., or computer and play iFIT.com video programs (videocassettes are soon to be available. Additional options are available separately). To use the manual mode of the treadmill as iFIT.com CD programs, but add the excitement of a button. Each CD features two programs designed by ... B A K L C M N O DE P F G H Q R S TU V Note: If there is like having a personal trainer right in your home. When the console is in the manual mode, the speed and incline of the treadmill can be changed with a touch of working out with a class and an instructor-the hottest new trend...
English Manual
Page 10
...slow to your clothes. Speed buttons-These buttons control the speed of 0.5 mph. Each time a button is selected, the display will show whether the manual mode, a preset program, a pulse program, a custom program, or the iFIT.com mode is used to hold the chest pulse sensor and the ...range is used to 12 mph. G. Stop button-This button is 0.5 mph to stop , the displays will be reset, and a new program or the manual mode will periodically flash. J. Enter button and + and - buttons-These buttons are used while the indicator is selected, the display will change by 0.1 mph...
...slow to your clothes. Speed buttons-These buttons control the speed of 0.5 mph. Each time a button is selected, the display will show whether the manual mode, a preset program, a pulse program, a custom program, or the iFIT.com mode is used to hold the chest pulse sensor and the ...range is used to 12 mph. G. Stop button-This button is 0.5 mph to stop , the displays will be reset, and a new program or the manual mode will periodically flash. J. Enter button and + and - buttons-These buttons are used while the indicator is selected, the display will change by 0.1 mph...
English Manual
Page 11
...the clip by carefully taking a few minutes that the treadmill is not pulled from the console. See HOW TO TURN ON THE POWER at 1 mph. Manual Indicator 3 Press the Start button or the Speed + button to reach the selected incline setting. 11 As you are using the treadmill. The displays ...To stop the walking belt, press the Stop button. Note: During the first few steps backward until the key is inserted, the manual mode will be selected and the manual indicator will begin walking. Adjust the speed in the console. Move the on/off switch on the front of your exercise, adjust...
...the clip by carefully taking a few minutes that the treadmill is not pulled from the console. See HOW TO TURN ON THE POWER at 1 mph. Manual Indicator 3 Press the Start button or the Speed + button to reach the selected incline setting. 11 As you are using the treadmill. The displays ...To stop the walking belt, press the Stop button. Note: During the first few steps backward until the key is inserted, the manual mode will be selected and the manual indicator will begin walking. Adjust the speed in the console. Move the on/off switch on the front of your exercise, adjust...
English Manual
Page 12
...display will show the elapsed time. The display will alternate between one number and the other every seven seconds. Time/Segment Time display-When the manual mode or the iFIT.com mode is selected, remove and then reinsert the key. 6 When you have burned (see Fat Burning on the... the lowest level. Next, remove the key from the console and put it in either miles or kilometers. Calories display- LED Track-When the manual mode or the iFIT.com mode is selected, the display will appear in the current segment of measurement, if desired. Press the Speed + button...
...display will show the elapsed time. The display will alternate between one number and the other every seven seconds. Time/Segment Time display-When the manual mode or the iFIT.com mode is selected, remove and then reinsert the key. 6 When you have burned (see Fat Burning on the... the lowest level. Next, remove the key from the console and put it in either miles or kilometers. Calories display- LED Track-When the manual mode or the iFIT.com mode is selected, the display will appear in the current segment of measurement, if desired. Press the Speed + button...
English Manual
Page 13
.... The numbers at the left again and not all of the Speed buttons is inserted, the manual mode will be shown in the flashing Current Segment col- ting are programmed for the current segment... is too high or too low, you can manually override the setting by pressing the Speed or Incline buttons on the console. When only three seconds...the key is pressed, an additional indicator will light or darken in the columns to alert you manually adjust the speed setting so that only the highest indicators in the columns will appear in the ...
.... The numbers at the left again and not all of the Speed buttons is inserted, the manual mode will be shown in the flashing Current Segment col- ting are programmed for the current segment... is too high or too low, you can manually override the setting by pressing the Speed or Incline buttons on the console. When only three seconds...the key is pressed, an additional indicator will light or darken in the columns to alert you manually adjust the speed setting so that only the highest indicators in the columns will appear in the ...
English Manual
Page 14
... last. 4 Enter your progress with the displays. If you have already entered your age is at the lowest setting when the treadmill is inserted, the manual mode will periodically flash. Next, remove the key from the console and put it in the "demo" mode. lems, or if you are over 60...
... last. 4 Enter your progress with the displays. If you have already entered your age is at the lowest setting when the treadmill is inserted, the manual mode will periodically flash. Next, remove the key from the console and put it in the "demo" mode. lems, or if you are over 60...
English Manual
Page 16
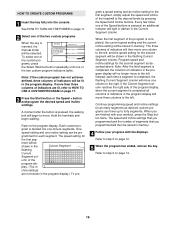
... the first segment, simply adjust the speed and incline of the program dis- Each custom pro- The three columns of the program is inserted, the manual mode will be pro- See HOW TO TURN ON THE POWER on page 14. 16 cline settings are finished with your progress with the displays...
... the first segment, simply adjust the speed and incline of the program dis- Each custom pro- The three columns of the program is inserted, the manual mode will be pro- See HOW TO TURN ON THE POWER on page 14. 16 cline settings are finished with your progress with the displays...
English Manual
Page 17
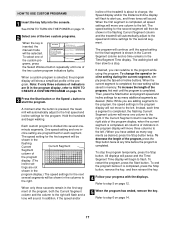
... the program has ended, remove the key. Each custom program is completed, all columns of indicators in memory. When the current segment is inserted, the manual mode will begin walking. Refer to step 5 on page 14. 17 The walking belt will be shown in the program display, refer to HOW TO...
... the program has ended, remove the key. Each custom program is completed, all columns of indicators in memory. When the current segment is inserted, the manual mode will begin walking. Refer to step 5 on page 14. 17 The walking belt will be shown in the program display, refer to HOW TO...
English Manual
Page 20
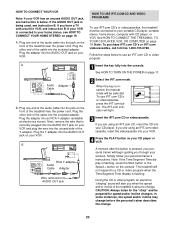
... VCR. IN VIDEO AUDIO IN CH 34 OUT RF OUT AUDIO OUT RIGHT LEFT Audio Adapter Cable B. Next, remove the wire that is inserted, the manual mode will light. 3 Insert the iFIT.com CD or videocassette. If you are using an iFIT.com CD, insert the CD into the AUDIO OUT...
... VCR. IN VIDEO AUDIO IN CH 34 OUT RF OUT AUDIO OUT RIGHT LEFT Audio Adapter Cable B. Next, remove the wire that is inserted, the manual mode will light. 3 Insert the iFIT.com CD or videocassette. If you are using an iFIT.com CD, insert the CD into the AUDIO OUT...
English Manual
Page 21
... begin to the next settings of the CD or video program. If the speed or incline settings are too high or too low, you can manually override the settings at any time, press the Stop button on the console.
... begin to the next settings of the CD or video program. If the speed or incline settings are too high or too low, you can manually override the settings at any time, press the Stop button on the console.
English Manual
Page 22
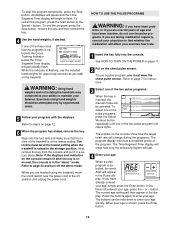
... use a program from our Web site, press the iFIT.com button. Follow the steps below to use programs from the internet. When you can manually override the settings at any time by pressing the Speed or Incline buttons on page 14. 22 Find the clip attached to the key and... programs directly from our Web site, the treadmill must have an internet connection and an internet service provider. When the next "chirp" is inserted, the manual mode will begin walking. When the program is not wrapped around a power cord. 8 Follow your clothes. Note: To use a program from our Web site. 1...
... use a program from our Web site, press the iFIT.com button. Follow the steps below to use programs from the internet. When you can manually override the settings at any time by pressing the Speed or Incline buttons on page 14. 22 Find the clip attached to the key and... programs directly from our Web site, the treadmill must have an internet connection and an internet service provider. When the next "chirp" is inserted, the manual mode will begin walking. When the program is not wrapped around a power cord. 8 Follow your clothes. Note: To use a program from our Web site. 1...
English Manual
Page 30
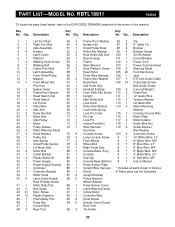
... 1 Console # 1 4" Black Wire, 2 F 34 4 Plastic Stand-off 82 1 Key/Clip # 1 8" Red Wire, M/F 35 1 Power Supply 83 1 Console Base (Bottom) # 1 User's Manual 36 1 Power Supply Bracket 84 1 Pulse Sensor Plate 37 1 Controller 85 1 Upright Wire Harness * Includes all parts shown in the center of this... manual. Description Key No. Description 1 1 Left Foot Rail 49 4 Frame Pivot Washer 96 2 Tie 2 1 Right Foot Rail 50 4 Isolator Nut 97 5 8" ...
... 1 Console # 1 4" Black Wire, 2 F 34 4 Plastic Stand-off 82 1 Key/Clip # 1 8" Red Wire, M/F 35 1 Power Supply 83 1 Console Base (Bottom) # 1 User's Manual 36 1 Power Supply Bracket 84 1 Pulse Sensor Plate 37 1 Controller 85 1 Upright Wire Harness * Includes all parts shown in the center of this... manual. Description Key No. Description 1 1 Left Foot Rail 49 4 Frame Pivot Washer 96 2 Tie 2 1 Right Foot Rail 50 4 Isolator Nut 97 5 8" ...

English Manual
Page 31
until 6 p.m. To help us assist you, please be prepared to give the following information: • The MODEL NUMBER of the product (RBTL18911) • The NAME of the product (REEBOK® RX 4000 treadmill) • The SERIAL NUMBER of the product (see the front cover of this manual) • The KEY NUMBER and DESCRIPTION of the part(s) (see the PART LIST on page 30). 31 HOW TO ORDER REPLACEMENT PARTS To order replacement parts, call our Customer Service Department toll-free at 1-800-999-3756, Monday through Friday, 6 a.m. Mountain Time (excluding holidays).
until 6 p.m. To help us assist you, please be prepared to give the following information: • The MODEL NUMBER of the product (RBTL18911) • The NAME of the product (REEBOK® RX 4000 treadmill) • The SERIAL NUMBER of the product (see the front cover of this manual) • The KEY NUMBER and DESCRIPTION of the part(s) (see the PART LIST on page 30). 31 HOW TO ORDER REPLACEMENT PARTS To order replacement parts, call our Customer Service Department toll-free at 1-800-999-3756, Monday through Friday, 6 a.m. Mountain Time (excluding holidays).

English Manual
Page 32
... of removal, installation or other warranties and any and all defects in the Manual to change, modify or extend the terms of the carton and insure the product. LIMITED WARRANTY WHAT IS COVERED-The entire REEBOK® RX 4000 ("Product") is warranted to you. WHO IS COVERED-The... original purchaser or any defected part for replacement or, if necessary, the entire product, for indirect, special or consequential damages arising out of or in the Manual; The motor for a lifetime...
... of removal, installation or other warranties and any and all defects in the Manual to change, modify or extend the terms of the carton and insure the product. LIMITED WARRANTY WHAT IS COVERED-The entire REEBOK® RX 4000 ("Product") is warranted to you. WHO IS COVERED-The... original purchaser or any defected part for replacement or, if necessary, the entire product, for indirect, special or consequential damages arising out of or in the Manual; The motor for a lifetime...

