
English Manual
Page 2
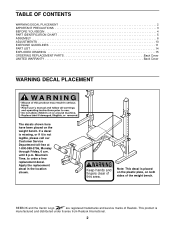
... 6 p.m. Mountain Time, to order a free replacement decal. Apply the replacement decal in the location shown. REEBOK and the Vector Logo are registered trademarks and service marks of this area. This product is not legible, please call...Monday through Friday, 6 a.m. If a decal is missing, or if it is manufactured and distributed under license from Reebok International. 2 Note: This decal is placed on the plastic plate, on the weight bench. TABLE OF CONTENTS WARNING DECAL PLACEMENT 2 IMPORTANT PRECAUTIONS 3 BEFORE YOU BEGIN 4 PART IDENTIFICATION CHART 5 ASSEMBLY 6 ...
... 6 p.m. Mountain Time, to order a free replacement decal. Apply the replacement decal in the location shown. REEBOK and the Vector Logo are registered trademarks and service marks of this area. This product is not legible, please call...Monday through Friday, 6 a.m. If a decal is missing, or if it is manufactured and distributed under license from Reebok International. 2 Note: This decal is placed on the plastic plate, on the weight bench. TABLE OF CONTENTS WARNING DECAL PLACEMENT 2 IMPORTANT PRECAUTIONS 3 BEFORE YOU BEGIN 4 PART IDENTIFICATION CHART 5 ASSEMBLY 6 ...
English Manual
Page 3
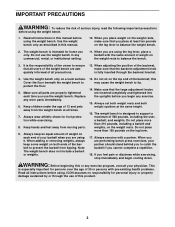
.... Always exercise with pre-existing health problems. Read all instructions in any worn parts immediately. 6. If you are using the weight bench. 1. Keep children under the age of serious injury, read the following important precautions before you use of the backrest; When adding...adjustment knob is intended for foot protection while exercising. 8. Read all instructions before using it. The weight bench is fully inserted through the use the weight bench. WARNING: Before beginning this manual before using. It is designed to protect the floor. 5. When adjusting...
.... Always exercise with pre-existing health problems. Read all instructions in any worn parts immediately. 6. If you are using the weight bench. 1. Keep children under the age of serious injury, read the following important precautions before you use of the backrest; When adding...adjustment knob is intended for foot protection while exercising. 8. Read all instructions before using it. The weight bench is fully inserted through the use the weight bench. WARNING: Before beginning this manual before using. It is designed to protect the floor. 5. When adjusting...
English Manual
Page 4
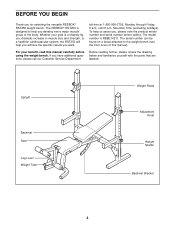
... us assist you develop every major muscle group of this manual carefully before calling. If you for selecting the versatile REEBOK® RST250 weight bench. The REEBOK® RST250 is designed to the weight bench (see the front cover of the body. To help you , please note the product model number and serial number...
... us assist you develop every major muscle group of this manual carefully before calling. If you for selecting the versatile REEBOK® RST250 weight bench. The REEBOK® RST250 is designed to the weight bench (see the front cover of the body. To help you , please note the product model number and serial number...
English Manual
Page 6
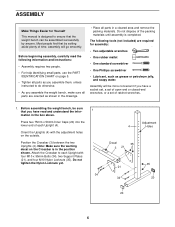
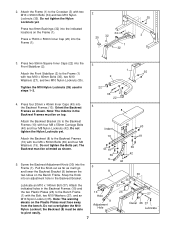
... (35). Before beginning assembly, carefully read and understand the infor- Position the Crossbar (3) between the two Uprights (4). Before assembling the weight bench, be more convenient if you have read the following tools (not included) are oriented as grease or petroleum jelly, and soapy water. ASSEMBLY... on page 5. • Tighten all parts as you assemble them, unless instructed to do otherwise. • As you assemble the weight bench, make sure all parts in the box above. Note: Make sure the warning decal on the outside. Attach the Crossbar to ensure that...
... (35). Before beginning assembly, carefully read and understand the infor- Position the Crossbar (3) between the two Uprights (4). Before assembling the weight bench, be more convenient if you have read the following tools (not included) are oriented as grease or petroleum jelly, and soapy water. ASSEMBLY... on page 5. • Tighten all parts as you assemble them, unless instructed to do otherwise. • As you assemble the weight bench, make sure all parts in the box above. Note: Make sure the warning decal on the outside. Attach the Crossbar to ensure that...
English Manual
Page 7
... 39 42 42 30 35 27 26 27 1 Decal 26 37 Lubricate The Backrest must be on the Bench Frame. Attach the indicated holes in the 8 Backrest Frames must be able to the Bench Frame (1) with two M10 x 95mm Bolts (34) and two M10 Nylon Locknuts (35). the Backrest (8) must face away... from the bench. Attach the Backrest (8) to the Crossbar (3) with the Bolt, two M10 Washers (27), and an M10 Nylon Locknut (35). Press a 75mm x 50mm Inner Cap (20) ...
... 39 42 42 30 35 27 26 27 1 Decal 26 37 Lubricate The Backrest must be on the Bench Frame. Attach the indicated holes in the 8 Backrest Frames must be able to the Bench Frame (1) with two M10 x 95mm Bolts (34) and two M10 Nylon Locknuts (35). the Backrest (8) must face away... from the bench. Attach the Backrest (8) to the Crossbar (3) with the Bolt, two M10 Washers (27), and an M10 Nylon Locknut (35). Press a 75mm x 50mm Inner Cap (20) ...

English Manual
Page 9
... parts will go. Make sure that both Weight Rests (12, 44) and both Weight Spotters (11, 45) are properly tightened before you use the weight bench. 10. Attach the Seat (7) to the Seat Frame with the right Upright (not shown). Pull the Large Adjustment Knob (18) in the Upright. Attach the...
... parts will go. Make sure that both Weight Rests (12, 44) and both Weight Spotters (11, 45) are properly tightened before you use the weight bench. 10. Attach the Seat (7) to the Seat Frame with the right Upright (not shown). Pull the Large Adjustment Knob (18) in the Upright. Attach the...
English Manual
Page 10
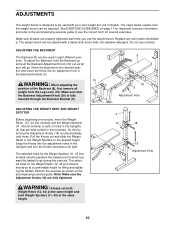
...cloth and a mild, non-abrasive detergent. See EXERCISE GUIDELINES on the accompanying exercise guide. WARNING: Always set (not included). The weight bench can be used in the Uprights (4) that exercise. Move the Backrest to the desired position and insert the Knob into the adjustment holes... in the Uprights and turn the Knobs clockwise until loose. ADJUSTMENTS The weight bench is fully inserted through the Backrest Bracket (9). 8 30 9 Adjustment Hole ADJUSTING THE WEIGHT REST AND WEIGHT SPOTTER Before beginning an ...
...cloth and a mild, non-abrasive detergent. See EXERCISE GUIDELINES on the accompanying exercise guide. WARNING: Always set (not included). The weight bench can be used in the Uprights (4) that exercise. Move the Backrest to the desired position and insert the Knob into the adjustment holes... in the Uprights and turn the Knobs clockwise until loose. ADJUSTMENTS The weight bench is fully inserted through the Backrest Bracket (9). 8 30 9 Adjustment Hole ADJUSTING THE WEIGHT REST AND WEIGHT SPOTTER Before beginning an ...
English Manual
Page 16
... this product to give the following information when calling: • The MODEL NUMBER of the product (RBBE14211) • The NAME of the product (REEBOK® RST250 weight bench) • The SERIAL NUMBER of the product (see the PART LIST and the EXPLODED DRAWING on how long an implied warranty lasts. You may...
... this product to give the following information when calling: • The MODEL NUMBER of the product (RBBE14211) • The NAME of the product (REEBOK® RST250 weight bench) • The SERIAL NUMBER of the product (see the PART LIST and the EXPLODED DRAWING on how long an implied warranty lasts. You may...
