
English Manual
Page 1
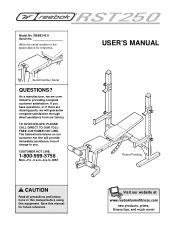
RBBE14211 Serial No. Serial Number Decal QUESTIONS? MST CAUTION Read all precautions and instructions in the space above for future reference. Save this equipment. Write the serial number in this manual before using this manual for reference. TO AVOID DELAYS, PLEASE CALL DIRECT TO OUR TOLLFREE CUSTOMER HOT LINE. The trained technicians on our customer hot line will guarantee complete satisfaction through direct assistance...
RBBE14211 Serial No. Serial Number Decal QUESTIONS? MST CAUTION Read all precautions and instructions in the space above for future reference. Save this equipment. Write the serial number in this manual before using this manual for reference. TO AVOID DELAYS, PLEASE CALL DIRECT TO OUR TOLLFREE CUSTOMER HOT LINE. The trained technicians on our customer hot line will guarantee complete satisfaction through direct assistance...
English Manual
Page 2
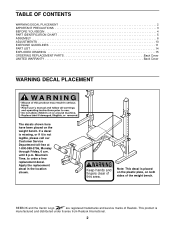
... 4 PART IDENTIFICATION CHART 5 ASSEMBLY 6 ADJUSTMENTS 10 EXERCISE GUIDELINES 11 PART LIST 14 EXPLODED DRAWING 15 ORDERING REPLACEMENT PARTS Back Cover LIMITED WARRANTY Back Cover WARNING DECAL PLACEMENT The decals shown here have been placed on both sides of the weight bench. REEBOK and the Vector Logo are registered trademarks and service marks of this area. until 6 p.m. Apply the replacement decal in the location shown. Mountain Time, to order a free replacement decal...
... 4 PART IDENTIFICATION CHART 5 ASSEMBLY 6 ADJUSTMENTS 10 EXERCISE GUIDELINES 11 PART LIST 14 EXPLODED DRAWING 15 ORDERING REPLACEMENT PARTS Back Cover LIMITED WARRANTY Back Cover WARNING DECAL PLACEMENT The decals shown here have been placed on both sides of the weight bench. REEBOK and the Vector Logo are registered trademarks and service marks of this area. until 6 p.m. Apply the replacement decal in the location shown. Mountain Time, to order a free replacement decal...
English Manual
Page 3
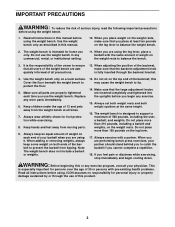
... adjustment knobs are adequately informed of all instructions in any commercial, rental, or institutional setting. 11. Always wear athletic shoes for persons over the age of 35 or persons with a partner. ICON assumes no responsibility for home use the weight bench. The weight bench is designed to tip. 14. Replace any exercise. 15. Do not sit on the weight rests to prevent the barbell from moving parts...
... adjustment knobs are adequately informed of all instructions in any commercial, rental, or institutional setting. 11. Always wear athletic shoes for persons over the age of 35 or persons with a partner. ICON assumes no responsibility for home use the weight bench. The weight bench is designed to tip. 14. Replace any exercise. 15. Do not sit on the weight rests to prevent the barbell from moving parts...
English Manual
Page 4
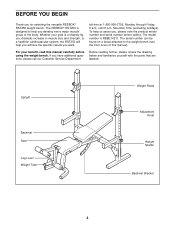
... selecting the versatile REEBOK® RST250 weight bench. Upright Backrest Seat Leg Lever Weight Tube Weight Rests Adjustment Knob Weight Spotter Backrest Bracket 4 If you want. The serial number can be found on a decal attached to help you achieve the specific results you have additional questions, please call our Customer Service Department Before reading further, please review the drawing below and familiarize yourself with the parts that are...
... selecting the versatile REEBOK® RST250 weight bench. Upright Backrest Seat Leg Lever Weight Tube Weight Rests Adjustment Knob Weight Spotter Backrest Bracket 4 If you want. The serial number can be found on a decal attached to help you achieve the specific results you have additional questions, please call our Customer Service Department Before reading further, please review the drawing below and familiarize yourself with the parts that are...
English Manual
Page 5
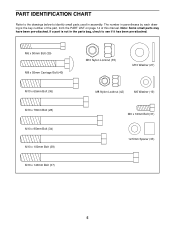
... Bolt (37) M10 Nylon Locknut (35) M10 Washer (27) M8 Nylon Locknut (42) M6 Washer (19) M6 x 16mm Bolt (31) 12.5mm Spacer (33) 5 Note: Some small parts may have been pre-attached. If a part is the key number of the part, from the PART LIST on page 14 of this manual. The number in parentheses by each drawing is not in assembly...
... Bolt (37) M10 Nylon Locknut (35) M10 Washer (27) M8 Nylon Locknut (42) M6 Washer (19) M6 x 16mm Bolt (31) 12.5mm Spacer (33) 5 Note: Some small parts may have been pre-attached. If a part is the key number of the part, from the PART LIST on page 14 of this manual. The number in parentheses by each drawing is not in assembly...
English Manual
Page 6
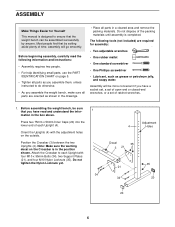
... otherwise. • As you assemble the weight bench, make sure all parts are required for Yourself This manual is designed to ensure that you have a socket set, a set of open-end or closed-end wrenches, or a set of ratchet wrenches. 1. The following information and instructions: • Assembly requires two people. • For help identifying small parts, use the PART IDENTIFICATION CHART on the Crossbar is completed.
... otherwise. • As you assemble the weight bench, make sure all parts are required for Yourself This manual is designed to ensure that you have a socket set, a set of open-end or closed-end wrenches, or a set of ratchet wrenches. 1. The following information and instructions: • Assembly requires two people. • For help identifying small parts, use the PART IDENTIFICATION CHART on the Crossbar is completed.
English Manual
Page 7
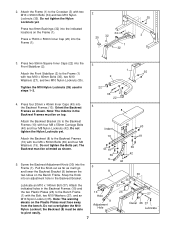
Press two 8mm Bushings (32) into an adjustment hole in the 8 Backrest Frames must face away from the bench. Do not tighten the Nylon Locknuts yet. Snap the Knob into the indicated locations on the Frame (1). Do not overtighten the M10 Nylon Locknut; Do not tighten the Nylon Locknuts yet. Attach...1 Decal 26 37 Lubricate Do not tighten the Bolts yet. The Backrest must be oriented as shown. 5. 2. the Backrest (8) must be able to the Bench Frame (1) with two M10 x 95mm Bolts (34) and two M10 Nylon Locknuts (35). Attach the indicated holes in steps 1-3. 22 36 27...
Press two 8mm Bushings (32) into an adjustment hole in the 8 Backrest Frames must face away from the bench. Do not tighten the Nylon Locknuts yet. Snap the Knob into the indicated locations on the Frame (1). Do not overtighten the M10 Nylon Locknut; Do not tighten the Nylon Locknuts yet. Attach...1 Decal 26 37 Lubricate Do not tighten the Bolts yet. The Backrest must be oriented as shown. 5. 2. the Backrest (8) must be able to the Bench Frame (1) with two M10 x 95mm Bolts (34) and two M10 Nylon Locknuts (35). Attach the indicated holes in steps 1-3. 22 36 27...
English Manual
Page 8
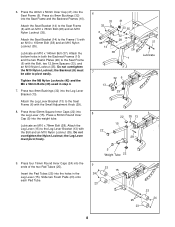
...(35). Tighten the M8 Nylon Locknuts (42) and the M6 x 50mm Bolts (39) used in both the Backrest Frames (10) and the two Plastic Plates (26) to pivot easily. Press a 50mm Round Inner Cap (5) into the holes in the Leg Lever (15). the Leg Lever must be able to the Seat Frame ...step 4. 7. the Backrest (8) must pivot freely. 6 33 32 6 35 14 38 41 33 35 32 10 28 32 26 1 37 Lubricate 7 32 6 13 29 8 22 22 15 35 13 28 9. Do not overtighten the Nylon Locknut; Press six 8mm Bushings (32) into the Leg Lever (15). Attach the Leg Lever (15) to the Seat Frame (6) with the Bolt...
...(35). Tighten the M8 Nylon Locknuts (42) and the M6 x 50mm Bolts (39) used in both the Backrest Frames (10) and the two Plastic Plates (26) to pivot easily. Press a 50mm Round Inner Cap (5) into the holes in the Leg Lever (15). the Leg Lever must be able to the Seat Frame ...step 4. 7. the Backrest (8) must pivot freely. 6 33 32 6 35 14 38 41 33 35 32 10 28 32 26 1 37 Lubricate 7 32 6 13 29 8 22 22 15 35 13 28 9. Do not overtighten the Nylon Locknut; Press six 8mm Bushings (32) into the Leg Lever (15). Attach the Leg Lever (15) to the Seat Frame (6) with the Bolt...

English Manual
Page 9
...) are properly tightened before you use of all parts are set at the same height. 12. Pull the Large Adjustment Knob (18) in the Left Weight Spotter (11) out as far as it is tight. Snap the Knob into the Weight Rest and the Weight Spotter. The use the weight bench. Attach the Seat (7) to the Seat Frame with the right Upright (not shown). 10. Attach the other...
...) are properly tightened before you use of all parts are set at the same height. 12. Pull the Large Adjustment Knob (18) in the Left Weight Spotter (11) out as far as it is tight. Snap the Knob into the Weight Rest and the Weight Spotter. The use the weight bench. Attach the Seat (7) to the Seat Frame with the right Upright (not shown). 10. Attach the other...
English Manual
Page 10
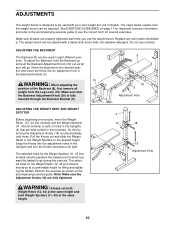
.... Do not use the weight bench. Move the Backrest to sets of the Backrest (8), first remove all parts are fully tightened. WARNING: Always set (not included). The steps below explain how the weight bench can be used in eight different positions. Do this by turning the Adjustment Knobs (18) counterclockwise until tight. Replace any worn parts immediately. Pull the Knobs out and slide the Weight Rests or the Weight Spotters to...
.... Do not use the weight bench. Move the Backrest to sets of the Backrest (8), first remove all parts are fully tightened. WARNING: Always set (not included). The steps below explain how the weight bench can be used in eight different positions. Do this by turning the Adjustment Knobs (18) counterclockwise until tight. Replace any worn parts immediately. Pull the Knobs out and slide the Weight Rests or the Weight Spotters to...
English Manual
Page 11
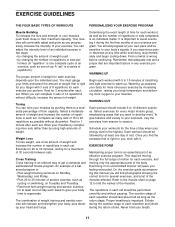
... by changing the number of repetitions or sets per- EXERCISE GUIDELINES THE FOUR BASIC TYPES OF WORKOUTS PERSONALIZING YOUR EXERCISE PROGRAM Muscle Building To increase the size and strength of your body's signals. Weight Loss To lose weight, use a low amount of weight and increase the number of repetitions in an uncontrolled manner will continually adapt and grow as one day of their maximum capacity. Find...
... by changing the number of repetitions or sets per- EXERCISE GUIDELINES THE FOUR BASIC TYPES OF WORKOUTS PERSONALIZING YOUR EXERCISE PROGRAM Muscle Building To increase the size and strength of your body's signals. Weight Loss To lose weight, use a low amount of weight and increase the number of repetitions in an uncontrolled manner will continually adapt and grow as one day of their maximum capacity. Find...
English Manual
Page 12
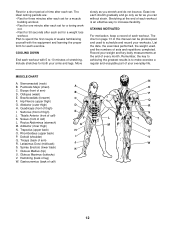
... can be photocopied and used , and the numbers of arm) R. Hamstring (back of calf) K. Move slowly as you stretch and do not bounce. Tibialis Anterior (front of leg) W. Gluteus Maximus (buttocks) V. Abductor (outer thigh) D H. Brachioradials (forearm) C F. Trapezius (upper back) H O. Triceps (back of sets and repetitions completed. List the date, the exercises performed, the weight used to schedule and record your workouts.
... can be photocopied and used , and the numbers of arm) R. Hamstring (back of calf) K. Move slowly as you stretch and do not bounce. Tibialis Anterior (front of leg) W. Gluteus Maximus (buttocks) V. Abductor (outer thigh) D H. Brachioradials (forearm) C F. Trapezius (upper back) H O. Triceps (back of sets and repetitions completed. List the date, the exercises performed, the weight used to schedule and record your workouts.
English Manual
Page 13
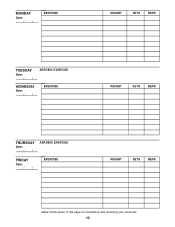
MONDAY Date: / / EXERCISE WEIGHT SETS REPS TUESDAY Date: / / AEROBIC EXERCISE WEDNESDAY Date: / / EXERCISE WEIGHT SETS REPS THURSDAY Date: / / AEROBIC EXERCISE FRIDAY Date: / / EXERCISE WEIGHT SETS REPS Make photocopies of this page for scheduling and recording your workouts. 13
MONDAY Date: / / EXERCISE WEIGHT SETS REPS TUESDAY Date: / / AEROBIC EXERCISE WEDNESDAY Date: / / EXERCISE WEIGHT SETS REPS THURSDAY Date: / / AEROBIC EXERCISE FRIDAY Date: / / EXERCISE WEIGHT SETS REPS Make photocopies of this page for scheduling and recording your workouts. 13
English Manual
Page 14
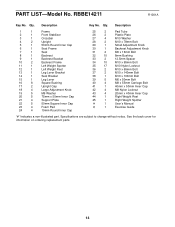
... Bolt 38 1 M10 x 100mm Bolt 39 5 M6 x 50mm Bolt 40 4 M8 x 55mm Carriage Bolt 41 1 40mm x 50mm Inner Cap 42 4 M8 Nylon Locknut 43 4 20mm x 40mm Inner Cap 44 1 Right Weight Rest 45 1 Right Weight Spotter # 1 User's Manual # 1 Exercise Guide "#" Indicates a non-illustrated part. Specifications are subject to change without notice. Qty. RBBE14211 R1001A Key No. Description Key No. See the back cover for information on ordering replacement parts...
... Bolt 38 1 M10 x 100mm Bolt 39 5 M6 x 50mm Bolt 40 4 M8 x 55mm Carriage Bolt 41 1 40mm x 50mm Inner Cap 42 4 M8 Nylon Locknut 43 4 20mm x 40mm Inner Cap 44 1 Right Weight Rest 45 1 Right Weight Spotter # 1 User's Manual # 1 Exercise Guide "#" Indicates a non-illustrated part. Specifications are subject to change without notice. Qty. RBBE14211 R1001A Key No. Description Key No. See the back cover for information on ordering replacement parts...

English Manual
Page 15
EXPLODED DRAWING-Model No. RBBE14211 R1001A 8 18 16 44 16 40 18 43 10 45 32 27 10 16 27 19 39 17 43 32 19 9 39 7 35 32 42 42 26 33 41 32 6 33 37 35 13 32 32 34 31 29 19 30 35 4 39 28 14 35 28 32 20 1 34 35 20 2 22 32 37 38 20 35 21 34 22 27 36 24 23 22 15 22 25 5 22 23 12 16 11 16 17 35 21 35 3 4 35 21 34 21 34 20 24 16 18 18 35 20 15
EXPLODED DRAWING-Model No. RBBE14211 R1001A 8 18 16 44 16 40 18 43 10 45 32 27 10 16 27 19 39 17 43 32 19 9 39 7 35 32 42 42 26 33 41 32 6 33 37 35 13 32 32 34 31 29 19 30 35 4 39 28 14 35 28 32 20 1 34 35 20 2 22 32 37 38 20 35 21 34 22 27 36 24 23 22 15 22 25 5 22 23 12 16 11 16 17 35 21 35 3 4 35 21 34 21 34 20 24 16 18 18 35 20 15
English Manual
Page 16
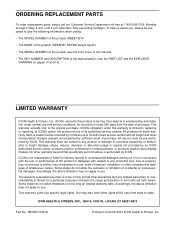
... date of any and all freight and other warranty beyond that specifically set forth herein. until 6 p.m. This warranty extends only to be received by sufficient proof of incidental or consequential damages. This warranty gives you . LIMITED WARRANTY ICON Health & Fitness, Inc. (ICON), warrants this manual) • The KEY NUMBER and DESCRIPTION of the desired part(s) (see the front cover of this product to the original purchaser...
... date of any and all freight and other warranty beyond that specifically set forth herein. until 6 p.m. This warranty extends only to be received by sufficient proof of incidental or consequential damages. This warranty gives you . LIMITED WARRANTY ICON Health & Fitness, Inc. (ICON), warrants this manual) • The KEY NUMBER and DESCRIPTION of the desired part(s) (see the front cover of this product to the original purchaser...


