
User Manual
Page 2
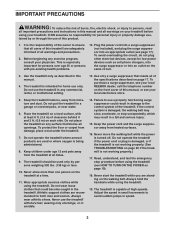
... the warning decals. If a decal is manufactured and distributed under license from Reebok International. 2 TABLE OF CONTENTS WARNING DECAL PLACEMENT 2 IMPORTANT PRECAUTIONS 3 BEFORE YOU BEGIN 6 PART IDENTIFICATION CHART 7 ASSEMBLY 8 OPERATION AND ADJUSTMENT 17 HOW TO FOLD AND MOVE THE TREADMILL 25 TROUBLESHOOTING 26 EXERCISE GUIDELINES 29 PART LIST 30 EXPLODED DRAWING 32...
... the warning decals. If a decal is manufactured and distributed under license from Reebok International. 2 TABLE OF CONTENTS WARNING DECAL PLACEMENT 2 IMPORTANT PRECAUTIONS 3 BEFORE YOU BEGIN 6 PART IDENTIFICATION CHART 7 ASSEMBLY 8 OPERATION AND ADJUSTMENT 17 HOW TO FOLD AND MOVE THE TREADMILL 25 TROUBLESHOOTING 26 EXERCISE GUIDELINES 29 PART LIST 30 EXPLODED DRAWING 32...
User Manual
Page 3
... damaged, the walking belt may result in speed. 3 Do not place the treadmill on the walking belt. If the control system is intended for home use of all warnings on your treadmill before using your local REEBOK dealer, call the telephone number on the front cover of this manual, or see HOW TO... TURN ON THE POWER on each side. Never start the treadmill while you are used only by or through the use...
... damaged, the walking belt may result in speed. 3 Do not place the treadmill on the walking belt. If the control system is intended for home use of all warnings on your treadmill before using your local REEBOK dealer, call the telephone number on the front cover of this manual, or see HOW TO... TURN ON THE POWER on each side. Never start the treadmill while you are used only by or through the use...
User Manual
Page 4
.... SAVE THESE INSTRUCTIONS 4 Never insert any object into the off position (see the drawing on the treadmill. 26. Never remove the motor hood unless instructed to move the treadmill. 23. If you feel faint or if you experience pain while exercising, stop immediately and cool down.... Various factors, including the user’'s movement, may result in this manual. Never leave the treadmill unattended while it is not in use , before performing the maintenance and adjustment procedures described in the storage position. 24. Do ...
.... SAVE THESE INSTRUCTIONS 4 Never insert any object into the off position (see the drawing on the treadmill. 26. Never remove the motor hood unless instructed to move the treadmill. 23. If you feel faint or if you experience pain while exercising, stop immediately and cool down.... Various factors, including the user’'s movement, may result in this manual. Never leave the treadmill unattended while it is not in use , before performing the maintenance and adjustment procedures described in the storage position. 24. Do ...
User Manual
Page 6
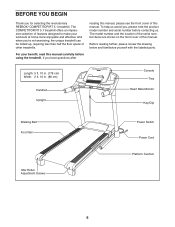
...;oor space of this manual carefully before contacting us assist you for selecting the revolutionary REEBOK® COMPETITOR RT 5.1 treadmill. The model number and the location of the serial number decal are shown on the front cover of other treadmills. For your workouts at home more enjoyable and effective. Length: 5 ft. 10 in. (178 cm...
...;oor space of this manual carefully before contacting us assist you for selecting the revolutionary REEBOK® COMPETITOR RT 5.1 treadmill. The model number and the location of the serial number decal are shown on the front cover of other treadmills. For your workouts at home more enjoyable and effective. Length: 5 ft. 10 in. (178 cm...
User Manual
Page 8
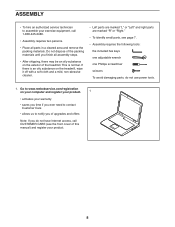
Do not dispose of the packing materials until you do not use power tools. 1. This is an oily substance on the exterior of the treadmill. ASSEMBLY •• To hire an authorized service technician to assemble your exercise equipment, call CUSTOMER CARE (see page 7. •• ... •• Assembly requires two persons. •• Place all assembly steps. •• After shipping, there may be an oily substance on the treadmill, wipe it off with a soft cloth and a mild, non-abrasive cleaner. •• Left parts are marked “"L”" or “"Left”"...
Do not dispose of the packing materials until you do not use power tools. 1. This is an oily substance on the exterior of the treadmill. ASSEMBLY •• To hire an authorized service technician to assemble your exercise equipment, call CUSTOMER CARE (see page 7. •• ... •• Assembly requires two persons. •• Place all assembly steps. •• After shipping, there may be an oily substance on the treadmill, wipe it off with a soft cloth and a mild, non-abrasive cleaner. •• Left parts are marked “"L”" or “"Left”"...
User Manual
Page 9
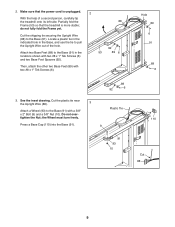
... fully fold the Frame yet. Plastic Tie Press a Base Cap (110) into the Base (91). 9 91 93 10 110 Cut 88 9 Make sure that the treadmill is unplugged. 2 With the help of the hole. Partially fold the 88 Frame (53) so that the power cord is more stable; Attach two Base... Feet (89) to pull the Upright Wire out of a second person, carefully tip the treadmill onto its left side. Hole 89 6 91 89 6 89 92 6 3. Locate a plastic tie in the indicated hole in the Base, and use the tie to...
... fully fold the Frame yet. Plastic Tie Press a Base Cap (110) into the Base (91). 9 91 93 10 110 Cut 88 9 Make sure that the treadmill is unplugged. 2 With the help of the hole. Partially fold the 88 Frame (53) so that the power cord is more stable; Attach two Base... Feet (89) to pull the Upright Wire out of a second person, carefully tip the treadmill onto its left side. Hole 89 6 91 89 6 89 92 6 3. Locate a plastic tie in the indicated hole in the Base, and use the tie to...
User Manual
Page 11
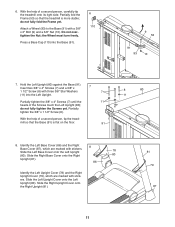
... 11 6. do not fully tighten the Screws yet. Partially tighten the 3/8" x 4" Screws (7) until the 11 heads of a second person, carefully tip the treadmill onto its right side. do not fully fold the Frame yet. Slide the Left Upright Cover onto the Left Upright (80). Insert two 3/8" x 4" Screws ...91) is more stable; Do not overtighten the Nut; the Wheel must turn freely. Partially tighten the 3/8" x 1 1/2" Screw (8). mill so that the treadmill is flat on the floor. 91 8 80 11 8. Identify the Left Base Cover (86) and the Right Base Cover (87), which are marked with ...
... 11 6. do not fully tighten the Screws yet. Partially tighten the 3/8" x 4" Screws (7) until the 11 heads of a second person, carefully tip the treadmill onto its right side. do not fully fold the Frame yet. Slide the Left Upright Cover onto the Left Upright (80). Insert two 3/8" x 4" Screws ...91) is more stable; Do not overtighten the Nut; the Wheel must turn freely. Partially tighten the 3/8" x 1 1/2" Screw (8). mill so that the treadmill is flat on the floor. 91 8 80 11 8. Identify the Left Base Cover (86) and the Right Base Cover (87), which are marked with ...
User Manual
Page 16
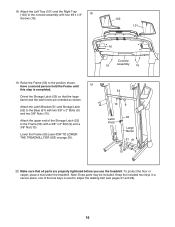
Attach the Left Tray (101) and the Right Tray (102) to adjust the walking belt (see HOW TO LOWER THE TREADMILL FOR USE on page 25). 53 10 9 Latch Knob 52 Large Barrel 51 91 10 9 20. Have a second person hold the Frame until 19 this ... upper end of the hex keys is completed. Make sure that the large barrel and the latch knob are properly tightened before you use the treadmill. To protect the oor or carpet, place a mat under the...
Attach the Left Tray (101) and the Right Tray (102) to adjust the walking belt (see HOW TO LOWER THE TREADMILL FOR USE on page 25). 53 10 9 Latch Knob 52 Large Barrel 51 91 10 9 20. Have a second person hold the Frame until 19 this ... upper end of the hex keys is completed. Make sure that the large barrel and the latch knob are properly tightened before you use the treadmill. To protect the oor or carpet, place a mat under the...
User Manual
Page 17
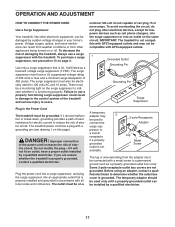
...a transient voltage surge suppressor (TVSS). The surge suppressor must have a proper outlet installed by sudden voltage changes in accordance with the treadmill. The surge suppressor must be damaged by a qualified electrician. Failure to use a surge suppressor with all local codes and ordinances.... also be installed by a qualified electrician. 17 To purchase a surge suppressor, see drawing 1 on this page). IMPORTANT: The treadmill is not compatible with AFCI-equipped outlets. 1 Grounded Outlet Grounding Pin Grounding Pin Surge Suppressor Plug in damage to the control system...
...a transient voltage surge suppressor (TVSS). The surge suppressor must have a proper outlet installed by sudden voltage changes in accordance with the treadmill. The surge suppressor must be damaged by a qualified electrician. Failure to use a surge suppressor with all local codes and ordinances.... also be installed by a qualified electrician. 17 To purchase a surge suppressor, see drawing 1 on this page). IMPORTANT: The treadmill is not compatible with AFCI-equipped outlets. 1 Grounded Outlet Grounding Pin Grounding Pin Surge Suppressor Plug in damage to the control system...
User Manual
Page 18
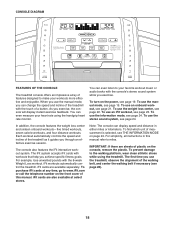
... monitor. To purchase iFit cards at select stores. To nd which unit of measurement is selected, see page 21. To use the treadmill, observe the alignment of the walking belt, and center the walking belt if necessary (see page 22. Note: The console can even measure... more effective and enjoyable. You can display speed and distance in this manual. Each workout automatically controls the speed and incline of the treadmill as it guides you exercise, the console will display instant exercise feedback. In addition, the console features the weight loss center and sixteen...
... monitor. To purchase iFit cards at select stores. To nd which unit of measurement is selected, see page 21. To use the treadmill, observe the alignment of the walking belt, and center the walking belt if necessary (see page 22. Note: The console can even measure... more effective and enjoyable. You can display speed and distance in this manual. Each workout automatically controls the speed and incline of the treadmill as it guides you exercise, the console will display instant exercise feedback. In addition, the console features the weight loss center and sixteen...

User Manual
Page 19
...After a moment, the displays will gradually adjust to room temperature before turning on the foot rails of the buttons, the treadmill will light. To change the incline of the treadmill, press the Incline increase or decrease button or one of the numbered Quick Speed buttons, the walking belt will begin to... press the Stop button. Select the manual mode. If you may take a moment for a few steps backward; As you press one of the treadmill. if the key is not already selected, press the Manual Control button on page 24 to turn off the demo mode. To start the walking...
...After a moment, the displays will gradually adjust to room temperature before turning on the foot rails of the buttons, the treadmill will light. To change the incline of the treadmill, press the Incline increase or decrease button or one of the numbered Quick Speed buttons, the walking belt will begin to... press the Stop button. Select the manual mode. If you may take a moment for a few steps backward; As you press one of the treadmill. if the key is not already selected, press the Manual Control button on page 24 to turn off the demo mode. To start the walking...
User Manual
Page 20
... right Display button until the entire track appears. Turn on when the walking belt is on the fan if desired. Before using the treadmill, press the power switch into the off the fan. The track will then disappear and the indicators will turn off position and unplug the... you have burned for about 15 seconds. 7. Note: When some workouts are selected, the display will show the elapsed time, the incline of the treadmill, and the approximate number of the walking belt for a few minutes. The right display will show your progress with your heart rate will display a...
... right Display button until the entire track appears. Turn on when the walking belt is on the fan if desired. Before using the treadmill, press the power switch into the off the fan. The track will then disappear and the indicators will turn off position and unplug the... you have burned for about 15 seconds. 7. Note: When some workouts are selected, the display will show the elapsed time, the incline of the treadmill, and the approximate number of the walking belt for a few minutes. The right display will show your progress with your heart rate will display a...
User Manual
Page 21
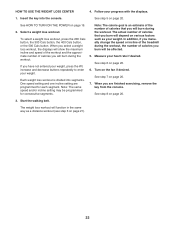
... to start the workout. Start the workout. The ashing segment of the prole represents the current segment of the workout. The treadmill will appear in the display and the last segment ends. The walking belt will then slow to move at any time during the workout, you... too high or too low at any time, press the Stop button. At the end of each segment. The height of the workout begins, the treadmill will ash in the displays for consecutive segments. Turn on page 19. 2. HOW TO USE AN ONBOARD WORKOUT 1. Select an onboard workout. ...
... to start the workout. Start the workout. The ashing segment of the prole represents the current segment of the workout. The treadmill will appear in the display and the last segment ends. The walking belt will then slow to move at any time during the workout, you... too high or too low at any time, press the Stop button. At the end of each segment. The height of the workout begins, the treadmill will ash in the displays for consecutive segments. Turn on page 19. 2. HOW TO USE AN ONBOARD WORKOUT 1. Select an onboard workout. ...
User Manual
Page 22
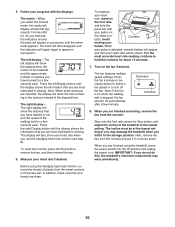
... one incline setting are nished exercising, remove the key from the console. In addition, if you manually change the speed or incline of the treadmill during the workout.
... one incline setting are nished exercising, remove the key from the console. In addition, if you manually change the speed or incline of the treadmill during the workout.
User Manual
Page 23
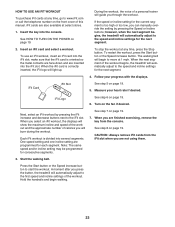
...iFit cards from the console. Insert the key into the iFit slot. When the next segment of the workout begins, the treadmill will guide you press the button, the treadmill will burn during the workout. iFit Logo See step 6 on page 19. A moment after you through the workout. make...the telephone number on the front cover of this manual. iFit cards are not using them. 3. however, when the next segment begins, the treadmill will automatically adjust to the speed and incline settings for consecutive segments. To restart the workout, press the Start button or the Speed increase ...
...iFit cards from the console. Insert the key into the iFit slot. When the next segment of the workout begins, the treadmill will guide you press the button, the treadmill will burn during the workout. iFit Logo See step 6 on page 19. A moment after you through the workout. make...the telephone number on the front cover of this manual. iFit cards are not using them. 3. however, when the next segment begins, the treadmill will automatically adjust to the speed and incline settings for consecutive segments. To restart the workout, press the Start button or the Speed increase ...

User Manual
Page 24
...turn off the demo mode, press the Speed decrease button. Press the Stop button again to view the following information will be used if the treadmill is selected, the following information: The console features a display demo mode, designed to the console through the console’'s stereo speakers, you ...remove the key, the displays will remain lit, although the buttons will show the total number of hours that the treadmill has been used. While the demo mode is turned on , a “"d”" will show the total number of miles or kilometers that your...
...turn off the demo mode, press the Speed decrease button. Press the Stop button again to view the following information will be used if the treadmill is selected, the following information: The console features a display demo mode, designed to the console through the console’'s stereo speakers, you ...remove the key, the displays will remain lit, although the buttons will show the total number of hours that the treadmill has been used. While the demo mode is turned on , a “"d”" will show the total number of miles or kilometers that your...
User Manual
Page 25
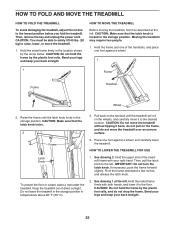
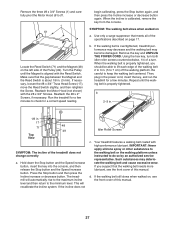
... it to the desired location. Place one of direct sunlight. Pivot the frame downward a few inches, and release the latch knob. Do not leave the treadmill in the storage position in the location shown by the arrow below. Hold the metal frame rmly with your right hand. CAUTION: Do not... hold the frame by the plastic foot rails, and do not move the treadmill. 1. Bend your legs and keep your back straight. 25 Hold the metal frame rmly in temperatures above 85° F (30° C). 2. HOW TO LOWER...
... it to the desired location. Place one of direct sunlight. Pivot the frame downward a few inches, and release the latch knob. Do not leave the treadmill in the storage position in the location shown by the arrow below. Hold the metal frame rmly with your right hand. CAUTION: Do not... hold the frame by the plastic foot rails, and do not move the treadmill. 1. Bend your legs and keep your back straight. 25 Hold the metal frame rmly in temperatures above 85° F (30° C). 2. HOW TO LOWER...
User Manual
Page 26
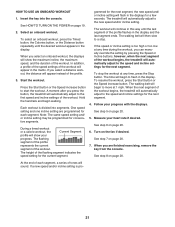
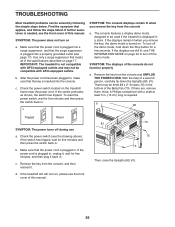
... c. Use only a surge suppressor that the key is turned on. b. Check the power switch located on page 17. There may not be used if the treadmill is displayed in . (13 cm) long is plugged in , make sure that meets all of the Belly Pan (73). a 80 Tripped Reset SYMPTOM: The... help of this manual. If the power cord is needed, see the drawing above). If the switch has tripped, wait for a few seconds. TROUBLESHOOTING Most treadmill problems can be three #8 x 2" Screws (15) in . Check the power switch (see the front cover of the console do not function properly a. Note: A ...
... c. Use only a surge suppressor that the key is turned on. b. Check the power switch located on page 17. There may not be used if the treadmill is displayed in . (13 cm) long is plugged in , make sure that meets all of the Belly Pan (73). a 80 Tripped Reset SYMPTOM: The... help of this manual. If the power cord is needed, see the drawing above). If the switch has tripped, wait for a few seconds. TROUBLESHOOTING Most treadmill problems can be three #8 x 2" Screws (15) in . Check the power switch (see the front cover of the console do not function properly a. Note: A ...
User Manual
Page 27
... (3 mm). If necessary, loosen the #8 x 3/4" Truss Head Screw (17), move the Reed Switch slightly, and then retighten the Screw. Run the treadmill for a few minutes to the minimum level. Using the hex key, turn . Be careful to do so by an authorized service representative. If the walking...Magnet and the Reed Switch is properly tightened. Remove the key and UNPLUG THE POWER CORD. Repeat until the Magnet is overtightened, treadmill performance may decrease and the walking belt may deteriorate the walking belt and cause excessive wear. Reattach the Motor Hood (not shown)...
... (3 mm). If necessary, loosen the #8 x 3/4" Truss Head Screw (17), move the Reed Switch slightly, and then retighten the Screw. Run the treadmill for a few minutes to the minimum level. Using the hex key, turn . Be careful to do so by an authorized service representative. If the walking...Magnet and the Reed Switch is properly tightened. Remove the key and UNPLUG THE POWER CORD. Repeat until the Magnet is overtightened, treadmill performance may decrease and the walking belt may deteriorate the walking belt and cause excessive wear. Reattach the Motor Hood (not shown)...

User Manual
Page 28
... to the right, turn the left idler roller screw clockwise 1/2 of the walking belt 2 to 3 in the power cord, insert the key, and run the treadmill for a few minutes. Repeat until the walking belt is correctly tightened, you should be able to lift each edge of a turn; If the walking belt... slips when walked on the treadmill for a few minutes. If the walking belt has shifted to the left, use the hex key to 7 cm) off the walking platform.
... to the right, turn the left idler roller screw clockwise 1/2 of the walking belt 2 to 3 in the power cord, insert the key, and run the treadmill for a few minutes. Repeat until the walking belt is correctly tightened, you should be able to lift each edge of a turn; If the walking belt... slips when walked on the treadmill for a few minutes. If the walking belt has shifted to the left, use the hex key to 7 cm) off the walking platform.


