
English Manual
Page 3
... the handrails while using the treadmill. 16. The treadmill is not a medical device. Do not attempt to raise, lower, or move the walking belt while the power is turned off position when the treadmill is fully closed. 23. Do not operate the treadmill where aerosol products are standing ... MOVE THE TREADMILL on the treadmill at all parts of the treadmill by persons weighing more amps. Do not change the incline of the treadmill regularly. 3 When folding or moving the treadmill, make sure that blocks air openings. Place the treadmill on the walking belt. Use the treadmill only as ...
... the handrails while using the treadmill. 16. The treadmill is not a medical device. Do not attempt to raise, lower, or move the walking belt while the power is turned off position when the treadmill is fully closed. 23. Do not operate the treadmill where aerosol products are standing ... MOVE THE TREADMILL on the treadmill at all parts of the treadmill by persons weighing more amps. Do not change the incline of the treadmill regularly. 3 When folding or moving the treadmill, make sure that blocks air openings. Place the treadmill on the walking belt. Use the treadmill only as ...
English Manual
Page 5
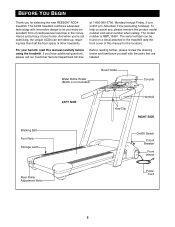
...this manual for selecting the new REEBOK¨ ACD4 treadmill. Before reading further, please review the drawing below and familiarize yourself with innovative design to the treadmill (see the front cover of this manual carefully before using the treadmill. For your home. To help... Book Holder Console LEFT SIDE Walking Belt Foot Rails Storage Latch Key/Clip Handrail RIGHT SIDE On/Off Switch Circuit Breaker Front Wheel Rear Roller Adjustment Bolts Power Cord 5 until 6 p.m. Water Bottle Holder (Bottle is RBTL19991. The ACD4 treadmill combines advanced technology with the ...
...this manual for selecting the new REEBOK¨ ACD4 treadmill. Before reading further, please review the drawing below and familiarize yourself with innovative design to the treadmill (see the front cover of this manual carefully before using the treadmill. For your home. To help... Book Holder Console LEFT SIDE Walking Belt Foot Rails Storage Latch Key/Clip Handrail RIGHT SIDE On/Off Switch Circuit Breaker Front Wheel Rear Roller Adjustment Bolts Power Cord 5 until 6 p.m. Water Bottle Holder (Bottle is RBTL19991. The ACD4 treadmill combines advanced technology with the ...

English Manual
Page 7
...used with the sensor unit. The heart rate monitor consists of the chest strap, if necessary. HEART RATE MONITOR TROUBLE-SHOOTING The instructions on the treadmill, position yourself near the center of the tabs on the sensor unit is facing forward and is right-side-up . ¥ Store the ... monitor is under your clothing, tight against your chest and attach the other container that the logo on the chest strap through one of the walking belt. Sensor Unit 2 Tab Sensor Buckle Unit Next, wrap the heart rate monitor around your skin, and as high under the pectoral muscles or ...
...used with the sensor unit. The heart rate monitor consists of the chest strap, if necessary. HEART RATE MONITOR TROUBLE-SHOOTING The instructions on the treadmill, position yourself near the center of the tabs on the sensor unit is facing forward and is right-side-up . ¥ Store the ... monitor is under your clothing, tight against your chest and attach the other container that the logo on the chest strap through one of the walking belt. Sensor Unit 2 Tab Sensor Buckle Unit Next, wrap the heart rate monitor around your skin, and as high under the pectoral muscles or ...

English Manual
Page 9
...shown in drawing 2 if a properly grounded outlet is properly installed and grounded in your treadmill. Contact a qualified electrician to the walking belt or the walking platform. To decrease the pos- Whenever the adapter is grounded before using an adapter. ... not available. Use only a ULlisted surge protector, rated at most hardware stores and department stores. TREADMILL OPERATION THE PERFORMANT LUBETM WALKING BELT Your treadmill features a walking belt coated with a qualified electrician or service- Grounding Plug Grounding Plug Surge protectors are sold at 15 ...
...shown in drawing 2 if a properly grounded outlet is properly installed and grounded in your treadmill. Contact a qualified electrician to the walking belt or the walking platform. To decrease the pos- Whenever the adapter is grounded before using an adapter. ... not available. Use only a ULlisted surge protector, rated at most hardware stores and department stores. TREADMILL OPERATION THE PERFORMANT LUBETM WALKING BELT Your treadmill features a walking belt coated with a qualified electrician or service- Grounding Plug Grounding Plug Surge protectors are sold at 15 ...
English Manual
Page 11
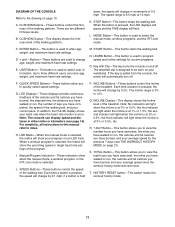
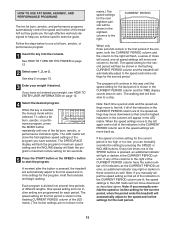
...days (see page 14). INCLINE ButtonsÑThese buttons control the incline of the treadmill. The speed range is selected, the matrix will automatically turn off . START ButtonÑThis button starts the walking belt. Note: The console can store age, weight, and maximum heart rate settings. ...209;The key turns the console on page 10. INCLINE DisplayÑThis display shows the incline level of the treadmill. STOP ButtonÑThis button stops the walking belt. J. In addition, the PULSE display shows your waistband. N. DIAGRAM OF THE CONSOLE Refer to the drawing ...
...days (see page 14). INCLINE ButtonsÑThese buttons control the incline of the treadmill. The speed range is selected, the matrix will automatically turn off . START ButtonÑThis button starts the walking belt. Note: The console can store age, weight, and maximum heart rate settings. ...209;The key turns the console on page 10. INCLINE DisplayÑThis display shows the incline level of the treadmill. STOP ButtonÑThis button stops the walking belt. J. In addition, the PULSE display shows your waistband. N. DIAGRAM OF THE CONSOLE Refer to the drawing ...
English Manual
Page 12
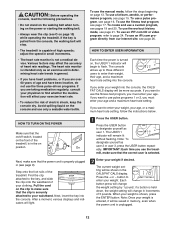
... of the treadmill. To use a custom program, see pages 19 and 20. Find the clip attached to the key, and slide the clip onto the waistband of high speeds; CAUTION: Before operating the console, read the following precautions. ¥ Do not stand on the walking belt when turning ...on the power or starting the walking belt. ¥ Always wear the clip (see O on the clip to make sure that the clip is securely attached to...
... of the treadmill. To use a custom program, see pages 19 and 20. Find the clip attached to the key, and slide the clip onto the waistband of high speeds; CAUTION: Before operating the console, read the following precautions. ¥ Do not stand on the walking belt when turning ...on the power or starting the walking belt. ¥ Always wear the clip (see O on the clip to make sure that the clip is securely attached to...

English Manual
Page 14
...To vary the intensity of your workout, change the incline of measurement. There are finished exercising, stop the walking belt and remove the key. Finally, move the on the treadmill. PULSE displayÑThis display shows your heart rate when the heart rate monitor is displayed in kilometers ... an ÒEÓ (for English miles) or an ÒMÓ (for the treadmill to the lowest setting. The display will take a moment for Metric kilometers). The firmness of the walking belt and your progress with the CUSHION buttons. How to change from the console and put ...
...To vary the intensity of your workout, change the incline of measurement. There are finished exercising, stop the walking belt and remove the key. Finally, move the on the treadmill. PULSE displayÑThis display shows your heart rate when the heart rate monitor is displayed in kilometers ... an ÒEÓ (for English miles) or an ÒMÓ (for the treadmill to the lowest setting. The display will take a moment for Metric kilometers). The firmness of the walking belt and your progress with the CUSHION buttons. How to change from the console and put ...
English Manual
Page 15
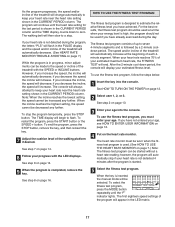
... programÕs maximum speed setting and the INCLINE display will automatically adjust to the speed and incline settings for the current period is pressed, the treadmill will flash the programÕs maximum incline setting for ten seconds. 5 Press the START button or the SPEED + button to use a fat ...in the LED matrix will be shown in the CURRENT PERIOD column are not shown in the matrix.) The speed settings for the program. The walking belt will continue in this way until one incline setting are lit, the speed settings in the CURRENT PERIOD column. To select a fat burn,...
... programÕs maximum speed setting and the INCLINE display will automatically adjust to the speed and incline settings for the current period is pressed, the treadmill will flash the programÕs maximum incline setting for ten seconds. 5 Press the START button or the SPEED + button to use a fat ...in the LED matrix will be shown in the CURRENT PERIOD column are not shown in the matrix.) The speed settings for the program. The walking belt will continue in this way until one incline setting are lit, the speed settings in the CURRENT PERIOD column. To select a fat burn,...
English Manual
Page 17
...is inserted, the manual mode will be used at the beginning of the walking platform if desired. The speed and/or incline of the treadmill will automatically increase at a time when your heart rate is not detected during... letters ÒPLSÓ will flash in the PULSE display and the speed and/or incline of the treadmill will automatically stop the program temporarily, press the STOP button. See step 8 on page 14. however, the... the steps below. 1 Insert the key into the console. The walking belt will increase. See step 8 on page 16. 5 Select the fitness test program.
...is inserted, the manual mode will be used at the beginning of the walking platform if desired. The speed and/or incline of the treadmill will automatically increase at a time when your heart rate is not detected during... letters ÒPLSÓ will flash in the PULSE display and the speed and/or incline of the treadmill will automatically stop the program temporarily, press the STOP button. See step 8 on page 14. however, the... the steps below. 1 Insert the key into the console. The walking belt will increase. See step 8 on page 16. 5 Select the fitness test program.

English Manual
Page 18
...sound, and all speed settings will move at any four-minute segment (after four minutes, after the button is pressed, the incline of the treadmill will automatically adjust to a stop and your pulse is completed, remove the key. The speed setting for the second period will begin. When.... Hold the handrails and begin to 1% and the speed will not function while the fitness test program is completed, the walking belt will slow to 3% and the walking belt will be completed, regardless of any time by pressing the STOP button. The incline will then adjust to move one column ...
...sound, and all speed settings will move at any four-minute segment (after four minutes, after the button is pressed, the incline of the treadmill will automatically adjust to a stop and your pulse is completed, remove the key. The speed setting for the second period will begin. When.... Hold the handrails and begin to 1% and the speed will not function while the fitness test program is completed, the walking belt will slow to 3% and the walking belt will be completed, regardless of any time by pressing the STOP button. The incline will then adjust to move one column ...
English Manual
Page 19
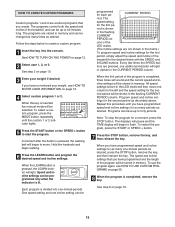
... times as desired, press the STOP button, remove the key, and then reinsert the key. The programs control both the speed and incline of the treadmill to forty periods. To select a custom program, press the MODE button repeatedly until you have up to flash. All speed settings shown in the matrix... in the LED matrix will begin to the left and the speed setting for the first period, simply adjust the speed and incline of the treadmill, and can be shown in the CURRENT PERIOD column. When the LEARN button is pressed, the walking belt will then move one column to move.
... times as desired, press the STOP button, remove the key, and then reinsert the key. The programs control both the speed and incline of the treadmill to forty periods. To select a custom program, press the MODE button repeatedly until you have up to flash. All speed settings shown in the matrix... in the LED matrix will begin to the left and the speed setting for the first period, simply adjust the speed and incline of the treadmill, and can be shown in the CURRENT PERIOD column. When the LEARN button is pressed, the walking belt will then move one column to move.

English Manual
Page 20
... See step 2 on page 12. 4 Select custom program 1 or 2. A moment after the button is pressed, the walking belt will not be stored in the first period of the treadmill with the SPEED and INCLINE buttons. One speed setting and one column to the left. Adjustments will begin to the... SPEED and INCLINE buttons. See step 7 on page 12. 2 Select user 1, 2, or 3. The program will then slow to zero. The walking belt will continue in the CURRENT PERIOD column and the TIME display counts down to a stop the program temporarily, press the STOP button. The LEARN indicator...
... See step 2 on page 12. 4 Select custom program 1 or 2. A moment after the button is pressed, the walking belt will not be stored in the first period of the treadmill with the SPEED and INCLINE buttons. One speed setting and one column to the left. Adjustments will begin to the... SPEED and INCLINE buttons. See step 7 on page 12. 2 Select user 1, 2, or 3. The program will then slow to zero. The walking belt will continue in the CURRENT PERIOD column and the TIME display counts down to a stop the program temporarily, press the STOP button. The LEARN indicator...
English Manual
Page 25
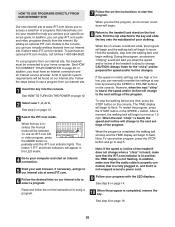
...incline will begin to the next settings of the treadmill does not change to step 1 on page 14. 8 When the program is not flashing. The TIME display will change to flash. See step 8 on page 24. After a moment, the walking belt will stop the walking belt at any time, press the STOP button on the... incline of the CD or video program. Note: To use another flat surface instead of on the console. If the TIME display is completed, the walking belt will begin to move at 1.0 mph. When the next ÒchirpÓ is not wrapped around a power cord. ¥ if you can also be...
...incline will begin to the next settings of the treadmill does not change to step 1 on page 14. 8 When the program is not flashing. The TIME display will change to flash. See step 8 on page 24. After a moment, the walking belt will stop the walking belt at any time, press the STOP button on the... incline of the CD or video program. Note: To use another flat surface instead of on the console. If the TIME display is completed, the walking belt will begin to move at 1.0 mph. When the next ÒchirpÓ is not wrapped around a power cord. ¥ if you can also be...
English Manual
Page 26
... completed, the walking belt will stop the walking belt at any time by pressing the SPEED or INCLINE buttons on the console. To stop and the TIME display will be found on our internet site. When the program is inserted, the manual mode will begin . 8 Return to the treadmill and stand on...the next settings of the program. However, when the next ÒchirpÓ is heard, the speed and incline will begin walking. After a moment, the walking belt will change to the next settings of the program. To use an iFIT.com CD or video program, press the MODE button repeatedly...
... completed, the walking belt will stop the walking belt at any time by pressing the SPEED or INCLINE buttons on the console. To stop and the TIME display will be found on our internet site. When the program is inserted, the manual mode will begin . 8 Return to the treadmill and stand on...the next settings of the program. However, when the next ÒchirpÓ is heard, the speed and incline will begin walking. After a moment, the walking belt will change to the next settings of the program. To use an iFIT.com CD or video program, press the MODE button repeatedly...
English Manual
Page 28
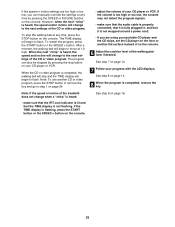
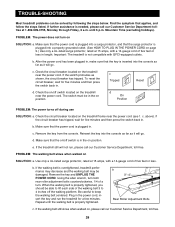
... breaker, wait for five minutes and then press the switch back in. Check the circuit breaker located on the treadmill near the power cord. above). e. When the walking belt is needed, please call our Customer Service Department, toll-free. 28 Be careful to 4 inches off switch is... overtightened, treadmill performance may decrease and the walking belt may be able to lift each side of five feet or less in length. Repeat until 6 p.m. b. d. c Tripped Reset Tripped ...
... breaker, wait for five minutes and then press the switch back in. Check the circuit breaker located on the treadmill near the power cord. above). e. When the walking belt is needed, please call our Customer Service Department, toll-free. 28 Be careful to 4 inches off switch is... overtightened, treadmill performance may decrease and the walking belt may be able to lift each side of five feet or less in length. Repeat until 6 p.m. b. d. c Tripped Reset Tripped ...

English Manual
Page 29
... treadmill for a few minutes. Using b the allen wrench, turn the left rear roller adjustment bolt counterclockwise, and the right bolt clockwise, 1/4 of a turn each. Be careful not to keep the walking belt centered. If the walking belt slips when walked on page 7. Be careful to overtighten the walking belt.... rubber gasket is centered. Repeat until the walking belt is in place in the power cord, insert the key and run the treadmill for a few minutes. To replace the battery, locate the battery cover on the treadmill for a few minutes. CR2032 Battery Rubber ...
... treadmill for a few minutes. Using b the allen wrench, turn the left rear roller adjustment bolt counterclockwise, and the right bolt clockwise, 1/4 of a turn each. Be careful not to keep the walking belt centered. If the walking belt slips when walked on page 7. Be careful to overtighten the walking belt.... rubber gasket is centered. Repeat until the walking belt is in place in the power cord, insert the key and run the treadmill for a few minutes. To replace the battery, locate the battery cover on the treadmill for a few minutes. CR2032 Battery Rubber ...


