

English Manual
Page 2
This product is attached in the center of Reebok. ¨ TABLE OF CONTENTS IMPORTANT PRECAUTIONS 3 BEFORE YOU BEGIN 5 HOW TO SET UP THE TREADMILL 6 HOW TO USE THE HEART RATE MONITOR 7 TREADMILL OPERATION 9 HOW TO FOLD AND MOVE THE TREADMILL 27 TROUBLE-SHOOTING 28 REEBOK UNIVERSITY 31 EXERCISE GUIDELINES 33 PART LIST 34 HOW TO ORDER REPLACEMENT PARTS 35 LIMITED WARRANTY Back Cover Note: An EXPLODED DRAWING is manufactured and distributed under license from Reebok International. 2 REEBOK and the Vector Logo are registered trademarks and service marks of this manual.
This product is attached in the center of Reebok. ¨ TABLE OF CONTENTS IMPORTANT PRECAUTIONS 3 BEFORE YOU BEGIN 5 HOW TO SET UP THE TREADMILL 6 HOW TO USE THE HEART RATE MONITOR 7 TREADMILL OPERATION 9 HOW TO FOLD AND MOVE THE TREADMILL 27 TROUBLE-SHOOTING 28 REEBOK UNIVERSITY 31 EXERCISE GUIDELINES 33 PART LIST 34 HOW TO ORDER REPLACEMENT PARTS 35 LIMITED WARRANTY Back Cover Note: An EXPLODED DRAWING is manufactured and distributed under license from Reebok International. 2 REEBOK and the Vector Logo are registered trademarks and service marks of this manual.

English Manual
Page 3
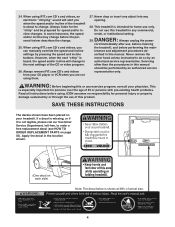
... /off switch to raise, lower, or move the treadmill. 21. Adjust the speed in small increments to ensure that the storage latch is properly set up. (See HOW TO SET UP THE TREADMILL on page 6 and HOW TO MOVE THE TREADMILL on page 27.) You must be on page 5 for the location of high speeds. Always remove the key, unplug the power cord and move the walking belt while the power is not...
... /off switch to raise, lower, or move the treadmill. 21. Adjust the speed in small increments to ensure that the storage latch is properly set up. (See HOW TO SET UP THE TREADMILL on page 6 and HOW TO MOVE THE TREADMILL on page 27.) You must be on page 5 for the location of high speeds. Always remove the key, unplug the power cord and move the walking belt while the power is not...
English Manual
Page 4
...; is especially important for home use of actual size. 4 tenance and adjustment procedures de- WARNING: Before beginning this or any opening. 28. 24. When using iFIT.com CDÕs and videos, you are not using them. 27. DANGER: 29. Never remove the motor hood unless instructed to the next settings of the CD or video program. 26. ICON assumes no responsibility for speed and/or incline changes. Apply the decal...
...; is especially important for home use of actual size. 4 tenance and adjustment procedures de- WARNING: Before beginning this or any opening. 28. 24. When using iFIT.com CDÕs and videos, you are not using them. 27. DANGER: 29. Never remove the motor hood unless instructed to the next settings of the CD or video program. 26. ICON assumes no responsibility for speed and/or incline changes. Apply the decal...
English Manual
Page 5
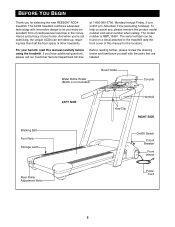
... parts that are labeled. For your home. If you Õre not exercising, the unique ACD4 can be folded up, requiring less than half the floor space of other treadmills. BEFORE YOU BEGIN Thank you for the location). The model number is not included) Book Holder Console LEFT SIDE Walking Belt Foot Rails Storage Latch Key/Clip Handrail RIGHT SIDE On/Off Switch Circuit Breaker Front Wheel Rear Roller Adjustment Bolts Power Cord...
... parts that are labeled. For your home. If you Õre not exercising, the unique ACD4 can be folded up, requiring less than half the floor space of other treadmills. BEFORE YOU BEGIN Thank you for the location). The model number is not included) Book Holder Console LEFT SIDE Walking Belt Foot Rails Storage Latch Key/Clip Handrail RIGHT SIDE On/Off Switch Circuit Breaker Front Wheel Rear Roller Adjustment Bolts Power Cord...

English Manual
Page 7
... electrode areas. Do not store the heart rate monitor in the PULSE display or if the displayed heart rate is excessively high or low, try moving it is comfortable. HOW TO USE THE HEART RATE MONITOR HOW TO PUT ON THE HEART RATE MONITOR HEART RATE MONITOR CARE AND MAINTENANCE Before you walk or run on the chest strapÑthe tab should be almost flush with the console. If the letters ÒPLS...
... electrode areas. Do not store the heart rate monitor in the PULSE display or if the displayed heart rate is excessively high or low, try moving it is comfortable. HOW TO USE THE HEART RATE MONITOR HOW TO PUT ON THE HEART RATE MONITOR HEART RATE MONITOR CARE AND MAINTENANCE Before you walk or run on the chest strapÑthe tab should be almost flush with the console. If the letters ÒPLS...

English Manual
Page 9
... be connected to a 2-pole receptacle as a properly grounded outlet box cover. The temporary adapter should malfunction or break down, grounding provides a path of least resistance for use a surge protector (not in - Whenever the adapter is not compatible with PERFORMANT LUBETM, a high-performance lubricant. Grounded Outlet Box Grounding Pin Treadmill Power Cord cluded) with a qualified electrician or service- Use only a ULlisted surge protector, rated at...
... be connected to a 2-pole receptacle as a properly grounded outlet box cover. The temporary adapter should malfunction or break down, grounding provides a path of least resistance for use a surge protector (not in - Whenever the adapter is not compatible with PERFORMANT LUBETM, a high-performance lubricant. Grounded Outlet Box Grounding Pin Treadmill Power Cord cluded) with a qualified electrician or service- Use only a ULlisted surge protector, rated at...

English Manual
Page 10
... face of the treadmill to keep your heart rate near target heart rate settings during your workouts; two pulse programs control the speed and the incline of the console, remove it. iFIT.com technology is in the manual mode, the speed, incline, and cushion level of the treadmill can be changed with a class and an instructorÑthe hottest new trend at www.iFIT.com and access basic programs, audio programs, and video programs directly from our internet...
... face of the treadmill to keep your heart rate near target heart rate settings during your workouts; two pulse programs control the speed and the incline of the console, remove it. iFIT.com technology is in the manual mode, the speed, incline, and cushion level of the treadmill can be changed with a class and an instructorÑthe hottest new trend at www.iFIT.com and access basic programs, audio programs, and video programs directly from our internet...
English Manual
Page 11
... LED track. HISTORY RESET buttonÑThis button resets the workout history mode. 11 B. START ButtonÑThis button starts the walking belt. Note: The console can store age, weight, and maximum heart rate settings. T. A. CUSHION DisplayÑThis display shows the firmness level of the treadmill. The speed range is worn. F. For simplicity, all instructions in this manual refer to 12%. The incline range is used to view the total hours you have exercised, the miles you...
... LED track. HISTORY RESET buttonÑThis button resets the workout history mode. 11 B. START ButtonÑThis button starts the walking belt. Note: The console can store age, weight, and maximum heart rate settings. T. A. CUSHION DisplayÑThis display shows the firmness level of the treadmill. The speed range is worn. F. For simplicity, all instructions in this manual refer to 12%. The incline range is used to view the total hours you have exercised, the miles you...
English Manual
Page 12
... key into the console. When your clothing. HOW TO TURN ON THE POWER Make sure that the power cord is held down, the weight setting will change in (see pages 19 and 20. if a button is properly plugged in increments of the treadmill, is not a medical device. To use the manual mode, follow the instructions below. If you want to use pulse programs 1 or 2, you want to flash. Press the USER button...
... key into the console. When your clothing. HOW TO TURN ON THE POWER Make sure that the power cord is held down, the weight setting will change in (see pages 19 and 20. if a button is properly plugged in increments of the treadmill, is not a medical device. To use the manual mode, follow the instructions below. If you want to use pulse programs 1 or 2, you want to flash. Press the USER button...

English Manual
Page 13
... the USER 1 indicator. When pulse programs 1 or 2 are 30 years old, your weight if desired. When the key is pressed, the walking belt will begin to start the walking belt. The display will be saved in increments of the SPEED buttons is inserted, user 1 will show the actual speed of 5 years. See HOW TO TURN ON THE POWER on page 12. 4 Select the manual mode. If you can be reset to move...
... the USER 1 indicator. When pulse programs 1 or 2 are 30 years old, your weight if desired. When the key is pressed, the walking belt will begin to start the walking belt. The display will be saved in increments of the SPEED buttons is inserted, user 1 will show the actual speed of 5 years. See HOW TO TURN ON THE POWER on page 12. 4 Select the manual mode. If you can be reset to move...
English Manual
Page 15
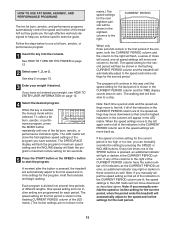
... seconds. 5 Press the START button or the SPEED + button to the speed and incline settings for each period. Note: Each time a period ends and the speed settings move to the speed and incline settings for the last period is divided into the console. HOW TO USE FAT BURN, AEROBIC, AND PERFORMANCE PROGRAMS The ten fat burn, aerobic, and performance programs automatically control the speed and incline of the treadmill as they guide you...
... seconds. 5 Press the START button or the SPEED + button to the speed and incline settings for each period. Note: Each time a period ends and the speed settings move to the speed and incline settings for the last period is divided into the console. HOW TO USE FAT BURN, AEROBIC, AND PERFORMANCE PROGRAMS The ten fat burn, aerobic, and performance programs automatically control the speed and incline of the treadmill as they guide you...

English Manual
Page 16
... key is pressed, the treadmill will automatically adjust to the first speed and incline settings for the first period will then move the on/off switch to the right. teen columns to the off position and unplug the power cord. HOW TO USE PULSE PROGRAMS 1 AND 2 Pulse programs 1 and 2 automatically control the speed and incline of tones will begin walking. To use pulse programs 1 or 2. 1 Insert the key into the console, the CALS/FAT CALS display...
... key is pressed, the treadmill will automatically adjust to the first speed and incline settings for the first period will then move the on/off switch to the right. teen columns to the off position and unplug the power cord. HOW TO USE PULSE PROGRAMS 1 AND 2 Pulse programs 1 and 2 automatically control the speed and incline of tones will begin walking. To use pulse programs 1 or 2. 1 Insert the key into the console, the CALS/FAT CALS display...
English Manual
Page 17
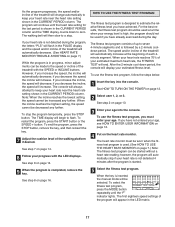
... program, press the STOP button, remove the key, and then reinsert the key. 7 Adjust the cushion level of the walking platform if desired. For the best results, the fitness test program should not be started . 9 When the program is shown in the PULSE display and the speed and/or incline of the treadmill will automatically decrease. (See HEART RATE MONITOR TROUBLE-SHOOTING on page 7.) While the program is used if you decrease the incline, the speed...
... program, press the STOP button, remove the key, and then reinsert the key. 7 Adjust the cushion level of the walking platform if desired. For the best results, the fitness test program should not be started . 9 When the program is shown in the PULSE display and the speed and/or incline of the treadmill will automatically decrease. (See HEART RATE MONITOR TROUBLE-SHOOTING on page 7.) While the program is used if you decrease the incline, the speed...

English Manual
Page 24
... console. Note: If the TIME display is inserted, the manual mode will not respond to your VCR. The treadmill will be prepared for the ÒchirpÓ and be selected. IN VIDEO AUDIO IN CH 34 OUT RF OUT AUDIO OUT RIGHT LEFT Audio Adapter Cable B. Next, remove the wire that is flashing. Follow the steps below . When the key is flashing, press the START button or the SPEED + button...
... console. Note: If the TIME display is inserted, the manual mode will not respond to your VCR. The treadmill will be prepared for the ÒchirpÓ and be selected. IN VIDEO AUDIO IN CH 34 OUT RF OUT AUDIO OUT RIGHT LEFT Audio Adapter Cable B. Next, remove the wire that is flashing. Follow the steps below . When the key is flashing, press the START button or the SPEED + button...
English Manual
Page 26
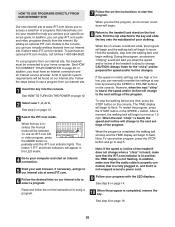
... the program, press the START button or the SPEED + button. After a moment, the walking belt will begin to move . Note: To use virtually endless features from our internet site, the treadmill must have an internet connection and an internet service provider. See step 8 on page 12. 2 Select user 1, 2, or 3. In addition, you can play iFIT.com audio and video programs directly from our internet site. 1 Insert the key into the console. In...
... the program, press the START button or the SPEED + button. After a moment, the walking belt will begin to move . Note: To use virtually endless features from our internet site, the treadmill must have an internet connection and an internet service provider. See step 8 on page 12. 2 Select user 1, 2, or 3. In addition, you can play iFIT.com audio and video programs directly from our internet site. 1 Insert the key into the console. In...
English Manual
Page 28
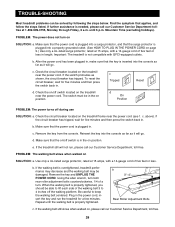
... treadmill still will go . b 3ÓÐ4Ó Rear Roller Adjustment Bolts c. Make sure that the power cord is plugged into the console as far as it will go . c Tripped Reset Tripped d On Position Reset PROBLEM: The power turns off the walking platform. Check the circuit breaker located on SOLUTION: a. d. When the walking belt is inserted into a surge protector, and that the key is properly tightened, you should be damaged. b. d. b. PROBLEM: The power...
... treadmill still will go . b 3ÓÐ4Ó Rear Roller Adjustment Bolts c. Make sure that the power cord is plugged into the console as far as it will go . c Tripped Reset Tripped d On Position Reset PROBLEM: The power turns off the walking platform. Check the circuit breaker located on SOLUTION: a. d. When the walking belt is inserted into a surge protector, and that the key is properly tightened, you should be damaged. b. d. b. PROBLEM: The power...

English Manual
Page 33
... with preexisting health problems. The heart rate monitor is too high or too low, adjust the speed or incline of exercise, your condition, complete three workouts each workout with 5 to strengthen your cardiovascular system, your exercise must exercise at least one day of time. 33 For aerobic exercise, adjust the speed or incline of time. After a few weeks of the treadmill until your heart rate is intended only as a guide. EXERCISE INTENSITY...
... with preexisting health problems. The heart rate monitor is too high or too low, adjust the speed or incline of exercise, your condition, complete three workouts each workout with 5 to strengthen your cardiovascular system, your exercise must exercise at least one day of time. 33 For aerobic exercise, adjust the speed or incline of time. After a few weeks of the treadmill until your heart rate is intended only as a guide. EXERCISE INTENSITY...

English Manual
Page 34
... Walking Belt Walking Platform Storage Knob Screw Storage Knob Shaft Storage Pin Spring Clip Storage Latch Insert Storage Knob Frame Rear Roller Adj. RBTL19991 R0700A To locate the parts listed below, refer to the EXPLODED DRAWING attached in the center of this manual. Bolt Allen Wrench Isolator Spacer Incline Motor Front Belly Pan Power Cord On/Off Switch Circuit Breaker Power Cord Grommet Incline Motor Shield Front Wheel Bolt Front Wheel Foam Grip (Right) Bumper Isolator Wire Harness Shock Stop Bracket Cushion Adjustment Motor Upright Endcap Upright Endcap Screw Rear...
... Walking Belt Walking Platform Storage Knob Screw Storage Knob Shaft Storage Pin Spring Clip Storage Latch Insert Storage Knob Frame Rear Roller Adj. RBTL19991 R0700A To locate the parts listed below, refer to the EXPLODED DRAWING attached in the center of this manual. Bolt Allen Wrench Isolator Spacer Incline Motor Front Belly Pan Power Cord On/Off Switch Circuit Breaker Power Cord Grommet Incline Motor Shield Front Wheel Bolt Front Wheel Foam Grip (Right) Bumper Isolator Wire Harness Shock Stop Bracket Cushion Adjustment Motor Upright Endcap Upright Endcap Screw Rear...

English Manual
Page 35
...; Wire Harness Rear Roller Cushion Rod Sensor Foam Pulse Receiver Receiver Bracket Wheel Sleeve Transformer Cushion Adj. Key No. For information about iFIT.com CDÕs or videocassettes, call toll-free 1-800-884-0620. For information about the iFIT.com module, call toll-free 1-800-735-0768 # These parts are not illustrated Specifications are optional. Nut 24Ó Reed Wire iFIT.com CD Console Base Side Screw Incline Stop Bracket Key No...
...; Wire Harness Rear Roller Cushion Rod Sensor Foam Pulse Receiver Receiver Bracket Wheel Sleeve Transformer Cushion Adj. Key No. For information about iFIT.com CDÕs or videocassettes, call toll-free 1-800-884-0620. For information about the iFIT.com module, call toll-free 1-800-735-0768 # These parts are not illustrated Specifications are optional. Nut 24Ó Reed Wire iFIT.com CD Console Base Side Screw Incline Stop Bracket Key No...

English Manual
Page 38
...; 2000 ICON Health & Fitness, Inc. The motor is VERY IMPORTANT THAT YOU READ THE MANUAL before operating the Product. USERÕS MANUALÑIt is covered for six months after the date of purchase. The belt and deck are covered for two years after the date of purchase. on how long an implied warranty lasts. LIMITED WARRANTY WHAT IS COVEREDÑThe entire REEBOK¨ ACD4...
...; 2000 ICON Health & Fitness, Inc. The motor is VERY IMPORTANT THAT YOU READ THE MANUAL before operating the Product. USERÕS MANUALÑIt is covered for six months after the date of purchase. The belt and deck are covered for two years after the date of purchase. on how long an implied warranty lasts. LIMITED WARRANTY WHAT IS COVEREDÑThe entire REEBOK¨ ACD4...


