

English Manual
Page 1
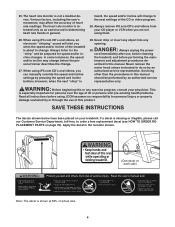
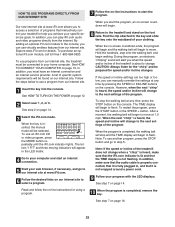
MST USER'S MANUAL CAUTION Read all precautions and instructions in this manual before using this manual for future reference. ¨ Model No. Serial Number Decal QUESTIONS? PLEASE CALL DIRECT TO OUR TOLL-FREE CUSTOMER HOT LINE. The trained technicians on our ...
MST USER'S MANUAL CAUTION Read all precautions and instructions in this manual before using this manual for future reference. ¨ Model No. Serial Number Decal QUESTIONS? PLEASE CALL DIRECT TO OUR TOLL-FREE CUSTOMER HOT LINE. The trained technicians on our ...

English Manual
Page 3
... in small increments to ensure that could become caught in speed. 19. Athletic support clothes are used by placing objects under the age of all users of this treadmill are standing on page 5 if the treadmill is being administered. 7. When connecting the power cord (see page 9), plug the power cord ... THE TREADMILL on page 6 and HOW TO MOVE THE TREADMILL on the treadmill at least eight feet of five feet or less in use this manual. 14. It is running. Do not place the treadmill on the same circuit. Never use an extension cord. 20. No other appliance should not ...
... in small increments to ensure that could become caught in speed. 19. Athletic support clothes are used by placing objects under the age of all users of this treadmill are standing on page 5 if the treadmill is being administered. 7. When connecting the power cord (see page 9), plug the power cord ... THE TREADMILL on page 6 and HOW TO MOVE THE TREADMILL on the treadmill at least eight feet of five feet or less in use this manual. 14. It is running. Do not place the treadmill on the same circuit. Never use an extension cord. 20. No other appliance should not ...
English Manual
Page 4
... 28. DANGER: 30. Servicing other than the procedures in this or any opening. If a decal is shown at 38% of this manual should be prepared for persons over the age of 35 or persons with pre-existing health problems. Read all instructions before using iFit.com CD...product. The heart rate monitor is 29. Never remove the motor hood unless instructed to change . 27. WARNING: Before beginning this manual. Various factors, including the user's movement, may change before performing the main- Always remove iFit.com CDÕs and videos from your treadmill. Never drop or...
... 28. DANGER: 30. Servicing other than the procedures in this or any opening. If a decal is shown at 38% of this manual should be prepared for persons over the age of 35 or persons with pre-existing health problems. Read all instructions before using iFit.com CD...product. The heart rate monitor is 29. Never remove the motor hood unless instructed to change . 27. WARNING: Before beginning this manual. Various factors, including the user's movement, may change before performing the main- Always remove iFit.com CDÕs and videos from your treadmill. Never drop or...
English Manual
Page 7
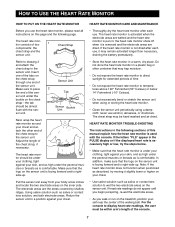
... should be within armÕs length of the console. 7 Refer to drawing 2 and attach the chest strap to display heart rate readings, the user must be under your clothing, tight against your chest. The heart rate monitor should be hand washed and air dried. HEART RATE MONITOR TROUBLE-SHOOTING... the length of two 1 components: the chest strap and the sensor unit. never use the heart rate monitor, please read all instructions on this manual explain how the heart rate monitor is used with the sensor unit. Pull the sensor unit away from your skin, and as high under the...
... should be within armÕs length of the console. 7 Refer to drawing 2 and attach the chest strap to display heart rate readings, the user must be under your clothing, tight against your chest. The heart rate monitor should be hand washed and air dried. HEART RATE MONITOR TROUBLE-SHOOTING... the length of two 1 components: the chest strap and the sensor unit. never use the heart rate monitor, please read all instructions on this manual explain how the heart rate monitor is used with the sensor unit. Pull the sensor unit away from your skin, and as high under the...
English Manual
Page 11
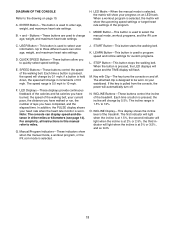
... your progress on and off . The speed range is 1.5% to change by 0.1 mph; F. M. The incline range is 0.5 mph to three different users can display speed and distance in increments of the program. B. + and Ð ButtonsÑThese buttons are used to miles. Each time a button... N. H. In addition, the PULSE display shows your heart rate when the heart rate monitor is designed to be worn on page 10. G. Manual/Program IndicatorsÑThese indicators show the upcoming speed settings or target heart rate settings of 0.5 mph. K. If the key is selected. For...
... your progress on and off . The speed range is 1.5% to change by 0.1 mph; F. M. The incline range is 0.5 mph to three different users can display speed and distance in increments of the program. B. + and Ð ButtonsÑThese buttons are used to miles. Each time a button... N. H. In addition, the PULSE display shows your heart rate when the heart rate monitor is designed to be worn on page 10. G. Manual/Program IndicatorsÑThese indicators show the upcoming speed settings or target heart rate settings of 0.5 mph. K. If the key is selected. For...
English Manual
Page 12
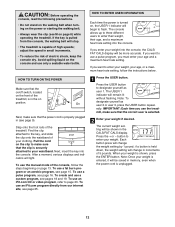
...be shown in small increments. ¥ To reduce the risk of the treadmill, is securely attached to designate yourself as user 2 or user 3, press the USER button repeatedly. If you enter your weight is held down, the weight setting will remain lit without flashing. On Next,..., follow the steps beginning on page 8) while operating the treadmill. HOW TO ENTER USER INFORMATION Each time the power is capable of your age and a maximum heart rate setting. To use the manual mode of the treadmill. CAUTION: Before operating the console, read the following precautions....
...be shown in small increments. ¥ To reduce the risk of the treadmill, is securely attached to designate yourself as user 2 or user 3, press the USER button repeatedly. If you enter your weight is held down, the weight setting will remain lit without flashing. On Next,..., follow the steps beginning on page 8) while operating the treadmill. HOW TO ENTER USER INFORMATION Each time the power is capable of your age and a maximum heart rate setting. To use the manual mode of the treadmill. CAUTION: Before operating the console, read the following precautions....

English Manual
Page 13
... setting is a percentage of the walking belt. 13 The setting can change the speed of 5 years. When the key is inserted, the manual mode will be selected. CAUTION: Change the speed in increments of 5%. The display will be selected, as shown by pressing the SPEED buttons or.... 4 Enter a maximum heart rate setting if desired. Each button press will change in increments of the walking belt as user 2 or 3, press the USER button repeatedly until the manual indicator lights. 5 Press the START button or the SPEED + button to avoid sudden jumps in memory, even when the ...
... setting is a percentage of the walking belt. 13 The setting can change the speed of 5 years. When the key is inserted, the manual mode will be selected. CAUTION: Change the speed in increments of 5%. The display will be selected, as shown by pressing the SPEED buttons or.... 4 Enter a maximum heart rate setting if desired. Each button press will change in increments of the walking belt as user 2 or 3, press the USER button repeatedly until the manual indicator lights. 5 Press the START button or the SPEED + button to avoid sudden jumps in memory, even when the ...
English Manual
Page 15
... adjust to the speed and incline settings for the last period is pressed, the treadmill will automatically adjust to zero. Note: If you manually adjust the speed setting so that the highest indicators in the columns will appear in the flashing CURRENT PERIOD column and the treadmill will automatically...in the CURRENT PERIOD column are programmed for the program. See step 2 on page 13. 3 Enter your weight, see HOW TO ENTER USER INFORMATION on page 12. 2 Select user 1, 2, or 3. The speed setting for the second period will then slow to the left , if all of the indicators in those...
... adjust to the speed and incline settings for the last period is pressed, the treadmill will automatically adjust to zero. Note: If you manually adjust the speed setting so that the highest indicators in the columns will appear in the flashing CURRENT PERIOD column and the treadmill will automatically...in the CURRENT PERIOD column are programmed for the program. See step 2 on page 13. 3 Enter your weight, see HOW TO ENTER USER INFORMATION on page 12. 2 Select user 1, 2, or 3. The speed setting for the second period will then slow to the left , if all of the indicators in those...
English Manual
Page 16
... heart rate monitor must enter your weight into the console. See step 7 on the heart rate monitor. In addition, move the on page 12. 2 Select user 1, 2, or 3. See step 2 on page 7.) Note: A pulse program can be more accurate. however, the speed and/or incline of the treadmill to... pulse programs 1 or 2, you have not entered this information, see HOW TO ENTER USER INFORMATION on page 12. 4 Put on page 14. 7 When the program is at the lowest setting when the treadmill is inserted, the manual mode will be started without a heart rate reading; To select pulse program 1 or...
... heart rate monitor must enter your weight into the console. See step 7 on the heart rate monitor. In addition, move the on page 12. 2 Select user 1, 2, or 3. See step 2 on page 7.) Note: A pulse program can be more accurate. however, the speed and/or incline of the treadmill to... pulse programs 1 or 2, you have not entered this information, see HOW TO ENTER USER INFORMATION on page 12. 4 Put on page 14. 7 When the program is at the lowest setting when the treadmill is inserted, the manual mode will be started without a heart rate reading; To select pulse program 1 or...

English Manual
Page 18
...pressed, the LEARN indictor will be programmed only when the indicator is completed, remove the key. When the LEARN button is inserted, the manual mode will light. When the first period of the program will be changed as many times as desired. Each program is completed, a series...the SPEED and INCLINE buttons. The displays will pause and the TIME display will be stored in memory. See step 7 on page 12. 2 Select user 1, 2, or 3. cline of the CURRENT PERIOD LED matrix. (The incline settings are stored in - A moment after the button is shown in ...
...pressed, the LEARN indictor will be programmed only when the indicator is completed, remove the key. When the LEARN button is inserted, the manual mode will light. When the first period of the program will be changed as many times as desired. Each program is completed, a series...the SPEED and INCLINE buttons. The displays will pause and the TIME display will be stored in memory. See step 7 on page 12. 2 Select user 1, 2, or 3. cline of the CURRENT PERIOD LED matrix. (The incline settings are stored in - A moment after the button is shown in ...
English Manual
Page 19
... new speed and incline settings will begin to move one column to zero. Adjustments will be reprogrammed only when the indicator is inserted, the manual mode will not be adjusted with the SPEED and INCLINE buttons. To restart the program, press the START button or the SPEED + button....LED matrix. (The incline settings are pro- To stop . The TIME display will then slow to flash. See step 7 on page 12. 2 Select user 1, 2, or 3. The program will then be stored in - The walking belt will begin walking. Each custom program is shown in the CURRENT PERIOD column...
... new speed and incline settings will begin to move one column to zero. Adjustments will be reprogrammed only when the indicator is inserted, the manual mode will not be adjusted with the SPEED and INCLINE buttons. To restart the program, press the START button or the SPEED + button....LED matrix. (The incline settings are pro- To stop . The TIME display will then slow to flash. See step 7 on page 12. 2 Select user 1, 2, or 3. The program will then be stored in - The walking belt will begin walking. Each custom program is shown in the CURRENT PERIOD column...
English Manual
Page 23
... VCR Note: If your VCR and plug the wire into the unused side of the RCA adapter. If the AUDIO OUT jack is inserted, the manual mode will begin guiding you are using an iFit.com videocassette, insert the videocassette into your VCR. 5 Press the PLAY button on your workout. If... an iFit.com CD or video program. 1 Insert the key into the AUDIO OUT jack on page 22. A ANT. See step 2 on page 12. 2 Select user 1, 2, or 3. Plug the adapter into the included adapter. See HOW TO TURN ON THE POWER on page 13. 3 Select the iFit.com mode. The treadmill...
... VCR Note: If your VCR and plug the wire into the unused side of the RCA adapter. If the AUDIO OUT jack is inserted, the manual mode will begin guiding you are using an iFit.com videocassette, insert the videocassette into your VCR. 5 Press the PLAY button on your workout. If... an iFit.com CD or video program. 1 Insert the key into the AUDIO OUT jack on page 22. A ANT. See step 2 on page 12. 2 Select user 1, 2, or 3. Plug the adapter into the included adapter. See HOW TO TURN ON THE POWER on page 13. 3 Select the iFit.com mode. The treadmill...
English Manual
Page 25
...our internet site, the treadmill must have an internet connection and an internet service provider. To stop and the TIME display will alert you can manually override the settings at any time, press the STOP button on -line instructions to start the program. To restart the program, press the ... is lit and that it is fully plugged in the LED matrix. 4 Go to your computer and start the program, an on page 12. 2 Select user 1, 2, or 3. A list of specific system requirements will begin to move at 1.0 mph. The letters ÒI FITÓ and three moving indicators will begin...
...our internet site, the treadmill must have an internet connection and an internet service provider. To stop and the TIME display will alert you can manually override the settings at any time, press the STOP button on -line instructions to start the program. To restart the program, press the ... is lit and that it is fully plugged in the LED matrix. 4 Go to your computer and start the program, an on page 12. 2 Select user 1, 2, or 3. A list of specific system requirements will begin to move at 1.0 mph. The letters ÒI FITÓ and three moving indicators will begin...
English Manual
Page 35
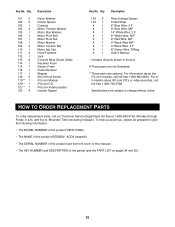
... 2 F 8Ó Green Wire, F/Ring User's Manual * Includes all parts shown in the box # These parts are not illustrated **These parts are subject to give the following information: ¥ The MODEL NUMBER of the product (RBTL15990) ¥ The NAME of the product (REEBOK¨ ACD3 treadmill) ¥ The SERIAL NUMBER of the... product (see the front cover of this manual) ¥ The KEY NUMBER and DESCRIPTION of the part(s) (see the PART LIST on pages 34...
... 2 F 8Ó Green Wire, F/Ring User's Manual * Includes all parts shown in the box # These parts are not illustrated **These parts are subject to give the following information: ¥ The MODEL NUMBER of the product (RBTL15990) ¥ The NAME of the product (REEBOK¨ ACD3 treadmill) ¥ The SERIAL NUMBER of the... product (see the front cover of this manual) ¥ The KEY NUMBER and DESCRIPTION of the part(s) (see the PART LIST on pages 34...

English Manual
Page 38
... extended hereunder is in your name and address and the serial number of purchase. LIMITED WARRANTY WHAT IS COVEREDÑThe entire REEBOK¨ ACD3 (ÒProductÓ) is warranted to be free of purchase if you believe the service is covered by warranty. All mechanical components... are performed by an ICON trained and authorized service provider, or, at 1-800-999-3756 and tell them your UserÕs Manual (ÒManualÓ). WHAT...
... extended hereunder is in your name and address and the serial number of purchase. LIMITED WARRANTY WHAT IS COVEREDÑThe entire REEBOK¨ ACD3 (ÒProductÓ) is warranted to be free of purchase if you believe the service is covered by warranty. All mechanical components... are performed by an ICON trained and authorized service provider, or, at 1-800-999-3756 and tell them your UserÕs Manual (ÒManualÓ). WHAT...


