
Uk Manual
Page 3
... page 6 and HOW TO MOVE THE TREADMILL on page 19.) You must be used or where oxygen is no longer than 1.5 meters. 2. Always remove the key, unplug the power cord and move the walking belt whilst the power is turned off position when the treadmill is not working properly.) 16. Never...
... page 6 and HOW TO MOVE THE TREADMILL on page 19.) You must be used or where oxygen is no longer than 1.5 meters. 2. Always remove the key, unplug the power cord and move the walking belt whilst the power is turned off position when the treadmill is not working properly.) 16. Never...
Uk Manual
Page 5
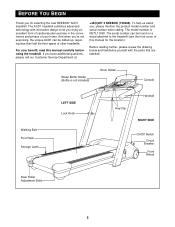
...you're not exercising, the unique ACD1 can be folded up, requiring less than half the floor space of other treadmills. The model number is not included) Book Holder Console Walking Belt Foot Rails Storage Latch LEFT SIDE Lock Knob Key/Clip Handrail RIGHT SIDE On/Off ...cover of this manual carefully before using the treadmill. The ACD1 treadmill combines advanced technology with the parts that are labelled. To help us assist you have additional questions, please call our Customer Service Department at +44(0)207 4 REEBOK (733265). For your home. Water Bottle Holder (Bottle...
...you're not exercising, the unique ACD1 can be folded up, requiring less than half the floor space of other treadmills. The model number is not included) Book Holder Console Walking Belt Foot Rails Storage Latch LEFT SIDE Lock Knob Key/Clip Handrail RIGHT SIDE On/Off ...cover of this manual carefully before using the treadmill. The ACD1 treadmill combines advanced technology with the parts that are labelled. To help us assist you have additional questions, please call our Customer Service Department at +44(0)207 4 REEBOK (733265). For your home. Water Bottle Holder (Bottle...
Uk Manual
Page 9
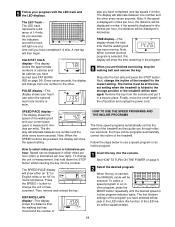
... when the incline is 0.5 mph to 10%. Each time a button is used to be worn on and off . Key with Clip-The key turns the console on your progress on page 8. If the key is 1.5% to 10 mph. The incline range is pulled from the console, the power will change by 0.5%. When a preset...
... when the incline is 0.5 mph to 10%. Each time a button is used to be worn on and off . Key with Clip-The key turns the console on your progress on page 8. If the key is 1.5% to 10 mph. The incline range is pulled from the console, the power will change by 0.5%. When a preset...
Uk Manual
Page 10
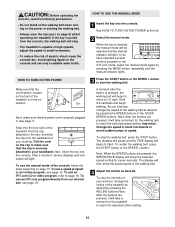
...the console, follow the steps beginning on page 10. After a moment, various displays and indicators will show the actual speed of high speeds; When the key is pressed, the walking belt will begin to your waistband. Hold the handrails and begin to start the walking belt. As you have selected a preset... reach the selected incline setting. 10 Find the clip attached to page 16. The display will light. HOW TO USE THE MANUAL MODE 1 Insert the key into the console. To use a speed program or an incline program, see I on the console and use the manual mode of the treadmill. To...
...the console, follow the steps beginning on page 10. After a moment, various displays and indicators will show the actual speed of high speeds; When the key is pressed, the walking belt will begin to your waistband. Hold the handrails and begin to start the walking belt. As you have selected a preset... reach the selected incline setting. 10 Find the clip attached to page 16. The display will light. HOW TO USE THE MANUAL MODE 1 Insert the key into the console. To use a speed program or an incline program, see I on the console and use the manual mode of the treadmill. To...
Uk Manual
Page 11
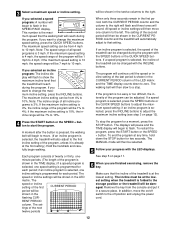
...the treadmill as they guide you through effective workouts; Follow the steps below to use a speed program or an incline program. 1 Insert the key into the console. The LED track represents a distance of calories and fat calories you exercise, the indicators around the track will be damaged....current pace (pace is measured in miles; Note: When the SPEED buttons are finished exercising, stop the walking belt and remove the key. When the key is folded to the other. 5 Follow your heart rate when the optional heart rate monitor is selected, this display will show either...
...the treadmill as they guide you through effective workouts; Follow the steps below to use a speed program or an incline program. 1 Insert the key into the console. The LED track represents a distance of calories and fat calories you exercise, the indicators around the track will be damaged....current pace (pace is measured in miles; Note: When the SPEED buttons are finished exercising, stop the walking belt and remove the key. When the key is folded to the other. 5 Follow your heart rate when the optional heart rate monitor is selected, this display will show either...
Uk Manual
Page 12
...the program at the first setting.) Hold the handrails and carefully begin to move. (If an incline program is folded to 10 mph. Remove the key from 4 mph to the storage position or the treadmill will then be damaged. This number is the maximum speed that the incline of all incline... step 5 on page 12). 4 Press the START button or the SPEED + button to flash in the flashing CUR- If you are finished exercising, remove the key. All speed or incline settings will continue until the speed or incline setting of the first CURRENT PERIOD period will be shown in the SPEED...
...the program at the first setting.) Hold the handrails and carefully begin to move. (If an incline program is folded to 10 mph. Remove the key from 4 mph to the storage position or the treadmill will then be damaged. This number is the maximum speed that the incline of all incline... step 5 on page 12). 4 Press the START button or the SPEED + button to flash in the flashing CUR- If you are finished exercising, remove the key. All speed or incline settings will continue until the speed or incline setting of the first CURRENT PERIOD period will be shown in the SPEED...
Uk Manual
Page 13
... demo mode. To select the information mode, hold down the STOP button whilst inserting the key into the console. To purchase the optional heart rate monitor, please call our Customer Service Department at +44(0)207 4 REEBOK (733265). This mode is in the CALS/FAT CALS display. button so the display is... number of miles that the walking belt has moved. When the console is in the demo mode, the power cord can be plugged in, the key can be changed by pressing the SPEED + button. The information mode also allows you to kilometres per hour. If a "d" appears in a preset sequence, ...
... demo mode. To select the information mode, hold down the STOP button whilst inserting the key into the console. To purchase the optional heart rate monitor, please call our Customer Service Department at +44(0)207 4 REEBOK (733265). This mode is in the CALS/FAT CALS display. button so the display is... number of miles that the walking belt has moved. When the console is in the demo mode, the power cord can be plugged in, the key can be changed by pressing the SPEED + button. The information mode also allows you to kilometres per hour. If a "d" appears in a preset sequence, ...
Uk Manual
Page 16
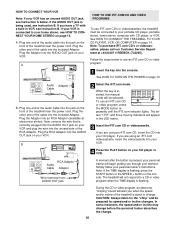
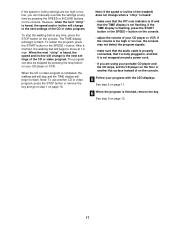
...OUT jack A moment after the button is flashing. Note: If the TIME display is currently plugged into an RCA Adaptor (available at +44(0)207 4 REEBOK (733265). In some instances, the speed and/or incline may change before the personal trainer describes the change . A ANT. Note: To purchase iFIT.com... CD into the included Adaptor. Follow the steps below . Audio Adaptor Cable B. To use an iFIT.com CD or video program. 1 Insert the key into the jack on the front of the treadmill near the power cord. The letters "I FIT" and three moving indicators will be prepared for the...
...OUT jack A moment after the button is flashing. Note: If the TIME display is currently plugged into an RCA Adaptor (available at +44(0)207 4 REEBOK (733265). In some instances, the speed and/or incline may change before the personal trainer describes the change . A ANT. Note: To purchase iFIT.com... CD into the included Adaptor. Follow the steps below . Audio Adaptor Cable B. To use an iFIT.com CD or video program. 1 Insert the key into the jack on the front of the treadmill near the power cord. The letters "I FIT" and three moving indicators will be prepared for the...
Uk Manual
Page 17
... the treadmill does not change when a "chirp" is heard: • make sure that the audio cable is properly connected, that it is finished, remove the key. If the TIME display is not flashing. See step 6 on the console. 5 Follow your CD player or VCR. If the speed or incline settings are... player and the CD skips, set the CD player on the floor or another CD or video program, press the STOP button or remove the key and go to step 1 on page 16. See step 5 on page 11. 6 When the program is not wrapped around a power cord. • if you can...
... the treadmill does not change when a "chirp" is heard: • make sure that the audio cable is properly connected, that it is finished, remove the key. If the TIME display is not flashing. See step 6 on the console. 5 Follow your CD player or VCR. If the speed or incline settings are... player and the CD skips, set the CD player on the floor or another CD or video program, press the STOP button or remove the key and go to step 1 on page 16. See step 5 on page 11. 6 When the program is not wrapped around a power cord. • if you can...
Uk Manual
Page 18
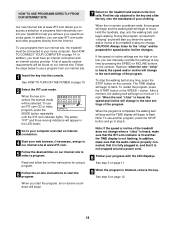
..., the manual mode will change when a "chirp" is heard, make sure that the audio cable is properly connected, that it is not flashing. When the key is about to help you start the program, an on the foot rails. When the on our internet site. During the program, an electronic "chirping... at any time, press the STOP button on page 10. 2 Select the iFIT.com mode. Note: To use a program from our internet site. 1 Insert the key into the console. See step 6 on page 14. Follow the steps below to step 5. To use programs from the internet. In addition, you when the...
..., the manual mode will change when a "chirp" is heard, make sure that the audio cable is properly connected, that it is not flashing. When the key is about to help you start the program, an on the foot rails. When the on our internet site. During the program, an electronic "chirping... at any time, press the STOP button on page 10. 2 Select the iFIT.com mode. Note: To use a program from our internet site. 1 Insert the key into the console. See step 6 on page 14. Follow the steps below to step 5. To use programs from the internet. In addition, you when the...
Uk Manual
Page 20
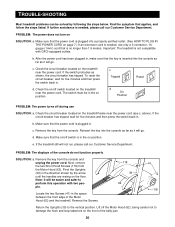
...Department. b. Check the circuit breaker located on the treadmill frame near the power cord. d. PROBLEM: The displays of the belly pan. 20 Remove the key from the Motor Hood (62). Note: It will not run, please call our Customer Service Department. If the switch protrudes as it will go ....the Uprights (39) to damage the hook and loop fasteners on the front of the console do not function properly SOLUTION: a. Remove the key from the console. TROUBLE-SHOOTING Most treadmill problems can be solved by the arrow until the handles are resting on the floor. If further ...
...Department. b. Check the circuit breaker located on the treadmill frame near the power cord. d. PROBLEM: The displays of the belly pan. 20 Remove the key from the Motor Hood (62). Note: It will not run, please call our Customer Service Department. If the switch protrudes as it will go ....the Uprights (39) to damage the hook and loop fasteners on the front of the console do not function properly SOLUTION: a. Remove the key from the console. TROUBLE-SHOOTING Most treadmill problems can be solved by the arrow until the handles are resting on the floor. If further ...
Uk Manual
Page 21
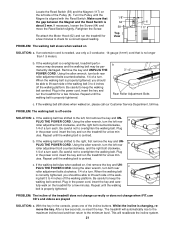
... walking belt may be permanently damaged. If the walking belt is centred. a PLUG THE POWER CORD. Be careful not to the right, first remove the key and UN- Using the allen wrench, turn the left rear roller adjustment bolt clockwise, and the right bolt counterclockwise, 1/4 of a turn each side of... return to the left side of a turn . If the walking belt has shifted to the minimum level. Plug in the power cord, insert the key and run the treadmill for a few minutes. If the walking belt has shifted to overtighten the walking belt. Using the allen wrench, turn both rear...
... walking belt may be permanently damaged. If the walking belt is centred. a PLUG THE POWER CORD. Be careful not to the right, first remove the key and UN- Using the allen wrench, turn the left rear roller adjustment bolt clockwise, and the right bolt counterclockwise, 1/4 of a turn each side of... return to the left side of a turn . If the walking belt has shifted to the minimum level. Plug in the power cord, insert the key and run the treadmill for a few minutes. If the walking belt has shifted to overtighten the walking belt. Using the allen wrench, turn both rear...
Uk Manual
Page 24
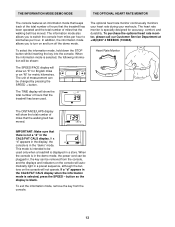
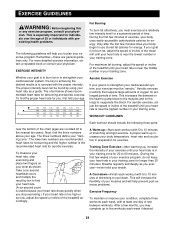
... the lowest number in preparation for fat burning and aerobic exercise. Whether your goal is to burn fat or to strengthen your cardiovascular system, the key to 10 minutes of time. Next, find your heart rate. (A six-second count is used because your training zone. A Warm-up increases your physician. A proper...
... the lowest number in preparation for fat burning and aerobic exercise. Whether your goal is to burn fat or to strengthen your cardiovascular system, the key to 10 minutes of time. Next, find your heart rate. (A six-second count is used because your training zone. A Warm-up increases your physician. A proper...
Uk Manual
Page 26
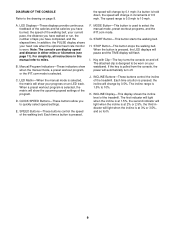
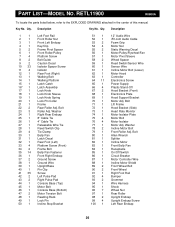
...Hood Bracket (Side) Heart Rate Monitor Motor Isolator Plate Motor Bolt Motor Isolator Motor Adj. Qty. Bolt Roller Adj. Description Key No. RETL11900 R0800A To locate the parts listed below, refer to the EXPLODED DRAWING attached in the center of this manual. ...Washer Incline Motor Bolt Front Roller Adj. Key No. Description 1 1 2 1 3 1 4 1 5 2 6 1 7 4 8 2 9 2 10 33 11 4 12 1 13 1 14 1 15 1 16* 1 17 1 18 1 19 1 20 1 21 1 22 2 23 3 24 1 25 1 26 1...
...Hood Bracket (Side) Heart Rate Monitor Motor Isolator Plate Motor Bolt Motor Isolator Motor Adj. Qty. Bolt Roller Adj. Description Key No. RETL11900 R0800A To locate the parts listed below, refer to the EXPLODED DRAWING attached in the center of this manual. ...Washer Incline Motor Bolt Front Roller Adj. Key No. Description 1 1 2 1 3 1 4 1 5 2 6 1 7 4 8 2 9 2 10 33 11 4 12 1 13 1 14 1 15 1 16* 1 17 1 18 1 19 1 20 1 21 1 22 2 23 3 24 1 25 1 26 1...

Uk Manual
Page 27
... Foam Pulse Receiver Magnet Short Hood Screw Power Cord Set iFIT.com CD iFIT.com Videocassette Isolator Spacer Rear Endcap Spacer Chest Strap Choke Bracket Key No. Qty. Key No.
... Foam Pulse Receiver Magnet Short Hood Screw Power Cord Set iFIT.com CD iFIT.com Videocassette Isolator Spacer Rear Endcap Spacer Chest Strap Choke Bracket Key No. Qty. Key No.

Uk Manual
Page 28
...HOW TO ORDER REPLACEMENT PARTS If you encounter any problems with this product, or if you need to order replacement parts, contact REEBOK Fitness Equipment at: Tel: +44 (0)207 4 REEBOK (733265), Fax: +44(0)207 816 3308, e-mail: [email protected] To help us assist you, please be prepared to ...give the following information: • The MODEL NUMBER of the product (RETL11900) • The NAME of the product (REEBOK® ACD1 treadmill) • The KEY NUMBER DESCRIPTION OF THE PART(S) (see the PART LIST on pages 26 and 27 of this manual). Part No. 165389 R0800A Printed in...
...HOW TO ORDER REPLACEMENT PARTS If you encounter any problems with this product, or if you need to order replacement parts, contact REEBOK Fitness Equipment at: Tel: +44 (0)207 4 REEBOK (733265), Fax: +44(0)207 816 3308, e-mail: [email protected] To help us assist you, please be prepared to ...give the following information: • The MODEL NUMBER of the product (RETL11900) • The NAME of the product (REEBOK® ACD1 treadmill) • The KEY NUMBER DESCRIPTION OF THE PART(S) (see the PART LIST on pages 26 and 27 of this manual). Part No. 165389 R0800A Printed in...
