
English Manual
Page 2
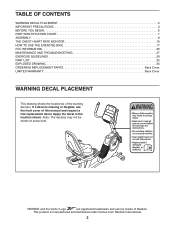
... trademarks and service marks of this manual and request a free replacement decal. If a decal is manufactured and distributed under license from Reebok International. 2 TABLE OF CONTENTS WARNING DECAL PLACEMENT 2 IMPORTANT PRECAUTIONS 3 BEFORE YOU BEGIN 6 PART IDENTIFICATION CHART 7 ASSEMBLY 8 THE CHEST HEART RATE MONITOR 16 HOW TO USE THE EXERCISE BIKE 17 FCC INFORMATION 26 MAINTENANCE AND TROUBLESHOOTING 27 EXERCISE GUIDELINES 29 PART LIST 32 EXPLODED DRAWING 34 ORDERING REPLACEMENT PARTS Back Cover LIMITED WARRANTY Back Cover WARNING...
... trademarks and service marks of this manual and request a free replacement decal. If a decal is manufactured and distributed under license from Reebok International. 2 TABLE OF CONTENTS WARNING DECAL PLACEMENT 2 IMPORTANT PRECAUTIONS 3 BEFORE YOU BEGIN 6 PART IDENTIFICATION CHART 7 ASSEMBLY 8 THE CHEST HEART RATE MONITOR 16 HOW TO USE THE EXERCISE BIKE 17 FCC INFORMATION 26 MAINTENANCE AND TROUBLESHOOTING 27 EXERCISE GUIDELINES 29 PART LIST 32 EXPLODED DRAWING 34 ORDERING REPLACEMENT PARTS Back Cover LIMITED WARRANTY Back Cover WARNING...
English Manual
Page 3
... the exercise bike indoors, away from moisture and dust. Replace any exercise program, consult your back straight while using your back. 14. It is especially important for home use the exercise bike in general. 13. Place the exercise bike on the exercise bike. The exercise bike should not be used by or through the use of this manual. 8. Over exercising may affect the accuracy of serious injury, read all parts regularly. ICON...
... the exercise bike indoors, away from moisture and dust. Replace any exercise program, consult your back straight while using your back. 14. It is especially important for home use the exercise bike in general. 13. Place the exercise bike on the exercise bike. The exercise bike should not be used by or through the use of this manual. 8. Over exercising may affect the accuracy of serious injury, read all parts regularly. ICON...
English Manual
Page 6
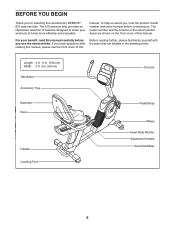
For your workouts at home more effective and enjoyable. BEFORE YOU BEGIN Thank you use the exercise bike. If you , note the product model number and serial number before you for selecting the revolutionary REEBOK® 610 exercise bike. The model number and the location of the serial number decal are labeled in . (69 cm) Handlebar Accessory Tray Backrest Seat Handle Leveling Foot Console Pedal/Strap Wheel Heart Rate Monitor Adjustment Handle Seat Handlebar 6 Length: 4 ft. 11 in...
For your workouts at home more effective and enjoyable. BEFORE YOU BEGIN Thank you use the exercise bike. If you , note the product model number and serial number before you for selecting the revolutionary REEBOK® 610 exercise bike. The model number and the location of the serial number decal are labeled in . (69 cm) Handlebar Accessory Tray Backrest Seat Handle Leveling Foot Console Pedal/Strap Wheel Heart Rate Monitor Adjustment Handle Seat Handlebar 6 Length: 4 ft. 11 in...
English Manual
Page 8
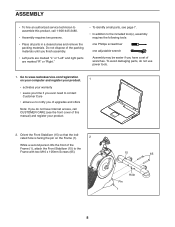
... assembly requires the following tools: one Phillips screwdriver one adjustable wrench Assembly may be easier if you do not use power tools. 1. To avoid damaging parts, do not have a set of wrenches. Orient the Front Stabilizer (15) so that the indi- cated hole is facing the pin on...of the Frame (1), attach the Front Stabilizer (15) to the Frame with two M10 x 105mm Screws (65). 15 65 Pin 1 Hole 8 ASSEMBLY •• To hire an authorized service technician to assemble this manual) and register your warranty •• saves you time if you ever need to contact Customer ...
... assembly requires the following tools: one Phillips screwdriver one adjustable wrench Assembly may be easier if you do not use power tools. 1. To avoid damaging parts, do not have a set of wrenches. Orient the Front Stabilizer (15) so that the indi- cated hole is facing the pin on...of the Frame (1), attach the Front Stabilizer (15) to the Frame with two M10 x 105mm Screws (65). 15 65 Pin 1 Hole 8 ASSEMBLY •• To hire an authorized service technician to assemble this manual) and register your warranty •• saves you time if you ever need to contact Customer ...
English Manual
Page 15
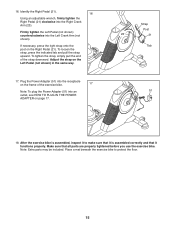
... HOW TO PLUG IN THE POWER ADAPTER on page 17. Identify the Right Pedal (21). 16 Using an adjustable wrench, firmly tighten the Right Pedal (21) clockwise into the Left Crank Arm (not shown). To loosen the strap, press the indicated tab and pull the strap upward. Strap Post 23 21 Tab 51 18. After the exercise bike is assembled, inspect it functions properly. Plug the Power Adapter (51) into...
... HOW TO PLUG IN THE POWER ADAPTER on page 17. Identify the Right Pedal (21). 16 Using an adjustable wrench, firmly tighten the Right Pedal (21) clockwise into the Left Crank Arm (not shown). To loosen the strap, press the indicated tab and pull the strap upward. Strap Post 23 21 Tab 51 18. After the exercise bike is assembled, inspect it functions properly. Plug the Power Adapter (51) into...

English Manual
Page 16
... the chest strap. If you are not displayed until you must be affected by shallow ridges. side-up. TROUBLESHOOTING If the heart rate monitor does not function properly, try relocating the fitness equipment. 16 Do not store the heart rate monitor in a warm, dry place. Sensor Buckle tor must be within arm’'s length of the console. •• If there is a battery cover on your chest...
... the chest strap. If you are not displayed until you must be affected by shallow ridges. side-up. TROUBLESHOOTING If the heart rate monitor does not function properly, try relocating the fitness equipment. 16 Do not store the heart rate monitor in a warm, dry place. Sensor Buckle tor must be within arm’'s length of the console. •• If there is a battery cover on your chest...
English Manual
Page 17
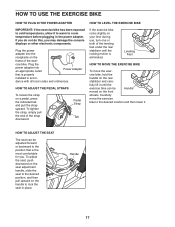
... the console displays or other electronic components. Leveling Feet HOW TO MOVE THE EXERCISE BIKE To move the exercise bike to the desired location and then lower it. To tighten the strap, simply pull the end of the exer- fully lift it to warm to room temperature before plugging in the power adapter. HOW TO USE THE EXERCISE BIKE HOW TO PLUG IN THE POWER ADAPTER HOW TO LEVEL THE EXERCISE BIKE IMPORTANT...
... the console displays or other electronic components. Leveling Feet HOW TO MOVE THE EXERCISE BIKE To move the exercise bike to the desired location and then lower it. To tighten the strap, simply pull the end of the exer- fully lift it to warm to room temperature before plugging in the power adapter. HOW TO USE THE EXERCISE BIKE HOW TO PLUG IN THE POWER ADAPTER HOW TO LEVEL THE EXERCISE BIKE IMPORTANT...
English Manual
Page 18
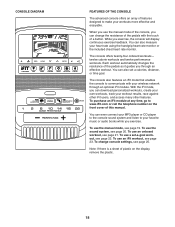
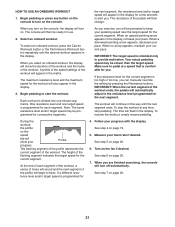
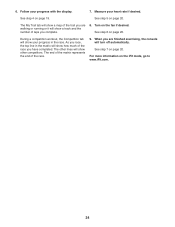
... a button. To use the sound system, see page 21. Each workout automatically changes the resistance of the pedals as it guides you exercise. To use a set a calories, distance, or time goal. To use the manual mode, see page 23. You can download personalized workouts, create your own workouts, track your wireless network through an effective workout. The console also features an iFit mode that enables the console to your workouts more effective and enjoyable. CONSOLE DIAGRAM...
... a button. To use the sound system, see page 21. Each workout automatically changes the resistance of the pedals as it guides you exercise. To use a set a calories, distance, or time goal. To use the manual mode, see page 23. You can download personalized workouts, create your own workouts, track your wireless network through an effective workout. The console also features an iFit mode that enables the console to your workouts more effective and enjoyable. CONSOLE DIAGRAM...
English Manual
Page 19
... iFit module is selected, this display mode will turn on the console. Calorie—-This tab will show a profile of the speed settings of the numbered Quick Resistance buttons. Press the Manual Control button on the console, the display will show the approximate amount of calories you pedal, change the resistance of the pedals by pressing the Resistance increase and decrease buttons or by pressing one of the workout. As you have burned. Resistance (Resist.)—-This display mode...
... iFit module is selected, this display mode will turn on the console. Calorie—-This tab will show a profile of the speed settings of the numbered Quick Resistance buttons. Press the Manual Control button on the console, the display will show the approximate amount of calories you pedal, change the resistance of the pedals by pressing the Resistance increase and decrease buttons or by pressing one of the workout. As you have burned. Resistance (Resist.)—-This display mode...
English Manual
Page 20
... you exercise, plug your audio cable into the jack on the console and into a jack on page 25 to turn off the fan. If there are finished exercising, the console will appear, and then your workout, simply resume pedaling. When your pulse is fully plugged in the display. Avoid moving your palms resting against the contacts. When you use the included chest heart rate monitor, see HOW TO CHANGE CONSOLE SETTINGS on...
... you exercise, plug your audio cable into the jack on the console and into a jack on page 25 to turn off the fan. If there are finished exercising, the console will appear, and then your workout, simply resume pedaling. When your pulse is fully plugged in the display. Avoid moving your palms resting against the contacts. When you use the included chest heart rate monitor, see HOW TO CHANGE CONSOLE SETTINGS on...
English Manual
Page 21
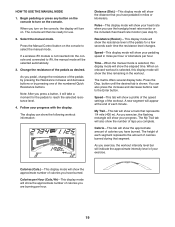
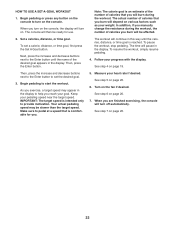
... resistance level and one target speed is divided into one-minute segments. Your actual pedaling speed may be ready for consecutive segments. During the workout, the profile on the speed tab will then be programmed for use. 2. See step 4 on page 20. 6. When you are finished exercising, the console will turn on the console. To select an onboard workout, press the Calorie Workouts button or the Performance Workouts button...
... resistance level and one target speed is divided into one-minute segments. Your actual pedaling speed may be ready for consecutive segments. During the workout, the profile on the speed tab will then be programmed for use. 2. See step 4 on page 20. 6. When you are finished exercising, the console will turn on the console. To select an onboard workout, press the Calorie Workouts button or the Performance Workouts button...
English Manual
Page 22
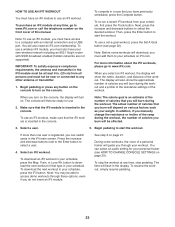
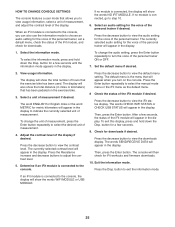
Set a calories, distance, or time goal. Next, press the increase and decrease buttons next to start the workout. Begin pedaling to the Enter button until the calories, distance, or time goal is intended only to turn off automatically. As you exercise, a target speed may be affected. In addition, if you manually change the resistance during the workout. To pause the workout, stop pedaling. Follow your goal. The console will be slower...
Set a calories, distance, or time goal. Next, press the increase and decrease buttons next to start the workout. Begin pedaling to the Enter button until the calories, distance, or time goal is intended only to turn off automatically. As you exercise, a target speed may be affected. In addition, if you manually change the resistance during the workout. To pause the workout, stop pedaling. Follow your goal. The console will be slower...
English Manual
Page 23
... an internet connection and a USB port. Select a user. 5. Begin pedaling to www.iFit.com or call the telephone number on . If more information about the iFit workouts, please go to start the workout. Select an iFit workout. To download an iFit workout in the display. See step 3 on the console, the display will guide you can select an audio setting for use an iFit workout, make sure that you must add them to turn on page...
... an internet connection and a USB port. Select a user. 5. Begin pedaling to www.iFit.com or call the telephone number on . If more information about the iFit workouts, please go to start the workout. Select an iFit workout. To download an iFit workout in the display. See step 3 on the console, the display will guide you can select an audio setting for use an iFit workout, make sure that you must add them to turn on page...
English Manual
Page 24
... a competition workout, the Competition tab will show your progress in the matrix will show how much of laps you are finished exercising, the console will show a track and the number of the race you race, the top line in the race. For more information on the fan if desired. Follow your heart rate if desired. Turn on the iFit mode, go...
... a competition workout, the Competition tab will show your progress in the matrix will show how much of laps you are finished exercising, the console will show a track and the number of the race you race, the top line in the race. For more information on the fan if desired. Follow your heart rate if desired. Turn on the iFit mode, go...
English Manual
Page 25
... audio setting for the voice of the personal trainer will then check for iFit workouts and firmware downloads. 10. button for the voice of the personal trainer. The display will show the total distance (in the display. 1. The display will also show the total number of hours that has been pedaled on the console. Press the Resistance increase and decrease buttons to view the default menu setting. Press the decrease button to adjust...
... audio setting for the voice of the personal trainer will then check for iFit workouts and firmware downloads. 10. button for the voice of the personal trainer. The display will show the total distance (in the display. 1. The display will also show the total number of hours that has been pedaled on the console. Press the Resistance increase and decrease buttons to view the default menu setting. Press the decrease button to adjust...
English Manual
Page 27
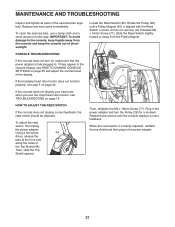
... REED SWITCH If the console does not display correct feedback, the reed switch should be adjusted. Locate the Reed Switch (46). To clean the exercise bike, use the chest heart rate monitor, see HOW TO CHANGE CONSOLE SETTINGS on , make sure that the power adapter is aligned with the Reed Switch. CONSOLE TROUBLESHOOTING If the console does not turn the Pulley (29) for a moment. Rotate the Pulley (29) until the console displays correct feedback. Repeat these actions until a Pulley Magnet (30) is fully plugged...
... REED SWITCH If the console does not display correct feedback, the reed switch should be adjusted. Locate the Reed Switch (46). To clean the exercise bike, use the chest heart rate monitor, see HOW TO CHANGE CONSOLE SETTINGS on , make sure that the power adapter is aligned with the Reed Switch. CONSOLE TROUBLESHOOTING If the console does not turn the Pulley (29) for a moment. Rotate the Pulley (29) until the console displays correct feedback. Repeat these actions until a Pulley Magnet (30) is fully plugged...
English Manual
Page 28
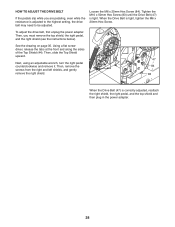
... drive belt, first unplug the power adapter. Tighten the M10 x 50mm Hex Screw (83) until the Drive Belt (47) is tight, tighten the M6 x 20mm Hex Screw. Then, remove the screws from the right and left shields, and gently remove the right shield. 47 84 83 When the Drive Belt (47) is adjusted to the highest setting, the drive belt may need to be adjusted. Then, you are pedaling, even while the resistance...
... drive belt, first unplug the power adapter. Tighten the M10 x 50mm Hex Screw (83) until the Drive Belt (47) is tight, tighten the M6 x 20mm Hex Screw. Then, remove the screws from the right and left shields, and gently remove the right shield. 47 84 83 When the Drive Belt (47) is adjusted to the highest setting, the drive belt may need to be adjusted. Then, you are pedaling, even while the resistance...
English Manual
Page 29
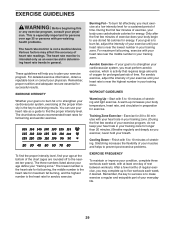
... the proper intensity is the key to 30 minutes with pre-existing health problems. The heart rate monitor is intended only as an exercise aid in determining heart rate trends in your training zone for longer than 20 minutes.) Breathe regularly and deeply as a guide to burn fat, adjust the intensity of your exercise program, do not keep your heart rate in preparation for persons over...
... the proper intensity is the key to 30 minutes with pre-existing health problems. The heart rate monitor is intended only as an exercise aid in determining heart rate trends in your training zone for longer than 20 minutes.) Breathe regularly and deeply as a guide to burn fat, adjust the intensity of your exercise program, do not keep your heart rate in preparation for persons over...
English Manual
Page 32
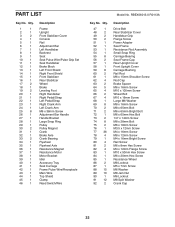
... Seat Seat Pulse Wire/Pulse Grip Set Seat Handlebar Brake Block Left Front Shield Right Front Shield Front Stabilizer Rear Stabilizer Wheel Brake Leveling Foot Right Handlebar Right Pedal/Strap Left Pedal/Strap Right Crank Arm Left Crank Arm M6 x 38mm Screw Adjustment Bar Handle Handle Bracket Large Snap Ring Pulley Pulley Magnet Crank Brake Axle Crank Bearing Flywheel Flywheel Axle Resistance Magnet Resistance Motor Motor Bracket Idler Accessory Tray Seat Carriage Frame Pulse Wire/Receptacle Main Wire Top Shield Clamp Reed Switch/Wire Model...
... Seat Seat Pulse Wire/Pulse Grip Set Seat Handlebar Brake Block Left Front Shield Right Front Shield Front Stabilizer Rear Stabilizer Wheel Brake Leveling Foot Right Handlebar Right Pedal/Strap Left Pedal/Strap Right Crank Arm Left Crank Arm M6 x 38mm Screw Adjustment Bar Handle Handle Bracket Large Snap Ring Pulley Pulley Magnet Crank Brake Axle Crank Bearing Flywheel Flywheel Axle Resistance Magnet Resistance Motor Motor Bracket Idler Accessory Tray Seat Carriage Frame Pulse Wire/Receptacle Main Wire Top Shield Clamp Reed Switch/Wire Model...

English Manual
Page 36
... a service center, freight charges to state. The warranty extended hereunder is authorized by ICON. Labor is warranted for one of this manual) LIMITED WARRANTY IMPORTANT: To protect your fitness equipment with respect to the terms set forth above limitation may not apply to provide the following information when contacting us: •• the model number and serial number of the product (see the front cover...
... a service center, freight charges to state. The warranty extended hereunder is authorized by ICON. Labor is warranted for one of this manual) LIMITED WARRANTY IMPORTANT: To protect your fitness equipment with respect to the terms set forth above limitation may not apply to provide the following information when contacting us: •• the model number and serial number of the product (see the front cover...


