
English Manual
Page 2
.... 2 Misuse of this machine may not be used on or around machine. TABLE OF CONTENTS WARNING DECAL PLACEMENT 2 IMPORTANT PRECAUTIONS 3 BEFORE YOU BEGIN 6 PART IDENTIFICATION CHART 7 ASSEMBLY 8 HOW TO USE THE EXERCISE BIKE 16 FCC INFORMATION 25 MAINTENANCE AND TROUBLESHOOTING 26 EXERCISE GUIDELINES 27 PART LIST 30 EXPLODED DRAWING 31 ORDERING REPLACEMENT PARTS Back Cover LIMITED WARRANTY Back Cover WARNING DECAL PLACEMENT This drawing shows the location(s) of Reebok. Note: The decal(s) may...
.... 2 Misuse of this machine may not be used on or around machine. TABLE OF CONTENTS WARNING DECAL PLACEMENT 2 IMPORTANT PRECAUTIONS 3 BEFORE YOU BEGIN 6 PART IDENTIFICATION CHART 7 ASSEMBLY 8 HOW TO USE THE EXERCISE BIKE 16 FCC INFORMATION 25 MAINTENANCE AND TROUBLESHOOTING 26 EXERCISE GUIDELINES 27 PART LIST 30 EXPLODED DRAWING 31 ORDERING REPLACEMENT PARTS Back Cover LIMITED WARRANTY Back Cover WARNING DECAL PLACEMENT This drawing shows the location(s) of Reebok. Note: The decal(s) may...
English Manual
Page 3
... exercising, stop immediately and cool down. 3 do not arch your physician. Over exercising may affect the accuracy of all parts regularly. ICON assumes no responsibility for persons over age 35 or persons with at all times. 9. Always wear athletic shoes for home use the exercise bike in a garage or covered patio, or near water. 6. Inspect and properly tighten all precautions. 2. The heart rate monitor...
... exercising, stop immediately and cool down. 3 do not arch your physician. Over exercising may affect the accuracy of all parts regularly. ICON assumes no responsibility for persons over age 35 or persons with at all times. 9. Always wear athletic shoes for home use the exercise bike in a garage or covered patio, or near water. 6. Inspect and properly tighten all precautions. 2. The heart rate monitor...
English Manual
Page 6
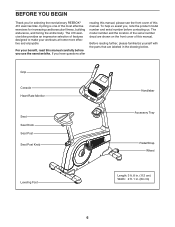
... Console Heart Rate Monitor Seat Seat Knob Seat Post Seat Post Knob Handlebar Accessory Tray Pedal/Strap Wheel Leveling Foot Length: 3 ft. 8 in. (112 cm) Width: 2 ft. 1 in the drawing below. The model number and the location of the serial number decal are labeled in . (64 cm) 6 The 410 exercise bike provides an impressive selection of this manual, please see the front cover of the most effective exercises for selecting the revolutionary REEBOK® 410 exercise bike...
... Console Heart Rate Monitor Seat Seat Knob Seat Post Seat Post Knob Handlebar Accessory Tray Pedal/Strap Wheel Leveling Foot Length: 3 ft. 8 in. (112 cm) Width: 2 ft. 1 in the drawing below. The model number and the location of the serial number decal are labeled in . (64 cm) 6 The 410 exercise bike provides an impressive selection of this manual, please see the front cover of the most effective exercises for selecting the revolutionary REEBOK® 410 exercise bike...
English Manual
Page 8
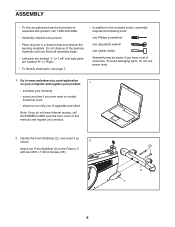
... service technician to assemble this manual) and register your warranty •• saves you time if you ever need to contact Customer Care •• allows us to notify you of upgrades and offers Note: If you have Internet access, call 1-800-445-2480. •• Assembly requires two persons. •• Place all assembly steps. •• Left parts...
... service technician to assemble this manual) and register your warranty •• saves you time if you ever need to contact Customer Care •• allows us to notify you of upgrades and offers Note: If you have Internet access, call 1-800-445-2480. •• Assembly requires two persons. •• Place all assembly steps. •• Left parts...

English Manual
Page 12
... wire into the Upright (4) or into the Seat Bracket (30) inside the Seat Carriage (24). 9 Next, set the Seat Carriage (24) on the Seat Post (6). While a second person holds the Console (13) near the Upright (4), connect the Main Wire (58) 10 and the Receiver Wire (59) to the matching wires on the Console (13) downward through the large opening in the Upright (4). Remove the Seat Knob (26) from the Seat...
... wire into the Upright (4) or into the Seat Bracket (30) inside the Seat Carriage (24). 9 Next, set the Seat Carriage (24) on the Seat Post (6). While a second person holds the Console (13) near the Upright (4), connect the Main Wire (58) 10 and the Receiver Wire (59) to the matching wires on the Console (13) downward through the large opening in the Upright (4). Remove the Seat Knob (26) from the Seat...

English Manual
Page 13
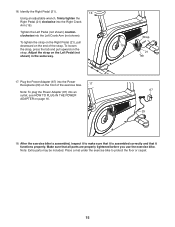
Attach the Console (13) to the indicated wire on the Console (13). start all four Screws, and then tighten them. 5 63 61 63 Avoid pinching the wires Wire 4 13 Tip: Avoid pinching the wires. Have a second person hold the Handlebar (5) near the Upright (4). 12 13 Connect the Pulse Wire (61) to the Upright (4) with four M8 x 16mm Screws (63); Tip: Avoid pinching the wires. 11. Attach the Handlebar (5) to the Upright (4) with four M4 x 11 16mm Screws (34). 13 34 4 Avoid pinching the wires 12.
Attach the Console (13) to the indicated wire on the Console (13). start all four Screws, and then tighten them. 5 63 61 63 Avoid pinching the wires Wire 4 13 Tip: Avoid pinching the wires. Have a second person hold the Handlebar (5) near the Upright (4). 12 13 Connect the Pulse Wire (61) to the Upright (4) with four M8 x 16mm Screws (63); Tip: Avoid pinching the wires. 11. Attach the Handlebar (5) to the Upright (4) with four M4 x 11 16mm Screws (34). 13 34 4 Avoid pinching the wires 12.
English Manual
Page 15
... the Right Pedal (21). 16 Using an adjustable wrench, firmly tighten the Right Pedal (21) clockwise into the Left Crank Arm (not shown). Plug the Power Adapter (67) into an outlet, see HOW TO PLUG IN THE POWER ADAPTER on the front of the strap. Place a mat under the exercise bike to make sure that it is assembled correctly and that all parts are properly tightened before you use the exercise bike.
... the Right Pedal (21). 16 Using an adjustable wrench, firmly tighten the Right Pedal (21) clockwise into the Left Crank Arm (not shown). Plug the Power Adapter (67) into an outlet, see HOW TO PLUG IN THE POWER ADAPTER on the front of the strap. Place a mat under the exercise bike to make sure that it is assembled correctly and that all parts are properly tightened before you use the exercise bike.
English Manual
Page 16
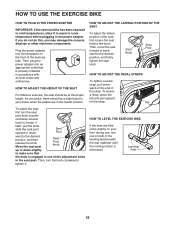
... local codes and ordinances. Leveling Feet 16 Seat Knob Seat Post HOW TO ADJUST THE PEDAL STRAPS To tighten a pedal strap, pull down - Move the seat post Seat Post Knob up or down slightly to room temperature before plugging in the power adapter. If you do not do this, you pedal, there should be a slight bend in your floor during use, turn the seat post knob counter- As you may damage the console displays...
... local codes and ordinances. Leveling Feet 16 Seat Knob Seat Post HOW TO ADJUST THE PEDAL STRAPS To tighten a pedal strap, pull down - Move the seat post Seat Post Knob up or down slightly to room temperature before plugging in the power adapter. If you do not do this, you pedal, there should be a slight bend in your floor during use, turn the seat post knob counter- As you may damage the console displays...
English Manual
Page 17
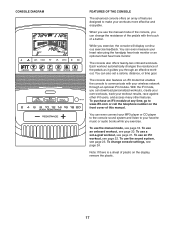
... the touch of a button. You can even measure your favorite music or audio books while you exercise, the console will display continuous exercise feedback. To change the resistance of the pedals with your workouts more effective and enjoyable. While you exercise. The console also offers twenty-two onboard workouts. The console also features an iFit mode that enables the console to your heart rate using the handgrip heart rate monitor or an optional chest heart rate monitor.
... the touch of a button. You can even measure your favorite music or audio books while you exercise, the console will display continuous exercise feedback. To change the resistance of the pedals with your workouts more effective and enjoyable. While you exercise. The console also offers twenty-two onboard workouts. The console also features an iFit mode that enables the console to your heart rate using the handgrip heart rate monitor or an optional chest heart rate monitor.

English Manual
Page 18
... the resistance level changes. When an onboard workout is selected, this display mode will be ready for a few seconds each minute. button until the desired tab is not inserted into the console and connected to reach the selected resistance level. 4. The My Trail tab will show the number of the pedals for use the handgrip heart rate monitor or an optional chest heart rate monitor (see step 5). As you exercise, the...
... the resistance level changes. When an onboard workout is selected, this display mode will be ready for a few seconds each minute. button until the desired tab is not inserted into the console and connected to reach the selected resistance level. 4. The My Trail tab will show the number of the pedals for use the handgrip heart rate monitor or an optional chest heart rate monitor (see step 5). As you exercise, the...

English Manual
Page 19
... contacts tightly. never use both heart rate monitors at the top of the display will be reset. 19 If necessary, press the Home button again. ping the contacts tightly. To resume your heart rate will show your heart rate, make sure that your heart rate using a soft cloth; If necessary, press the Home button again. When your pulse is connected, the wireless symbol at the same time, the console will turn off automatically...
... contacts tightly. never use both heart rate monitors at the top of the display will be reset. 19 If necessary, press the Home button again. ping the contacts tightly. To resume your heart rate will show your heart rate, make sure that your heart rate using a soft cloth; If necessary, press the Home button again. When your pulse is connected, the wireless symbol at the same time, the console will turn off automatically...

English Manual
Page 20
... automatically adjust to start the workout. Each workout is programmed for If the resistance level for consecutive segments. As you exercise, you select an onboard workout, the display will also appear in the matrix. The maximum resistance level and the maximum speed for use. 2. When no arrow appears, maintain your pedaling speed. To resume the workout, simply resume pedaling. 4. See step 5 on the console. HOW TO USE AN ONBOARD WORKOUT 1.
... automatically adjust to start the workout. Each workout is programmed for If the resistance level for consecutive segments. As you exercise, you select an onboard workout, the display will also appear in the matrix. The maximum resistance level and the maximum speed for use. 2. When no arrow appears, maintain your pedaling speed. To resume the workout, simply resume pedaling. 4. See step 5 on the console. HOW TO USE AN ONBOARD WORKOUT 1.
English Manual
Page 21
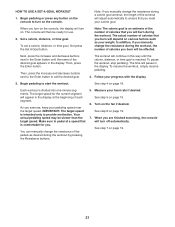
... Enter button. See step 6 on the console. HOW TO USE A SET-A-GOAL WORKOUT 1. Begin pedaling or press any button on the console, the display will continue in the display at a speed that you burn will be ready for you exercise, keep your calorie goal. To pause the workout, stop pedaling. The time will turn on page 19. 7. Your actual pedaling speed may be slower than the target speed. You can manually change the resistance...
... Enter button. See step 6 on the console. HOW TO USE A SET-A-GOAL WORKOUT 1. Begin pedaling or press any button on the console, the display will continue in the display at a speed that you burn will be ready for you exercise, keep your calorie goal. To pause the workout, stop pedaling. The time will turn on page 19. 7. Your actual pedaling speed may be slower than the target speed. You can manually change the resistance...
English Manual
Page 22
... CHANGE CONSOLE SETTINGS on page 20. You can switch users in the display. When you can select an audio setting for use the demo workouts, remove the iFit module from your personal trainer (see www.iFit.com. You will turn on the console, the display will also need an iFit.com membership. The iFit main screen will flash in the iFit main screen. Press the increase and decrease buttons next to the Enter button to start...
... CHANGE CONSOLE SETTINGS on page 20. You can switch users in the display. When you can select an audio setting for use the demo workouts, remove the iFit module from your personal trainer (see www.iFit.com. You will turn on the console, the display will also need an iFit.com membership. The iFit main screen will flash in the iFit main screen. Press the increase and decrease buttons next to the Enter button to start...

English Manual
Page 23
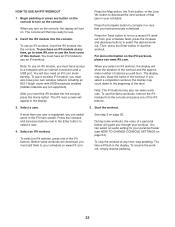
... a track and the number of the race you complete. Adjust the volume level using the volume increase and decrease buttons on the console or the volume control on page 19. 8. THE OPTIONAL CHEST HEART RATE MONITOR Whether your goal is to burn fat or to strengthen your workouts. For more information on page 18. HOW TO USE THE SOUND SYSTEM See step 4 on the iFit mode, go...
... a track and the number of the race you complete. Adjust the volume level using the volume increase and decrease buttons on the console or the volume control on page 19. 8. THE OPTIONAL CHEST HEART RATE MONITOR Whether your goal is to burn fat or to strengthen your workouts. For more information on page 18. HOW TO USE THE SOUND SYSTEM See step 4 on the iFit mode, go...
English Manual
Page 24
... NO IFIT MODULE. To change the audio setting, press the Enter button repeatedly to indicate the currently selected unit of the personal trainer if desired. Press the decrease button to view the contrast level. If no module is connected, the display will show the total distance (in the display. 1. Select a unit of the personal trainer will appear in miles or kilometers) that the exercise bike has been used. Adjust...
... NO IFIT MODULE. To change the audio setting, press the Enter button repeatedly to indicate the currently selected unit of the personal trainer if desired. Press the decrease button to view the contrast level. If no module is connected, the display will show the total distance (in the display. 1. Select a unit of the personal trainer will appear in miles or kilometers) that the exercise bike has been used. Adjust...
English Manual
Page 26
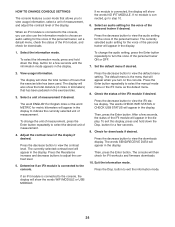
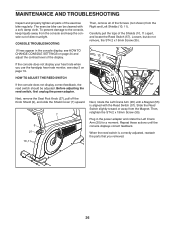
... exercise bike can be adjusted. If lines appear in the power adapter and rotate the Left Crank Arm (20) for a moment. HOW TO ADJUST THE REED SWITCH If the console does not display correct feedback, the reed switch should be cleaned with the Reed Switch (57). Plug in the console display, see HOW TO CHANGE CONSOLE SETTINGS on page 19. Repeat these actions until a Magnet (55) is correctly adjusted, reattach the parts that you use...
... exercise bike can be adjusted. If lines appear in the power adapter and rotate the Left Crank Arm (20) for a moment. HOW TO ADJUST THE REED SWITCH If the console does not display correct feedback, the reed switch should be cleaned with the Reed Switch (57). Plug in the console display, see HOW TO CHANGE CONSOLE SETTINGS on page 19. Repeat these actions until a Magnet (55) is correctly adjusted, reattach the parts that you use...

English Manual
Page 27
... heart rate for maximum fat burning, and the highest number is near the middle number in your training zone. (During the first few minutes of the chart (ages are essential for successful results. For aerobic exercise, adjust the intensity of exercise does your body begin to plan your training zone. WORKOUT GUIDELINES Warming Up—-Start with your heart rate near the highest number in your exercise program...
... heart rate for maximum fat burning, and the highest number is near the middle number in your training zone. (During the first few minutes of the chart (ages are essential for successful results. For aerobic exercise, adjust the intensity of exercise does your body begin to plan your training zone. WORKOUT GUIDELINES Warming Up—-Start with your heart rate near the highest number in your exercise program...

English Manual
Page 30
... 3 1 Rear Stabilizer 4 1 Upright 5 1 Handlebar 6 1 Seat Post 7 1 Shield Cover 8 1 Accessory Tray 9 1 Knob Shield 10 1 Right Shield 11 1 Left Shield 12 1 Front Console Cover 13 1 Console 14 1 Lower Handlebar Cover 15 1 Rear Console Cover 16 1 Upper Handlebar Cover 17 2 Wheel 18 2 M10 x 62mm Bolt 19 1 Right Crank Arm 20 1 Left Crank Arm 21 1 Right Pedal/Strap 22 1 Left Pedal/Strap 23 1 Seat 24 1 Seat Carriage 25 2 #8 x 22mm Screw 26 1 Seat Knob 27 1 Seat Post Knob 28 1 Seat Post Sleeve 29 1 Power Receptacle/Wire 30...
... 3 1 Rear Stabilizer 4 1 Upright 5 1 Handlebar 6 1 Seat Post 7 1 Shield Cover 8 1 Accessory Tray 9 1 Knob Shield 10 1 Right Shield 11 1 Left Shield 12 1 Front Console Cover 13 1 Console 14 1 Lower Handlebar Cover 15 1 Rear Console Cover 16 1 Upper Handlebar Cover 17 2 Wheel 18 2 M10 x 62mm Bolt 19 1 Right Crank Arm 20 1 Left Crank Arm 21 1 Right Pedal/Strap 22 1 Left Pedal/Strap 23 1 Seat 24 1 Seat Carriage 25 2 #8 x 22mm Screw 26 1 Seat Knob 27 1 Seat Post Knob 28 1 Seat Post Sleeve 29 1 Power Receptacle/Wire 30...
English Manual
Page 32
... cover of this manual) •• the key number and description of the replacement part(s) (see the PART LIST and the EXPLODED DRAWING near the end of this warranty is not responsible or liable for a minimal trip charge. The warranty extended hereunder is authorized by ICON. ICON Health & Fitness, Inc., 1500 S. 1000 W., Logan, UT 84321-9813 Part No. 341725 R0113A Printed in connection with an extended service...
... cover of this manual) •• the key number and description of the replacement part(s) (see the PART LIST and the EXPLODED DRAWING near the end of this warranty is not responsible or liable for a minimal trip charge. The warranty extended hereunder is authorized by ICON. ICON Health & Fitness, Inc., 1500 S. 1000 W., Logan, UT 84321-9813 Part No. 341725 R0113A Printed in connection with an extended service...


