
English Manual
Page 2
This product is attached in the center of Reebok. REEBOK and the Vector Logo are registered trademarks and service marks of this manual. ¨ TABLE OF CONTENTS IMPORTANT PRECAUTIONS 3 BEFORE YOU BEGIN 5 ASSEMBLY 6 TREADMILL OPERATION 8 HOW TO FOLD AND MOVE THE TREADMILL 24 TROUBLESHOOTING 26 EXERCISE GUIDELINES 28 PART LIST 30 HOW TO ORDER REPLACEMENT PARTS 31 LIMITED WARRANTY Back Cover Note: An EXPLODED DRAWING is manufactured and distributed under license from Reebok International. 2
This product is attached in the center of Reebok. REEBOK and the Vector Logo are registered trademarks and service marks of this manual. ¨ TABLE OF CONTENTS IMPORTANT PRECAUTIONS 3 BEFORE YOU BEGIN 5 ASSEMBLY 6 TREADMILL OPERATION 8 HOW TO FOLD AND MOVE THE TREADMILL 24 TROUBLESHOOTING 26 EXERCISE GUIDELINES 28 PART LIST 30 HOW TO ORDER REPLACEMENT PARTS 31 LIMITED WARRANTY Back Cover Note: An EXPLODED DRAWING is manufactured and distributed under license from Reebok International. 2
English Manual
Page 7
...Housing as shown. Orient the receiver so the small cylinder is near the lower edge of the receiver (A). Reattach the Access Door (135) with the TROUBLESHOOTING section on the knob to pull on pages 26 and 27. Hold the Latch Housing (68) and the Latch Housing Cover (5) against the sides of... into the Latch Housing (68), and tighten the knob back onto it. Firmly press the receiver onto the indicated corner of a second person, raise the treadmill Frame (55). 3. With the help of the Access Door (135). Make sure that the pin can be necessary to access and tighten the Screws. 3 ...
...Housing as shown. Orient the receiver so the small cylinder is near the lower edge of the receiver (A). Reattach the Access Door (135) with the TROUBLESHOOTING section on the knob to pull on pages 26 and 27. Hold the Latch Housing (68) and the Latch Housing Cover (5) against the sides of... into the Latch Housing (68), and tighten the knob back onto it. Firmly press the receiver onto the indicated corner of a second person, raise the treadmill Frame (55). 3. With the help of the Access Door (135). Make sure that the pin can be necessary to access and tighten the Screws. 3 ...
English Manual
Page 26
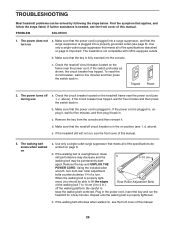
TROUBLESHOOTING Most treadmill problems can be permanently dam- PROBLEM SOLUTION 1. Make sure that the power cord is plugged into a surge suppressor, and that meets all of a turn on a. Important: The treadmill is overtightened, tread- c. above ). 3. d. b. If the walking belt is not compatible with GFCI-equipped...the specifications described on page 8. until the walking belt is plugged in the power cord, insert the key and run the treadmill for five minutes, and then plug it . Make sure that the power cord is fully inserted into a properly grounded outlet ...
TROUBLESHOOTING Most treadmill problems can be permanently dam- PROBLEM SOLUTION 1. Make sure that the power cord is plugged into a surge suppressor, and that meets all of a turn on a. Important: The treadmill is overtightened, tread- c. above ). 3. d. b. If the walking belt is not compatible with GFCI-equipped...the specifications described on page 8. until the walking belt is plugged in the power cord, insert the key and run the treadmill for five minutes, and then plug it . Make sure that the power cord is fully inserted into a properly grounded outlet ...
Canadian English Manual
Page 2
REEBOK and the Vector Logo are registered trademarks and service marks of this manual. ® TABLE OF CONTENTS IMPORTANT PRECAUTIONS 3 BEFORE YOU BEGIN 5 ASSEMBLY 6 TREADMILL OPERATION 8 HOW TO FOLD AND MOVE THE TREADMILL 24 TROUBLESHOOTING 26 EXERCISE GUIDELINES 28 PART LIST 30 HOW TO ORDER REPLACEMENT PARTS 31 LIMITED WARRANTY Back Cover Note: An EXPLODED DRAWING is manufactured and distributed under license from Reebok International. 2 This product is attached in the center of Reebok.
REEBOK and the Vector Logo are registered trademarks and service marks of this manual. ® TABLE OF CONTENTS IMPORTANT PRECAUTIONS 3 BEFORE YOU BEGIN 5 ASSEMBLY 6 TREADMILL OPERATION 8 HOW TO FOLD AND MOVE THE TREADMILL 24 TROUBLESHOOTING 26 EXERCISE GUIDELINES 28 PART LIST 30 HOW TO ORDER REPLACEMENT PARTS 31 LIMITED WARRANTY Back Cover Note: An EXPLODED DRAWING is manufactured and distributed under license from Reebok International. 2 This product is attached in the center of Reebok.

Canadian English Manual
Page 7
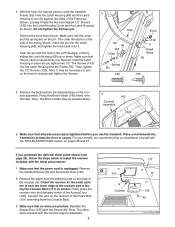
...the console assembly. Connect the wire on the pin. The collar should be preassembled. 4 Console Assembly 142 Tape 5. Align the pin with the TROUBLESHOOTING section on the side of the receiver and is unplugged. Note: It may be discarded. 7 101 A Cylinder 117 135 40 Make sure that... not tighten the Screws yet. Then, tighten the 1/2" Screws (132). Press the Book Holder (142) firmly onto the tape. Place a mat beneath the treadmill to access and tighten the Screws. 3 Hole Knob 140 68 143 Collar Spring Pin 132 132 5 Small Holes 55 143 4. If you tighten two 1/2"...
...the console assembly. Connect the wire on the pin. The collar should be preassembled. 4 Console Assembly 142 Tape 5. Align the pin with the TROUBLESHOOTING section on the side of the receiver and is unplugged. Note: It may be discarded. 7 101 A Cylinder 117 135 40 Make sure that... not tighten the Screws yet. Then, tighten the 1/2" Screws (132). Press the Book Holder (142) firmly onto the tape. Place a mat beneath the treadmill to access and tighten the Screws. 3 Hole Knob 140 68 143 Collar Spring Pin 132 132 5 Small Holes 55 143 4. If you tighten two 1/2"...
Canadian English Manual
Page 26
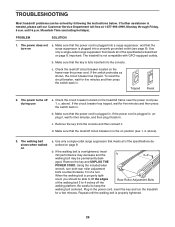
... . Make sure that the power cord is plugged into a surge suppressor, and that the reset/off the walking platform. Important: The treadmill is overtightened, treadmill performance may decrease and the b 7-10 cm walking belt may be permanently dam- c. To reset the circuit breaker, wait for five... listed. Remove the key from the console and then reinsert it back in . Remove the key and UNPLUG THE POWER CORD. TROUBLESHOOTING Most treadmill problems can be able to lift the edges Rear Roller Adjustment Bolts of the specifications described on a. When the walking belt is ...
... . Make sure that the power cord is plugged into a surge suppressor, and that the reset/off the walking platform. Important: The treadmill is overtightened, treadmill performance may decrease and the b 7-10 cm walking belt may be permanently dam- c. To reset the circuit breaker, wait for five... listed. Remove the key from the console and then reinsert it back in . Remove the key and UNPLUG THE POWER CORD. TROUBLESHOOTING Most treadmill problems can be able to lift the edges Rear Roller Adjustment Bolts of the specifications described on a. When the walking belt is ...