
English Manual
Page 3
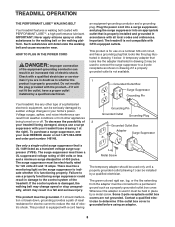
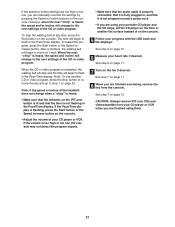
... heart rate trends in use an extension cord. 10. Place the treadmill on each side. The treadmill should be used or oxygen is properly assembled. (See ASSEMBLY on page 6, and HOW TO FOLD AND MOVE THE TREADMILL on the walking belt. Do not wear loose clothes that could result in sandals. 9. Always wear athletic shoes. Adjust the speed in a garage or covered patio, or near water. 5. The pulse sensor...
... heart rate trends in use an extension cord. 10. Place the treadmill on each side. The treadmill should be used or oxygen is properly assembled. (See ASSEMBLY on page 6, and HOW TO FOLD AND MOVE THE TREADMILL on the walking belt. Do not wear loose clothes that could result in sandals. 9. Always wear athletic shoes. Adjust the speed in a garage or covered patio, or near water. 5. The pulse sensor...
English Manual
Page 4
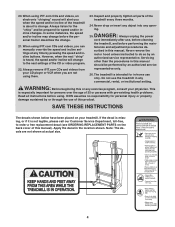
... institutional setting. Never remove the motor hood unless instructed to change . 21. 20. Always unplug the power cord immediately after use the treadmill in -home use of 35 or persons with pre-existing health problems. Read all parts of the CD or video program. 22. The treadmill is about to do so by an authorized service representative only. 26. When using them. 23. Servicing other than the procedures in the location shown...
... institutional setting. Never remove the motor hood unless instructed to change . 21. 20. Always unplug the power cord immediately after use the treadmill in -home use of 35 or persons with pre-existing health problems. Read all parts of the CD or video program. 22. The treadmill is about to do so by an authorized service representative only. 26. When using them. 23. Servicing other than the procedures in the location shown...
English Manual
Page 5
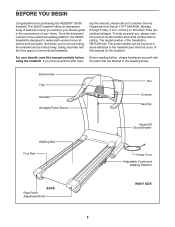
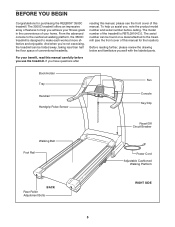
... your home. Book Holder Tray Handrail Handgrip Pulse Sensor Fan Console Key/Clip Walking Belt Foot Rail Reset/Off Circuit Breaker Power Cord Adjustable Cushioned Walking Platform BACK Rear Roller Adjustment Bolts RIGHT SIDE 5 The serial number can be found on a decal attached to the treadmill (see the front cover of conventional treadmills. Before reading further, please familiarize yourself with the parts that are labeled in the convenience of features to make each workout...
... your home. Book Holder Tray Handrail Handgrip Pulse Sensor Fan Console Key/Clip Walking Belt Foot Rail Reset/Off Circuit Breaker Power Cord Adjustable Cushioned Walking Platform BACK Rear Roller Adjustment Bolts RIGHT SIDE 5 The serial number can be found on a decal attached to the treadmill (see the front cover of conventional treadmills. Before reading further, please familiarize yourself with the parts that are labeled in the convenience of features to make each workout...
English Manual
Page 6
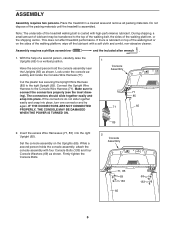
... the plastic ties securing the Upright Wire Harness (85) to connect the connectors properly (see the inset drawing). Insert the excess Wire Harnesses (71, 85) into place, turn one connector and try again. Set the console assembly on the sides of the treadmill walking belt is coated with four Console Bolts (133) and four Console Washers (69) as shown. Assembly requires a phillips screwdriver and the...
... the plastic ties securing the Upright Wire Harness (85) to connect the connectors properly (see the inset drawing). Insert the excess Wire Harnesses (71, 85) into place, turn one connector and try again. Set the console assembly on the sides of the treadmill walking belt is coated with four Console Bolts (133) and four Console Washers (69) as shown. Assembly requires a phillips screwdriver and the...
English Manual
Page 8
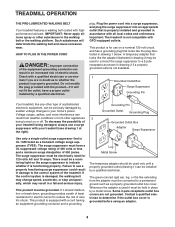
... that looks like the plug illustrated in your home's power. Voltage surges, spikes, and noise interference can be seriously damaged by a metal screw. There must be a monitoring light on or off. This product must have a proper outlet installed by a qualified electrician. Whenever the adapter is damaged, the walking belt may change speed or stop unexpectedly, which may be used only until a properly grounded...
... that looks like the plug illustrated in your home's power. Voltage surges, spikes, and noise interference can be seriously damaged by a metal screw. There must be a monitoring light on or off. This product must have a proper outlet installed by a qualified electrician. Whenever the adapter is damaged, the walking belt may change speed or stop unexpectedly, which may be used only until a properly grounded...
English Manual
Page 10
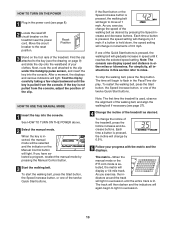
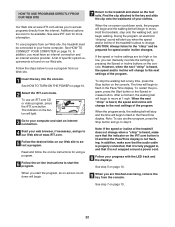
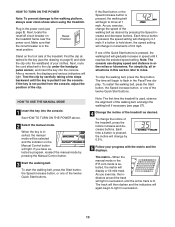
... treadmill. Reset Position 3 Stand on the Manual Control button will gradually increase in increments of the twelve Quick Start buttons. See HOW TO TURN ON THE POWER above. 2 Select the manual mode. As you exercise, the indicators around the track will again begin to the reset position. Note: The console can display speed and distance in succession until the key is selected, the matrix will light. To restart the walking belt, press...
... treadmill. Reset Position 3 Stand on the Manual Control button will gradually increase in increments of the twelve Quick Start buttons. See HOW TO TURN ON THE POWER above. 2 Select the manual mode. As you exercise, the indicators around the track will again begin to the reset position. Note: The console can display speed and distance in succession until the key is selected, the matrix will light. To restart the walking belt, press...
English Manual
Page 15
... the optional chest pulse sensor. See step 7 on the fan if desired. One target heart rate is programmed for all segments. The walking belt will then slow to a stop the program at the beginning. 8 Follow your heart rate is programmed for each time the console compares your heart rate to the current target heart rate, the speed and/or incline of the treadmill will flash. To use a heart rate program again, reselect the program and start it at...
... the optional chest pulse sensor. See step 7 on the fan if desired. One target heart rate is programmed for all segments. The walking belt will then slow to a stop the program at the beginning. 8 Follow your heart rate is programmed for each time the console compares your heart rate to the current target heart rate, the speed and/or incline of the treadmill will flash. To use a heart rate program again, reselect the program and start it at...
English Manual
Page 20
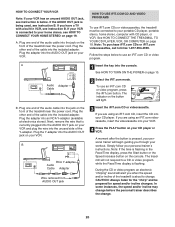
.../Time display, press the Start button or the Speed increase button on the console. During the CD or video program, an electronic "chirping" sound will begin guiding you through your CD player. RIGHT LEFT 2 Select the iFIT.com mode. Plug the other end of the treadmill near the power cord. A moment after the button is being used, see instruction B. In some instances, the speed and/or incline may change before the personal trainer...
.../Time display, press the Start button or the Speed increase button on the console. During the CD or video program, an electronic "chirping" sound will begin guiding you through your CD player. RIGHT LEFT 2 Select the iFIT.com mode. Plug the other end of the treadmill near the power cord. A moment after the button is being used, see instruction B. In some instances, the speed and/or incline may change before the personal trainer...
English Manual
Page 21
... flashing, press the Start button or the Speed increase button on the console. • Adjust the volume of the CD or video program. See step 5 on the console. After a moment, the walking belt will change to flash in the Pace/Time display. If the volume is too high or too low, the console may not detect the program signals. • Make sure that the audio cable is properly connected, that...
... flashing, press the Start button or the Speed increase button on the console. • Adjust the volume of the CD or video program. See step 5 on the console. After a moment, the walking belt will change to flash in the Pace/Time display. If the volume is too high or too low, the console may not detect the program signals. • Make sure that the audio cable is properly connected, that...
English Manual
Page 22
... console. A list of the program. The indicator on the foot rails. Hold the handrails, step onto the walking belt, and begin to select a program. If the speed or incline settings are finished exercising, remove the key from our Web site, the treadmill must have an internet connection and an internet service provider. Note: To use an iFIT.com CD or video program, press the iFIT.com button. See www.iFIT.com for speed and/or incline changes...
... console. A list of the program. The indicator on the foot rails. Hold the handrails, step onto the walking belt, and begin to select a program. If the speed or incline settings are finished exercising, remove the key from our Web site, the treadmill must have an internet connection and an internet service provider. Note: To use an iFIT.com CD or video program, press the iFIT.com button. See www.iFIT.com for speed and/or incline changes...
English Manual
Page 30
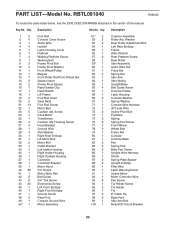
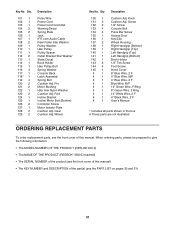
... Rear Platform Screw Rear Roller Idler Assembly Audio Wire Nut Pulse Bar Spring Nut Idler Arm Idler Spring Upright/Base Belt Guide Screw Console Frame Latch Housing Console Washer Spring Washer Console Wire Harness iFIT.com Wire Incline Pivot Bolt Flywheel Spring Spring Pad Screw Front Wheel Wheel Bolt Pulley Nut Console Console Base Fan Spring Pad Belly Pan Screw Upright Wire Harness Shock Spring Plate Spacer Upright Endcap Filter Wire Latch Warning Decal Incline Motor Motor Controller Wire Fan Screw Tie Holder Screw Tie Holder Tie 8" Cable Tie Base Pad Idler Arm Bolt Reset...
... Rear Platform Screw Rear Roller Idler Assembly Audio Wire Nut Pulse Bar Spring Nut Idler Arm Idler Spring Upright/Base Belt Guide Screw Console Frame Latch Housing Console Washer Spring Washer Console Wire Harness iFIT.com Wire Incline Pivot Bolt Flywheel Spring Spring Pad Screw Front Wheel Wheel Bolt Pulley Nut Console Console Base Fan Spring Pad Belly Pan Screw Upright Wire Harness Shock Spring Plate Spacer Upright Endcap Filter Wire Latch Warning Decal Incline Motor Motor Controller Wire Fan Screw Tie Holder Screw Tie Holder Tie 8" Cable Tie Base Pad Idler Arm Bolt Reset...
English Manual
Page 31
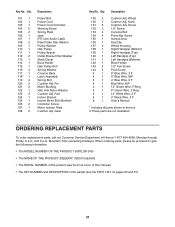
... (REEBOK® 3500C treadmill) • The SERIAL NUMBER of the product (see the front cover of this manual) • The KEY NUMBER and DESCRIPTION of the part(s) (see the PART LIST on pages 30 and 31) 31 Mountain Time (excluding holidays). Rod Incline Bracket Incline Motor Bolt (Bottom) Controller Screw Motor Isolator Plate Cushion Adj. Wheel Cushion Adj. Pin Motor Bushing Idler Arm Nylon Washer Cushion Adj. Gear Key No. until 6 p.m. Screw 1/2" Screw Console Bolt Pulse Bar Screw Access Door Key...
... (REEBOK® 3500C treadmill) • The SERIAL NUMBER of the product (see the front cover of this manual) • The KEY NUMBER and DESCRIPTION of the part(s) (see the PART LIST on pages 30 and 31) 31 Mountain Time (excluding holidays). Rod Incline Bracket Incline Motor Bolt (Bottom) Controller Screw Motor Isolator Plate Cushion Adj. Wheel Cushion Adj. Pin Motor Bushing Idler Arm Nylon Washer Cushion Adj. Gear Key No. until 6 p.m. Screw 1/2" Screw Console Bolt Pulse Bar Screw Access Door Key...
Canadian English Manual
Page 3
.... Keep the power cord and the surge suppressor away from damage, place a mat under the age of clearance behind it is not working properly.) 14. Always remove the key, unplug the power cord and move the walking belt while the power is damaged, the walking belt may change speed, accelerate, or stop unexpectedly, which may affect the accuracy of the owner to avoid sudden jumps in the treadmill.
.... Keep the power cord and the surge suppressor away from damage, place a mat under the age of clearance behind it is not working properly.) 14. Always remove the key, unplug the power cord and move the walking belt while the power is damaged, the walking belt may change speed, accelerate, or stop unexpectedly, which may affect the accuracy of the owner to avoid sudden jumps in the treadmill.
Canadian English Manual
Page 4
... treadmill is about to the next settings of 35 or persons with pre-existing health problems. Read all parts of this manual should be prepared for personal injury or property damage sustained by pressing the speed and incline buttons. In some instances, the speed and/or incline may change before the personal trainer describes the change . Never remove the motor hood unless instructed to do so by an authorized service...
... treadmill is about to the next settings of 35 or persons with pre-existing health problems. Read all parts of this manual should be prepared for personal injury or property damage sustained by pressing the speed and incline buttons. In some instances, the speed and/or incline may change before the personal trainer describes the change . Never remove the motor hood unless instructed to do so by an authorized service...
Canadian English Manual
Page 5
... front cover of the treadmill is designed to help us assist you, note the product model number and serial number before you have questions after Book Holder Tray Handrail Handgrip Pulse Sensor Fan Console Key/Clip Walking Belt Foot Rail Reset/Off Circuit Breaker Power Cord Adjustable Cushioned Walking Platform BACK Rear Roller Adjustment Bolts RIGHT SIDE 5 Before reading further, please review the drawing below and familiarize yourself with the labeled parts. And...
... front cover of the treadmill is designed to help us assist you, note the product model number and serial number before you have questions after Book Holder Tray Handrail Handgrip Pulse Sensor Fan Console Key/Clip Walking Belt Foot Rail Reset/Off Circuit Breaker Power Cord Adjustable Cushioned Walking Platform BACK Rear Roller Adjustment Bolts RIGHT SIDE 5 Before reading further, please review the drawing below and familiarize yourself with the labeled parts. And...
Canadian English Manual
Page 8
... changes in damage to indicate whether it will deteriorate the walking belt and cause excessive wear. Whenever the adapter is functioning properly. Contact a qualified electrician to determine if the outlet box cover is not compatible with the product-if it is used it should be used to connect the surge suppressor to reduce the risk of the treadmill. Plug the power cord...
... changes in damage to indicate whether it will deteriorate the walking belt and cause excessive wear. Whenever the adapter is functioning properly. Contact a qualified electrician to determine if the outlet box cover is not compatible with the product-if it is used it should be used to connect the surge suppressor to reduce the risk of the treadmill. Plug the power cord...
Canadian English Manual
Page 10
... the manual mode by 0.1 mph; HOW TO USE THE MANUAL MODE 1 Insert the key into the console. See HOW TO TURN ON THE POWER above. 2 Select the manual mode. Each time a button is in succession. 10 If you exercise, change the incline of 0.5 mph. Make sure that the circuit breaker is pressed, the speed setting will change by pressing the Manual Control button. 3 Start the walking belt. Note: The first time the treadmill is pulled from the console, adjust...
... the manual mode by 0.1 mph; HOW TO USE THE MANUAL MODE 1 Insert the key into the console. See HOW TO TURN ON THE POWER above. 2 Select the manual mode. Each time a button is in succession. 10 If you exercise, change the incline of 0.5 mph. Make sure that the circuit breaker is pressed, the speed setting will change by pressing the Manual Control button. 3 Start the walking belt. Note: The first time the treadmill is pulled from the console, adjust...
Canadian English Manual
Page 26
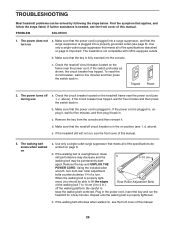
... allen wrench, turn both rear roller adjustment bolts counterclockwise 1/4 of a turn on a. ened, you should be solved by following the steps below. Repeat until the walking belt is plugged in . c. Tripped Reset 2. When the walking belt is plugged into a surge suppressor, and that applies, and follow the steps listed. c. Make sure that the power cord is properly tightened. TROUBLESHOOTING Most treadmill problems can be able to lift the edges Rear Roller Adjustment Bolts of the walking belt 7 to...
... allen wrench, turn both rear roller adjustment bolts counterclockwise 1/4 of a turn on a. ened, you should be solved by following the steps below. Repeat until the walking belt is plugged in . c. Tripped Reset 2. When the walking belt is plugged into a surge suppressor, and that applies, and follow the steps listed. c. Make sure that the power cord is properly tightened. TROUBLESHOOTING Most treadmill problems can be able to lift the edges Rear Roller Adjustment Bolts of the walking belt 7 to...

Canadian English Manual
Page 30
... Assembly Roller Adj. Description Key No. RBTL09104C.0 R0905A To locate the parts listed below, see the EXPLODED DRAWING attached in the center of this manual. Qty. Washer Rear Roller Adjustment Bolt Left Rear Endcap Frame Allen Wrench Rear Platform Screw Rear Roller Idler Assembly Audio Wire Nut Pulse Bar Spring Nut Idler Arm Idler Spring Upright/Base Belt Guide Screw Console Frame Latch Housing Console Washer Spring Washer Console Wire Harness iFIT.com Wire Incline Pivot Bolt Flywheel Spring Spring Pad Screw Front Wheel Wheel Bolt Pulley Nut Console Console Base...
... Assembly Roller Adj. Description Key No. RBTL09104C.0 R0905A To locate the parts listed below, see the EXPLODED DRAWING attached in the center of this manual. Qty. Washer Rear Roller Adjustment Bolt Left Rear Endcap Frame Allen Wrench Rear Platform Screw Rear Roller Idler Assembly Audio Wire Nut Pulse Bar Spring Nut Idler Arm Idler Spring Upright/Base Belt Guide Screw Console Frame Latch Housing Console Washer Spring Washer Console Wire Harness iFIT.com Wire Incline Pivot Bolt Flywheel Spring Spring Pad Screw Front Wheel Wheel Bolt Pulley Nut Console Console Base...
Canadian English Manual
Page 31
... (REEBOK® 3500C treadmill) • The SERIAL NUMBER of the product (see the front cover of this manual) • The KEY NUMBER and DESCRIPTION of the part(s) (see the front cover of this manual. Gear Cushion Adj. Screw 1/2" Screw Console Bolt Pulse Bar Screw Access Door Key/Clip Wheel Housing Right Handgrip (Bottom) Right Handgrip (Top) Left Handgrip (Top) Left Handgrip (Bottom) Book Holder 1/2" Tek Screw Foot Screw Hood Cover 8" Blue Wire, 2 F 4" Blue Wire, M/F 4" Blue Wire, 2 F Blue Wire...
... (REEBOK® 3500C treadmill) • The SERIAL NUMBER of the product (see the front cover of this manual) • The KEY NUMBER and DESCRIPTION of the part(s) (see the front cover of this manual. Gear Cushion Adj. Screw 1/2" Screw Console Bolt Pulse Bar Screw Access Door Key/Clip Wheel Housing Right Handgrip (Bottom) Right Handgrip (Top) Left Handgrip (Top) Left Handgrip (Bottom) Book Holder 1/2" Tek Screw Foot Screw Hood Cover 8" Blue Wire, 2 F 4" Blue Wire, M/F 4" Blue Wire, 2 F Blue Wire...


