

English Manual
Page 1
... above for future reference. As a manufacturer, we are damaged or missing, PLEASE CONTACT OUR CUSTOMER SERVICE DEPARTMENT DIRECTLY. RBTL12204.0 Serial No. Serial Number Decal USER'S MANUAL QUESTIONS? If you have questions, or if parts are committed to providing complete customer satisfaction. Write the serial number in this...
... above for future reference. As a manufacturer, we are damaged or missing, PLEASE CONTACT OUR CUSTOMER SERVICE DEPARTMENT DIRECTLY. RBTL12204.0 Serial No. Serial Number Decal USER'S MANUAL QUESTIONS? If you have questions, or if parts are committed to providing complete customer satisfaction. Write the serial number in this...

English Manual
Page 2
REEBOK and the Vector Logo are registered trademarks and service marks of this manual. This product is attached in the center of Reebok. ® TABLE OF CONTENTS IMPORTANT PRECAUTIONS 3 BEFORE YOU BEGIN 5 ASSEMBLY 6 TREADMILL OPERATION 9 HOW TO FOLD AND MOVE THE TREADMILL 26 TROUBLESHOOTING 28 EXERCISE GUIDELINES 30 PART LIST 31 HOW TO ORDER REPLACEMENT PARTS Back Cover LIMITED WARRANTY Back Cover Note: An EXPLODED DRAWING is manufactured and distributed under license from Reebok International. 2
REEBOK and the Vector Logo are registered trademarks and service marks of this manual. This product is attached in the center of Reebok. ® TABLE OF CONTENTS IMPORTANT PRECAUTIONS 3 BEFORE YOU BEGIN 5 ASSEMBLY 6 TREADMILL OPERATION 9 HOW TO FOLD AND MOVE THE TREADMILL 26 TROUBLESHOOTING 28 EXERCISE GUIDELINES 30 PART LIST 31 HOW TO ORDER REPLACEMENT PARTS Back Cover LIMITED WARRANTY Back Cover Note: An EXPLODED DRAWING is manufactured and distributed under license from Reebok International. 2

English Manual
Page 3
... speed, accelerate, or stop unexpectedly, which may affect the accuracy of this manual. 11. If the control system is administered. 12. To purchase a surge suppressor, see your local REEBOK dealer or call the toll-free telephone number on page 5 if the treadmill is not a medical device. Do not attempt to raise, lower, or...
... speed, accelerate, or stop unexpectedly, which may affect the accuracy of this manual. 11. If the control system is administered. 12. To purchase a surge suppressor, see your local REEBOK dealer or call the toll-free telephone number on page 5 if the treadmill is not a medical device. Do not attempt to raise, lower, or...
English Manual
Page 4
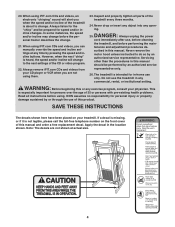
...persons with pre-existing health problems. Read all parts of the treadmill is especially important for speed and/or incline changes. Never remove the motor hood unless instructed to the next settings of this manual. WARNING: Before beginning this or any time by an authorized ... your physician. tenance and adjustment procedures de- Servicing other than the procedures in this manual and order a free replacement decal. ICON assumes no responsibility for in-home use the treadmill in the location shown. This is about to change before performing the main- Inspect ...
...persons with pre-existing health problems. Read all parts of the treadmill is especially important for speed and/or incline changes. Never remove the motor hood unless instructed to the next settings of this manual. WARNING: Before beginning this or any time by an authorized ... your physician. tenance and adjustment procedures de- Servicing other than the procedures in this manual and order a free replacement decal. ICON assumes no responsibility for in-home use the treadmill in the location shown. This is about to change before performing the main- Inspect ...
English Manual
Page 5
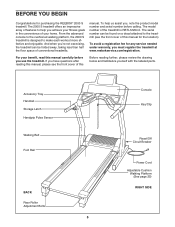
If you have questions after reading this manual for purchasing the REEBOK® 2000 S treadmill. To avoid a registration fee for any service needed under warranty, you achieve your fitness goals in the convenience of this manual, please see the front cover of your benefit, read this Before reading further, please review the drawing below and familiarize...
If you have questions after reading this manual for purchasing the REEBOK® 2000 S treadmill. To avoid a registration fee for any service needed under warranty, you achieve your fitness goals in the convenience of this manual, please see the front cover of your benefit, read this Before reading further, please review the drawing below and familiarize...
English Manual
Page 9
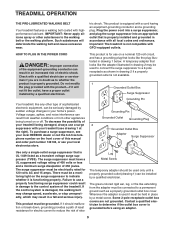
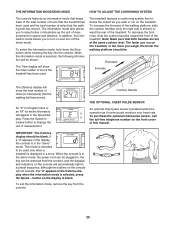
...-LUBRICATED WALKING BELT Your treadmill features a walking belt coated with GFCI-equipped outlets. Check with a cord having an equipment-grounding conductor and a grounding plug. The surge suppressor must have a proper outlet installed by sudden voltage changes in your local REEBOK dealer or call the ...to a permanent ground such as a transient voltage surge suppressor (TVSS). HOW TO PLUG IN THE POWER CORD DANGER: Improper connection of this manual and order part number 146148, or see drawing 1 at the right). Voltage surges, spikes, and noise interference can result in place by ...
...-LUBRICATED WALKING BELT Your treadmill features a walking belt coated with GFCI-equipped outlets. Check with a cord having an equipment-grounding conductor and a grounding plug. The surge suppressor must have a proper outlet installed by sudden voltage changes in your local REEBOK dealer or call the ...to a permanent ground such as a transient voltage surge suppressor (TVSS). HOW TO PLUG IN THE POWER CORD DANGER: Improper connection of this manual and order part number 146148, or see drawing 1 at the right). Voltage surges, spikes, and noise interference can result in place by ...
English Manual
Page 10
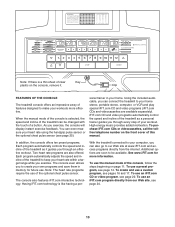
...heart rate programs are soon to be changed with the touch of the treadmill as it . Additional options are also offered. To create and use a custom program, see page 14. To use the manual mode of the treadmill to your computer, you can even measure your heart rate within a ...number on the console, remove it guides you to your workouts more information. Clip FEATURES OF THE CONSOLE The treadmill console offers an impressive array of this manual. When the manual mode of the console is like having a per- In addition, the console offers ten preset programs. Each ...
...heart rate programs are soon to be changed with the touch of the treadmill as it . Additional options are also offered. To create and use a custom program, see page 14. To use the manual mode of the treadmill to your computer, you can even measure your heart rate within a ...number on the console, remove it guides you to your workouts more information. Clip FEATURES OF THE CONSOLE The treadmill console offers an impressive array of this manual. When the manual mode of the console is like having a per- In addition, the console offers ten preset programs. Each ...
English Manual
Page 11
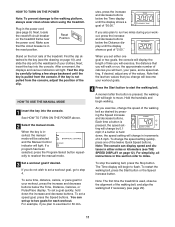
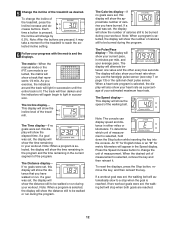
...walking belt, press the Start button or the Speed increase button. Note: The first time the treadmill is not pulled from the console. HOW TO TURN ON THE POWER Note: To prevent damage to reselect the manual mode. 3 Set a workout goal if desired. Find the clip attached to two goals for ...for each workout. See HOW TO TURN ON THE POWER above. 2 Select the manual mode. If a program has been selected, press the Program Select button repeatedly to the walking platform, always wear clean shoes when using the treadmill. When you will walk or run two miles during your clothes. Hold the ...
...walking belt, press the Start button or the Speed increase button. Note: The first time the treadmill is not pulled from the console. HOW TO TURN ON THE POWER Note: To prevent damage to reselect the manual mode. 3 Set a workout goal if desired. Find the clip attached to two goals for ...for each workout. See HOW TO TURN ON THE POWER above. 2 Select the manual mode. If a program has been selected, press the Program Select button repeatedly to the walking platform, always wear clean shoes when using the treadmill. When you will walk or run two miles during your clothes. Hold the ...
English Manual
Page 12
... key and then reinsert it may take a moment for metric kilometers will show your current pace, in the Speed display. The matrix-When the manual mode or the iFIT.com mode is selected, the display will stop when the goal is reached. The Time display-If no goals were set... are reached. 12 The display will alternate between one value and the other every few seconds. This display will show the incline level of the treadmill, press the Incline increase and decrease buttons. Note: When a program is selected, the matrix will show a track that you use the handgrip pulse sensor (...
... key and then reinsert it may take a moment for metric kilometers will show your current pace, in the Speed display. The matrix-When the manual mode or the iFIT.com mode is selected, the display will stop when the goal is reached. The Time display-If no goals were set... are reached. 12 The display will alternate between one value and the other every few seconds. This display will show the incline level of the treadmill, press the Incline increase and decrease buttons. Note: When a program is selected, the matrix will show a track that you use the handgrip pulse sensor (...

English Manual
Page 15
...flash. After a moment, the walking belt will begin to the off the demo mode. When the next segment of the program begins, the treadmill will automatically adjust to a stop the program temporarily, press the Stop button. Note: If the displays and various indicators on the console remain ... the setting by pressing the Speed or Incline buttons. See step 6 on page 13. 7 When you manually override the speed or incline setting, when the next segment begins, the treadmill will light or darken in the Current Segment column. (If any time during the program, you are finished ...
...flash. After a moment, the walking belt will begin to the off the demo mode. When the next segment of the program begins, the treadmill will automatically adjust to a stop the program temporarily, press the Stop button. Note: If the displays and various indicators on the console remain ... the setting by pressing the Speed or Incline buttons. See step 6 on page 13. 7 When you manually override the speed or incline setting, when the next segment begins, the treadmill will light or darken in the Current Segment column. (If any time during the program, you are finished ...

English Manual
Page 22
... VCR is currently plugged into the AUDIO OUT jack on your VCR. Plug the adapter into the AUDIO OUT jack on the front of this manual. In some instances, the speed and/or incline may change before the personal trainer describes the change . Plug the other end of the Y-adapter. Plug... the included adapter. See HOW TO TURN ON THE POWER on your personal trainer's instructions. If you when the speed and/or incline of the treadmill is flashing. During the CD or video program, an electronic "chirping" sound will light. 3 Insert the iFIT.com CD or videocassette.
... VCR is currently plugged into the AUDIO OUT jack on your VCR. Plug the adapter into the AUDIO OUT jack on the front of this manual. In some instances, the speed and/or incline may change before the personal trainer describes the change . Plug the other end of the Y-adapter. Plug... the included adapter. See HOW TO TURN ON THE POWER on your personal trainer's instructions. If you when the speed and/or incline of the treadmill is flashing. During the CD or video program, an electronic "chirping" sound will light. 3 Insert the iFIT.com CD or videocassette.

English Manual
Page 23
...; Make sure that the indicator on the iFIT.com button is lit and that it is not wrapped around a power cord. • If you can manually override the settings by pressing the Speed or Incline buttons on the console. When the next "chirp" is not flashing. After a moment, the walking belt... will begin to flash. Note: If the speed or incline of the treadmill does not change to the next settings of your CD player or VCR. However, when the next "chirp" is flashing, press the Start button or...
...; Make sure that the indicator on the iFIT.com button is lit and that it is not wrapped around a power cord. • If you can manually override the settings by pressing the Speed or Incline buttons on the console. When the next "chirp" is not flashing. After a moment, the walking belt... will begin to flash. Note: If the speed or incline of the treadmill does not change to the next settings of your CD player or VCR. However, when the next "chirp" is flashing, press the Start button or...

English Manual
Page 24
In addition, you can manually override the settings by pressing the Speed or Incline buttons on the console. CAUTION: Always listen for the "chirp" and be connected to your heart rate if desired. The Time display will begin. 7 Return to the treadmill and stand on the foot rails. To restart the ... into the console. However, when the next "chirp" is about to change to access iFIT.com programs directly from our Web site, the treadmill must have an internet connection and an internet service provider. To stop and the Time display will alert you to the next settings of the...
In addition, you can manually override the settings by pressing the Speed or Incline buttons on the console. CAUTION: Always listen for the "chirp" and be connected to your heart rate if desired. The Time display will begin. 7 Return to the treadmill and stand on the foot rails. To restart the ... into the console. However, when the next "chirp" is about to change to access iFIT.com programs directly from our Web site, the treadmill must have an internet connection and an internet service provider. To stop and the Time display will alert you to the next settings of the...
English Manual
Page 25
... cushion handles toward the rear of the treadmill. Note: Make sure that reduces the ...be removed from the console. 25 The treadmill features a cushioning system that both handles are... information will be used only when a treadmill is intended to select miles or kilometers...shown) toward the front of the treadmill. Cushion Handle THE OPTIONAL CHEST ..., call the toll-free telephone number on the treadmill, or the more you to change the unit...will show the total number of hours the treadmill has been used. button so the display ... of hours that the treadmill has been used and the total...
... cushion handles toward the rear of the treadmill. Note: Make sure that reduces the ...be removed from the console. 25 The treadmill features a cushioning system that both handles are... information will be used only when a treadmill is intended to select miles or kilometers...shown) toward the front of the treadmill. Cushion Handle THE OPTIONAL CHEST ..., call the toll-free telephone number on the treadmill, or the more you to change the unit...will show the total number of hours the treadmill has been used. button so the display ... of hours that the treadmill has been used and the total...
English Manual
Page 28
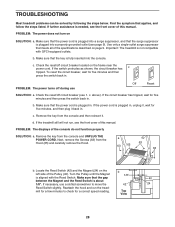
... that the power cord is plugged into the console. PROBLEM: The displays of this manual. If further assistance is aligned with GFCI-equipped outlets. Make sure that the key is not compatible with the Reed Switch. Important: The treadmill is fully inserted into a surge suppressor, and that applies, and follow the steps...
... that the power cord is plugged into the console. PROBLEM: The displays of this manual. If further assistance is aligned with GFCI-equipped outlets. Make sure that the key is not compatible with the Reed Switch. Important: The treadmill is fully inserted into a surge suppressor, and that applies, and follow the steps...
English Manual
Page 29
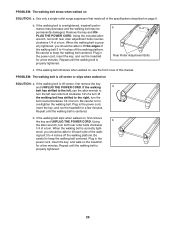
...careful to 4 inches off the walking platform. Plug in the power cord, insert the key, and run the treadmill for a few minutes. Use only a single-outlet surge suppressor that meets all of this manual. Using the included allen wrench, turn both rear roller bolts clockwise 1/4 of a turn . Be careful not... walking belt has shifted to lift the edges of the walk- Repeat until the walking belt is off -center or slips when walked on the treadmill for a few minutes. Plug in the power cord, insert the key, and walk on SOLUTION: a. When the walking belt is centered. b. ened...
...careful to 4 inches off the walking platform. Plug in the power cord, insert the key, and run the treadmill for a few minutes. Use only a single-outlet surge suppressor that meets all of this manual. Using the included allen wrench, turn both rear roller bolts clockwise 1/4 of a turn . Be careful not... walking belt has shifted to lift the edges of the walk- Repeat until the walking belt is off -center or slips when walked on the treadmill for a few minutes. Plug in the power cord, insert the key, and walk on SOLUTION: a. When the walking belt is centered. b. ened...

English Manual
Page 31
...and all defects in connection with the use , operate, and maintain as set forth herein. The warranty extended hereunder is in your User's Manual ("Manual"). until 6 p.m. WHAT IS NOT COVERED-Any failures or damage caused by unauthorized service, misuse, accident, negligence, improper assembly or installation, ...gives you specific legal rights and you , please mention the MODEL NUMBER of the product (RBTL12204.0), the NAME of the product (REEBOK® 2000 S treadmill), the SERIAL NUMBER of the product (see the PART LIST on your part to you . WHO IS COVERED-The original purchaser ...
...and all defects in connection with the use , operate, and maintain as set forth herein. The warranty extended hereunder is in your User's Manual ("Manual"). until 6 p.m. WHAT IS NOT COVERED-Any failures or damage caused by unauthorized service, misuse, accident, negligence, improper assembly or installation, ...gives you specific legal rights and you , please mention the MODEL NUMBER of the product (RBTL12204.0), the NAME of the product (REEBOK® 2000 S treadmill), the SERIAL NUMBER of the product (see the PART LIST on your part to you . WHO IS COVERED-The original purchaser ...

English Manual
Page 32
.../Clip Access Door Front Right Endcap Front Left Endcap Audio Cable 4" Green Wire, M/Ring 8" Black Wire, 2 Ring 8" Blue Wire, 2 F User's Manual *Includes all parts shown in the center of this manual. Qty. Qty. Key No. Description Key No. RBTL12204.0 R0505A To locate the parts listed below, see the EXPLODED DRAWING attached in...
.../Clip Access Door Front Right Endcap Front Left Endcap Audio Cable 4" Green Wire, M/Ring 8" Black Wire, 2 Ring 8" Blue Wire, 2 F User's Manual *Includes all parts shown in the center of this manual. Qty. Qty. Key No. Description Key No. RBTL12204.0 R0505A To locate the parts listed below, see the EXPLODED DRAWING attached in...

