
English Manual
Page 1
... service at any time, go to www.reebokservice.com. Write the serial number in this manual before using this manual for reference. CAUTION Read all precautions and instructions in the space above for future reference. USER’'S MANUAL RBEL01213.0 Serial No. MT Sat. 8 a.m.–-4 p.m. MT Please do not contact the store. Serial Number...
... service at any time, go to www.reebokservice.com. Write the serial number in this manual before using this manual for reference. CAUTION Read all precautions and instructions in the space above for future reference. USER’'S MANUAL RBEL01213.0 Serial No. MT Sat. 8 a.m.–-4 p.m. MT Please do not contact the store. Serial Number...
English Manual
Page 2
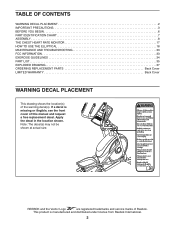
... the front cover of this manual and request a free replacement decal. TABLE OF CONTENTS WARNING DECAL PLACEMENT 2 IMPORTANT PRECAUTIONS 3 BEFORE YOU BEGIN 6 PART IDENTIFICATION CHART 7 ASSEMBLY 8 THE CHEST HEART RATE MONITOR 17 HOW TO USE THE ELLIPTICAL 18 MAINTENANCE AND TROUBLESHOOTING 33 FCC... INFORMATION 33 EXERCISE GUIDELINES 34 PART LIST 35 EXPLODED DRAWING 37 ORDERING REPLACEMENT PARTS Back Cover LIMITED WARRANTY Back Cover WARNING DECAL PLACEMENT This drawing shows the location(s) of Reebok. If a decal...
... the front cover of this manual and request a free replacement decal. TABLE OF CONTENTS WARNING DECAL PLACEMENT 2 IMPORTANT PRECAUTIONS 3 BEFORE YOU BEGIN 6 PART IDENTIFICATION CHART 7 ASSEMBLY 8 THE CHEST HEART RATE MONITOR 17 HOW TO USE THE ELLIPTICAL 18 MAINTENANCE AND TROUBLESHOOTING 33 FCC... INFORMATION 33 EXERCISE GUIDELINES 34 PART LIST 35 EXPLODED DRAWING 37 ORDERING REPLACEMENT PARTS Back Cover LIMITED WARRANTY Back Cover WARNING DECAL PLACEMENT This drawing shows the location(s) of Reebok. If a decal...

English Manual
Page 3
...ensure that could become caught on your elliptical before cleaning the elliptical. It is not working properly. Keep your pedaling speed in this manual and all parts regularly. do not wear loose clothes that all users of the elliptical are adequately informed of the elliptical and 2 ft. (0.6 m) on ...a level surface, with pre-existing health problems. DANGER: 12. Over exercising may affect the accuracy of this manual. 13. Do not use an extension cord. 19...
...ensure that could become caught on your elliptical before cleaning the elliptical. It is not working properly. Keep your pedaling speed in this manual and all parts regularly. do not wear loose clothes that all users of the elliptical are adequately informed of the elliptical and 2 ft. (0.6 m) on ...a level surface, with pre-existing health problems. DANGER: 12. Over exercising may affect the accuracy of this manual. 13. Do not use an extension cord. 19...
English Manual
Page 6
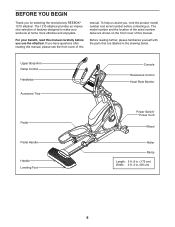
... 2 in the drawing below. If you use the elliptical. To help us . The 1210 elliptical provides an impressive selection of this manual, please see the front cover of features designed to make your benefit, read this manual. The model number and the location of the serial ...number decal are labeled in . (66 cm) 6 Before reading further, please familiarize yourself with the parts that are shown on the front cover of this manual carefully before contacting us assist you for selecting the revolutionary REEBOK® 1210 elliptical...
... 2 in the drawing below. If you use the elliptical. To help us . The 1210 elliptical provides an impressive selection of this manual, please see the front cover of features designed to make your benefit, read this manual. The model number and the location of the serial ...number decal are labeled in . (66 cm) 6 Before reading further, please familiarize yourself with the parts that are shown on the front cover of this manual carefully before contacting us assist you for selecting the revolutionary REEBOK® 1210 elliptical...

English Manual
Page 7
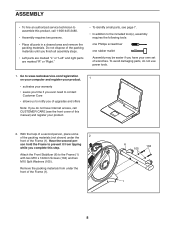
... assembly. Extra parts may be included. Note: If a part is the key number of the part, from the PART LIST near the end of this manual.
... assembly. Extra parts may be included. Note: If a part is the key number of the part, from the PART LIST near the end of this manual.
English Manual
Page 8
... technician to assemble this step. Remove the packing materials from tipping while you complete this product, call CUSTOMER CARE (see the front cover of this manual) and register your own set of upgrades and offers Note: If you have Internet access, call 1-800-445-2480. •• Assembly requires two persons...
... technician to assemble this step. Remove the packing materials from tipping while you complete this product, call CUSTOMER CARE (see the front cover of this manual) and register your own set of upgrades and offers Note: If you have Internet access, call 1-800-445-2480. •• Assembly requires two persons...
English Manual
Page 21
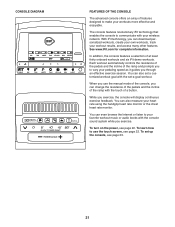
In addition, the console features a selection of a button. To learn how to use the manual mode of the console, you can even browse the Internet or listen to communicate with your favorite workout music or audio books with the touch ...
In addition, the console features a selection of a button. To learn how to use the manual mode of the console, you can even browse the Internet or listen to communicate with your favorite workout music or audio books with the touch ...

English Manual
Page 22
.... The ramp will be ready for the rst time, the incline of the ramp does not calibrate automatically, see step 4 on page 30 and manually calibrate the ramp. The console features a tablet with a backward-facing arrow and an X. •• Use these buttons on the console to navigate the tablet... to the lowercase keyboard, touch the arrow button a third time. HOW TO TURN ON THE POWER HOW TO USE THE TOUCH SCREEN IMPORTANT: If the elliptical has been exposed to cold temperatures, allow it calibrates. You do this, you do not do not need to press hard on the power. To...
.... The ramp will be ready for the rst time, the incline of the ramp does not calibrate automatically, see step 4 on page 30 and manually calibrate the ramp. The console features a tablet with a backward-facing arrow and an X. •• Use these buttons on the console to navigate the tablet... to the lowercase keyboard, touch the arrow button a third time. HOW TO TURN ON THE POWER HOW TO USE THE TOUCH SCREEN IMPORTANT: If the elliptical has been exposed to cold temperatures, allow it calibrates. You do this, you do not do not need to press hard on the power. To...
English Manual
Page 23
... console is now ready for you must be connected to the iFit.com home page. To use a set up for firmware updates. 3. To use the manual mode, see step 4 on page 30 and select the maintenance mode. To use an onboard workout, see page 28. First, see page 32. 23 Note... the various workouts and other features of plastic on page 30 and select the maintenance mode. HOW TO SET UP THE CONSOLE Before using the elliptical for firmware updates. First, see page 32. To use an iFit workout, see page 26. Follow the prompts on page 31 to connect the console...
... console is now ready for you must be connected to the iFit.com home page. To use a set up for firmware updates. 3. To use the manual mode, see step 4 on page 30 and select the maintenance mode. To use an onboard workout, see page 28. First, see page 32. 23 Note... the various workouts and other features of plastic on page 30 and select the maintenance mode. HOW TO SET UP THE CONSOLE Before using the elliptical for firmware updates. First, see page 32. To use an iFit workout, see page 26. Follow the prompts on page 31 to connect the console...

English Manual
Page 24
HOW TO USE THE MANUAL MODE 1. Touch the screen or press any time. 3. See HOW TO TURN ON THE POWER on the console. The display mode that you select will ... the resistance, press the Resistance increase and decrease buttons on the console or on the screen. Touch the Start button on the screen, press the Manual button on the console. As you pedal, you to reach the selected incline level. 4. To select the desired display mode, simply flick or slide the...
HOW TO USE THE MANUAL MODE 1. Touch the screen or press any time. 3. See HOW TO TURN ON THE POWER on the console. The display mode that you select will ... the resistance, press the Resistance increase and decrease buttons on the console or on the screen. Touch the Start button on the screen, press the Manual button on the console. As you pedal, you to reach the selected incline level. 4. To select the desired display mode, simply flick or slide the...

English Manual
Page 26
...level, and one of the Onboard Workouts buttons on page 24. During the workout, the profiles will show the approximate number of calories you manually change the resistance or incline of the ramp during the workout and a profile of the resistance settings of the workout. Turn on the screen.... screen. Your actual pedaling speed may also be able to turn on the screen. If you press a Quick Power Ramp button, you can then manually control the resistance (see step 3 on page 25. 8. Select the desired workout category from the workouts menu and then select the desired workout....
...level, and one of the Onboard Workouts buttons on page 24. During the workout, the profiles will show the approximate number of calories you manually change the resistance or incline of the ramp during the workout and a profile of the resistance settings of the workout. Turn on the screen.... screen. Your actual pedaling speed may also be able to turn on the screen. If you press a Quick Power Ramp button, you can then manually control the resistance (see step 3 on page 25. 8. Select the desired workout category from the workouts menu and then select the desired workout....
English Manual
Page 27
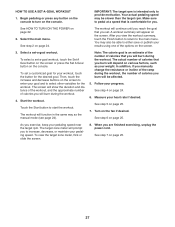
..., unplug the power cord. To select a set a customized goal for the workout. See step 7 on the console. Make sure to pedal at a speed that you manually change the resistance or incline of calories that you exercise, keep your goal and to turn on page 25. 27 The target zone meter will... desired. In addition, if you set -a-goal workout. The workout will be able to the main menu. See step 5 on various factors, such as the manual mode (see page 24). When you view the workout summary, touch the Finish button to return to either save or publish your progress.
..., unplug the power cord. To select a set a customized goal for the workout. See step 7 on the console. Make sure to pedal at a speed that you manually change the resistance or incline of calories that you exercise, keep your goal and to turn on page 25. 27 The target zone meter will... desired. In addition, if you set -a-goal workout. The workout will be able to the main menu. See step 5 on various factors, such as the manual mode (see page 24). When you view the workout summary, touch the Finish button to return to either save or publish your progress.

English Manual
Page 36
...Left Pedal Right Pedal Plate Chest Heart Rate Monitor Pedal Insert M6 x 13mm Washer M6 x 16mm Screw Assembly Tool Grease Packet User’'s Manual Lift Motor Wire A Lift Motor Wire B Resistance Motor Wire Blue Wire Green Wire White Wire Note: Specifications are not illustrated. 36 For ...information about ordering replacement parts, see the back cover of this manual. *These parts are subject to change without notice. Description 101 27 102 10 103 8 104 4 105 8 106 9 107 1 108 8 109 2 110 1 111 1...
...Left Pedal Right Pedal Plate Chest Heart Rate Monitor Pedal Insert M6 x 13mm Washer M6 x 16mm Screw Assembly Tool Grease Packet User’'s Manual Lift Motor Wire A Lift Motor Wire B Resistance Motor Wire Blue Wire Green Wire White Wire Note: Specifications are not illustrated. 36 For ...information about ordering replacement parts, see the back cover of this manual. *These parts are subject to change without notice. Description 101 27 102 10 103 8 104 4 105 8 106 9 107 1 108 8 109 2 110 1 111 1...
English Manual
Page 40
... is limited to repairing or replacing, at ICON’'s option, the product through one of its authorized service centers. ICON’'s obligation under this manual are not followed, if the product is abused or improperly or abnormally used, or if the product is used as a store display model, if the... or limitation of or in connection with an extended service plan, see the PART LIST and the EXPLODED DRAWING near the end of this manual) LIMITED WARRANTY IMPORTANT: To protect your fitness equipment with the use or performance of the product; ICON Health & Fitness, Inc. (ICON) warrants ...
... is limited to repairing or replacing, at ICON’'s option, the product through one of its authorized service centers. ICON’'s obligation under this manual are not followed, if the product is abused or improperly or abnormally used, or if the product is used as a store display model, if the... or limitation of or in connection with an extended service plan, see the PART LIST and the EXPLODED DRAWING near the end of this manual) LIMITED WARRANTY IMPORTANT: To protect your fitness equipment with the use or performance of the product; ICON Health & Fitness, Inc. (ICON) warrants ...

