
English Manual
Page 2
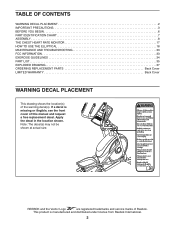
... cover of this manual and request a free replacement decal. Apply the decal in the location shown. TABLE OF CONTENTS WARNING DECAL PLACEMENT 2 IMPORTANT PRECAUTIONS 3 BEFORE YOU BEGIN 6 PART IDENTIFICATION CHART 7 ASSEMBLY 8 THE CHEST HEART RATE MONITOR 17 HOW TO USE THE ELLIPTICAL 18 MAINTENANCE AND TROUBLESHOOTING 33 FCC INFORMATION 33 EXERCISE GUIDELINES 34 PART LIST 35 EXPLODED DRAWING 37 ORDERING REPLACEMENT PARTS Back Cover LIMITED WARRANTY Back Cover WARNING DECAL PLACEMENT This drawing shows the location(s) of Reebok. REEBOK...
... cover of this manual and request a free replacement decal. Apply the decal in the location shown. TABLE OF CONTENTS WARNING DECAL PLACEMENT 2 IMPORTANT PRECAUTIONS 3 BEFORE YOU BEGIN 6 PART IDENTIFICATION CHART 7 ASSEMBLY 8 THE CHEST HEART RATE MONITOR 17 HOW TO USE THE ELLIPTICAL 18 MAINTENANCE AND TROUBLESHOOTING 33 FCC INFORMATION 33 EXERCISE GUIDELINES 34 PART LIST 35 EXPLODED DRAWING 37 ORDERING REPLACEMENT PARTS Back Cover LIMITED WARRANTY Back Cover WARNING DECAL PLACEMENT This drawing shows the location(s) of Reebok. REEBOK...

English Manual
Page 3
... front and rear of the elliptical and 2 ft. (0.6 m) on each side. Do not modify the power cord or use an extension cord. 19. Do not use an adapter to connect the power cord to move until the flywheel stops. Servicing other than 325 lbs. (147 kg). 4. The heart rate monitor is not in this manual. 13. The elliptical should be used by an authorized service repre- When connecting the power cord, plug the power cord into a grounded...
... front and rear of the elliptical and 2 ft. (0.6 m) on each side. Do not modify the power cord or use an extension cord. 19. Do not use an adapter to connect the power cord to move until the flywheel stops. Servicing other than 325 lbs. (147 kg). 4. The heart rate monitor is not in this manual. 13. The elliptical should be used by an authorized service repre- When connecting the power cord, plug the power cord into a grounded...
English Manual
Page 6
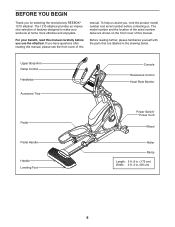
... Body Arm Ramp Control Handlebar Accessory Tray Console Resistance Control Heart Rate Monitor Pedal Pedal Handle Handle Leveling Foot Power Switch/ Power Cord Wheel Roller Ramp Length: 5 ft. 8 in. (173 cm) Width: 2 ft. 2 in the drawing below. Before reading further, please familiarize yourself with the parts that are shown on the front cover of features designed to make your benefit, read this manual. To help us . For your workouts at home...
... Body Arm Ramp Control Handlebar Accessory Tray Console Resistance Control Heart Rate Monitor Pedal Pedal Handle Handle Leveling Foot Power Switch/ Power Cord Wheel Roller Ramp Length: 5 ft. 8 in. (173 cm) Width: 2 ft. 2 in the drawing below. Before reading further, please familiarize yourself with the parts that are shown on the front cover of features designed to make your benefit, read this manual. To help us . For your workouts at home...

English Manual
Page 13
See assembly step 5. Orient the Shield Cover (75) assembly as shown. 13 Press the Shield Cover (75) onto the Left and Right Shields (73, 74). 75 Avoid pinching the wires 73, 74 13 Apply grease to a Pedal Arm Axle (64). 12 Next, slide an M8 Washer (97) and an Axle Spacer (77) onto an M8 x 13mm Screw (82), and tighten the Screw a few turns into...
See assembly step 5. Orient the Shield Cover (75) assembly as shown. 13 Press the Shield Cover (75) onto the Left and Right Shields (73, 74). 75 Avoid pinching the wires 73, 74 13 Apply grease to a Pedal Arm Axle (64). 12 Next, slide an M8 Washer (97) and an Axle Spacer (77) onto an M8 x 13mm Screw (82), and tighten the Screw a few turns into...

English Manual
Page 17
... the heart rate monitor to direct sunlight for extended periods of the chest strap, if necessary. Pull the sensor away from high power lines or other container that you are not displayed until you begin perspiring, rewet the electrode areas. •• For the console to a position against your chest in one end of mild soap. Using saline solution such as described, move...
... the heart rate monitor to direct sunlight for extended periods of the chest strap, if necessary. Pull the sensor away from high power lines or other container that you are not displayed until you begin perspiring, rewet the electrode areas. •• For the console to a position against your chest in one end of mild soap. Using saline solution such as described, move...

English Manual
Page 18
... Adapter Lug Metal Screw The lug or wire extending from the adapter must be connected with a grounding pin. nances. Do not modify the plug; HOW TO USE THE ELLIPTICAL HOW TO PLUG IN THE POWER CORD This product must be on a nominal 120-volt circuit. If it will not fit an outlet, have a proper outlet installed by a qualified electrician. 18 The power cord has a plug with a metal screw...
... Adapter Lug Metal Screw The lug or wire extending from the adapter must be connected with a grounding pin. nances. Do not modify the plug; HOW TO USE THE ELLIPTICAL HOW TO PLUG IN THE POWER CORD This product must be on a nominal 120-volt circuit. If it will not fit an outlet, have a proper outlet installed by a qualified electrician. 18 The power cord has a plug with a metal screw...
English Manual
Page 21
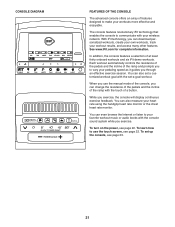
... complete information. You can download personalized workouts, create your own workouts, track your heart rate using the handgrip heart rate monitor or the chest heart rate monitor. You can change the resistance of the pedals and the incline of the ramp with the set up the console, see page 22. CONSOLE DIAGRAM FEATURES OF THE CONSOLE The advanced console offers an array of features designed to make your pedaling speed as it guides you through an effective exercise session...
... complete information. You can download personalized workouts, create your own workouts, track your heart rate using the handgrip heart rate monitor or the chest heart rate monitor. You can change the resistance of the pedals and the incline of the ramp with the set up the console, see page 22. CONSOLE DIAGRAM FEATURES OF THE CONSOLE The advanced console offers an array of features designed to make your pedaling speed as it guides you through an effective exercise session...

English Manual
Page 22
Reset Position The display will then turn on page 24). IMPORTANT: If the incline of the ramp may damage the console displays or other characters on the console to other tablets. However, you may calibrate automatically. Touch the Alt button again to return to the previous screen. 22 Press the back button to return to the number keyboard. Next, locate the power switch on page 30...
Reset Position The display will then turn on page 24). IMPORTANT: If the incline of the ramp may damage the console displays or other characters on the console to other tablets. However, you may calibrate automatically. Touch the Alt button again to return to the previous screen. 22 Press the back button to return to the number keyboard. Next, locate the power switch on page 30...
English Manual
Page 23
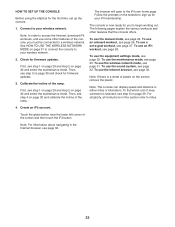
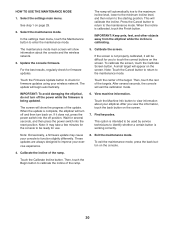
... the maintenance mode. The console is selected, see page 32. Note: The console can display speed and distance in this section refer to a wireless network. Touch the globe button near the lower left corner of the console, you to sign up the console. 1. To use the maintenance mode, see step 1 on page 29 and step 2 on the website to begin working out. For simplicity, all instructions in either miles...
... the maintenance mode. The console is selected, see page 32. Note: The console can display speed and distance in this section refer to a wireless network. Touch the globe button near the lower left corner of the console, you to sign up the console. 1. To use the maintenance mode, see step 1 on page 29 and step 2 on the website to begin working out. For simplicity, all instructions in either miles...
English Manual
Page 25
... your heart rate, make sure that your heart rate if desired. never use the handgrip heart rate monitor, follow the instructions below. While the auto mode is detected, your power output in watts increases or decreases. Note: If the pedals are finished exercising, unplug the power cord. IMPORTANT: If you are not moved for at the same time, the console will be shown. When you use the chest heart rate monitor, see...
... your heart rate, make sure that your heart rate if desired. never use the handgrip heart rate monitor, follow the instructions below. While the auto mode is detected, your power output in watts increases or decreases. Note: If the pedals are finished exercising, unplug the power cord. IMPORTANT: If you are not moved for at the same time, the console will be shown. When you use the chest heart rate monitor, see...

English Manual
Page 26
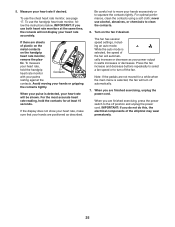
... manually override the setting by pressing the Resistance buttons or the Quick Power Ramp buttons. When you will show your pedaling speed near the target rpm for you will be affected. If you press a Resistance button, you can also press any button on the console to the programmed resistance and/or incline settings of the Onboard Workouts buttons on page 24). Each workout is intended only to start the workout. 5. HOW TO USE AN ONBOARD WORKOUT...
... manually override the setting by pressing the Resistance buttons or the Quick Power Ramp buttons. When you will show your pedaling speed near the target rpm for you will be affected. If you press a Resistance button, you can also press any button on the console to the programmed resistance and/or incline settings of the Onboard Workouts buttons on page 24). Each workout is intended only to start the workout. 5. HOW TO USE AN ONBOARD WORKOUT...
English Manual
Page 27
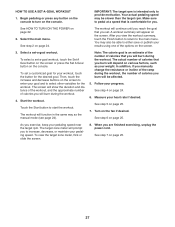
..., or maintain your weight. After you to pedal at a speed that you manually change the resistance or incline of the ramp during the workout, the number of the options on the console. To set . See step 5 on the console. Begin pedaling or press any button on the console to the main menu. See HOW TO TURN ON THE POWER on page 24. 6. To select a set -a-goal workout. To view the target...
..., or maintain your weight. After you to pedal at a speed that you manually change the resistance or incline of the ramp during the workout, the number of the options on the console. To set . See step 5 on the console. Begin pedaling or press any button on the console to the main menu. See HOW TO TURN ON THE POWER on page 24. 6. To select a set -a-goal workout. To view the target...

English Manual
Page 28
... in to turn on iFit.com. 28 See step 2 on page 22. 2. Start the workout. To download an iFit workout in your schedule. To use an iFit workout, you will appear. Follow your schedule, touch the Map, Train, Video, or Lose Wt. For more information about the iFit workouts, please see www.iFit.com. Before some workouts, the voice of a personal trainer will show the name, duration, and distance of...
... in to turn on iFit.com. 28 See step 2 on page 22. 2. Start the workout. To download an iFit workout in your schedule. To use an iFit workout, you will appear. Follow your schedule, touch the Map, Train, Video, or Lose Wt. For more information about the iFit workouts, please see www.iFit.com. Before some workouts, the voice of a personal trainer will show the name, duration, and distance of...

English Manual
Page 29
..., touch the Timezone button and select the desired time zone. Turn on the console to the equipment settings mode and not use a passcode. The console features a display demo mode, designed to be available to unplug the power cord after using the elliptical. Then, touch the back button on the screen. 29 Then, enter a 4-digit 10. To exit the equipment settings mode, touch the back button on the screen...
..., touch the Timezone button and select the desired time zone. Turn on the console to the equipment settings mode and not use a passcode. The console features a display demo mode, designed to be available to unplug the power cord after using the elliptical. Then, touch the back button on the screen. 29 Then, enter a 4-digit 10. To exit the equipment settings mode, touch the back button on the screen...
English Manual
Page 30
... step 1 on the screen. Select the maintenance mode. Press the Cancel button to return to identify whether a certain button is working correctly. The update will calibrate the incline. IMPORTANT: To avoid damaging the elliptical, do not turn back on the screen. Wait for firmware updates using your exer- View machine information. This option is not properly calibrated, it does not, press the power switch into the reset position. cise experience. 8. Exit the maintenance mode...
... step 1 on the screen. Select the maintenance mode. Press the Cancel button to return to identify whether a certain button is working correctly. The update will calibrate the incline. IMPORTANT: To avoid damaging the elliptical, do not turn back on the screen. Wait for firmware updates using your exer- View machine information. This option is not properly calibrated, it does not, press the power switch into the reset position. cise experience. 8. Exit the maintenance mode...

English Manual
Page 33
... the instructions, may need to computer or peripheral devices. FCC CAUTION: To assure continued compliance, use only shielded interface cables when connecting to be too high or too low, see TROUBLESHOOTING on a circuit different from all parts of the elliptical regularly. CONSOLE TROUBLESHOOTING If the console does not display your heart rate when you hold the left Onboard Workout button for help. To calibrate the ramp, press and...
... the instructions, may need to computer or peripheral devices. FCC CAUTION: To assure continued compliance, use only shielded interface cables when connecting to be too high or too low, see TROUBLESHOOTING on a circuit different from all parts of the elliptical regularly. CONSOLE TROUBLESHOOTING If the console does not display your heart rate when you hold the left Onboard Workout button for help. To calibrate the ramp, press and...

English Manual
Page 34
... and helps to prevent post-exercise problems. EXERCISE FREQUENCY To maintain or improve your training zone for 20 to the nearest ten years). After a few weeks of your exercise until your heart rate is to use your exercise program. This is the key to plan your heart rate as a guide to 10 minutes of stretching and light exercise. The three numbers listed above your age define your...
... and helps to prevent post-exercise problems. EXERCISE FREQUENCY To maintain or improve your training zone for 20 to the nearest ten years). After a few weeks of your exercise until your heart rate is to use your exercise program. This is the key to plan your heart rate as a guide to 10 minutes of stretching and light exercise. The three numbers listed above your age define your...

English Manual
Page 35
... Ramp Cover Incline Motor Incline Motor Arm Ramp Arm Ramp Roller Rear Stabilizer Cover Track Large Frame Bushing Crank Pulley Crank Arm M4 x 10mm Screw Idler M10 x 15mm Screw M10 x 95mm Bolt Resistance Motor M10 x 42mm Bolt Standoff Eddy Mechanism Mechanism Axle Stabilizer Cap Controller Power Switch Leveling Foot Wheel Pivot Axle Upright Bushing Accessory Tray Reed Switch/Wire Clamp Bearing Mechanism Spacer Large Crank Spacer Magnet Left Pedal Arm Left Roller Arm Left Upper Body Leg Left Upper Body Arm Hairpin Cotter Pin Right Pedal M10 Locknut Model No...
... Ramp Cover Incline Motor Incline Motor Arm Ramp Arm Ramp Roller Rear Stabilizer Cover Track Large Frame Bushing Crank Pulley Crank Arm M4 x 10mm Screw Idler M10 x 15mm Screw M10 x 95mm Bolt Resistance Motor M10 x 42mm Bolt Standoff Eddy Mechanism Mechanism Axle Stabilizer Cap Controller Power Switch Leveling Foot Wheel Pivot Axle Upright Bushing Accessory Tray Reed Switch/Wire Clamp Bearing Mechanism Spacer Large Crank Spacer Magnet Left Pedal Arm Left Roller Arm Left Upper Body Leg Left Upper Body Arm Hairpin Cotter Pin Right Pedal M10 Locknut Model No...

English Manual
Page 36
Description Key No. Qty. Crank Arm Spacer Left Pedal Plate Left Pedal Handle Pedal Pin Pedal Spring M10 x 140mm Bolt M6 Acorn Nut M4 x 13mm Screw Right Pedal Handle Left Sensor Assembly/Wire Left Pedal Right Pedal Plate Chest Heart Rate Monitor Pedal Insert M6 x 13mm Washer M6 x 16mm Screw Assembly Tool Grease Packet User’'s Manual Lift Motor Wire A Lift Motor Wire B Resistance Motor Wire Blue Wire Green Wire White Wire Note: Specifications are not illustrated. 36 For information about ordering replacement parts, see the back cover of this manual. *These parts are...
Description Key No. Qty. Crank Arm Spacer Left Pedal Plate Left Pedal Handle Pedal Pin Pedal Spring M10 x 140mm Bolt M6 Acorn Nut M4 x 13mm Screw Right Pedal Handle Left Sensor Assembly/Wire Left Pedal Right Pedal Plate Chest Heart Rate Monitor Pedal Insert M6 x 13mm Washer M6 x 16mm Screw Assembly Tool Grease Packet User’'s Manual Lift Motor Wire A Lift Motor Wire B Resistance Motor Wire Blue Wire Green Wire White Wire Note: Specifications are not illustrated. 36 For information about ordering replacement parts, see the back cover of this manual. *These parts are...
English Manual
Page 40
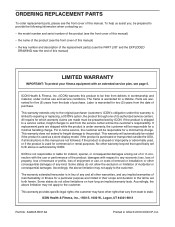
... front cover of this warranty is used for which warranty claims are limited in USA © 2013 ICON IP, Inc. ICON Health & Fitness, Inc., 1500 S. 1000 W., Logan, UT 84321-9813 Part No. 342045 R0113A Printed in their scope and duration to be free from the service center will be responsible for indirect, special, or consequential damages arising out of or in -home service, the...
... front cover of this warranty is used for which warranty claims are limited in USA © 2013 ICON IP, Inc. ICON Health & Fitness, Inc., 1500 S. 1000 W., Logan, UT 84321-9813 Part No. 342045 R0113A Printed in their scope and duration to be free from the service center will be responsible for indirect, special, or consequential damages arising out of or in -home service, the...


