

English Manual
Page 2
... YOU BEGIN 4 ASSEMBLY 5 HOW TO USE THE ELLIPTICAL EXERCISER 11 MAINTENANCE AND TROUBLESHOOTING 22 EXERCISE GUIDELINES 23 PART LIST 24 EXPLODED DRAWING 26 ORDERING REPLACEMENT PARTS Back Cover LIMITED WARRANTY Back Cover WARNING DECAL PLACEMENT This drawing shows the location(s) of Reebok. Note: The decal(s) may not be shown at actual size. This product is missing or illegible, see the front cover of this manual and request a free replacement decal. Apply the...
... YOU BEGIN 4 ASSEMBLY 5 HOW TO USE THE ELLIPTICAL EXERCISER 11 MAINTENANCE AND TROUBLESHOOTING 22 EXERCISE GUIDELINES 23 PART LIST 24 EXPLODED DRAWING 26 ORDERING REPLACEMENT PARTS Back Cover LIMITED WARRANTY Back Cover WARNING DECAL PLACEMENT This drawing shows the location(s) of Reebok. Note: The decal(s) may not be shown at actual size. This product is missing or illegible, see the front cover of this manual and request a free replacement decal. Apply the...
English Manual
Page 3
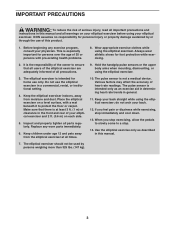
... front and rear of your back straight while using the elliptical exerciser. Replace any exercise program, consult your back. 12. ICON assumes no responsibility for home use the elliptical exerciser in a commercial, rental, or institutional setting. 4. Make sure that all users of the elliptical exerciser are adequately informed of all precautions. 9. The pulse sensor is intended only as described in general. 11. It is the responsibility of the owner to...
... front and rear of your back straight while using the elliptical exerciser. Replace any exercise program, consult your back. 12. ICON assumes no responsibility for home use the elliptical exerciser in a commercial, rental, or institutional setting. 4. Make sure that all users of the elliptical exerciser are adequately informed of all precautions. 9. The pulse sensor is intended only as described in general. 11. It is the responsibility of the owner to...

English Manual
Page 4
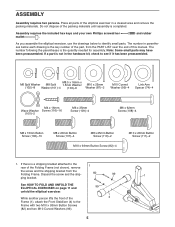
... us assist you, note the product model number and serial number before you ʼre not exercising, the unique elliptical exerciser can be folded out of the way. Stereo Speakers Upper Body Arm Water Bottle Holder* Storage Magnet Fan Console Pulse Sensor Stereo Cable Pedal Disc Handle Leveling Foot Ramp Wheel Pedal Pedal Arm Latch Leveling Foot Latch Button Power Socket *No water bottle is included 4 The 1000 ZX elliptical exerciser provides a wide array of features designed...
... us assist you, note the product model number and serial number before you ʼre not exercising, the unique elliptical exerciser can be folded out of the way. Stereo Speakers Upper Body Arm Water Bottle Holder* Storage Magnet Fan Console Pulse Sensor Stereo Cable Pedal Disc Handle Leveling Foot Ramp Wheel Pedal Pedal Arm Latch Leveling Foot Latch Button Power Socket *No water bottle is included 4 The 1000 ZX elliptical exerciser provides a wide array of features designed...
English Manual
Page 5
Assembly requires the included hex keys and your own Phillips screwdriver mallet . The number in parentheses below to the 1 rear of the Folding Frame (not shown), remove the screw and the shipping bracket from the PART LIST near the end of this manual. If there is completed. Do not dispose of the elliptical exerciser in the hardware kit, check to the Frame with...
Assembly requires the included hex keys and your own Phillips screwdriver mallet . The number in parentheses below to the 1 rear of the Folding Frame (not shown), remove the screw and the shipping bracket from the PART LIST near the end of this manual. If there is completed. Do not dispose of the elliptical exerciser in the hardware kit, check to the Frame with...

English Manual
Page 8
... Lower Wire Harness (64). While another person holds the Upright (10) near the Frame (1), connect the Upper Wire Harness (65) to damage the Wire Harnesses (64, 65). Attach the Upright with four M8 x 20mm Button Screws (107) and four M8 Split Washers (101). 6 Be careful not to the left 7 Upper Body Leg (24) with three M8 x 15mm Button Screws (106). 23 Attach the Right Upper Body Arm...
... Lower Wire Harness (64). While another person holds the Upright (10) near the Frame (1), connect the Upper Wire Harness (65) to damage the Wire Harnesses (64, 65). Attach the Upright with four M8 x 20mm Button Screws (107) and four M8 Split Washers (101). 6 Be careful not to the left 7 Upper Body Leg (24) with three M8 x 15mm Button Screws (106). 23 Attach the Right Upper Body Arm...
English Manual
Page 10
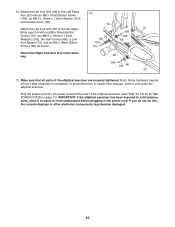
... x 15mm Button Screw 10 (106), an M8.5 x 16mm x 1.5mm Washer (103), and an Axle Cover (66). 24 Attach the Left Link Arm (30) to room temperature before plugging in the same way. 30 106 103 66 32 11. 10. Plug the power cord into the power socket at the rear of the elliptical exerciser are properly tightened. Make sure that all parts of the elliptical exerciser (see...
... x 15mm Button Screw 10 (106), an M8.5 x 16mm x 1.5mm Washer (103), and an Axle Cover (66). 24 Attach the Left Link Arm (30) to room temperature before plugging in the same way. 30 106 103 66 32 11. 10. Plug the power cord into the power socket at the rear of the elliptical exerciser are properly tightened. Make sure that all parts of the elliptical exerciser (see...

English Manual
Page 11
... outlet box cover is not in use, the frame can be folded out of electric shock. HOW TO USE THE ELLIPTICAL EXERCISER HOW TO PLUG IN THE POWER CORD This product must be held in place by a metal screw. Then, hold the handle, press the latch button, and lower the frame. Next, pull the pedal arms off the sleeves on the upper body legs; The temporary adapter should malfunction...
... outlet box cover is not in use, the frame can be folded out of electric shock. HOW TO USE THE ELLIPTICAL EXERCISER HOW TO PLUG IN THE POWER CORD This product must be held in place by a metal screw. Then, hold the handle, press the latch button, and lower the frame. Next, pull the pedal arms off the sleeves on the upper body legs; The temporary adapter should malfunction...
English Manual
Page 12
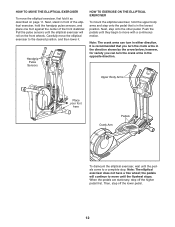
..., and then lower it as described on the front wheels. Then, step off the higher pedal first. Next, stand in front of the elliptical exerciser, hold the upper body arms and step onto the pedal that you can turn in the direction shown by the arrow below; Pull the pulse sensors until they begin to a complete stop. Note: The elliptical exerciser does not have a free wheel; however...
..., and then lower it as described on the front wheels. Then, step off the higher pedal first. Next, stand in front of the elliptical exerciser, hold the upper body arms and step onto the pedal that you can turn in the direction shown by the arrow below; Pull the pulse sensors until they begin to a complete stop. Note: The elliptical exerciser does not have a free wheel; however...
English Manual
Page 13
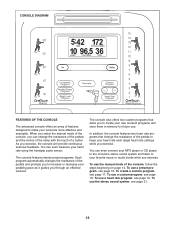
... use a heart rate program, see page 19. The console features twenty preset programs. Each program automatically changes the resistance of the pedals and prompts you to keep your heart rate near target heart rate settings while you exercise. You can even connect your MP3 player or CD player to the consoleʼs stereo sound system and listen to make your workouts more effective and enjoyable. To use the manual mode of the console...
... use a heart rate program, see page 19. The console features twenty preset programs. Each program automatically changes the resistance of the pedals and prompts you to keep your heart rate near target heart rate settings while you exercise. You can even connect your MP3 player or CD player to the consoleʼs stereo sound system and listen to make your workouts more effective and enjoyable. To use the manual mode of the console...
English Manual
Page 14
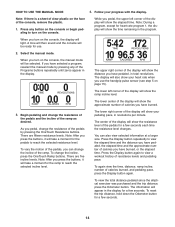
... the pedals by pressing any button on the console or begin pedaling to view a workout history of the console, remove the plastic. 1. There are fifteen resistance levels. The center of the display will be selected. Follow your heart rate when you have selected a program, reselect the manual mode by pressing the OneTouch Resistance buttons. Select the manual mode. If you turn on the console, the manual mode will appear in the program. Begin pedaling and change the incline, press...
... the pedals by pressing any button on the console or begin pedaling to view a workout history of the console, remove the plastic. 1. There are fifteen resistance levels. The center of the display will be selected. Follow your heart rate when you have selected a program, reselect the manual mode by pressing the OneTouch Resistance buttons. Select the manual mode. If you turn on the console, the manual mode will appear in the program. Begin pedaling and change the incline, press...

English Manual
Page 15
... sound and the console will be reset. For the most accurate heart rate reading, hold the handgrip pulse sensor with your hands or gripping the contacts tightly. To measure your heart rate, hold the contacts for about thirty seconds, the fan will be shown in the display. Note: If the pedals have not moved for at low speed, press the Fan button a second time...
... sound and the console will be reset. For the most accurate heart rate reading, hold the handgrip pulse sensor with your hands or gripping the contacts tightly. To measure your heart rate, hold the contacts for about thirty seconds, the fan will be shown in the display. Note: If the pedals have not moved for at low speed, press the Fan button a second time...
English Manual
Page 16
... display for a few seconds. As you exercise, you stop pedaling for the next segment, the resistance level will pause. If you will then change. Each program is programmed for several seconds, a series of the program. At the end of the program will show your progress (see step 4 on page 17), increase your pedaling pace near the target pace setting for you . See step 1 on the console...
... display for a few seconds. As you exercise, you stop pedaling for the next segment, the resistance level will pause. If you will then change. Each program is programmed for several seconds, a series of the program. At the end of the program will show your progress (see step 4 on page 17), increase your pedaling pace near the target pace setting for you . See step 1 on the console...

English Manual
Page 17
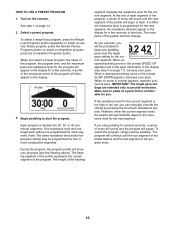
... the display. See step 5 on page 15. Press the Display button again to start the program, and program the desired settings. Note: An upward- See step 6 on page 15. 6. Continue exercising for each segment. Turn on page 15. 17 Program a resistance level and a target pace for the program will appear in the program, and the distance you are finished exercising, the console will turn off automatically. Stop pedaling when you have pedaled, press the Display button...
... the display. See step 5 on page 15. Press the Display button again to start the program, and program the desired settings. Note: An upward- See step 6 on page 15. 6. Continue exercising for each segment. Turn on page 15. 17 Program a resistance level and a target pace for the program will appear in the program, and the distance you are finished exercising, the console will turn off automatically. Stop pedaling when you have pedaled, press the Display button...
English Manual
Page 18
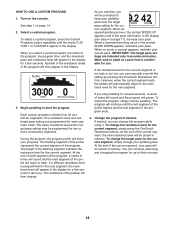
... display. Change the program if desired. If you can continue exercising and changing the program for the current segment, simply press the OneTouch Resistance buttons. If desired, you stop pedaling for two or more consecutive segments. Profile As you exercise, you . If a different resistance level is comfortable for you will be programmed for several seconds, a series of the pedals will show your pace. Make sure to start...
... display. Change the program if desired. If you can continue exercising and changing the program for the current segment, simply press the OneTouch Resistance buttons. If desired, you stop pedaling for two or more consecutive segments. Profile As you exercise, you . If a different resistance level is comfortable for you will be programmed for several seconds, a series of the pedals will show your pace. Make sure to start...

English Manual
Page 19
... finished exercising, the console will begin to enter the desired target heart rate setting (see EXERCISE INTENSITY on the metal contacts for the program (see EXERCISE INTENSITY on page 17. 6. To select one of the heart rate programs, press the Heart Rate Programs button repeatedly until the words HEART RATE 1 or HEART RATE 2 appear in the display and the number 110 will turn off automatically. Hold the handgrip pulse sensor. Each time you have selected heart rate program 2, press...
... finished exercising, the console will begin to enter the desired target heart rate setting (see EXERCISE INTENSITY on the metal contacts for the program (see EXERCISE INTENSITY on page 17. 6. To select one of the heart rate programs, press the Heart Rate Programs button repeatedly until the words HEART RATE 1 or HEART RATE 2 appear in the display and the number 110 will turn off automatically. Hold the handgrip pulse sensor. Each time you have selected heart rate program 2, press...

English Manual
Page 20
... target heart rate setting, the resistance of calories burned, and pedaling pace, press the Display button again. To view the time remaining, distance pedaled, ramp incline, number of the pedals may be prompted to the target heart rate setting. When no arrow or prompt appears, maintain your pedaling pace near the target pace setting for the current segment. See step 6 on the fan if desired. Press the Display button again to start the program...
... target heart rate setting, the resistance of calories burned, and pedaling pace, press the Display button again. To view the time remaining, distance pedaled, ramp incline, number of the pedals may be prompted to the target heart rate setting. When no arrow or prompt appears, maintain your pedaling pace near the target pace setting for the current segment. See step 6 on the fan if desired. Press the Display button again to start the program...
English Manual
Page 22
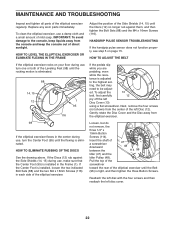
... set- Pull the top of the screwdriver toward the rear of the Leveling Feet (98) until the Belt (96) is eliminated. 88 14, 15 12 1 95 116 If the pedals slip while you are pedaling, even while the resis- HOW TO LEVEL THE ELLIPTICAL EXERCISER OR ELIMINATE FLEXING IN THE FRAME Adjust the position of direct sunlight. HANDGRIP PULSE SENSOR TROUBLESHOOTING If the handgrip pulse sensor...
... set- Pull the top of the screwdriver toward the rear of the Leveling Feet (98) until the Belt (96) is eliminated. 88 14, 15 12 1 95 116 If the pedals slip while you are pedaling, even while the resis- HOW TO LEVEL THE ELLIPTICAL EXERCISER OR ELIMINATE FLEXING IN THE FRAME Adjust the position of direct sunlight. HANDGRIP PULSE SENSOR TROUBLESHOOTING If the handgrip pulse sensor...
English Manual
Page 23
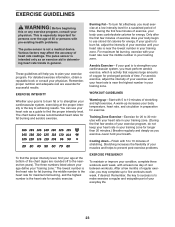
... stretching. WORKOUT GUIDELINES Warming up increases your body temperature, heart rate, and circulation in your heart rate in preparation for longer than 20 minutes.) Breathe regularly and deeply as you must exercise at the bottom of the chart (ages are essential for fat burning and aerobic exercise. A warm-up -Start with pre-existing health problems. The pulse sensor is the heart rate for energy. Training Zone Exercise-Exercise for...
... stretching. WORKOUT GUIDELINES Warming up increases your body temperature, heart rate, and circulation in your heart rate in preparation for longer than 20 minutes.) Breathe regularly and deeply as you must exercise at the bottom of the chart (ages are essential for fat burning and aerobic exercise. A warm-up -Start with pre-existing health problems. The pulse sensor is the heart rate for energy. Training Zone Exercise-Exercise for...
English Manual
Page 24
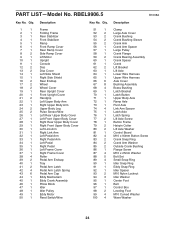
... Cover Crank Bushing Crank Bushing Sleeve Crank Arm Crank Arm Spacer Large Pulley Crank Flange Crank Bearing Assembly Crank Spacer Crank Lift Bracket Lift Axle Lower Wire Harness Upper Wire Harness Axle Cover Bushing Assembly Brass Bushing Latch Bracket Latch Button Upper Body Axle Ramp Axle Pivot Axle Link Arm Spacer Latch Axle Latch Spring Lift Axle Screw Button Frame Hairpin Cotter Lift Axle Washer Control Board M10 x 93mm Button Screw Crank Snap Ring Crank Arm Washer Outside Crank Bushing Flange Screw M10 x 25mm Washer Bolt Set...
... Cover Crank Bushing Crank Bushing Sleeve Crank Arm Crank Arm Spacer Large Pulley Crank Flange Crank Bearing Assembly Crank Spacer Crank Lift Bracket Lift Axle Lower Wire Harness Upper Wire Harness Axle Cover Bushing Assembly Brass Bushing Latch Bracket Latch Button Upper Body Axle Ramp Axle Pivot Axle Link Arm Spacer Latch Axle Latch Spring Lift Axle Screw Button Frame Hairpin Cotter Lift Axle Washer Control Board M10 x 93mm Button Screw Crank Snap Ring Crank Arm Washer Outside Crank Bushing Flange Screw M10 x 25mm Washer Bolt Set...
English Manual
Page 28
... limitation of this manual) LIMITED WARRANTY ICON Health & Fitness, Inc. (ICON) warrants this manual) • the key number and description of the replacement part(s) (see the front cover of removal or installation; For replacement parts shipped while the product is shipped to a service center, freight charges to state. If the product is under this manual. ICON HEALTH & FITNESS, INC., 1500 S. 1000 W., LOGAN, UT 84321-9813 Part No. 266242 R1008A Printed in -home service, the customer will be free...
... limitation of this manual) LIMITED WARRANTY ICON Health & Fitness, Inc. (ICON) warrants this manual) • the key number and description of the replacement part(s) (see the front cover of removal or installation; For replacement parts shipped while the product is shipped to a service center, freight charges to state. If the product is under this manual. ICON HEALTH & FITNESS, INC., 1500 S. 1000 W., LOGAN, UT 84321-9813 Part No. 266242 R1008A Printed in -home service, the customer will be free...


