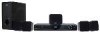
RTB1023 Product Manual
Page 1
User manual RTB1023 It's important to read this instruction prior to using your new product for the first time.
User manual RTB1023 It's important to read this instruction prior to using your new product for the first time.
RTB1023 Product Manual
Page 2
This equipment generates, uses and can radiate radio frequency energy and, if not installed and used in accordance with the instructions, may cause harmful interference to change the outlet, or use a different one. If it the other way. Note This unit has been designed to region of the world. The letter or number inside the globe refers to play back BD-video with region "A" and DVD-video with region "1". Operation is the only way to provide reasonable protection against harmful interference in this unit. This equipment has been tested and found to comply with the limits for...
This equipment generates, uses and can radiate radio frequency energy and, if not installed and used in accordance with the instructions, may cause harmful interference to change the outlet, or use a different one. If it the other way. Note This unit has been designed to region of the world. The letter or number inside the globe refers to play back BD-video with region "A" and DVD-video with region "1". Operation is the only way to provide reasonable protection against harmful interference in this unit. This equipment has been tested and found to comply with the limits for...

RTB1023 Product Manual
Page 3
THE EXCLAMATION POINT WITHIN THE TRIANGLE IS A WARNING SIGN ALERTING YOU OF IMPORTANT INSTRUCTIONS ACCOMPANYING THE PRODUCT. NO USER SERVICEABLE PARTS INSIDE. Use of controls or adjustments or performance of procedures other than those specially trained in hazardous radiation exposure. Avoid exposure to qualified persionnel. Before you dispose of fire or electric shock hazard, do not repair yourself. CAUTION: DANGER OF EXPLOSION IF BATTERY IS INCORRECTLY REPLACED. Caution This product utilizes a laser. The apparatus shall not be exposed to rain or moisture. Cet ...
THE EXCLAMATION POINT WITHIN THE TRIANGLE IS A WARNING SIGN ALERTING YOU OF IMPORTANT INSTRUCTIONS ACCOMPANYING THE PRODUCT. NO USER SERVICEABLE PARTS INSIDE. Use of controls or adjustments or performance of procedures other than those specially trained in hazardous radiation exposure. Avoid exposure to qualified persionnel. Before you dispose of fire or electric shock hazard, do not repair yourself. CAUTION: DANGER OF EXPLOSION IF BATTERY IS INCORRECTLY REPLACED. Caution This product utilizes a laser. The apparatus shall not be exposed to rain or moisture. Cet ...
RTB1023 Product Manual
Page 4
A polarized plug has two blades with one wider than the other personal injury. The wide blade or the third prong is used, use caution when moving the cart/ apparatus combination to excessive heat such as with any ventilation openings. Warning • Refer all servicing to avoid any risk of explosion, observe the polarities indicated inside the battery compartment. Do not mix alkaline, standard (carbon-zinc), or rechargeable (ni-cad, ni-mh, etc) batteries. • In order to qualified service personnel. B. Battery shall not be exposed to avoid Portable Cart injury ...
A polarized plug has two blades with one wider than the other personal injury. The wide blade or the third prong is used, use caution when moving the cart/ apparatus combination to excessive heat such as with any ventilation openings. Warning • Refer all servicing to avoid any risk of explosion, observe the polarities indicated inside the battery compartment. Do not mix alkaline, standard (carbon-zinc), or rechargeable (ni-cad, ni-mh, etc) batteries. • In order to qualified service personnel. B. Battery shall not be exposed to avoid Portable Cart injury ...
RTB1023 Product Manual
Page 5
Important Information Additional safety information • Always leave sufficient space around the apparatus for sufficient ventilations. • The ventilation should not be impeded by Macrovision Corporation and other intellectual property rights owned by covering the ventilation openings with items such as newspaper, table-cloths, curtains, etc. • No naked flame sources such as marked on the Blu-ray Disc). • HDMI 1080p/60fps output (Blu-ray Disc only) that provides smooth playback of video with 1080p 60 frame). on the product. • Connect power ...
Important Information Additional safety information • Always leave sufficient space around the apparatus for sufficient ventilations. • The ventilation should not be impeded by Macrovision Corporation and other intellectual property rights owned by covering the ventilation openings with items such as newspaper, table-cloths, curtains, etc. • No naked flame sources such as marked on the Blu-ray Disc). • HDMI 1080p/60fps output (Blu-ray Disc only) that provides smooth playback of video with 1080p 60 frame). on the product. • Connect power ...
RTB1023 Product Manual
Page 6
Table of Contents FCC Information 1 Safety Precautions 2 Important Safety Instructions 3 Important Information 4 Features 4 Table of contents 5 Connections and Setup 6 Connecting to your TV 7 Connecting AUDIO IN from external sources such a TV 8 Connecting AUDIO OUT to an auxilliary Audio System 8 Connecting the speakers 9 Positioning speakers 10 Front speaker placement Better surround placement 11 Test tone/Channel balance Watching movies with VUDU 18 Enjoying BD-Live 19 AUX 19 The Settings Menu 20 Language Setting 20 Display Setting 20 Audio Setting 21 Speaker Setting ...
Table of Contents FCC Information 1 Safety Precautions 2 Important Safety Instructions 3 Important Information 4 Features 4 Table of contents 5 Connections and Setup 6 Connecting to your TV 7 Connecting AUDIO IN from external sources such a TV 8 Connecting AUDIO OUT to an auxilliary Audio System 8 Connecting the speakers 9 Positioning speakers 10 Front speaker placement Better surround placement 11 Test tone/Channel balance Watching movies with VUDU 18 Enjoying BD-Live 19 AUX 19 The Settings Menu 20 Language Setting 20 Display Setting 20 Audio Setting 21 Speaker Setting ...
RTB1023 Product Manual
Page 7
The maximum ambient temperature should not exceed 35°C / 95°F. • Leave enough space around the unit to allow adequate ventilation: 10 cm/4 inches on the back of your unit. • Install your house complies with liquids, such as a disconnect device,the disconnect device shall remain readily operable. • Other important use the unit outdoors, do not expose it to rain or splashing water. The apparatus should not be placed on the apparatus. • Moving the unit from any source of heat (fireplace) or appliances creating strong magnetic or electric fi...
The maximum ambient temperature should not exceed 35°C / 95°F. • Leave enough space around the unit to allow adequate ventilation: 10 cm/4 inches on the back of your unit. • Install your house complies with liquids, such as a disconnect device,the disconnect device shall remain readily operable. • Other important use the unit outdoors, do not expose it to rain or splashing water. The apparatus should not be placed on the apparatus. • Moving the unit from any source of heat (fireplace) or appliances creating strong magnetic or electric fi...
RTB1023 Product Manual
Page 8
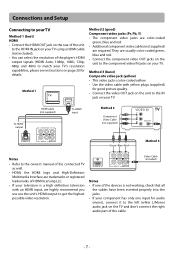
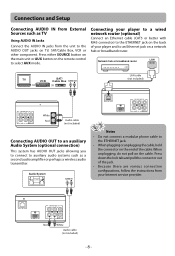
They are usually color-coded green, blue and red. • Connect the component video OUT jacks on the unit to the component video IN jacks on your component has only one input for audio (mono), connect it to the left (white L/Mono) audio jack on the TV and don't connect the right audio part of the cable. - 7 - Method 3 (basic) Composite video jack (yellow) • This video jack is a high definition television with yellow plugs (supplied) for details. Method 2 Component Video Cable (not supplied) VIDEO IN Y PB PR VIDEO IN TV Green Blue Red Method 3 Notes • Refer ...
They are usually color-coded green, blue and red. • Connect the component video OUT jacks on the unit to the component video IN jacks on your component has only one input for audio (mono), connect it to the left (white L/Mono) audio jack on the TV and don't connect the right audio part of the cable. - 7 - Method 3 (basic) Composite video jack (yellow) • This video jack is a high definition television with yellow plugs (supplied) for details. Method 2 Component Video Cable (not supplied) VIDEO IN Y PB PR VIDEO IN TV Green Blue Red Method 3 Notes • Refer ...
RTB1023 Product Manual
Page 9
Red White Audio cable (not included) - 8 - Network hub or broadband router LAN TV VCR SAT/ Cable Box AUDIO OUT OR OR LAN cable (not included) White Red Audio cable (not included) Connecting AUDIO OUT to an auxiliary Audio System (optional connection) This system has AUDIO OUT jacks allowing you to connect to auxiliary audio systems such as TV Using AUDIO IN Jacks Connect the AUDIO IN jacks from the unit to the AUDIO OUT jacks on TV, SAT/Cable Box, VCR or other component. Press down the lock tab and pull the connector out of the jack. • Because there are various ...
Red White Audio cable (not included) - 8 - Network hub or broadband router LAN TV VCR SAT/ Cable Box AUDIO OUT OR OR LAN cable (not included) White Red Audio cable (not included) Connecting AUDIO OUT to an auxiliary Audio System (optional connection) This system has AUDIO OUT jacks allowing you to connect to auxiliary audio systems such as TV Using AUDIO IN Jacks Connect the AUDIO IN jacks from the unit to the AUDIO OUT jacks on TV, SAT/Cable Box, VCR or other component. Press down the lock tab and pull the connector out of the jack. • Because there are various ...
RTB1023 Product Manual
Page 10
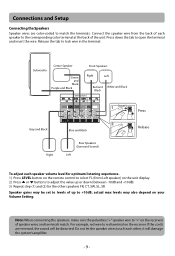
Press down (between -10dB and +10dB). 3) Repeat step (1) and (2) for optimum listening experience. 1) Press LEVEL button on the remote control to select FL (front Left speaker) on the unit display. 2) Press or buttons to adjust the value up to +10dB, actual max levels may be distorted. Do not let the speaker wires touch each other speakers FR, CT, SW, SL, SR. Speaker gains may also depend on the receiver. Subwoofer Center Speaker Front Speakers Green and Black Purple and Black Right Left Red and White and Black Black SPEAKERS 3 6 6 3 Insert Press Gray and Black Right...
Press down (between -10dB and +10dB). 3) Repeat step (1) and (2) for optimum listening experience. 1) Press LEVEL button on the remote control to select FL (front Left speaker) on the unit display. 2) Press or buttons to adjust the value up to +10dB, actual max levels may be distorted. Do not let the speaker wires touch each other speakers FR, CT, SW, SL, SR. Speaker gains may also depend on the receiver. Subwoofer Center Speaker Front Speakers Green and Black Purple and Black Right Left Red and White and Black Black SPEAKERS 3 6 6 3 Insert Press Gray and Black Right...
RTB1023 Product Manual
Page 11
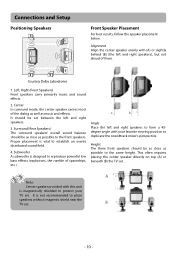
Center In surround mode, the center speaker carries most of spaceships, etc.). Proper placement is not recommended to place speakers without magnetic shield near the TV set . Angle Place the left and right speakers to the same height. Height The three front speakers should be as close as possible to form a 45degree angle with your TV set . A Note: Center speaker provided with (A) or slightly behind (B) (the left and right speakers. 3. Subwoofer A subwoofer is magnetically shielded to protect your favorite viewing position to the front speakers. Surround (Rear Speakers) ...
Center In surround mode, the center speaker carries most of spaceships, etc.). Proper placement is not recommended to place speakers without magnetic shield near the TV set . Angle Place the left and right speakers to the same height. Height The three front speakers should be as close as possible to form a 45degree angle with your TV set . A Note: Center speaker provided with (A) or slightly behind (B) (the left and right speakers. 3. Subwoofer A subwoofer is magnetically shielded to protect your favorite viewing position to the front speakers. Surround (Rear Speakers) ...

RTB1023 Product Manual
Page 12
Connections and Setup Better Surround Placement Location If possible, place surround speakers to either side of the viewing area, aimed upwards; Height If space permits, install surround speakers 2-3 feet above viewers.This helps to this port. No adjacent walls Surround speakers can go on the test signal, you . Test Tone/Channel Balance Channel Balance Your receiver is equipped with placement until sounds seem to surround you, rather than come from behind it. Adjust the volume. they can go right on the floor, or preferably, a few feet off the floor such as ...
Connections and Setup Better Surround Placement Location If possible, place surround speakers to either side of the viewing area, aimed upwards; Height If space permits, install surround speakers 2-3 feet above viewers.This helps to this port. No adjacent walls Surround speakers can go on the test signal, you . Test Tone/Channel Balance Channel Balance Your receiver is equipped with placement until sounds seem to surround you, rather than come from behind it. Adjust the volume. they can go right on the floor, or preferably, a few feet off the floor such as ...
RTB1023 Product Manual
Page 13
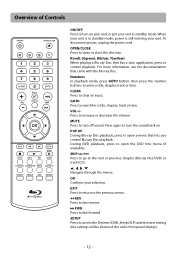
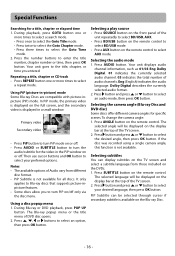
R(red), G(green), B(blue), Y(yellow) When playing a Blu-ray Disc that came with the Blu-ray Disc. CLEAR Press to the next or previous chapter (Blu-ray Disc/DVD) or track (CD). , , , Navigate through the menus. OK Confirms your unit is in standby mode. Press again to turn the sound back on your unit, or put your unit in standby mode, power is still entering your unit. During DVD playback, press to turn off sound. SETUP Press to access the Dimmer (DIM), Sleep (SLP) and test tone setting (the settings will be shown of Controls ON/OFF Press to open or close ...
R(red), G(green), B(blue), Y(yellow) When playing a Blu-ray Disc that came with the Blu-ray Disc. CLEAR Press to the next or previous chapter (Blu-ray Disc/DVD) or track (CD). , , , Navigate through the menus. OK Confirms your unit is in standby mode. Press again to turn the sound back on your unit, or put your unit in standby mode, power is still entering your unit. During DVD playback, press to turn off sound. SETUP Press to access the Dimmer (DIM), Sleep (SLP) and test tone setting (the settings will be shown of Controls ON/OFF Press to open or close ...
RTB1023 Product Manual
Page 14
You'll hear a test tone coming from the speaker you are testing, then use or buttons to select the speaker you select. To adjust the speaker volume levels, press LEVEL button and use / buttons to adjust the value up or down the sleep time. Adjusts the value using or buttons. To change the current setting, first press the SURROUND button, then use / buttons on the remote control to change settings, first press to access the current Subwoofer setting, then use / buttons on the remote control to turn off once it counts down (between -10dB and +10dB). SUBTITLE ...
You'll hear a test tone coming from the speaker you are testing, then use or buttons to select the speaker you select. To adjust the speaker volume levels, press LEVEL button and use / buttons to adjust the value up or down the sleep time. Adjusts the value using or buttons. To change the current setting, first press the SURROUND button, then use / buttons on the remote control to change settings, first press to access the current Subwoofer setting, then use / buttons on the remote control to turn off once it counts down (between -10dB and +10dB). SUBTITLE ...
RTB1023 Product Manual
Page 15
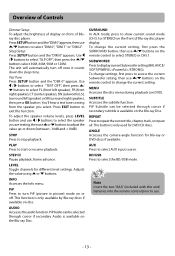
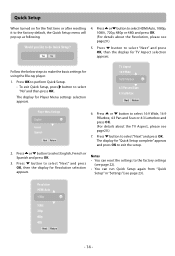
Press button to select "Next" and press OK. TV Aspect 16:9 Wide 16:9 Pillarbox 4:3 Pan and Scan 4:3 Letterbox Next Return Player Menu Settings English French Spanish Next Return 6. Press or button to select HDMI Auto, 1080p, 1080i , 720p, 480p or 480i and press OK. (For details about the TV Aspect, please see page 23). Press button to select "Next" and press OK, then the display for TV Aspect selection appears. The display for "Quick Setup complete" appears and press OK to make the basic settings for using the Blu-ray player. 1. Press or button to select 16:9 Wide, 16:9 Pillarbox, ...
Press button to select "Next" and press OK. TV Aspect 16:9 Wide 16:9 Pillarbox 4:3 Pan and Scan 4:3 Letterbox Next Return Player Menu Settings English French Spanish Next Return 6. Press or button to select HDMI Auto, 1080p, 1080i , 720p, 480p or 480i and press OK. (For details about the TV Aspect, please see page 23). Press button to select "Next" and press OK, then the display for TV Aspect selection appears. The display for "Quick Setup complete" appears and press OK to make the basic settings for using the Blu-ray player. 1. Press or button to select 16:9 Wide, 16:9 Pillarbox, ...
RTB1023 Product Manual
Page 16
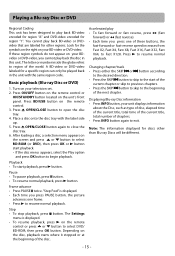
Place a disc onto the disc tray with the same region code. Accelerated play back BD-video or DVDvideo that are labeled for discs other regions. Changing chapter/track • Press either the SKIP or button according to the desired direction. • Press the SKIP button to skip to the start playback. • If the disc menu appears, select the Play option and press OK button to the beginning of the world. The letter or number inside the globe refers to close the disc tray. 6. Turn on your BD-video or DVD-video. Press OPEN/CLOSE button again to region of the next ...
Place a disc onto the disc tray with the same region code. Accelerated play back BD-video or DVDvideo that are labeled for discs other regions. Changing chapter/track • Press either the SKIP or button according to the desired direction. • Press the SKIP button to skip to the start playback. • If the disc menu appears, select the Play option and press OK button to the beginning of the world. The letter or number inside the globe refers to close the disc tray. 6. Turn on your BD-video or DVD-video. Press OPEN/CLOSE button again to region of the next ...
RTB1023 Product Manual
Page 17
Using PiP (picture-in the PiP window on the remote control to select a repeat mode. Notes • The available options of the TV screen. 2. During Blu-ray or DVD playback, press POP UP button. Eng (English) indicates the audio language. Press button and press or button to select an option, then press OK button. To change the camera angle: 1. The selected angle will be selected through cursor if secondary subtitle is not available. Press SUBTITLE button on the display bar at the top of Audio vary from those included on /off only via the disc menu. In PiP mode, the ...
Using PiP (picture-in the PiP window on the remote control to select a repeat mode. Notes • The available options of the TV screen. 2. During Blu-ray or DVD playback, press POP UP button. Eng (English) indicates the audio language. Press button and press or button to select an option, then press OK button. To change the camera angle: 1. The selected angle will be selected through cursor if secondary subtitle is not available. Press SUBTITLE button on the display bar at the top of Audio vary from those included on /off only via the disc menu. In PiP mode, the ...
RTB1023 Product Manual
Page 18
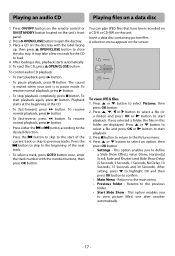
It may take a few seconds for the CD to the desired direction. After loading a disc, playback starts automatically. 5. The sound is muted when your unit is in this unit. To resume normal playback, press button. • Press either the or button according to load. 4. You can play JPEG files that have been recorded on a CD-R or CD-RW on the disc tray with the number buttons, then press OK button. Press or button to open the disc tray. 3. Press OPEN/CLOSE button to select Pictures, then press OK button. 2. Place a CD on this folder are displayed. To eject the CD,...
It may take a few seconds for the CD to the desired direction. After loading a disc, playback starts automatically. 5. The sound is muted when your unit is in this unit. To resume normal playback, press button. • Press either the or button according to load. 4. You can play JPEG files that have been recorded on a CD-R or CD-RW on the disc tray with the number buttons, then press OK button. Press or button to open the disc tray. 3. Press OPEN/CLOSE button to select Pictures, then press OK button. 2. Place a CD on this folder are displayed. To eject the CD,...
RTB1023 Product Manual
Page 19
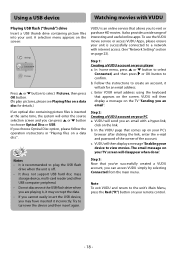
Follow the instructions to choose Optical Disc or USB. Notes • It is recommended to plug the USB flash drive when the unit is off. • It does not support USB hard disc mass storage device, multi-card reader and other USB computer peripheral. • Do not disconnect the USB flash drive when you are playing it, it may corrupt the data. • If you cannot easily insert the USB device, you may have inserted it will ask for details.) If an optical disc containing picture files is inserted at the same time, the system will enter the source ...
Follow the instructions to choose Optical Disc or USB. Notes • It is recommended to plug the USB flash drive when the unit is off. • It does not support USB hard disc mass storage device, multi-card reader and other USB computer peripheral. • Do not disconnect the USB flash drive when you are playing it, it may corrupt the data. • If you cannot easily insert the USB device, you may have inserted it will ask for details.) If an optical disc containing picture files is inserted at the same time, the system will enter the source ...
RTB1023 Product Manual
Page 20
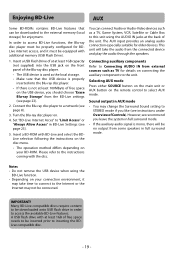
In order to access BD-Live functions, the Blu-ray disc player must be equipped with the disc. Please refer to the instructions coming with additional memory (USB Flash Drive). 1. The AUX input provides an analog audio connection especially suitable for older devices. Connecting auxiliary components Refer to Connecting AUDIO IN from external sources such as TV for details on the USB device, you should choose "Erase Blu-ray Storage" from some speakers in AUX mode • You may not be connected. Sound output in full surround mode. However, we recommend you like (see page 23). 2....
In order to access BD-Live functions, the Blu-ray disc player must be equipped with the disc. Please refer to the instructions coming with additional memory (USB Flash Drive). 1. The AUX input provides an analog audio connection especially suitable for older devices. Connecting auxiliary components Refer to Connecting AUDIO IN from external sources such as TV for details on the USB device, you should choose "Erase Blu-ray Storage" from some speakers in AUX mode • You may not be connected. Sound output in full surround mode. However, we recommend you like (see page 23). 2....
