
User Manual
Page 4
B_RT2380 EN 4/7/04 1:44 PM Page 5 Table of Content FCC Information Advanced Sound Control EN Sound Enhancement Systems 18 Getting Started Fine Setting of Components 19 Unpacking the Receiver 2 Fine ... Important battery information 23 Connecting the Subwoofer 6 Safety precautions 23 Positioning your Speaker 7 Headset safety 23 Front Speaker Placement 7 Don't infringe 23 Preferred Surround Placement 8 Equipment Specifications 23 Advanced Setting 8 Test Tone / Channel Balance 9 Connecting for Power 9 Limited Warranty (U.S 24 Using Headphones 9 Factory Setting...
B_RT2380 EN 4/7/04 1:44 PM Page 5 Table of Content FCC Information Advanced Sound Control EN Sound Enhancement Systems 18 Getting Started Fine Setting of Components 19 Unpacking the Receiver 2 Fine ... Important battery information 23 Connecting the Subwoofer 6 Safety precautions 23 Positioning your Speaker 7 Headset safety 23 Front Speaker Placement 7 Don't infringe 23 Preferred Surround Placement 8 Equipment Specifications 23 Advanced Setting 8 Test Tone / Channel Balance 9 Connecting for Power 9 Limited Warranty (U.S 24 Using Headphones 9 Factory Setting...
User Manual
Page 5
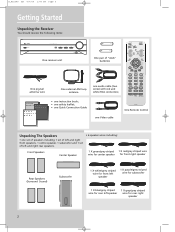
...pair of "AAA" batteries One pig-tail antenna wire One external AM loop antenna one audio cable (two wires) with red and white RCA connectors; • one instruction book; • one safety leaflet; • one Quick Connection Guide one Video cable One Remote Control ... including: Front Speakers Center Speaker 1 X green/grey striped 1 X red/grey striped wire wire for center speaker for front right speaker Rear Speakers (Surround Sound) Subwoofer 1 X white/grey striped wire for front left speaker 1 X purple/grey striped wire for subwoofer 1 X blue/grey striped wire for rear...
...pair of "AAA" batteries One pig-tail antenna wire One external AM loop antenna one audio cable (two wires) with red and white RCA connectors; • one instruction book; • one safety leaflet; • one Quick Connection Guide one Video cable One Remote Control ... including: Front Speakers Center Speaker 1 X green/grey striped 1 X red/grey striped wire wire for center speaker for front right speaker Rear Speakers (Surround Sound) Subwoofer 1 X white/grey striped wire for front left speaker 1 X purple/grey striped wire for subwoofer 1 X blue/grey striped wire for rear...
User Manual
Page 7
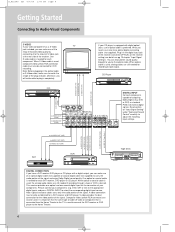
...is used to connect the SAT receiver or DVD player to the Home Theatre. 4 This receiver provides one optical and one more optical digital connecting cable (not supplied). Please connect your components (e.g. Composite video (yellow RCA connector) can make use of it to enjoy enhanced video quality...S-Video TV jack included, you need is just one coaxial digital input for the connection of your components. What you can enjoy better sound quality brought to adjust the matching input settings. You can make use of outputing Dolby Digital (e.g. CD Player to S-VIDEO OUT (DVD)...
...is used to connect the SAT receiver or DVD player to the Home Theatre. 4 This receiver provides one optical and one more optical digital connecting cable (not supplied). Please connect your components (e.g. Composite video (yellow RCA connector) can make use of it to enjoy enhanced video quality...S-Video TV jack included, you need is just one coaxial digital input for the connection of your components. What you can enjoy better sound quality brought to adjust the matching input settings. You can make use of outputing Dolby Digital (e.g. CD Player to S-VIDEO OUT (DVD)...

User Manual
Page 9
...1 subwoofer). For more information please refer to section "Fine Setting of the Speakers" in the terminal. Release tab to lock wire in "Advanced Sound Control" on the receiver. To ease speaker connections, the speaker wires and the terminals are color-coded. • White/Grey Striped (Front Left... • Grey/Grey Striped (Rear Right Speaker). • Purple/Grey Striped (Subwoofer) Speakers There are reversed, the sound will be distorted and will enhance surround effects. At least two front speakers (left and right) are matched. NOTE: Make sure the insulation is needed for ...
...1 subwoofer). For more information please refer to section "Fine Setting of the Speakers" in the terminal. Release tab to lock wire in "Advanced Sound Control" on the receiver. To ease speaker connections, the speaker wires and the terminals are color-coded. • White/Grey Striped (Front Left... • Grey/Grey Striped (Rear Right Speaker). • Purple/Grey Striped (Subwoofer) Speakers There are reversed, the sound will be distorted and will enhance surround effects. At least two front speakers (left and right) are matched. NOTE: Make sure the insulation is needed for ...
User Manual
Page 10
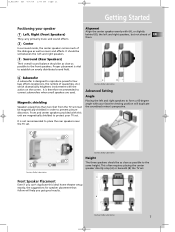
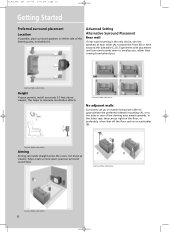
... less than two feet from the TV set between the left and right speakers to form a 45-degree angle with this ideal home theater setup exactly, the suggestions for speaker placement that follow will duplicate the soundtrack mixer's perspective. A Front Speaker Placement Even if you...EN 4/7/04 1:44 PM Page 11 Getting Started Positioning your speaker 1 Left, Right (Front Speakers) They carry primarily music and sound effects 2 Center In surround mode, the center speaker carries much of EN them. 4 Subwoofer A subwoofer is therefore recommended to connect subwoofers when small speakers...
... less than two feet from the TV set between the left and right speakers to form a 45-degree angle with this ideal home theater setup exactly, the suggestions for speaker placement that follow will duplicate the soundtrack mixer's perspective. A Front Speaker Placement Even if you...EN 4/7/04 1:44 PM Page 11 Getting Started Positioning your speaker 1 Left, Right (Front Speakers) They carry primarily music and sound effects 2 Center In surround mode, the center speaker carries much of EN them. 4 Subwoofer A subwoofer is therefore recommended to connect subwoofers when small speakers...
User Manual
Page 11
... wall mounting is the only choice, aim the speakers at viewers, helps create a more open, spacious surround sound field. Courtesy Dolby Laboratories No adjacent walls Surrounds can go on end tables (B). This helps to the sides or rear of the listening area, not ...Dolby Laboratories Courtesy Dolby Laboratories 8 Courtesy Dolby Laboratories Aiming Aiming surrounds straight across the room, not down at each other (A), towards the front (B) or even towards the sidewalls (C, D). Experiment with placement until surround sounds seem to either side of the viewing area aimed upwards. ...
... wall mounting is the only choice, aim the speakers at viewers, helps create a more open, spacious surround sound field. Courtesy Dolby Laboratories No adjacent walls Surrounds can go on end tables (B). This helps to the sides or rear of the listening area, not ...Dolby Laboratories Courtesy Dolby Laboratories 8 Courtesy Dolby Laboratories Aiming Aiming surrounds straight across the room, not down at each other (A), towards the front (B) or even towards the sidewalls (C, D). Experiment with placement until surround sounds seem to either side of the viewing area aimed upwards. ...
User Manual
Page 12
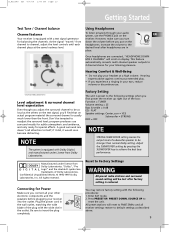
... the power cord in the wall outlet, matching the wide blade of subwoofer speaker to Factory Settings WARNING All preset radio stations and surround sound setting will scroll on the test signal, you turn for special effects. Enter SAT mode. 2. Hearing experts advise against continuous extended ... setting makes the output level of the plug with Dolby Digital, and manufactured under license from down the volume before plugging your audio system, use . Reset to be lost after headphones are connected, "HEADPHONE DOWN MIX 2 CHANNEL" will be stronger than the front. Be sure...
... the power cord in the wall outlet, matching the wide blade of subwoofer speaker to Factory Settings WARNING All preset radio stations and surround sound setting will scroll on the test signal, you turn for special effects. Enter SAT mode. 2. Hearing experts advise against continuous extended ... setting makes the output level of the plug with Dolby Digital, and manufactured under license from down the volume before plugging your audio system, use . Reset to be lost after headphones are connected, "HEADPHONE DOWN MIX 2 CHANNEL" will be stronger than the front. Be sure...

User Manual
Page 13
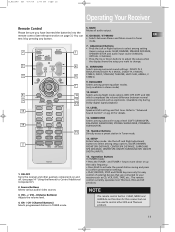
...system is turned on and off when phones are inserted. 4. SOURCE Buttons Selects sound source. (DVD, Tuner, Tape, VCR, CD, TV and SAT) 5. ON/STANDBY Turns the unit on , the unit will be off . PRESET Buttons Selects preset station in before powered off. 2. SURROUND Buttons Selects digital sound... processor. (DOLBY PL II MOVIE, STEREO, DISCO, STADIUM, THEATER, JAZZ CLUB, ARENA, 3 STEREO, DOLBY PL EMULATION, DOLBY PL II MUSIC) 10 VOLUME Increases and...
...system is turned on and off when phones are inserted. 4. SOURCE Buttons Selects sound source. (DVD, Tuner, Tape, VCR, CD, TV and SAT) 5. ON/STANDBY Turns the unit on , the unit will be off . PRESET Buttons Selects preset station in before powered off. 2. SURROUND Buttons Selects digital sound... processor. (DOLBY PL II MOVIE, STEREO, DISCO, STADIUM, THEATER, JAZZ CLUB, ARENA, 3 STEREO, DOLBY PL EMULATION, DOLBY PL II MUSIC) 10 VOLUME Increases and...
User Manual
Page 14
...SETUP Enters Setup mode. Use the Left and Right adjustment 2 buttons to select among surround sound settings: DOLBY PL II EMULATION, DOLBY PL II MUSIC, DOLBY PL II MOVIE, 5 6 STEREO, DISCO, STADIUM, THEATER, JAZZ CLUB, ARENA, 3 STEREO. 9. NOTE The remote control button CLEAR, MENU...the volume level. 4. NIGHT 8 10 Selects among setting 2 1 items in Tuner mode. 14. The remote control currently operates most Thomson, RCA and GE products. Adjustment Buttons • Press the Left or Right buttons to Control Additional Components"). 2. MUTE Mutes all audio output. Source ...
...SETUP Enters Setup mode. Use the Left and Right adjustment 2 buttons to select among surround sound settings: DOLBY PL II EMULATION, DOLBY PL II MUSIC, DOLBY PL II MOVIE, 5 6 STEREO, DISCO, STADIUM, THEATER, JAZZ CLUB, ARENA, 3 STEREO. 9. NOTE The remote control button CLEAR, MENU...the volume level. 4. NIGHT 8 10 Selects among setting 2 1 items in Tuner mode. 14. The remote control currently operates most Thomson, RCA and GE products. Adjustment Buttons • Press the Left or Right buttons to Control Additional Components"). 2. MUTE Mutes all audio output. Source ...
User Manual
Page 16
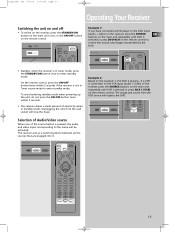
... the receiver, press the STANDBY/ON button on the main unit once, or the ON•OFF button on the remote control to receive the sounds and images transmitted by the DVD. • Standby: when the receiver is not in Tuner source mode to enter standby mode. The receiver acts as... powering up the unit, do not press the ON•OFF button twice within 2 seconds if the receiver is in standby mode. The image and sound from the wall socket will replace the DVD. Example 1: If you have connected a DVD player to enter standby mode.
... the receiver, press the STANDBY/ON button on the main unit once, or the ON•OFF button on the remote control to receive the sounds and images transmitted by the DVD. • Standby: when the receiver is not in Tuner source mode to enter standby mode. The receiver acts as... powering up the unit, do not press the ON•OFF button twice within 2 seconds if the receiver is in standby mode. The image and sound from the wall socket will replace the DVD. Example 1: If you have connected a DVD player to enter standby mode.
User Manual
Page 18
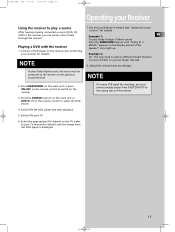
... the receiver. 7. Select the appropriate A/V channel on the remote control to the receiver (see "Advanced sound control" for details). EN Example 1: To play Dolby Prologic II Movie sound Press the SURROUND buttons until the image from DVD/CD/SAT/TV to the analog input of the speaker'' icons light... up. 1. Set the sound Mode if needed (see connecting your receiver for details). B_RT2380 EN 4/7/04 1:...
... the receiver. 7. Select the appropriate A/V channel on the remote control to the receiver (see "Advanced sound control" for details). EN Example 1: To play Dolby Prologic II Movie sound Press the SURROUND buttons until the image from DVD/CD/SAT/TV to the analog input of the speaker'' icons light... up. 1. Set the sound Mode if needed (see connecting your receiver for details). B_RT2380 EN 4/7/04 1:...
User Manual
Page 19
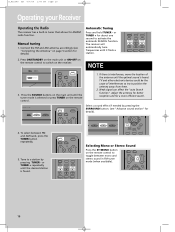
...If there is interference, move the location of interferences so try to switch on page 5 section for about one second to a station by pressing the SURROUND button. (see "Connecting the Antenna" on the receiver. or TUNER + repeatedly until it finds a station. B_RT2380 EN 4/7/04 1:44 PM Page 20...Operating your Receiver Operating the Radio The receiver has a built-in FM tuner mode (when available). 16 To select between mono and stereo sound in tuner that allows for a more efficient search. TV and other electronic devices could be the cause of the antenna until the tuner ...
...If there is interference, move the location of interferences so try to switch on page 5 section for about one second to a station by pressing the SURROUND button. (see "Connecting the Antenna" on the receiver. or TUNER + repeatedly until it finds a station. B_RT2380 EN 4/7/04 1:44 PM Page 20...Operating your Receiver Operating the Radio The receiver has a built-in FM tuner mode (when available). 16 To select between mono and stereo sound in tuner that allows for a more efficient search. TV and other electronic devices could be the cause of the antenna until the tuner ...
User Manual
Page 21
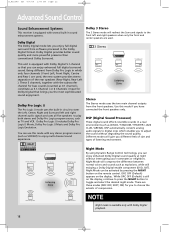
...night mode. Night Mode will compress the difference between normal voices and sounds such as (DISCO / STADIUM / THEATER / JAZZ CLUB / ARENA). Dolby Digital provides better sound quality and more powerful presence than conventional Dolby Surround. Being different from Dolby Pro Logic in which enables you have connected...Speaker This unit is equipped with Dolby Digital playback. DRC OFF (Default) appears on the display. There are used , the new system provides stereo separation of the rear speakers (Rear-Right, Rear-Left ). Dolby Pro Logic II includes Dolby Pro Logic II Movie, ...
...night mode. Night Mode will compress the difference between normal voices and sounds such as (DISCO / STADIUM / THEATER / JAZZ CLUB / ARENA). Dolby Digital provides better sound quality and more powerful presence than conventional Dolby Surround. Being different from Dolby Pro Logic in which enables you have connected...Speaker This unit is equipped with Dolby Digital playback. DRC OFF (Default) appears on the display. There are used , the new system provides stereo separation of the rear speakers (Rear-Right, Rear-Left ). Dolby Pro Logic II includes Dolby Pro Logic II Movie, ...
User Manual
Page 22
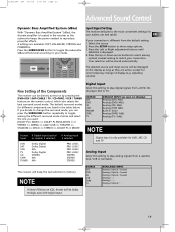
...source and input source will be displayed on the display as long as seen on the remote control, which also selects the best surround sound mode. If you want. Fine Setting of display (e.g. If linear PCM source (CD), format will keep the last selection in memory...Amplified System (dBas) With "Dynamic Bass Amplified System" (dBas), the discrete amplifier is located in the receiver so the subwoofer keeps the power needed to reproduce powerful effects. 4 settings are listed in the table below. DOLBY PL II MUSIC => DOLBY PL EMULATION => 3 STEREO => ARENA => JAZZ CLUB => THEATER =>...
...source and input source will be displayed on the display as long as seen on the remote control, which also selects the best surround sound mode. If you want. Fine Setting of display (e.g. If linear PCM source (CD), format will keep the last selection in memory...Amplified System (dBas) With "Dynamic Bass Amplified System" (dBas), the discrete amplifier is located in the receiver so the subwoofer keeps the power needed to reproduce powerful effects. 4 settings are listed in the table below. DOLBY PL II MUSIC => DOLBY PL EMULATION => 3 STEREO => ARENA => JAZZ CLUB => THEATER =>...
User Manual
Page 23
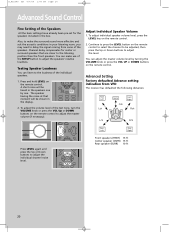
... press the VOL UP or DOWN buttons on the remote control to make use of the individual speakers. 1. Testing Speaker Loudness You can make the surround sound more effective and suit the acoustic conditions in the speakers one by one. Front speakers (FRNT) 15 ft Center speaker (CNTR) 15 ft Rear ..., you may need to adjust the level. B_RT2380 EN 4/7/04 1:44 PM Page 24 Advanced Sound Control Fine Setting of the Speakers All the basic settings have already been pre-set for center or surround speakers that moment will be shown in the box. Press and hold LEVEL on the remote...
... press the VOL UP or DOWN buttons on the remote control to make use of the individual speakers. 1. Testing Speaker Loudness You can make the surround sound more effective and suit the acoustic conditions in the speakers one by one. Front speakers (FRNT) 15 ft Center speaker (CNTR) 15 ft Rear ..., you may need to adjust the level. B_RT2380 EN 4/7/04 1:44 PM Page 24 Advanced Sound Control Fine Setting of the Speakers All the basic settings have already been pre-set for center or surround speakers that moment will be shown in the box. Press and hold LEVEL on the remote...

User Manual
Page 24
...YES. Repeat step 2 and 3 to set the ones you do not intend to use them, set up the next speaker Center Speaker selection (CTR) Surround Speaker selection (SURR) Front Speaker distance (FRNT) Centre Speaker distance (CNTR) Rear Speaker distance (SURR) YES / NO YES / NO 3-30 ft 0-... stands for 5 seconds to automatically save your selection and set up mode. 21 Press the SETUP button to enjoy optimum sound. • Speaker distance: For optimum surround experience measure the distance between the speaker and your settings or press any key to the subwoofer, offering more dynamic deep ...
...YES. Repeat step 2 and 3 to set the ones you do not intend to use them, set up the next speaker Center Speaker selection (CTR) Surround Speaker selection (SURR) Front Speaker distance (FRNT) Centre Speaker distance (CNTR) Rear Speaker distance (SURR) YES / NO YES / NO 3-30 ft 0-... stands for 5 seconds to automatically save your selection and set up mode. 21 Press the SETUP button to enjoy optimum sound. • Speaker distance: For optimum surround experience measure the distance between the speaker and your settings or press any key to the subwoofer, offering more dynamic deep ...

User Manual
Page 25
...is an obstacle between the receiver and the speakers if the sound does not match the video. • Check if the video and audio cable are not outputting in mono. ends of the system with a soft dust cloth, or with your system) Install the batteries before attempting to the analog input jacks. ... is not pointed at the remote control sensor on . • The TV is too close to match the + and - Cleaning the Exterior Disconnect the system from one channel. • Check the speaker level setting. • Check the speaker wire or external source cable connections. DVD, CD player) near the...
...is an obstacle between the receiver and the speakers if the sound does not match the video. • Check if the video and audio cable are not outputting in mono. ends of the system with a soft dust cloth, or with your system) Install the batteries before attempting to the analog input jacks. ... is not pointed at the remote control sensor on . • The TV is too close to match the + and - Cleaning the Exterior Disconnect the system from one channel. • Check the speaker level setting. • Check the speaker wire or external source cable connections. DVD, CD player) near the...
User Manual
Page 26
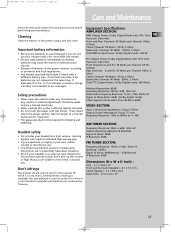
...Noise: 60dB(stereo) / 65dB(mono) IF Rejection: 50dB Dimensions (H x W x D inch) : Unit - 3.7 x 16.9 x 14 Front and Surround Speakers - 6.1 x 3.1x 3.5 Center Speaker - 2.7 x 9.8 x 33.3 Subwoofer - 12.4 x 6.3 x 14 23 Important battery information • ...Safety precautions • Never open -air type designed to let you hear outside sounds, don't turn up the volume so high that is around you do not ...high volume. B_RT2380 EN 4/7/04 1:44 PM Page 27 Care and Maintenance Disconnect the audio system from 40 dB to 60dB VIDEO SECTION: Input ( Sensitivity/ Impedance ):1Vp-p/ 75ohm Output...
...Noise: 60dB(stereo) / 65dB(mono) IF Rejection: 50dB Dimensions (H x W x D inch) : Unit - 3.7 x 16.9 x 14 Front and Surround Speakers - 6.1 x 3.1x 3.5 Center Speaker - 2.7 x 9.8 x 33.3 Subwoofer - 12.4 x 6.3 x 14 23 Important battery information • ...Safety precautions • Never open -air type designed to let you hear outside sounds, don't turn up the volume so high that is around you do not ...high volume. B_RT2380 EN 4/7/04 1:44 PM Page 27 Care and Maintenance Disconnect the audio system from 40 dB to 60dB VIDEO SECTION: Input ( Sensitivity/ Impedance ):1Vp-p/ 75ohm Output...


