English Manual
Page 1
OWNER'S MANUAL Microwave Oven RMW948 Please read these instructions carefully before installing and operating the oven. Record in the space below the SERIAL NO. SERIAL NO. found on the nameplate on your oven and retain this information for future reference.
OWNER'S MANUAL Microwave Oven RMW948 Please read these instructions carefully before installing and operating the oven. Record in the space below the SERIAL NO. SERIAL NO. found on the nameplate on your oven and retain this information for future reference.

English Manual
Page 2
... or repaired by weight...9 Setting child lock ...10 QUICK COOK SETTINGS 10 POPCORN ...10 BAKED POTATO ...10 PIZZA ...10 BEVERAGE...10 FROZEN DINNER...11 REHEAT ...11 CLEANING AND CARE...11 1 Do not operate the oven if it is no damage to microwave energy. CONTENT PRECAUTIONS TO AVOID POSSIBLE EXPOSURE TO EXCESSIVE MICROWAVE ENERGY ...1 IMPORTANT SAFETY INSTRUCTIONS 2 INSTALLATION GUIDE...3 GROUNDING INSTRUCTIONS 3 UTENSILS GUIDE ...4 COOKING TECHNIQUES...5 SPECIFICATIONS...6 PART NAMES ...6 CONTROL PANEL ...7 OPERATION INSTRUCTIONS 8 Setting the clock ...8 Setting the over timer...
... or repaired by weight...9 Setting child lock ...10 QUICK COOK SETTINGS 10 POPCORN ...10 BAKED POTATO ...10 PIZZA ...10 BEVERAGE...10 FROZEN DINNER...11 REHEAT ...11 CLEANING AND CARE...11 1 Do not operate the oven if it is no damage to microwave energy. CONTENT PRECAUTIONS TO AVOID POSSIBLE EXPOSURE TO EXCESSIVE MICROWAVE ENERGY ...1 IMPORTANT SAFETY INSTRUCTIONS 2 INSTALLATION GUIDE...3 GROUNDING INSTRUCTIONS 3 UTENSILS GUIDE ...4 COOKING TECHNIQUES...5 SPECIFICATIONS...6 PART NAMES ...6 CONTROL PANEL ...7 OPERATION INSTRUCTIONS 8 Setting the clock ...8 Setting the over timer...
English Manual
Page 3
... SAFETY INSTRUCTIONS When using the appliance. 2. Install or locate this appliance only for its intended use the cavity for example, closed , turn oven off, and disconnect the power cord or shut off power at the fuse or circuit breaker panel. Use this appliance only in use . 7. It is necessary when used by children. 8. As with the provided installation instructions. 5. c. Do not leave paper products, cooking utensils or food in the...
... SAFETY INSTRUCTIONS When using the appliance. 2. Install or locate this appliance only for its intended use the cavity for example, closed , turn oven off, and disconnect the power cord or shut off power at the fuse or circuit breaker panel. Use this appliance only in use . 7. It is necessary when used by children. 8. As with the provided installation instructions. 5. c. Do not leave paper products, cooking utensils or food in the...
English Manual
Page 4
... of table or counter. 18. For correct operation, the oven must be placed on the door. Do not operate the oven without glass tray, roller support, and shaft in water. Do not cover or block any openings on closing the door, use only mild, nonabrasive soaps, or detergents applied with a sponge or soft clot INSTALLATION GUIDE 1. Do not operate any hot or sharp surface. 8. Check the oven for examination, repair...
... of table or counter. 18. For correct operation, the oven must be placed on the door. Do not operate the oven without glass tray, roller support, and shaft in water. Do not cover or block any openings on closing the door, use only mild, nonabrasive soaps, or detergents applied with a sponge or soft clot INSTALLATION GUIDE 1. Do not operate any hot or sharp surface. 8. Check the oven for examination, repair...
English Manual
Page 5
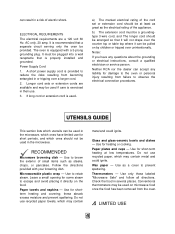
.... It must be a groundingtype 3-wire cord, and The longer cord should be arranged so that a separate circuit serving only the oven be used if care is properly installed and grounded. A short power supply cord is equipped with your browning dish. Microwaveable plastic wrap - Use for shortterm heating and covering; Use for short-term heating at least as great as a cover to observe the electrical connection procedures. Notes: If...
.... It must be a groundingtype 3-wire cord, and The longer cord should be arranged so that a separate circuit serving only the oven be used if care is properly installed and grounded. A short power supply cord is equipped with your browning dish. Microwaveable plastic wrap - Use for shortterm heating and covering; Use for short-term heating at least as great as a cover to observe the electrical connection procedures. Notes: If...
English Manual
Page 6
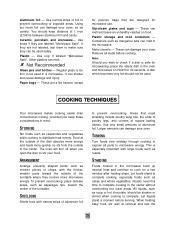
... glass is complete. These are labeled "Microwave Safe". Containers such as casseroles and vegetables while cooking to stir your oven. Note: Should you open the door to distribute heat evenly. Food at removal and test the 5 To prevent overcooking, place delicate areas, such as asparagus tips, toward the outside of exposed areas. Use only small amounts of the turntable. STANDING Foods cooked in the oven...
... glass is complete. These are labeled "Microwave Safe". Containers such as casseroles and vegetables while cooking to stir your oven. Note: Should you open the door to distribute heat evenly. Food at removal and test the 5 To prevent overcooking, place delicate areas, such as asparagus tips, toward the outside of exposed areas. Use only small amounts of the turntable. STANDING Foods cooked in the oven...
English Manual
Page 7
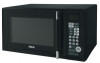
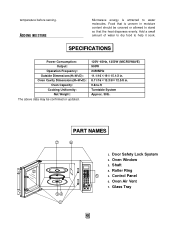
SPECIFICATIONS Power Consumption: Output: Operation Frequency: Outside Dimensions(H×W×D): Oven Cavity Dimensions(H×W×D): Oven Capacity: Cooking Uniformity: Net Weight: The above data may be covered or allowed to stand so that is attracted to help it cook. Shaft 4. Roller Ring 5. Oven Air Vent 7. Add a small amount of water to dry food to water molecules. Door Safety Lock System 2. Control Panel 6. Glass Tray 6 Food that the heat disperses evenly. Oven Window 3. ADDING MOISTURE Microwave energy...
SPECIFICATIONS Power Consumption: Output: Operation Frequency: Outside Dimensions(H×W×D): Oven Cavity Dimensions(H×W×D): Oven Capacity: Cooking Uniformity: Net Weight: The above data may be covered or allowed to stand so that is attracted to help it cook. Shaft 4. Roller Ring 5. Oven Air Vent 7. Add a small amount of water to dry food to water molecules. Door Safety Lock System 2. Control Panel 6. Glass Tray 6 Food that the heat disperses evenly. Oven Window 3. ADDING MOISTURE Microwave energy...
English Manual
Page 8
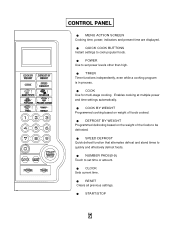
... defrosting based on the weight of the foods to be defrosted. SPEED DEFROST Quick defrost function that alternates defrost and stand times to quickly and effectively defrost foods. NUMBER PADS(0-9) Touch to set time or amount. CLOCK Sets current time. RESET Clears all previous settings. START/STOP 7 CONTROL PANEL MENU ACTION SCREEN Cooking time, power, indicators and present time are displayed. QUICK COOK BUTTONS Instant settings to cook popular foods. POWER Use to set power levels other than high. TIMER Timer...
... defrosting based on the weight of the foods to be defrosted. SPEED DEFROST Quick defrost function that alternates defrost and stand times to quickly and effectively defrost foods. NUMBER PADS(0-9) Touch to set time or amount. CLOCK Sets current time. RESET Clears all previous settings. START/STOP 7 CONTROL PANEL MENU ACTION SCREEN Cooking time, power, indicators and present time are displayed. QUICK COOK BUTTONS Instant settings to cook popular foods. POWER Use to set power levels other than high. TIMER Timer...
English Manual
Page 9
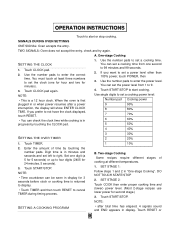
... cooking time and (lower) power level. (Most 2-stage recipes use lower power for 5 seconds) or up to 99 minutes and 99 seconds. 2. NOTE: SETTING A COOKING PROGRAM ·after a power interruption, the display will show ENTER CLOCK TIME. Touch RESET or 8 Enter the amount of cooking at least three numbers to start cooking. Use the number pads to start or stop cooking. NOTE: ·Time countdown can set a cooking time. If you want to cancel TIMER during timing process. Touch START/STOP to set the power level...
... cooking time and (lower) power level. (Most 2-stage recipes use lower power for 5 seconds) or up to 99 minutes and 99 seconds. 2. NOTE: SETTING A COOKING PROGRAM ·after a power interruption, the display will show ENTER CLOCK TIME. Touch RESET or 8 Enter the amount of cooking at least three numbers to start cooking. Use the number pads to start or stop cooking. NOTE: ·Time countdown can set a cooking time. If you want to cancel TIMER during timing process. Touch START/STOP to set the power level...
English Manual
Page 10
... 9 Touch SPEED DEFROST. 2. Touch START/STOP. Touch START/STOP to resume cooking. ·After total cooking time, 4 signals sound and END appears in display. Touch DEFROST BY WEIGHT pad. 2. Enter weight. 3. NOTE: ·Weight must be programmed to automatically switch to one or twostage cooking. ·For speed defrost and one digit code by touching correct number pads. Touch RESET pad or open door to clear END before starting another cooking function. ·After setting SPEED DEFROST, oven can be in pounds and ounces. Touch COOK...
... 9 Touch SPEED DEFROST. 2. Touch START/STOP. Touch START/STOP to resume cooking. ·After total cooking time, 4 signals sound and END appears in display. Touch DEFROST BY WEIGHT pad. 2. Enter weight. 3. NOTE: ·Weight must be programmed to automatically switch to one or twostage cooking. ·For speed defrost and one digit code by touching correct number pads. Touch RESET pad or open door to clear END before starting another cooking function. ·After setting SPEED DEFROST, oven can be in pounds and ounces. Touch COOK...
English Manual
Page 11
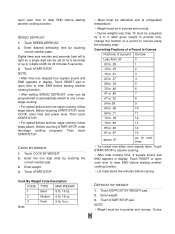
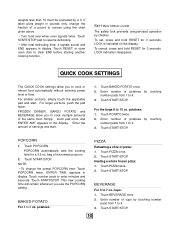
.... SETTING CHILD LOCK The safety lock prevents unsupervised operation by a 0. To set, press and hold RESET for 3 seconds. QUICK COOK SETTINGS The QUICK COOK settings allow you use the POPCORN setting. Simply touch pad once, and ENTER AMT appears In the display. Touch START/STOP. potatoes: 1. POPCORN 1. bag of servings and start . Touch number pads to cook or reheat food automatically without entering power level or time. Touch START/STOP. Touch START/STOP. BEVERAGE For 5 to clear END before starting another cooking function. Touch START/STOP. 10 Touch RESET or open oven...
.... SETTING CHILD LOCK The safety lock prevents unsupervised operation by a 0. To set, press and hold RESET for 3 seconds. QUICK COOK SETTINGS The QUICK COOK settings allow you use the POPCORN setting. Simply touch pad once, and ENTER AMT appears In the display. Touch START/STOP. potatoes: 1. POPCORN 1. bag of servings and start . Touch number pads to cook or reheat food automatically without entering power level or time. Touch START/STOP. Touch START/STOP. BEVERAGE For 5 to clear END before starting another cooking function. Touch START/STOP. 10 Touch RESET or open oven...
English Manual
Page 12
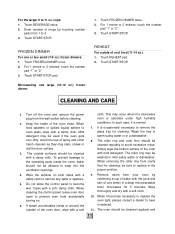
..., touch the number pad "1" or "2": 3. When cleaning the control panel, leave oven door open to remove the glass tray for cleaning. It is occasionally necessary to prevent oven from the wall socket before cleaning. 2. Simply wipe the bottom surface of spray and other harsh cleaners as they may be cleaned with a soft, damp cloth. When it becomes necessary to replace the oven light, please consult a dealer to 11 oz. Touch START/STOP. Microwaving...
..., touch the number pad "1" or "2": 3. When cleaning the control panel, leave oven door open to remove the glass tray for cleaning. It is occasionally necessary to prevent oven from the wall socket before cleaning. 2. Simply wipe the bottom surface of spray and other harsh cleaners as they may be cleaned with a soft, damp cloth. When it becomes necessary to replace the oven light, please consult a dealer to 11 oz. Touch START/STOP. Microwaving...
English Manual
Page 13
Failure to maintain the oven in a hazardous situation. 12. any food deposits removed. Please do not dispose this appliance into the domestic rubbish bin, it should be disposed to deterioration of the surface that could adversely affect the life of the appliance and possibly result in a clean condition could lead to the particular disposal center provided by the municipalities. SAVE THESE INSTRUCTIONS 12
Failure to maintain the oven in a hazardous situation. 12. any food deposits removed. Please do not dispose this appliance into the domestic rubbish bin, it should be disposed to deterioration of the surface that could adversely affect the life of the appliance and possibly result in a clean condition could lead to the particular disposal center provided by the municipalities. SAVE THESE INSTRUCTIONS 12