
User Guide
Page 1
Mini Projector User's Guide Please read this manual before Model P50
Mini Projector User's Guide Please read this manual before Model P50
User Guide
Page 2
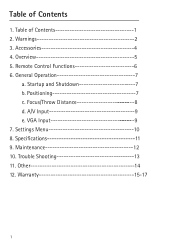
Table of Contents 1 2. Accessories 4 4. Overview 5 5. VGA Input 9 7. Settings Menu 10 9. Warranty 15-17 1 Positioning 7 c. A/V Input 9 e. Other 14 12. Focus/Throw Distance 8 d. Trouble Shooting 13 11. Warnings 2 3. Remote Control Functions 6 6. Startup and Shutdown 7 b. General Operation 7 a. Table of Contents 1. Maintenance 12 10.
Table of Contents 1 2. Accessories 4 4. Overview 5 5. VGA Input 9 7. Settings Menu 10 9. Warranty 15-17 1 Positioning 7 c. A/V Input 9 e. Other 14 12. Focus/Throw Distance 8 d. Trouble Shooting 13 11. Warnings 2 3. Remote Control Functions 6 6. Startup and Shutdown 7 b. General Operation 7 a. Table of Contents 1. Maintenance 12 10.
User Guide
Page 3
serviceable parts inside. Refer WARNINGS Important Safety Instructions 1. Read these instructions. 3. Keep these instructions. 2. Clean only with the manufacturer's instructions. 8. Do not block any heat sources such as laptops, radiators, heat that produce heat. 9. Do not use the projector near any ventilation openings. There are no user- Protect the power cord from being walked on or pinched particularly at plugs, convenience receptacles, and the point where they exit...
serviceable parts inside. Refer WARNINGS Important Safety Instructions 1. Read these instructions. 3. Keep these instructions. 2. Clean only with the manufacturer's instructions. 8. Do not block any heat sources such as laptops, radiators, heat that produce heat. 9. Do not use the projector near any ventilation openings. There are no user- Protect the power cord from being walked on or pinched particularly at plugs, convenience receptacles, and the point where they exit...
User Guide
Page 4
The projector should not be exposed to dripping or splashing should be used in any way, such as when a power-supply cord or plug is damaged, liquid has been spilled or objects have fallen into the projector, the projector has been exposed to prevent overheating. 3 required when the projector has been damaged in a well ventilated area to rain or moisture, does not operate normally, or has been dropped. 13. The projector should placed on the projector. 14. 12.
The projector should not be exposed to dripping or splashing should be used in any way, such as when a power-supply cord or plug is damaged, liquid has been spilled or objects have fallen into the projector, the projector has been exposed to prevent overheating. 3 required when the projector has been damaged in a well ventilated area to rain or moisture, does not operate normally, or has been dropped. 13. The projector should placed on the projector. 14. 12.
User Guide
Page 6
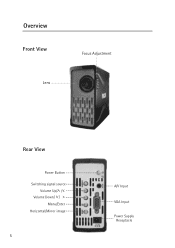
Overview Front View Lens Focus Adjustment Rear View Power Button Switching signal source Volume Up/ / Volume Down/ / Menu/Enter Horizontal/Mirror image 5 A/V Input VGA Input Power Supply Receptacle
Overview Front View Lens Focus Adjustment Rear View Power Button Switching signal source Volume Up/ / Volume Down/ / Menu/Enter Horizontal/Mirror image 5 A/V Input VGA Input Power Supply Receptacle
User Guide
Page 8
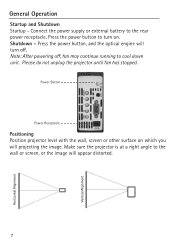
Connect the power supply or external battery to turn on which you will projecting the image. Please do not unplug the projector until fan has stopped. Shutdown - Press the power button, and the optical engine will appear distorted. 7 Horizontal Alignment Vertical Alignment Power Button Power Receptacle Positioning Position projector level with the wall, screen or other surface on . Make sure the projector is at a right angle to the wall or screen, or the image will unit. General Operation Startup and Shutdown Startup - Press the power button to the rear power receptacle.
Connect the power supply or external battery to turn on which you will projecting the image. Please do not unplug the projector until fan has stopped. Shutdown - Press the power button, and the optical engine will appear distorted. 7 Horizontal Alignment Vertical Alignment Power Button Power Receptacle Positioning Position projector level with the wall, screen or other surface on . Make sure the projector is at a right angle to the wall or screen, or the image will unit. General Operation Startup and Shutdown Startup - Press the power button to the rear power receptacle.
User Guide
Page 9
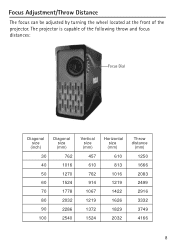
Focus Adjustment/Throw Distance The focus can be adjusted by turning the wheel located at the front of the following throw and focus distances: us Focus Dial t nt Focus Adjustment Diagonal size (inch) 30 40 50 60 70 80 90 100 Diagonal size (mm) 762 1016 1270 1524 1778 2032 2286 2540 Vertical size (mm) 457 610 762 914 1067 1219 1372 1524 Horizontal size (mm) 610 813 1016 1219 1422 1626 1829 2032 Throw distance (mm) 1250 1666 2083 2499 2916 3332 3749 4166 8 The projector is capable of the projector.
Focus Adjustment/Throw Distance The focus can be adjusted by turning the wheel located at the front of the following throw and focus distances: us Focus Dial t nt Focus Adjustment Diagonal size (inch) 30 40 50 60 70 80 90 100 Diagonal size (mm) 762 1016 1270 1524 1778 2032 2286 2540 Vertical size (mm) 457 610 762 914 1067 1219 1372 1524 Horizontal size (mm) 610 813 1016 1219 1422 1626 1829 2032 Throw distance (mm) 1250 1666 2083 2499 2916 3332 3749 4166 8 The projector is capable of the projector.
User Guide
Page 10
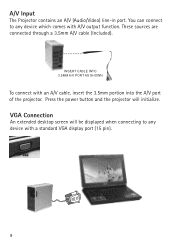
These sources are connected through a 3.5mm A/V cable (Included). Press the power button and the projector will be displayed when connecting to any device with A/V output function. You can connect to any device which comes with a standard VGA display port (15 pin). 9 VGA Connection An extended desktop screen will initialize. A/V Input The Projector contains an A/V (Audio/Video) line-in port. INSERT CABLE INTO 3.5MM A/V PORT AS SHOWN To connect with an A/V cable, insert the 3.5mm portion into the A/V port of the projector.
These sources are connected through a 3.5mm A/V cable (Included). Press the power button and the projector will be displayed when connecting to any device with A/V output function. You can connect to any device which comes with a standard VGA display port (15 pin). 9 VGA Connection An extended desktop screen will initialize. A/V Input The Projector contains an A/V (Audio/Video) line-in port. INSERT CABLE INTO 3.5MM A/V PORT AS SHOWN To connect with an A/V cable, insert the 3.5mm portion into the A/V port of the projector.
User Guide
Page 11
Settings Menu The Settings Menu can be accessed by pressing the Menu button on the remote control or on the remote control: Contrast, Brightness and Saturation. 10 The following options can be accessed through the settings menu, and can be adjusted using the buttons on the back of the projector.
Settings Menu The Settings Menu can be accessed by pressing the Menu button on the remote control or on the remote control: Contrast, Brightness and Saturation. 10 The following options can be accessed through the settings menu, and can be adjusted using the buttons on the back of the projector.
User Guide
Page 12
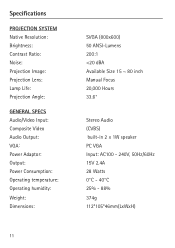
PROJECTION SYSTEM Native Resolution: Brightness: Contrast Ratio: Noise: Projection Image: Projection Lens: Lamp Life: Projection Angle: GENERAL SPECS Audio/Video Input: Composite Video Audio Output: VGAɿ Power Adaptor: Output: Power Consumption: Operating temperature: Operating humidity: Weight: Dimensions: 11 SVGA (800x600) 50 ANSI-Lumens 200:1
PROJECTION SYSTEM Native Resolution: Brightness: Contrast Ratio: Noise: Projection Image: Projection Lens: Lamp Life: Projection Angle: GENERAL SPECS Audio/Video Input: Composite Video Audio Output: VGAɿ Power Adaptor: Output: Power Consumption: Operating temperature: Operating humidity: Weight: Dimensions: 11 SVGA (800x600) 50 ANSI-Lumens 200:1
User Guide
Page 13
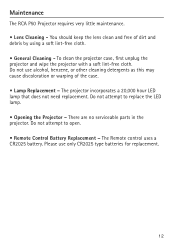
The Remote control uses a CR2025 battery. The projector incorporates a 20,000 hour LED lamp that does not need replacement. You should keep the lens clean and free of the case. • Lamp Replacement - Do not use only CR2025 type batteries for replacement. 12 Do not attempt to replace the LED lamp. • Opening the Projector - Maintenance The RCA P50 Projector requires very little maintenance. • Lens Cleaning - Please use alcohol, benzene, or other cleaning detergents as this may cause...
The Remote control uses a CR2025 battery. The projector incorporates a 20,000 hour LED lamp that does not need replacement. You should keep the lens clean and free of the case. • Lamp Replacement - Do not use only CR2025 type batteries for replacement. 12 Do not attempt to replace the LED lamp. • Opening the Projector - Maintenance The RCA P50 Projector requires very little maintenance. • Lens Cleaning - Please use alcohol, benzene, or other cleaning detergents as this may cause...
User Guide
Page 14
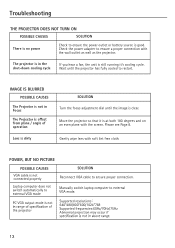
... as well as the projector. Wait until the image is clear. The projector is in Focus from plane / angle of operation Lens is dirty SOLUTION Turn the focus adjustment dial until the projector has fully cooled to ensure proper connection. Laptop computer does not switch automatically to external VGA mode PC VGA output mode is not the projector Manually switch laptop computer to ensure the power outlet or battery source is good. Move...
... as well as the projector. Wait until the image is clear. The projector is in Focus from plane / angle of operation Lens is dirty SOLUTION Turn the focus adjustment dial until the projector has fully cooled to ensure proper connection. Laptop computer does not switch automatically to external VGA mode PC VGA output mode is not the projector Manually switch laptop computer to ensure the power outlet or battery source is good. Move...

User Guide
Page 15
... does cause harmful interference to change without prior notice. 14 Reorient or relocate the receiving antenna. - Ensure external video device has output. REMOTE CONTROL DOES NOT WORK POSSIBLE CAUSES SOLUTION The remote control battery is subject to radio or television reception, which can radiate radio frequencyenergy and, if not installed and used in a particular installation. Operation is no guarantee that may...
... does cause harmful interference to change without prior notice. 14 Reorient or relocate the receiving antenna. - Ensure external video device has output. REMOTE CONTROL DOES NOT WORK POSSIBLE CAUSES SOLUTION The remote control battery is subject to radio or television reception, which can radiate radio frequencyenergy and, if not installed and used in a particular installation. Operation is no guarantee that may...
User Guide
Page 16
...is highly recommended. • Upon receipt of your own expense. How you get service: • Locate your proof of purchase in materials or workmanship For how long after your purchase: • One year, from date of purchase What we will help you troubleshoot and diagnose the problem. ...You are responsible for shipping the defective unit back to our warranty fulfillment center at (800) 274-3014. Our representatives will repair or replace it and return to obtain warranty service. • Contact RCA Customer Care at ...
...is highly recommended. • Upon receipt of your own expense. How you get service: • Locate your proof of purchase in materials or workmanship For how long after your purchase: • One year, from date of purchase What we will help you troubleshoot and diagnose the problem. ...You are responsible for shipping the defective unit back to our warranty fulfillment center at (800) 274-3014. Our representatives will repair or replace it and return to obtain warranty service. • Contact RCA Customer Care at ...
User Guide
Page 17
... setup and use . • The air intake and exhaust vent must be clear of obstructions. Limited Warranty What your RCA projector) • Installation and setup service adjustments ...air ventilation might cause the projector to malfunction or will cause damage to lightning damage • This warranty covers only normal use of the product. 24-hour-per-day or other excessive continual use causes strain and is not considered normal use of your warranty does not cover: • Customer instruction. (Your Instruction Book provides information regarding operating instructions and user controls...
... setup and use . • The air intake and exhaust vent must be clear of obstructions. Limited Warranty What your RCA projector) • Installation and setup service adjustments ...air ventilation might cause the projector to malfunction or will cause damage to lightning damage • This warranty covers only normal use of the product. 24-hour-per-day or other excessive continual use causes strain and is not considered normal use of your warranty does not cover: • Customer instruction. (Your Instruction Book provides information regarding operating instructions and user controls...

User Guide
Page 18
Model P50 T00000XXXX Printed in this ©2011. ...SHALL CREATE A GUARANTY OR IN ANY WAY INCREASE THE SCOPE OF THIS WARRANTY. •REPAIR OR REPLACEMENT AS PROVIDED UNDER THIS WARRANTY IS THE EXCLUSIVE REMEDY OF THE CONSUMER. SHALL NOT BE... LIABLE FOR INCIDENTAL OR CONSEQUENTIAL DAMAGES RESULTING FROM THE USE OF THIS PRODUCT OR ...PURPOSE ON THIS PRODUCT IS LIMITED TO THE APPLICABLE WARRANTY PERIOD SET FORTH ABOVE. How state law relates to this warranty: • Some states do not ...
Model P50 T00000XXXX Printed in this ©2011. ...SHALL CREATE A GUARANTY OR IN ANY WAY INCREASE THE SCOPE OF THIS WARRANTY. •REPAIR OR REPLACEMENT AS PROVIDED UNDER THIS WARRANTY IS THE EXCLUSIVE REMEDY OF THE CONSUMER. SHALL NOT BE... LIABLE FOR INCIDENTAL OR CONSEQUENTIAL DAMAGES RESULTING FROM THE USE OF THIS PRODUCT OR ...PURPOSE ON THIS PRODUCT IS LIMITED TO THE APPLICABLE WARRANTY PERIOD SET FORTH ABOVE. How state law relates to this warranty: • Some states do not ...
