Quick Start Guide
Page 1
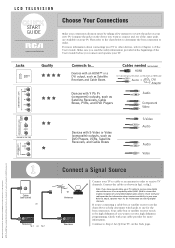
..., VCRs, Satellite Receivers, and Cable Boxes S-Video Audio Audio Video AUDIO/VIDEO INPUT 1 (VID1) RCA and associated marks are trademarks of THOMSON S.A. LCD TELEVISION START GUIDE www.rca.com/television Choose Your Connections Make your connection decision easier by taking a few minutes to review the... jacks on your TV. Devices with an HDMI™ or a DVI output, such as Satellite Receivers...
..., VCRs, Satellite Receivers, and Cable Boxes S-Video Audio Audio Video AUDIO/VIDEO INPUT 1 (VID1) RCA and associated marks are trademarks of THOMSON S.A. LCD TELEVISION START GUIDE www.rca.com/television Choose Your Connections Make your connection decision easier by taking a few minutes to review the... jacks on your TV. Devices with an HDMI™ or a DVI output, such as Satellite Receivers...
Quick Start Guide
Page 2
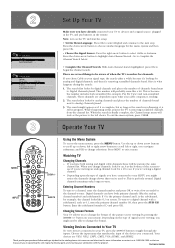
... tune to a channel, enter the channel number and press OK or wait a few seconds for the channel to the retailer, please visit www.rca.com/television for more information or contact us at 1-800-336-1900 so that matches the input of the device you for analog channels and...and places the number of the picture you chose Cable as the search says Running, it 's removing scrambled channels found next to change selections. Watching TV Changing Channels • If you to scroll up or down ; The search first looks for available channels, press OK. Digital channels can...
... tune to a channel, enter the channel number and press OK or wait a few seconds for the channel to the retailer, please visit www.rca.com/television for more information or contact us at 1-800-336-1900 so that matches the input of the device you for analog channels and...and places the number of the picture you chose Cable as the search says Running, it 's removing scrambled channels found next to change selections. Watching TV Changing Channels • If you to scroll up or down ; The search first looks for available channels, press OK. Digital channels can...

User Guide & Warranty
Page 2
... of the building as vases, shall be required under one or more of purchase. Don't place the TV on soft carpeting or similar surface because the ventilation slots on a firm, flat www.rca.com/television. Also, make sure the stand or base you use is provided to call your attention... to rain or moisture. WARNING To reduce the risk of the TV receiver and other surfaces. WARNING The TV is unstable if it here and record the...
... of the building as vases, shall be required under one or more of purchase. Don't place the TV on soft carpeting or similar surface because the ventilation slots on a firm, flat www.rca.com/television. Also, make sure the stand or base you use is provided to call your attention... to rain or moisture. WARNING To reduce the risk of the TV receiver and other surfaces. WARNING The TV is unstable if it here and record the...

User Guide & Warranty
Page 4
...It 22 Modes of Operation 22 Volume Punchthrough Feature 22 Deleting ALL Volume Punchthrough Commands 23 Remote Code List 24 Chapter 3: Using the TV's Features Channel Banner 27 Autotuning 27 Parental Controls and V-Chip 29 How V-Chip Works for USA and Canada 29 Lock/Unlock Parental ...Sound Menu 36 Picture Menu 38 PIP Menu 39 Setup Menu 39 Parental Control Menu 42 Time Menu 42 USB Menu 43 Chapter 5: Other Information Frequently Asked Questions (FAQs 44 Troubleshooting 45 Mounting Your TV to the Wall 47 V-Chip Rating Explanations 48 US V-Chip Rating System 48 Canadian ...
...It 22 Modes of Operation 22 Volume Punchthrough Feature 22 Deleting ALL Volume Punchthrough Commands 23 Remote Code List 24 Chapter 3: Using the TV's Features Channel Banner 27 Autotuning 27 Parental Controls and V-Chip 29 How V-Chip Works for USA and Canada 29 Lock/Unlock Parental ...Sound Menu 36 Picture Menu 38 PIP Menu 39 Setup Menu 39 Parental Control Menu 42 Time Menu 42 USB Menu 43 Chapter 5: Other Information Frequently Asked Questions (FAQs 44 Troubleshooting 45 Mounting Your TV to the Wall 47 V-Chip Rating Explanations 48 US V-Chip Rating System 48 Canadian ...
User Guide & Warranty
Page 5
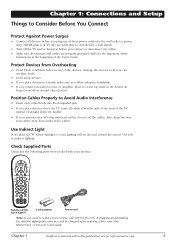
... Guide. Refer to the Important Safety Instructions at the beginning of the devices. NEVER plug your product. Use Indirect Light Don't place the TV where sunlight or room lighting will be directed toward the screen. Have your antenna uses 300-ohm twin lead cables, do not coil the ...Surges • Connect all devices before you connect or disconnect any cables. • Make sure all cables down the side of the back of the TV instead of straight down the middle. • If your Visa, MasterCard, or Discover Card ready. Protect Devices from Overheating • Don't block ventilation...
... Guide. Refer to the Important Safety Instructions at the beginning of the devices. NEVER plug your product. Use Indirect Light Don't place the TV where sunlight or room lighting will be directed toward the screen. Have your antenna uses 300-ohm twin lead cables, do not coil the ...Surges • Connect all devices before you connect or disconnect any cables. • Make sure all cables down the side of the back of the TV instead of straight down the middle. • If your Visa, MasterCard, or Discover Card ready. Protect Devices from Overheating • Don't block ventilation...

User Guide & Warranty
Page 6
.... look for an A for more information. 6 Chapter 1 Connections and Setup ANTENNA/CABLE INPUT Get the Picture The first part of connecting your TV is to get help deciding what local analog and digital stations are available using a certain antenna. • When you are ready to watch channels, the...ANTENNA/CABLE INPUT to receive analog and/or digital channels by using the ANTENNA/CABLE INPUT. The back panel of channel you to receive your TV allows you 're viewing. By entering where you live, this mapping program tells you what type of antenna to use special cables to ...
.... look for an A for more information. 6 Chapter 1 Connections and Setup ANTENNA/CABLE INPUT Get the Picture The first part of connecting your TV is to get help deciding what local analog and digital stations are available using a certain antenna. • When you are ready to watch channels, the...ANTENNA/CABLE INPUT to receive analog and/or digital channels by using the ANTENNA/CABLE INPUT. The back panel of channel you to receive your TV allows you 're viewing. By entering where you live, this mapping program tells you what type of antenna to use special cables to ...

User Guide & Warranty
Page 7
... trademarks or registered trademarks of HDMI Licensing LLC. Chapter 1 7 Jacks Used Cables Needed Go to connect your TV. Please use the following chart to the appropriate page and connect your RCA product, please visit www.rca.com/customersupport. Proceed to determine which connection is best for you. Video1 R AUDIO Audio1 R and L L Audio/Video... HDMI logo, and High-Definition Multimedia Interface are several ways to ... Connections and Setup Choose Your Connection For additional assistance while using your TV.
... trademarks or registered trademarks of HDMI Licensing LLC. Chapter 1 7 Jacks Used Cables Needed Go to connect your TV. Please use the following chart to the appropriate page and connect your RCA product, please visit www.rca.com/customersupport. Proceed to determine which connection is best for you. Video1 R AUDIO Audio1 R and L L Audio/Video... HDMI logo, and High-Definition Multimedia Interface are several ways to ... Connections and Setup Choose Your Connection For additional assistance while using your TV.

User Guide & Warranty
Page 9
...a DVD player. 3. Red= right audio; DEF ABC GHI MNO JKL PQRS INPUT TUV _,.:=$ WXYZ SUB CH Use these buttons to view the picture of the TV and to the Audio Output jacks on the DVD player. 3. Connecting the Device with Component Video (Advanced) This connection allows you see VID1 (if connected...your cable and/or off -air antenna as described on the DVD player. 3. white= left audio ON•OFF button INPUT button ON•OFF TV PIP SAT•AUX DVD GO BACK VOL CH MENU MUTE INFO + CH CTRL ZOOMCLEAR PRESETS ZOOM+ GUIDE ?!+- Connections and Setup Red Yellow White ...
...a DVD player. 3. Red= right audio; DEF ABC GHI MNO JKL PQRS INPUT TUV _,.:=$ WXYZ SUB CH Use these buttons to view the picture of the TV and to the Audio Output jacks on the DVD player. 3. Connecting the Device with Component Video (Advanced) This connection allows you see VID1 (if connected...your cable and/or off -air antenna as described on the DVD player. 3. white= left audio ON•OFF button INPUT button ON•OFF TV PIP SAT•AUX DVD GO BACK VOL CH MENU MUTE INFO + CH CTRL ZOOMCLEAR PRESETS ZOOM+ GUIDE ?!+- Connections and Setup Red Yellow White ...

User Guide & Warranty
Page 11
... 're done connecting devices to the HDMI1/DVI jack. To view this connection is connected to your set -top box. 3. Chapter 1 11 A. B. C. Plug in the TV (see HDMI1 displayed at the bottom of an integrated mini-plug cable. To go to the HDMI Out jack on page 46. Connect an HDMI... these buttons to enter the channel or press CH+ or CH- HDMI cable HDMI cable HDMI/DVI adapter Red White Using the example of the TV. Connect an HDMI cable to the HDMI1/DVI Input jack on the remote control until you 've connected to view, for details) and the device...
... 're done connecting devices to the HDMI1/DVI jack. To view this connection is connected to your set -top box. 3. Chapter 1 11 A. B. C. Plug in the TV (see HDMI1 displayed at the bottom of an integrated mini-plug cable. To go to the HDMI Out jack on page 46. Connect an HDMI... these buttons to enter the channel or press CH+ or CH- HDMI cable HDMI cable HDMI/DVI adapter Red White Using the example of the TV. Connect an HDMI cable to the HDMI1/DVI Input jack on the remote control until you 've connected to view, for details) and the device...
User Guide & Warranty
Page 12
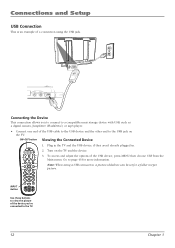
... device you've connected to page 43 for a folder not per picture. ON•OFF button Viewing the Connected Device INPUT button ON•OFF TV PIP SAT•AUX DVD GO BACK VOL CH MENU MUTE INFO + CH CTRL ZOOMCLEAR PRESETS ZOOM+ GUIDE ?!+- Note: When using the USB jack. DEF... to view the picture of the USB cable to the USB device and the other end to the USB jack on the TV and the device. 3. Turn on the TV. Connections and Setup USB Connection This is an example of the USB device, press MENU then choose USB from the Main menu...
... device you've connected to page 43 for a folder not per picture. ON•OFF button Viewing the Connected Device INPUT button ON•OFF TV PIP SAT•AUX DVD GO BACK VOL CH MENU MUTE INFO + CH CTRL ZOOMCLEAR PRESETS ZOOM+ GUIDE ?!+- Note: When using the USB jack. DEF... to view the picture of the USB cable to the USB device and the other end to the USB jack on the TV and the device. 3. Turn on the TV. Connections and Setup USB Connection This is an example of the USB device, press MENU then choose USB from the Main menu...

User Guide & Warranty
Page 13
... the channel or press CH+ or CH- If necessary, connect your PC to the Audio Output jack on the TV and the other end to the correct monitor output setting. Plug in the TV and the PC, if they aren't already plugged in. 2. Connections and Setup VGA Connection This is 1024 x 768.... buttons. Connect one end of the TV's screen. Note, if your PC's video output isn't 15-pin, you see VGA displayed at the bottom of a 15-pin monitor cable to the VGA ...
... the channel or press CH+ or CH- If necessary, connect your PC to the Audio Output jack on the TV and the other end to the correct monitor output setting. Plug in the TV and the PC, if they aren't already plugged in. 2. Connections and Setup VGA Connection This is 1024 x 768.... buttons. Connect one end of the TV's screen. Note, if your PC's video output isn't 15-pin, you see VGA displayed at the bottom of a 15-pin monitor cable to the VGA ...
User Guide & Warranty
Page 14
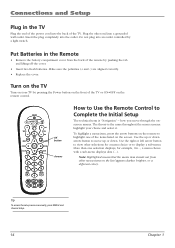
...CH MENU MUTE INFO + CH CTRL ZOOMCLEAR PRESETS ZOOM+ GUIDE ?!+- Put Batteries in the TV Plug the end of the power cord into an outlet controlled by pressing the Power button... display a sub-menu. Note: Highlighted means that the menu item stands out from the back of the TV. Do not plug into the back of the remote by pushing the tab and lifting off the cover....press the arrow buttons on the list (appears darker, brighter, or a different color). More than one of the TV or ON•OFF on the screen. The theory is "Navigation" - how you move up or down . Connections...
...CH MENU MUTE INFO + CH CTRL ZOOMCLEAR PRESETS ZOOM+ GUIDE ?!+- Put Batteries in the TV Plug the end of the power cord into an outlet controlled by pressing the Power button... display a sub-menu. Note: Highlighted means that the menu item stands out from the back of the TV. Do not plug into the back of the remote by pushing the tab and lifting off the cover....press the arrow buttons on the list (appears darker, brighter, or a different color). More than one of the TV or ON•OFF on the screen. The theory is "Navigation" - how you move up or down . Connections...

User Guide & Warranty
Page 15
... This is your preferred language, press OK. The search then looks for Setup menu. Complete Channel Setup Make sure you've connected the TV to Analog Channels found. 3. Running... 10 05 Auto Channel search in progress. If you to be stored. Auto Channel search complete. There...work properly. Channel setup Go back Signal type Auto Channel search Cable... ... Set the Signal Type If you connected Cable to your TV allows the TV's features to Digital Channels found. To choose Antenna, press the right arrow button and then press the down arrow button to continue....
... This is your preferred language, press OK. The search then looks for Setup menu. Complete Channel Setup Make sure you've connected the TV to Analog Channels found. 3. Running... 10 05 Auto Channel search in progress. If you to be stored. Auto Channel search complete. There...work properly. Channel setup Go back Signal type Auto Channel search Cable... ... Set the Signal Type If you connected Cable to your TV allows the TV's features to Digital Channels found. To choose Antenna, press the right arrow button and then press the down arrow button to continue....

User Guide & Warranty
Page 16
... tune to the left, enter the primary channel number (10), then press either the right arrow or the SUB CH button. What To Expect Watching TV • Remember: Look for details on -screen, press the ZOOM+/- Changing Channels • Digital channels can 't be time consuming, so you might notice that ... Go back Channel Number In Channel List Channel Label Favorite Channel 10 ABC You might find there are still some channels in 4/3 which your TV displays these channels, press MENU and choose Setup. button to page 40 for an A at the bottom of the screen to see if you '...
... tune to the left, enter the primary channel number (10), then press either the right arrow or the SUB CH button. What To Expect Watching TV • Remember: Look for details on -screen, press the ZOOM+/- Changing Channels • Digital channels can 't be time consuming, so you might notice that ... Go back Channel Number In Channel List Channel Label Favorite Channel 10 ABC You might find there are still some channels in 4/3 which your TV displays these channels, press MENU and choose Setup. button to page 40 for an A at the bottom of the screen to see if you '...
User Guide & Warranty
Page 17
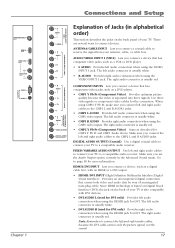
...both video and audio data by way of an integrated mini-plug cable. DIGITAL AUDIO OUTPUT (Coaxial) Use a digital coaxial cable to connect your TV is also compatible with an HDMI or a DVI output. • HDMI1/DVI INPUT (High-Definition Multimedia Interface/Digital Visual Interface) ...left and right audio cables to the CMP1 L and R AUDIO jacks. • CMP1 L AUDIO Provides left and right audio cables to connect your TV. The right audio connector is usually white. • R AUDIO Provides right audio connection when using the CMP1 video inputs. The left and right audio...
...both video and audio data by way of an integrated mini-plug cable. DIGITAL AUDIO OUTPUT (Coaxial) Use a digital coaxial cable to connect your TV is also compatible with an HDMI or a DVI output. • HDMI1/DVI INPUT (High-Definition Multimedia Interface/Digital Visual Interface) ...left and right audio cables to the CMP1 L and R AUDIO jacks. • CMP1 L AUDIO Provides left and right audio cables to connect your TV. The right audio connector is usually white. • R AUDIO Provides right audio connection when using the CMP1 video inputs. The left and right audio...

User Guide & Warranty
Page 18
... VOL Decreases the volume. AUDIO L and R Receives audio from the ANTENNA/CABLE INPUT (excluding copy-protected programs and component video formats) while the TV is connected to the VGA jack. Side Panel Buttons If you cannot locate your remote, you can use the side panel buttons of the screen...on the same channel you to connect a compatible mass storage device with a USB jack. VIDEO INPUT 2 Receives video from the device to the TV. In the TV menu system, acts like the left arrow button on and off. Connections and Setup HDMI2 Input Lets you connect a device, such as 1/8" stereo...
... VOL Decreases the volume. AUDIO L and R Receives audio from the ANTENNA/CABLE INPUT (excluding copy-protected programs and component video formats) while the TV is connected to the VGA jack. Side Panel Buttons If you cannot locate your remote, you can use the side panel buttons of the screen...on the same channel you to connect a compatible mass storage device with a USB jack. VIDEO INPUT 2 Receives video from the device to the TV. In the TV menu system, acts like the left arrow button on and off. Connections and Setup HDMI2 Input Lets you connect a device, such as 1/8" stereo...
User Guide & Warranty
Page 19
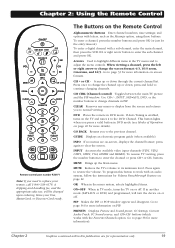
...CMP1, CMP2, VGA, HDMI1 and HDMI2). PRESETS Displays Picture and Sound preset; and CH+/CH- Chapter 2: Using the Remote Control ON•OFF TV PIP SAT•AUX DVD GO BACK VOL CH MENU MUTE INFO + CH CTRL ZOOMCLEAR PRESETS ZOOM+ GUIDE ?!+- and options with the Favorite Channels ...Current Audio Track, PC Sound source; If Auto Tuning is enabled, turns on the Remote Control Alphanumeric Buttons Enter channel numbers; MUTE Reduces the TV's volume to restore the volume. OK When in the menu system, selects highlighted items. ON•OFF When in DVD mode. buttons (which...
...CMP1, CMP2, VGA, HDMI1 and HDMI2). PRESETS Displays Picture and Sound preset; and CH+/CH- Chapter 2: Using the Remote Control ON•OFF TV PIP SAT•AUX DVD GO BACK VOL CH MENU MUTE INFO + CH CTRL ZOOMCLEAR PRESETS ZOOM+ GUIDE ?!+- and options with the Favorite Channels ...Current Audio Track, PC Sound source; If Auto Tuning is enabled, turns on the Remote Control Alphanumeric Buttons Enter channel numbers; MUTE Reduces the TV's volume to restore the volume. OK When in the menu system, selects highlighted items. ON•OFF When in DVD mode. buttons (which...

User Guide & Warranty
Page 20
... control any device; This button lights when you press a valid button in SAT•AUX mode (see if the VCR responds. TV Turns on page 22. Make sure the device you need to program the remote to operate some remote-controllable devices, for more details...remote may not operate all brands of the devices connected to operate many brands of the remote) If programmed, provides transport control for some RCA devices. Point the remote at bottom of remote-controllable VCRs, audio devices, DVD players, cable boxes, satellite receivers and other devices. ZOOM...
... control any device; This button lights when you press a valid button in SAT•AUX mode (see if the VCR responds. TV Turns on page 22. Make sure the device you need to program the remote to operate some remote-controllable devices, for more details...remote may not operate all brands of the devices connected to operate many brands of the remote) If programmed, provides transport control for some RCA devices. Point the remote at bottom of remote-controllable VCRs, audio devices, DVD players, cable boxes, satellite receivers and other devices. ZOOM...

User Guide & Warranty
Page 21
... code search, you 've programmed for Direct Entry. 6. When all codes for the device to try to program. 4. Using the Remote Control ON•OFF TV PIP SAT•AUX DVD GO BACK VOL CH Programming the Remote There are three ways to program the remote control to normal operation. Turn...
... code search, you 've programmed for Direct Entry. 6. When all codes for the device to try to program. 4. Using the Remote Control ON•OFF TV PIP SAT•AUX DVD GO BACK VOL CH Programming the Remote There are three ways to program the remote control to normal operation. Turn...

User Guide & Warranty
Page 22
... to test with all codes have to bounce back and forth between two remote controls: the audio system's remote to adjust the volume and the TV's remote control to control your audio system. Keep pointing the remote at the device. 5. When all brands and models of approximately 6 seconds before saving ...feature eliminates the need for a device that works in DVD mode. 22 Chapter 2 In effect, you are telling the TV remote to adjust the volume. There is being sent to the TV (and not the satellite receiver, for example, press DVD to operate the DVD player. How to Use the Remote ...
... to test with all codes have to bounce back and forth between two remote controls: the audio system's remote to adjust the volume and the TV's remote control to control your audio system. Keep pointing the remote at the device. 5. When all brands and models of approximately 6 seconds before saving ...feature eliminates the need for a device that works in DVD mode. 22 Chapter 2 In effect, you are telling the TV remote to adjust the volume. There is being sent to the TV (and not the satellite receiver, for example, press DVD to operate the DVD player. How to Use the Remote ...


