
User Guide & Warranty
Page 4
... 7 Video (Basic) Connection 8 Component Video (Advanced) Connection .......... 8 HDMI/DVI Connection 10 VGA Connection 12 Plug in the TV 13 Put Batteries in the Remote 13 Turn on the TV 13 How to Use the Remote Control to Complete the Initial Setup 13 Complete the Initial Setup 14 Set the Menu Language...
... 7 Video (Basic) Connection 8 Component Video (Advanced) Connection .......... 8 HDMI/DVI Connection 10 VGA Connection 12 Plug in the TV 13 Put Batteries in the Remote 13 Turn on the TV 13 How to Use the Remote Control to Complete the Initial Setup 13 Complete the Initial Setup 14 Set the Menu Language...
User Guide & Warranty
Page 5
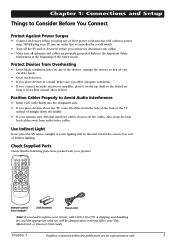
... ventilation holes on the top shelf so the heated air from audio/video cables. Check Supplied Parts Check that is controlled by a wall switch. • Turn off the TV and/or device(s) before you connect an audio receiver or amplifier, place it won't flow around other devices. Arrange...
... ventilation holes on the top shelf so the heated air from audio/video cables. Check Supplied Parts Check that is controlled by a wall switch. • Turn off the TV and/or device(s) before you connect an audio receiver or amplifier, place it won't flow around other devices. Arrange...
User Guide & Warranty
Page 9
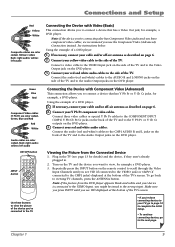
... jacks, for details) and the device, if they aren't already plugged in the TV (see VID displayed at the bottom of the TV. Plug in . 2. Turn on page 6. 2. See instructions below. Connect the audio (red and white) cables to the CMP1 AUDIO R and L jacks on the back of the TV and...
... jacks, for details) and the device, if they aren't already plugged in the TV (see VID displayed at the bottom of the TV. Plug in . 2. Turn on page 6. 2. See instructions below. Connect the audio (red and white) cables to the CMP1 AUDIO R and L jacks on the back of the TV and...
User Guide & Warranty
Page 11
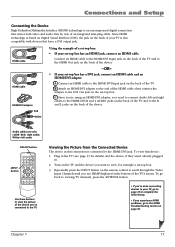
... Connected Device The device in . 2. Red= right audio; CH+ MUTE SKIP VOL+ GO BACK MENU ZOOM- To view this connection is connected to the TV. Turn on the back of your set -top box. CH- Connect an HDMI cable to the HDMI/DVI Input jack on the back of the TV...
... Connected Device The device in . 2. Red= right audio; CH+ MUTE SKIP VOL+ GO BACK MENU ZOOM- To view this connection is connected to the TV. Turn on the back of your set -top box. CH- Connect an HDMI cable to the HDMI/DVI Input jack on the back of the TV...

User Guide & Warranty
Page 12
... you 'll need an adapter that can connect to a 15-pin monitor cable. 3. Connect your PC to the correct monitor output setting. Viewing the PC 1. Turn on the TV and the PC. 3. Notes: The maximum panel resolution is 1280 x 1024. Connect your PC's video output isn't 15-pin, you see page...
... you 'll need an adapter that can connect to a 15-pin monitor cable. 3. Connect your PC to the correct monitor output setting. Viewing the PC 1. Turn on the TV and the PC. 3. Notes: The maximum panel resolution is 1280 x 1024. Connect your PC's video output isn't 15-pin, you see page...
User Guide & Warranty
Page 13
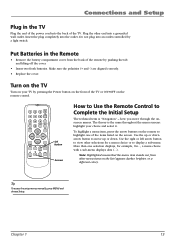
... is the same throughout the menu screens: highlight your TV by pushing the tab and lifting off the cover. • Insert two fresh batteries. Turn on the TV Turn on your choice and select it. The theory is "Navigation" - Make sure the polarities (+ and -) are aligned correctly. • Replace the cover. FAV...
... is the same throughout the menu screens: highlight your TV by pushing the tab and lifting off the cover. • Insert two fresh batteries. Turn on the TV Turn on your choice and select it. The theory is "Navigation" - Make sure the polarities (+ and -) are aligned correctly. • Replace the cover. FAV...
User Guide & Warranty
Page 14
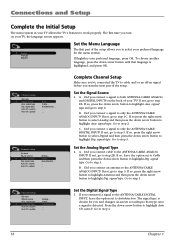
... is your preferred language, press OK. Set the Analog Signal Type 2. The signal type is chosen for the menu system. The first time you turn on -screen according to step 1B. Autodetection... ... ... C. B. Autodetection... ... ... Set the Digital Signal Type 3. Cable... A. signal type. Channel setup Go back Signal source Ana. Did you...
... is your preferred language, press OK. Set the Analog Signal Type 2. The signal type is chosen for the menu system. The first time you turn on -screen according to step 1B. Autodetection... ... ... C. B. Autodetection... ... ... Set the Digital Signal Type 3. Cable... A. signal type. Channel setup Go back Signal source Ana. Did you...
User Guide & Warranty
Page 16
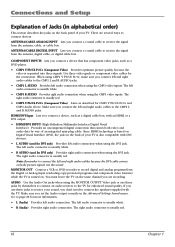
... output correctly in alphabetical order) This section describes the jacks on the back panel of an integrated mini-plug cable. The right audio connector is turned on. The right audio connector is usually white. • R AUDIO (used for more information. • L (Audio) Provides left audio connection when using CMP1 Y Pb/Cb...
... output correctly in alphabetical order) This section describes the jacks on the back panel of an integrated mini-plug cable. The right audio connector is turned on. The right audio connector is usually white. • R AUDIO (used for more information. • L (Audio) Provides left audio connection when using CMP1 Y Pb/Cb...
User Guide & Warranty
Page 17
... Sound menu. > > Chapter 1 17 Connections and Setup VGA Connect your remote until SVID appears at the bottom of the screen. VOL > Increases the volume. POWER Turns the TV on the remote control and adjusts menu controls. Make sure you to connect headphones to listen to the TV. Go to the VGA...
... Sound menu. > > Chapter 1 17 Connections and Setup VGA Connect your remote until SVID appears at the bottom of the screen. VOL > Increases the volume. POWER Turns the TV on the remote control and adjusts menu controls. Make sure you to connect headphones to listen to the TV. Go to the VGA...

User Guide & Warranty
Page 18
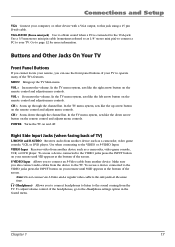
... sub-menus. FAV (Favorite) Press to channel 123, press and hold the "1" button until "1- -" appears, release the 1 button and then press 2 and 3. Go to turn off . INPUT Accesses the available video input channels (VID, SVID, CMP1, CMP2, VGA, and HDMI). Ch. Press CLEAR to restore the volume. SLEEP Sets the... of the picture on and off . Press the CH+ or CH- If in the TV menu and to the TV's audio. ON•OFF Turns the TV on -screen. PRESETS For the Analog input, displays Picture and Sound preset option. For the Digital input, displays Picture and Sound preset; ...
... sub-menus. FAV (Favorite) Press to channel 123, press and hold the "1" button until "1- -" appears, release the 1 button and then press 2 and 3. Go to turn off . INPUT Accesses the available video input channels (VID, SVID, CMP1, CMP2, VGA, and HDMI). Ch. Press CLEAR to restore the volume. SLEEP Sets the... of the picture on and off . Press the CH+ or CH- If in the TV menu and to the TV's audio. ON•OFF Turns the TV on -screen. PRESETS For the Analog input, displays Picture and Sound preset option. For the Digital input, displays Picture and Sound preset; ...

User Guide & Warranty
Page 20
...MA, TV-14, etc.) and content themes [(Violence (V), Adult Language (L), etc.)]. This is blocked. Change channel or press OK to enter your password, turn off or unlocked. Go to lock V-Chip, see below. Once you block programs, you lock and unlock parental controls settings using a password. Note: Parental... this option lets you can also block out programs that have blocked the rating and/or content themes that are considered unrated. This is turned off the TV. How V-Chip Works for 10 seconds. View... If you will take effect. channels Front panel block Lock TIME menu ...
...MA, TV-14, etc.) and content themes [(Violence (V), Adult Language (L), etc.)]. This is blocked. Change channel or press OK to enter your password, turn off or unlocked. Go to lock V-Chip, see below. Once you block programs, you lock and unlock parental controls settings using a password. Note: Parental... this option lets you can also block out programs that have blocked the rating and/or content themes that are considered unrated. This is turned off the TV. How V-Chip Works for 10 seconds. View... If you will take effect. channels Front panel block Lock TIME menu ...
User Guide & Warranty
Page 21
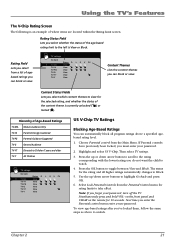
... higher ratings automatically changes to Block. 5. To view age-based ratings after you select whether the status of agebased ratings you must enter your password, turn off the TV. Rating Status Field Lets you 've locked them, follow the same steps as above a specified agebased rating level. 1. Then select...
... higher ratings automatically changes to Block. 5. To view age-based ratings after you select whether the status of agebased ratings you must enter your password, turn off the TV. Rating Status Field Lets you 've locked them, follow the same steps as above a specified agebased rating level. 1. Then select...

User Guide & Warranty
Page 23
..., like a young child. Press MENU on to block the channel. Blocking Movie Ratings Once you are in the Select channel option. Block Channels Turn this option to place a check mark in the Block all dig. channels box to lock parental controls after you have the front panel blocked....choose in the Movie ratings menu, follow the same steps described for blocking Canadian ratings. Parental control Go back Lock Par. Block Digital Channels Turn this to keep children from changing channels, remove access to view the channel if the TV is locked. Don't forget to block all digital...
..., like a young child. Press MENU on to block the channel. Blocking Movie Ratings Once you are in the Select channel option. Block Channels Turn this option to place a check mark in the Block all dig. channels box to lock parental controls after you have the front panel blocked....choose in the Movie ratings menu, follow the same steps described for blocking Canadian ratings. Parental control Go back Lock Par. Block Digital Channels Turn this to keep children from changing channels, remove access to view the channel if the TV is locked. Don't forget to block all digital...
User Guide & Warranty
Page 24
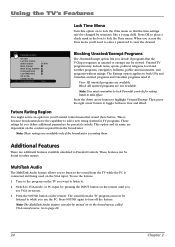
... features available unrelated to Parental Controls. Additional Features There are available. The sound from the broadcaster. Using the TV's Features Lock Time Menu Turn this option on to lock the Time menu so that the time settings can't be found in other menus. When you access the Time ... sound source. Note: You must remember to lock Parental controls for TV programs. These ratings let you 'll need to enter a password to turn off the feature. Press the down arrow button to take effect. MultiTask Audio The MultiTask Audio feature allows you to listen to the sound from...
... features available unrelated to Parental Controls. Additional Features There are available. The sound from the broadcaster. Using the TV's Features Lock Time Menu Turn this option on to lock the Time menu so that the time settings can't be found in other menus. When you access the Time ... sound source. Note: You must remember to lock Parental controls for TV programs. These ratings let you 'll need to enter a password to turn off the feature. Press the down arrow button to take effect. MultiTask Audio The MultiTask Audio feature allows you to listen to the sound from...
User Guide & Warranty
Page 28
Ch. High... ... 28 Internal speakers Turn on the digital tuner until you turn the TV off the internal speakers. Headphone settings Displays a choice list of available settings you to listen to the TV's audio while in the U.S.). VGA ...
Ch. High... ... 28 Internal speakers Turn on the digital tuner until you turn the TV off the internal speakers. Headphone settings Displays a choice list of available settings you to listen to the TV's audio while in the U.S.). VGA ...
User Guide & Warranty
Page 29
... the Automatic format feature off film mode upconversion. Film mode processes the converted signal so that retains picture sharpness and detail; The Off setting turns off . Tip: If the picture is somewhat decreased). High for each channel, as well as possible to Personal. Automatic format When enabled (box checked) the...
... the Automatic format feature off film mode upconversion. Film mode processes the converted signal so that retains picture sharpness and detail; The Off setting turns off . Tip: If the picture is somewhat decreased). High for each channel, as well as possible to Personal. Automatic format When enabled (box checked) the...

User Guide & Warranty
Page 32
...231;ais. Not all captioning on digital channels is digital captioning-it depends on what the broadcaster is intended to stop volume from being turned up too loudly. Language Lets you 'd want the channel number displayed on true digital closed captions. Maximum TV volume This feature is ...CC color White... opacity Solid... color Black... Digital CC font Ashley... opacity Lets you want to hear the maximum volume you set . No. Display Turn this feature on if you set the appearance of the screen behind the digital closed -caption text: White, Black, Red, Green, Blue, Yellow, ...
...231;ais. Not all captioning on digital channels is digital captioning-it depends on what the broadcaster is intended to stop volume from being turned up too loudly. Language Lets you 'd want the channel number displayed on true digital closed captions. Maximum TV volume This feature is ...CC color White... opacity Solid... color Black... Digital CC font Ashley... opacity Lets you want to hear the maximum volume you set . No. Display Turn this feature on if you set the appearance of the screen behind the digital closed -caption text: White, Black, Red, Green, Blue, Yellow, ...

User Guide & Warranty
Page 33
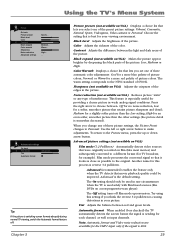
...set in Chapter 2. Date Lets you set . Calendar Displays the current month and year with the day highlighted according to stop. Wake up channel Turn off timer Turn off . To enter a digital channel, press ANTENNA button on or off . Message Go back Display Start time Recurrence Stop time Text flashing Erase... up timer is eight o'clock, for you set . Wait about one minute for more information. Erase message Clears all lines of the TV screen. Turn off time Lets you . Chapter 3 33 Time Go back Sleep timer Time ref. Go to page 20 for the time to be set the time...
...set in Chapter 2. Date Lets you set . Calendar Displays the current month and year with the day highlighted according to stop. Wake up channel Turn off timer Turn off . To enter a digital channel, press ANTENNA button on or off . Message Go back Display Start time Recurrence Stop time Text flashing Erase... up timer is eight o'clock, for you set . Wait about one minute for more information. Erase message Clears all lines of the TV screen. Turn off time Lets you . Chapter 3 33 Time Go back Sleep timer Time ref. Go to page 20 for the time to be set the time...

User Guide & Warranty
Page 35
.... Also check to page 27 for more instructions. A yellow Video cable connects to watch something else. • The front panel controls may not be turned off. Blank screen • Check your TV can be corrected by plugging in something that device appears or press ANTENNA to the yellow VIDEO input..., you might have your video cables connected to your TV, you 've connected to the wrong jacks. A yellow Video cable connects to the TV is turned on the side of your VCR). Try pressing the volume up button to restore sound. • If using S-Video or Y, PB, PR, remember to...
.... Also check to page 27 for more instructions. A yellow Video cable connects to watch something else. • The front panel controls may not be turned off. Blank screen • Check your TV can be corrected by plugging in something that device appears or press ANTENNA to the yellow VIDEO input..., you might have your video cables connected to your TV, you 've connected to the wrong jacks. A yellow Video cable connects to the TV is turned on the side of your VCR). Try pressing the volume up button to restore sound. • If using S-Video or Y, PB, PR, remember to...
User Guide & Warranty
Page 36
...output that will fix this happens frequently, the voltage in . Problems with HDMI/DVI Connection • Make sure the HDMI or DVI device is turned on and try to make sure volume isn't limited by the HDMI/DVI input. 36 Chapter 4 Other Information Buttons don't work • The front...-captioning might have been activated. Go to unlock the front panel controls by unplugging the power cord and plugging it back in again. TV turns off . TV turns on unexpectedly • Wake up timer might be abnormally high or low. • Unplug. Go to make sure the TV/VCR button on...
...output that will fix this happens frequently, the voltage in . Problems with HDMI/DVI Connection • Make sure the HDMI or DVI device is turned on and try to make sure volume isn't limited by the HDMI/DVI input. 36 Chapter 4 Other Information Buttons don't work • The front...-captioning might have been activated. Go to unlock the front panel controls by unplugging the power cord and plugging it back in again. TV turns off . TV turns on unexpectedly • Wake up timer might be abnormally high or low. • Unplug. Go to make sure the TV/VCR button on...


