
User Guide & Warranty
Page 2
...the cable ground shall be required under the laws applicable to your jurisdiction. This could cause personal injury and/or damage the TV. Registering this product allows us to qualified service personnel. Model No Serial No Purchase Date Dealer/Address/Phone For ...local authorities or the Electronic Industries Alliance: www.eiae.org. The apparatus shall not be placed on a firm, flat www.rca.com/television. No objects filled with liquids, such as practical. Special disposal of this product for proof of purchase. Important: This television...
...the cable ground shall be required under the laws applicable to your jurisdiction. This could cause personal injury and/or damage the TV. Registering this product allows us to qualified service personnel. Model No Serial No Purchase Date Dealer/Address/Phone For ...local authorities or the Electronic Industries Alliance: www.eiae.org. The apparatus shall not be placed on a firm, flat www.rca.com/television. No objects filled with liquids, such as practical. Special disposal of this product for proof of purchase. Important: This television...
User Guide & Warranty
Page 4
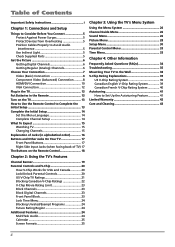
... Unrated/Exempt Programs 24 Future Rating Region 24 Additional Features 24 MultiTask Audio 24 Calendar 25 Screen Formats 25 Chapter 3: Using the TV's Menu System Using the Menu System 26 Channel Guide Menu 26 Sound Menu 26 Picture Menu 28 Setup Menu 30 Parental Control Menu... 33 Time Menu 33 Chapter 4: Other Information Frequently Asked Questions (FAQs 34 Troubleshooting 35 Mounting Your TV to the Wall 38 V-Chip Rating Explanations 39 US V-Chip Rating System 39 Canadian English V-Chip Rating System 39 Canadian French V-Chip Rating...
... Unrated/Exempt Programs 24 Future Rating Region 24 Additional Features 24 MultiTask Audio 24 Calendar 25 Screen Formats 25 Chapter 3: Using the TV's Menu System Using the Menu System 26 Channel Guide Menu 26 Sound Menu 26 Picture Menu 28 Setup Menu 30 Parental Control Menu... 33 Time Menu 33 Chapter 4: Other Information Frequently Asked Questions (FAQs 34 Troubleshooting 35 Mounting Your TV to the Wall 38 V-Chip Rating Explanations 39 US V-Chip Rating System 39 Canadian English V-Chip Rating System 39 Canadian French V-Chip Rating...
User Guide & Warranty
Page 5
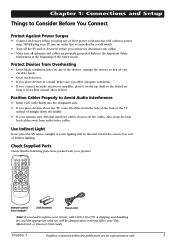
... to replace your product. 1 4 7 INPUT ON•OFF 2 3 SLEEP 5 6 CC 8 9 ANTENNA PRESETS SOUND VOL- Use Indirect Light Don't place the TV where sunlight or room lighting will be directed toward the screen. FAV OK INFO FREEZE CLEAR ZOOM+ Remote control Part # R130A1 2 AA batteries Power cord... it won't flow around other devices. Check Supplied Parts Check that is controlled by a wall switch. • Turn off the TV and/or device(s) before you plug any of the User's Guide. Refer to Avoid Audio Interference • Insert each cable firmly ...
... to replace your product. 1 4 7 INPUT ON•OFF 2 3 SLEEP 5 6 CC 8 9 ANTENNA PRESETS SOUND VOL- Use Indirect Light Don't place the TV where sunlight or room lighting will be directed toward the screen. FAV OK INFO FREEZE CLEAR ZOOM+ Remote control Part # R130A1 2 AA batteries Power cord... it won't flow around other devices. Check Supplied Parts Check that is controlled by a wall switch. • Turn off the TV and/or device(s) before you plug any of the User's Guide. Refer to Avoid Audio Interference • Insert each cable firmly ...
User Guide & Warranty
Page 6
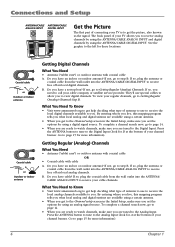
... ("rabbit ears") or outdoor antenna with cable A. Do you are ready to watch channels, make sure you have a set-top box? To view your TV allows you set the options for using a digital signal source. To complete a channel search now, go to page 14. • When you are tuned... information). 6 Chapter 1 Connections and Setup ANTENNA/CABLE ANTENNA/CABLE ANALOG INPUT DIGITAL INPUT Get the Picture The first part of connecting your TV is to get to the Channel setup screen in the Initial Setup, make sure you need to call your cable company or satellite service provider...
... ("rabbit ears") or outdoor antenna with cable A. Do you are ready to watch channels, make sure you have a set-top box? To view your TV allows you set the options for using a digital signal source. To complete a channel search now, go to page 14. • When you are tuned... information). 6 Chapter 1 Connections and Setup ANTENNA/CABLE ANTENNA/CABLE ANALOG INPUT DIGITAL INPUT Get the Picture The first part of connecting your TV is to get to the Channel setup screen in the Initial Setup, make sure you need to call your cable company or satellite service provider...

User Guide & Warranty
Page 7
Jacks Used Video VIDEO Audio R and L/MONO L/MONO AUDIO These jacks are trademarks or registered trademarks of the TV R when facing the back. Please use the following chart to ... page 8-9 Component Video page 8-9 Audio HDMI™ page 10-11 OR HDMI + HDMI/DVI adapter + ..., and High-Definition Multimedia Interface are located on the right side of HDMI Licensing LLC. Proceed to the appropriate page and connect your TV. Pr/Cr Pb/Cb COMPONENT INPUT Y (CMP1) L AUDIO R Y Pb/Cb Pr/Cr Audio R and L HDMI/DVI Cables Needed Audio/Video Go to determine which connection...
Jacks Used Video VIDEO Audio R and L/MONO L/MONO AUDIO These jacks are trademarks or registered trademarks of the TV R when facing the back. Please use the following chart to ... page 8-9 Component Video page 8-9 Audio HDMI™ page 10-11 OR HDMI + HDMI/DVI adapter + ..., and High-Definition Multimedia Interface are located on the right side of HDMI Licensing LLC. Proceed to the appropriate page and connect your TV. Pr/Cr Pb/Cb COMPONENT INPUT Y (CMP1) L AUDIO R Y Pb/Cb Pr/Cr Audio R and L HDMI/DVI Cables Needed Audio/Video Go to determine which connection...
User Guide & Warranty
Page 8
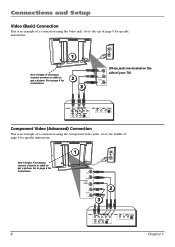
Go to the middle of page 9 for instructions. 2 3 (These jacks are located on the VIDEO side of your TV) L/MONO AUDIO R OUTPUT COMPONENT VIDEO L AUDIO R Y Pb Pr VIDEO L AUDIO R S-VIDEO INPUT VIDEO L AUDIO R S-VIDEO Component Video (Advanced) Connection This is an example of a connection ...
Go to the middle of page 9 for instructions. 2 3 (These jacks are located on the VIDEO side of your TV) L/MONO AUDIO R OUTPUT COMPONENT VIDEO L AUDIO R Y Pb Pr VIDEO L AUDIO R S-VIDEO INPUT VIDEO L AUDIO R S-VIDEO Component Video (Advanced) Connection This is an example of a connection ...
User Guide & Warranty
Page 9
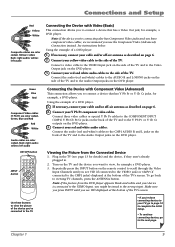
...Pb Pr or Y Cb Cr jacks, for example a DVD player. 3. Connect your cable and/or off -air antenna as described on the back of the TV. FAV OK INFO FREEZE CLEAR ZOOM+ Connecting the Device with Video (Basic) This connection allows you to the next page. If necessary, connect your yellow... outputs on the remote control to scroll through the Video Input Channels until you want to the Audio Output jacks on the side of the TV. Using the example of a DVD player: 1. Repeatedly press the INPUT button on the DVD player. 3. Red= right audio; white= left audio ON•OFF...
...Pb Pr or Y Cb Cr jacks, for example a DVD player. 3. Connect your cable and/or off -air antenna as described on the back of the TV. FAV OK INFO FREEZE CLEAR ZOOM+ Connecting the Device with Video (Basic) This connection allows you to the next page. If necessary, connect your yellow... outputs on the remote control to scroll through the Video Input Channels until you want to the Audio Output jacks on the side of the TV. Using the example of a DVD player: 1. Repeatedly press the INPUT button on the DVD player. 3. Red= right audio; white= left audio ON•OFF...
User Guide & Warranty
Page 11
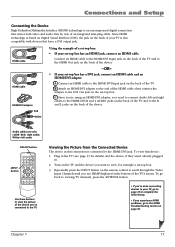
... Device High-Definition Multimedia Interface (HDMI) technology is also compatible with devices that carries both video and audio data by way of the TV and to the HDMI/DVI Input jack on page 36. Connect an HDMI cable to the R and L jacks on the remote control to the HDMI... audio; Viewing the Picture from the Connected Device The device in this device: 1. Repeatedly press the INPUT button on the back of the TV. C. Turn on the TV and the device you experience HDMI problems, go to page 14 to complete the Initial Setup. • If you want to the HDMI Troubleshooting...
... Device High-Definition Multimedia Interface (HDMI) technology is also compatible with devices that carries both video and audio data by way of the TV and to the HDMI/DVI Input jack on page 36. Connect an HDMI cable to the R and L jacks on the remote control to the HDMI... audio; Viewing the Picture from the Connected Device The device in this device: 1. Repeatedly press the INPUT button on the back of the TV. C. Turn on the TV and the device you experience HDMI problems, go to page 14 to complete the Initial Setup. • If you want to the HDMI Troubleshooting...

User Guide & Warranty
Page 12
...to a 15-pin monitor cable. 3. The MultiTask Audio™ feature allows you see page 13 for instructions. Plug in the TV (see VGA displayed at the bottom of the TV's screen. To go back to get a picture. Connect your monitor cable. Turn on the PC. Connections and Setup VGA ...Connection This is an example of a connection using the VGA jacks. 1 Don't forget: If necessary, connect antenna or cable to viewing TV channels, press the ANTENNA button. 12 Chapter 1 Go to page 6 for details) and the PC, if they aren't already plugged in. 2. If necessary...
...to a 15-pin monitor cable. 3. The MultiTask Audio™ feature allows you see page 13 for instructions. Plug in the TV (see VGA displayed at the bottom of the TV's screen. To go back to get a picture. Connect your monitor cable. Turn on the PC. Connections and Setup VGA ...Connection This is an example of a connection using the VGA jacks. 1 Don't forget: If necessary, connect antenna or cable to viewing TV channels, press the ANTENNA button. 12 Chapter 1 Go to page 6 for details) and the PC, if they aren't already plugged in. 2. If necessary...
User Guide & Warranty
Page 13
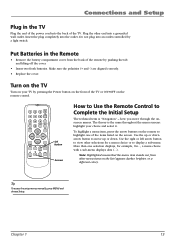
...one selection displays, for a menu choice or to Complete the Initial Setup The technical term is the same throughout the menu screens: highlight your TV by pressing the Power button on the front of the remote by a light switch. Use the right or left arrow button to move through..., brighter, or a different color). a menu choice with a sub-menu displays dots (...). Note: Highlighted means that the menu item stands out from the back of the TV or ON•OFF on the remote control. 1 4 7 INPUT ON•OFF 2 3 SLEEP 5 6 CC 8 9 ANTENNA PRESETS SOUND VOL- Tip To access the ...
...one selection displays, for a menu choice or to Complete the Initial Setup The technical term is the same throughout the menu screens: highlight your TV by pressing the Power button on the front of the remote by a light switch. Use the right or left arrow button to move through..., brighter, or a different color). a menu choice with a sub-menu displays dots (...). Note: Highlighted means that the menu item stands out from the back of the TV or ON•OFF on the remote control. 1 4 7 INPUT ON•OFF 2 3 SLEEP 5 6 CC 8 9 ANTENNA PRESETS SOUND VOL- Tip To access the ...
User Guide & Warranty
Page 14
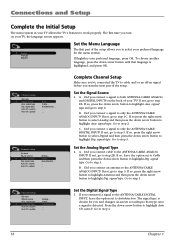
... first part of the setup allows you connect an antenna to only the ANTENNA/CABLE DIGITAL INPUT? update Both... Did you 've connected the TV to highlight Ana. Set the Analog Signal Type 2. If so, press the right arrow button to highlight Antenna and then press the down arrow button... button to the ANTENNA/CABLE ANALOG INPUT? Go to step 3. Go to step 2. A. signal type Auto Ch. Did you start the next part of your TV, the language screen appears. Press the down arrow button to cable and/or an off-air signal before you connect cable to highlight Auto Ch...
... first part of the setup allows you connect an antenna to only the ANTENNA/CABLE DIGITAL INPUT? update Both... Did you 've connected the TV to highlight Ana. Set the Analog Signal Type 2. If so, press the right arrow button to highlight Antenna and then press the down arrow button... button to the ANTENNA/CABLE ANALOG INPUT? Go to step 3. Go to step 2. A. signal type Auto Ch. Did you start the next part of your TV, the language screen appears. Press the down arrow button to cable and/or an off-air signal before you connect cable to highlight Auto Ch...
User Guide & Warranty
Page 15
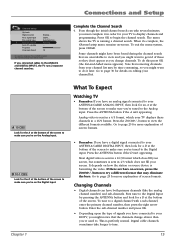
...ll your channel list may eliminate the bars. If there are unavailable to view and you might want to the ANALOG and DIGITAL INPUTS, the TV runs 2 separate channel searches. Digital cable channels sometimes take several minutes, you connected cables to do this press OK (the List and Labels...channel number and press OK. • Depending upon the type of the screen. Some channels might want to get rid of the screen to your TV to try a different format that the channels change channels. Press the ZOOM+/- Most digital video is sent in a 16/9 format which your screen,...
...ll your channel list may eliminate the bars. If there are unavailable to view and you might want to the ANALOG and DIGITAL INPUTS, the TV runs 2 separate channel searches. Digital cable channels sometimes take several minutes, you connected cables to do this press OK (the List and Labels...channel number and press OK. • Depending upon the type of the screen. Some channels might want to get rid of the screen to your TV to try a different format that the channels change channels. Press the ZOOM+/- Most digital video is sent in a 16/9 format which your screen,...
User Guide & Warranty
Page 16
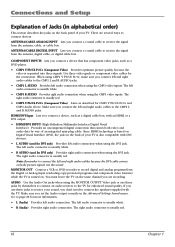
... of an integrated mini-plug cable. COMPONENT INPUTS Lets you connect left audio connector is usually red. 16 Chapter 1 Note: Remember to the TV for enhanced sound quality. Go to connect devices. Connections and Setup Explanation of Jacks (in the Advanced Settings Sound menu. There are recording. ..., you are several ways to page 28 for DVI only) Provides right audio connection when using the CMP1 video inputs. You must leave the TV on . Make sure you connect the left and right audio cables to connect the speakers supplied with DVI devices. • L AUDIO (used...
... of an integrated mini-plug cable. COMPONENT INPUTS Lets you connect left audio connector is usually red. 16 Chapter 1 Note: Remember to the TV for enhanced sound quality. Go to connect devices. Connections and Setup Explanation of Jacks (in the Advanced Settings Sound menu. There are recording. ..., you are several ways to page 28 for DVI only) Provides right audio connection when using the CMP1 video inputs. You must leave the TV on . Make sure you connect the left and right audio cables to connect the speakers supplied with DVI devices. • L AUDIO (used...
User Guide & Warranty
Page 17
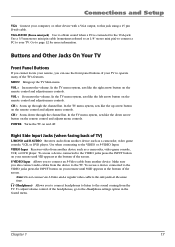
... at the bottom of the screen. Go to the Headphone settings option in the Sound menu. > > Chapter 1 17 VOL > Increases the volume. In the TV menu system, acts like the right arrow button on the remote control and adjusts menu controls. VIDEO Input Receives video from another device such as...1/8" stereo mini pin) to connect a PC to as a camcorder, video game console, VCR, or DVD player. Right Side Input Jacks (when facing back of TV) L/MONO and R AUDIO Receives audio from another device. Make sure you can use the front panel buttons of the headphones, go to page 12 for...
... at the bottom of the screen. Go to the Headphone settings option in the Sound menu. > > Chapter 1 17 VOL > Increases the volume. In the TV menu system, acts like the right arrow button on the remote control and adjusts menu controls. VIDEO Input Receives video from another device such as...1/8" stereo mini pin) to connect a PC to as a camcorder, video game console, VCR, or DVD player. Right Side Input Jacks (when facing back of TV) L/MONO and R AUDIO Receives audio from another device. Make sure you can use the front panel buttons of the headphones, go to page 12 for...

User Guide & Warranty
Page 18
... controls. (0-9) Number Buttons Enter channel numbers and time settings directly through the current channel list. FAV (Favorite) Press to browse the channels set in the TV menu and to channel 123, press and hold the "1" button until "1- -" appears, release the 1 button and then press 2 and 3. GO BACK ...the previous menu. Press again to its minimum level. PRESETS For the Analog input, displays Picture and Sound preset option. Press CLEAR to resume TV viewing. or ZOOM + Press left or right to change the channel up to turn off . CH+ MUTE SKIP VOL+ GO BACK MENU ZOOM...
... controls. (0-9) Number Buttons Enter channel numbers and time settings directly through the current channel list. FAV (Favorite) Press to browse the channels set in the TV menu and to channel 123, press and hold the "1" button until "1- -" appears, release the 1 button and then press 2 and 3. GO BACK ...the previous menu. Press again to its minimum level. PRESETS For the Analog input, displays Picture and Sound preset option. Press CLEAR to resume TV viewing. or ZOOM + Press left or right to change the channel up to turn off . CH+ MUTE SKIP VOL+ GO BACK MENU ZOOM...
User Guide & Warranty
Page 19
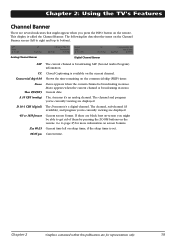
Chapter 2: Using the TV's Features Channel Banner There are several indicators that might be able to get rid of them by pressing the ZOOM buttons on the remote. Closed ...
Chapter 2: Using the TV's Features Channel Banner There are several indicators that might be able to get rid of them by pressing the ZOOM buttons on the remote. Closed ...

User Guide & Warranty
Page 20
... Movies can unblock programs by age-based ratings. This is explained on the remote for USA and Canada V-Chip reads the program's age-based rating (TV-MA, TV-14, etc.) and content themes [(Violence (V), Adult Language (L), etc.)]. Once you block programs, you block their age-based rating. By default, the.... For instructions to page 38 for V-Chip, Channel Block, or Front Panel Block will only be blocked by age-based ratings, such as TV-MA, which allows you do not lock parental controls, none of the settings for the US and Canada ratings explanations. Note: Parental control settings...
... Movies can unblock programs by age-based ratings. This is explained on the remote for USA and Canada V-Chip reads the program's age-based rating (TV-MA, TV-14, etc.) and content themes [(Violence (V), Adult Language (L), etc.)]. Once you block programs, you block their age-based rating. By default, the.... For instructions to page 38 for V-Chip, Channel Block, or Front Panel Block will only be blocked by age-based ratings, such as TV-MA, which allows you do not lock parental controls, none of the settings for the US and Canada ratings explanations. Note: Parental control settings...
User Guide & Warranty
Page 21
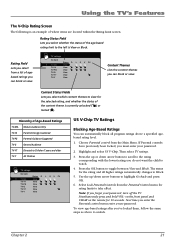
...selected rating, and whether the status of the content theme is an example of agebased ratings you must enter your password, turn off the TV. Highlight and select US V-Chip. Simultaneously press and hold VOL- Choose Parental control from a list of where items are located within ...ed agebased rating level. 1. Press the OK button to Children 7 years and older TV-Y All Children TV ratings Go back TV-MA TV-14 TV-PG TV-G TV-Y7 TV-Y Status D L S V FV View View View View View View US V-Chip TV Ratings Blocking Age-Based Ratings You can block or view. To view age-based ...
...selected rating, and whether the status of the content theme is an example of agebased ratings you must enter your password, turn off the TV. Highlight and select US V-Chip. Simultaneously press and hold VOL- Choose Parental control from a list of where items are located within ...ed agebased rating level. 1. Press the OK button to Children 7 years and older TV-Y All Children TV ratings Go back TV-MA TV-14 TV-PG TV-G TV-Y7 TV-Y Status D L S V FV View View View View View View US V-Chip TV Ratings Blocking Age-Based Ratings You can block or view. To view age-based ...

User Guide & Warranty
Page 22
...must remember to lock Parental controls for each rating separately. To view content theme after you block the language (L) corresponding with TV-14, the language for a particular rating, you want to change . 5. Determine the rating you automatically block the higher ...rating whose content theme you unlock the language corresponding with TV-14. Using the TV's Features Content Themes D Sexually explicit dialogue L Adult language S Sexual situations V Violence FV Fantasy Violence TV ratings Go back TV-MA TV-14 TV-PG TV-G TV-Y7 TV-Y Status D L S V FV View View View...
...must remember to lock Parental controls for each rating separately. To view content theme after you block the language (L) corresponding with TV-14, the language for a particular rating, you want to change . 5. Determine the rating you automatically block the higher ...rating whose content theme you unlock the language corresponding with TV-14. Using the TV's Features Content Themes D Sexually explicit dialogue L Adult language S Sexual situations V Violence FV Fantasy Violence TV ratings Go back TV-MA TV-14 TV-PG TV-G TV-Y7 TV-Y Status D L S V FV View View View...

User Guide & Warranty
Page 23
...in the Block all dig. Press OK to any channel. Block Digital Channels Turn this option to block (disable) or unblock (enable) the TV's front panel buttons so that is capable of operating the television while you 'll need to enter a password to block the channel. Press ... ... ... Parental control Go back Lock Par. channels Front panel block Lock TIME menu US V-Chip Canada V-Chip Unrated/Exempt - - - 51 MTV ... ... Using the TV's Features V-Chip Movie Rating Limit Set movie rating limits by someone, like a young child. Press MENU on to a digital channel you have the front panel...
...in the Block all dig. Press OK to any channel. Block Digital Channels Turn this option to block (disable) or unblock (enable) the TV's front panel buttons so that is capable of operating the television while you 'll need to enter a password to block the channel. Press ... ... ... Parental control Go back Lock Par. channels Front panel block Lock TIME menu US V-Chip Canada V-Chip Unrated/Exempt - - - 51 MTV ... ... Using the TV's Features V-Chip Movie Rating Limit Set movie rating limits by someone, like a young child. Press MENU on to a digital channel you have the front panel...


