
User Guide & Warranty
Page 4
... Against Power Surges 5 Protect Devices from Overheating 5 Position Cables Properly to Avoid Audio Interference 5 Use Indirect Light 5 Check Supplied Parts 5 Get the Picture 6 Getting Digital Channels 6 Getting Regular (Analog) Channels 6 Choose Your Connection 7 Video (Basic) Connection 8 Component Video (Advanced) Connection .......... 8 ... 25 Chapter 3: Using the TV's Menu System Using the Menu System 26 Channel Guide Menu 26 Sound Menu 26 Picture Menu 28 Setup Menu 30 Parental Control Menu 33 Time Menu 33 Chapter 4: Other Information Frequently Asked Questions (FAQs ...
... Against Power Surges 5 Protect Devices from Overheating 5 Position Cables Properly to Avoid Audio Interference 5 Use Indirect Light 5 Check Supplied Parts 5 Get the Picture 6 Getting Digital Channels 6 Getting Regular (Analog) Channels 6 Choose Your Connection 7 Video (Basic) Connection 8 Component Video (Advanced) Connection .......... 8 ... 25 Chapter 3: Using the TV's Menu System Using the Menu System 26 Channel Guide Menu 26 Sound Menu 26 Picture Menu 28 Setup Menu 30 Parental Control Menu 33 Time Menu 33 Chapter 4: Other Information Frequently Asked Questions (FAQs ...
User Guide & Warranty
Page 6
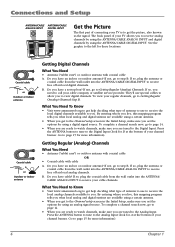
... What You Need • Antenna ("rabbit ears") or outdoor antenna with cable A. Connections and Setup ANTENNA/CABLE ANTENNA/CABLE ANALOG INPUT DIGITAL INPUT Get the Picture The first part of connecting your TV is to the Digital Input. To complete a channel search now, go to the Digital Input (look for... the bottom of antenna to use to receive the local analog channels available to page 15 for using a certain antenna. • When you get the picture, also known as the signal. Go to you have an indoor or outdoor antenna? Do you .
... What You Need • Antenna ("rabbit ears") or outdoor antenna with cable A. Connections and Setup ANTENNA/CABLE ANTENNA/CABLE ANALOG INPUT DIGITAL INPUT Get the Picture The first part of connecting your TV is to the Digital Input. To complete a channel search now, go to the Digital Input (look for... the bottom of antenna to use to receive the local analog channels available to page 15 for using a certain antenna. • When you get the picture, also known as the signal. Go to you have an indoor or outdoor antenna? Do you .
User Guide & Warranty
Page 8
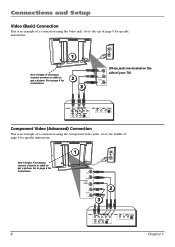
Go to the top of page 9 for specific instructions. 1 Don't forget: If necessary, connect antenna or cable to get a picture. Connections and Setup Video (Basic) Connection This is an example of a connection using the Video jack. Go to the middle of page 9 for... specific instructions. Don't forget: If necessary, connect antenna or cable to get a picture. Go to page 6 for instructions. 2 3 (These jacks are located on the VIDEO side of your TV) L/MONO AUDIO R OUTPUT COMPONENT VIDEO L AUDIO R Y...
Go to the top of page 9 for specific instructions. 1 Don't forget: If necessary, connect antenna or cable to get a picture. Connections and Setup Video (Basic) Connection This is an example of a connection using the Video jack. Go to the middle of page 9 for... specific instructions. Don't forget: If necessary, connect antenna or cable to get a picture. Go to page 6 for instructions. 2 3 (These jacks are located on the VIDEO side of your TV) L/MONO AUDIO R OUTPUT COMPONENT VIDEO L AUDIO R Y...
User Guide & Warranty
Page 9
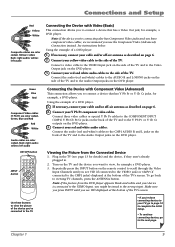
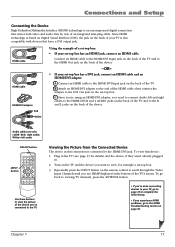
... BACK MENU ZOOM- Connect the audio (red and white) cables to the CMP1 AUDIO R and L jacks on the back of the TV. Note: If the picture from the Connected Device 1. Chapter 1 9 Note: If the device you're connecting also has Component Video jacks and you have component video cables, we recommend... back of the TV. Connect your yellow video cable to your cable and/or off -air antenna as described on the DVD player. 3. Viewing the Picture from the DVD player appears black and white and your cable and/or off -air antenna as described on the DVD player. Plug in . 2. Repeatedly...
... BACK MENU ZOOM- Connect the audio (red and white) cables to the CMP1 AUDIO R and L jacks on the back of the TV. Note: If the picture from the Connected Device 1. Chapter 1 9 Note: If the device you're connecting also has Component Video jacks and you have component video cables, we recommend... back of the TV. Connect your yellow video cable to your cable and/or off -air antenna as described on the DVD player. 3. Viewing the Picture from the DVD player appears black and white and your cable and/or off -air antenna as described on the DVD player. Plug in . 2. Repeatedly...

User Guide & Warranty
Page 10
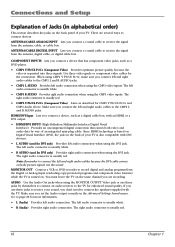
Go to get a picture. Device with HDMI Y Pb Pr Video Out R L Audio Out HDMI Out VIDEO HDMI/DVI R AUDIO L A C OR R L Audio Out B DVI Out Device with DVI 10 Chapter 1 Connections and Setup HDMI/DVI Connection This is an example of a connection using the HDMI/DVI jack. * *Don't forget: If necessary, connect antenna or cable to page 6 for instructions.
Go to get a picture. Device with HDMI Y Pb Pr Video Out R L Audio Out HDMI Out VIDEO HDMI/DVI R AUDIO L A C OR R L Audio Out B DVI Out Device with DVI 10 Chapter 1 Connections and Setup HDMI/DVI Connection This is an example of a connection using the HDMI/DVI jack. * *Don't forget: If necessary, connect antenna or cable to page 6 for instructions.
User Guide & Warranty
Page 11
... the back of an integrated mini-plug cable. CH+ MUTE SKIP VOL+ GO BACK MENU ZOOM- To view this connection is connected to view the picture of a set-top box: • If your set -top box has a DVI jack, connect an HDMI cable and an HDMI/DVI adapter. Repeatedly press the... done connecting devices to your TV, go to the TV. Connect an HDMI cable to the HDMI/DVI Input jack on page 36. Viewing the Picture from the Connected Device The device in the TV (see HDMI displayed at the bottom of the device. -OR- • If your set -top box...
... the back of an integrated mini-plug cable. CH+ MUTE SKIP VOL+ GO BACK MENU ZOOM- To view this connection is connected to view the picture of a set-top box: • If your set -top box has a DVI jack, connect an HDMI cable and an HDMI/DVI adapter. Repeatedly press the... done connecting devices to your TV, go to the TV. Connect an HDMI cable to the HDMI/DVI Input jack on page 36. Viewing the Picture from the Connected Device The device in the TV (see HDMI displayed at the bottom of the device. -OR- • If your set -top box...

User Guide & Warranty
Page 12
.... Go to viewing TV channels, press the ANTENNA button. 12 Chapter 1 VIDEO VGA AUDIO 2 3 Connecting the Device This connection allows you to listen to get a picture. To go back to page 24 for more information. Connections and Setup VGA Connection This is 1280 x 1024. Be sure to a personal computer. 1. The MultiTask...
.... Go to viewing TV channels, press the ANTENNA button. 12 Chapter 1 VIDEO VGA AUDIO 2 3 Connecting the Device This connection allows you to listen to get a picture. To go back to page 24 for more information. Connections and Setup VGA Connection This is 1280 x 1024. Be sure to a personal computer. 1. The MultiTask...
User Guide & Warranty
Page 16
...the CMP2 L and R AUDIO jacks. COMPONENT INPUTS Lets you connect the left and right audio cables because the DVI cable carries only the picture signal, not the sound. Make sure you connect a device that carries both video and audio data by themselves to connect an audio receiver to.... • CMP2 Y Pb/Cb Pr/Cr (Component Video) Same as a DVD player. • CMP1 Y Pb/Cb Pr/Cr (Component Video) Provides optimum picture quality because the video is separated into three signals. The right audio connector is usually white. • CMP1 R AUDIO Provides right audio connection when using...
...the CMP2 L and R AUDIO jacks. COMPONENT INPUTS Lets you connect the left and right audio cables because the DVI cable carries only the picture signal, not the sound. Make sure you connect a device that carries both video and audio data by themselves to connect an audio receiver to.... • CMP2 Y Pb/Cb Pr/Cr (Component Video) Same as a DVD player. • CMP1 Y Pb/Cb Pr/Cr (Component Video) Provides optimum picture quality because the video is separated into three signals. The right audio connector is usually white. • CMP1 R AUDIO Provides right audio connection when using...

User Guide & Warranty
Page 18
...Press again to the TV's audio. OK When in a sub-menu, takes you to add more information. PRESETS For the Analog input, displays Picture and Sound preset option. and Dig. Aud. Lang. and CH+/CH- Press repeatedly to the previous channel. Each time you to change the ...channel up the channel banner; For the Digital input, displays Picture and Sound preset; and Dig. Ch. Lang. In VGA mode, switches to restore the volume. VOL - or ZOOM + Press left or right...
...Press again to the TV's audio. OK When in a sub-menu, takes you to add more information. PRESETS For the Analog input, displays Picture and Sound preset option. and Dig. Aud. Lang. and CH+/CH- Press repeatedly to the previous channel. Each time you to change the ...channel up the channel banner; For the Digital input, displays Picture and Sound preset; and Dig. Ch. Lang. In VGA mode, switches to restore the volume. VOL - or ZOOM + Press left or right...
User Guide & Warranty
Page 25
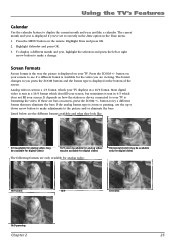
Screen Formats Screen format is the way the picture is available for the video you are the different formats available and what they look like a calendar. button on your remote to see if a different ... be available for digital video) 14/9 zoom 16/9 Cinerama 16/9 panning Chapter 2 25 Press the MENU button on -screen, press the ZOOM +/- button to the picture and/or eliminate the bars.
Screen Formats Screen format is the way the picture is available for the video you are the different formats available and what they look like a calendar. button on your remote to see if a different ... be available for digital video) 14/9 zoom 16/9 Cinerama 16/9 panning Chapter 2 25 Press the MENU button on -screen, press the ZOOM +/- button to the picture and/or eliminate the bars.
User Guide & Warranty
Page 26
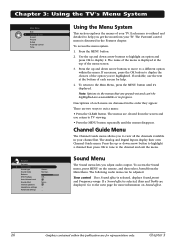
... the screen and you to display the choices of your channel list. Chapter 3: Using the TV's Menu System Main Menu Exit TV Channel Guide Sound Picture Setup Parental control Time Sound Go back Tone control Sound type Sound mode Balance SRS TruBass Auto Volume Level Sound effect Internal speakers Headphone settings...
... the screen and you to display the choices of your channel list. Chapter 3: Using the TV's Menu System Main Menu Exit TV Channel Guide Sound Picture Setup Parental control Time Sound Go back Tone control Sound type Sound mode Balance SRS TruBass Auto Volume Level Sound effect Internal speakers Headphone settings...
User Guide & Warranty
Page 28
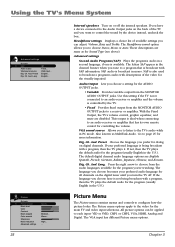
...language options are same as MultiTask Audio. Ch. If the language you prefer for Sound Type (see above). The VGA input has different Picture menu options. Aud. Lang. English... Ch. Preset Choose the language you choose here is not being broadcast with a program, then ...8226; Variable Provides variable output from the audio languages available for more information. Go to the video for the visually impaired. Dig. All picture options can adjust: Volume, Bass and Treble. Using the TV's Menu System Advanced settings Go back SAP Audio output VGA sound source Dig...
...language options are same as MultiTask Audio. Ch. If the language you prefer for Sound Type (see above). The VGA input has different Picture menu options. Aud. Lang. English... Ch. Preset Choose the language you choose here is not being broadcast with a program, then ...8226; Variable Provides variable output from the audio languages available for more information. Go to the video for the visually impaired. Dig. All picture options can adjust: Volume, Bass and Treble. Using the TV's Menu System Advanced settings Go back SAP Audio output VGA sound source Dig...
User Guide & Warranty
Page 29
...Note: Automatic format and Video noise reduction are available for the CMP1 input only if the signal is sending for an even softer, smoother picture than the Low setting; Black Level Adjusts the brightness of 6500 K. Normal; High for each channel, as well as possible to a ... down arrow button. Another name for this setting if you select one of three automatic color adjustments: Cool for providing a clearer picture in the picture. This feature is switching screen formats abruptly during normal TV viewing, switch the Automatic format feature off film mode upconversion....
...Note: Automatic format and Video noise reduction are available for the CMP1 input only if the signal is sending for an even softer, smoother picture than the Low setting; Black Level Adjusts the brightness of 6500 K. Normal; High for each channel, as well as possible to a ... down arrow button. Another name for this setting if you select one of three automatic color adjustments: Cool for providing a clearer picture in the picture. This feature is switching screen formats abruptly during normal TV viewing, switch the Automatic format feature off film mode upconversion....

User Guide & Warranty
Page 30
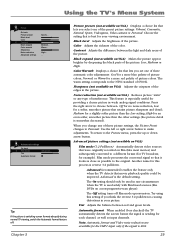
...using an off -air antenna for the analog tuner only) The analog signal type was set during the initial setup. Phase Adjusts the picture if there is receiving. If you change how you receive broadcasts through the ANTENNA/CABLE ANALOG INPUT, you are using cable or a .... update Searches for any new channels that are using cable or a cable box for digital TV signals. Using the TV's Menu System Picture Go back Black level Color Contrast Color warmth Auto adjustment Phase Clock Vertical position Horizontal position Warm... .... Channel setup Signal source If you ...
...using an off -air antenna for the analog tuner only) The analog signal type was set during the initial setup. Phase Adjusts the picture if there is receiving. If you change how you receive broadcasts through the ANTENNA/CABLE ANALOG INPUT, you are using cable or a .... update Searches for any new channels that are using cable or a cable box for digital TV signals. Using the TV's Menu System Picture Go back Black level Color Contrast Color warmth Auto adjustment Phase Clock Vertical position Horizontal position Warm... .... Channel setup Signal source If you ...

User Guide & Warranty
Page 35
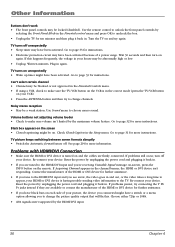
... the side of the TV, not to the MONITOR OUT jacks on the back of your TV. • If you're getting a black and white picture from a device you've connected to your TV, you might be corrected by selecting the Front Panel Block in the correct mode (press the TV... 3/4 switch on the back of the TV. • If you're trying to watch TV. • Maybe the Signal source option is muted. Sound okay, picture poor • If you're getting no device connected to it is "live" by plugging in . • Check the wall receptacle (or extension cord) to...
... the side of the TV, not to the MONITOR OUT jacks on the back of your TV. • If you're getting a black and white picture from a device you've connected to your TV, you might be corrected by selecting the Front Panel Block in the correct mode (press the TV... 3/4 switch on the back of the TV. • If you're trying to watch TV. • Maybe the Signal source option is muted. Sound okay, picture poor • If you're getting no device connected to it is "live" by plugging in . • Check the wall receptacle (or extension cord) to...
User Guide & Warranty
Page 36
...of your house may be locked (disabled). Volume buttons not adjusting volume louder • Check to choose mono sound. Go to change the picture quality output that will fix this happens frequently, the voltage in . • If you are tuned to appear, your HDMI or DVI...Pr jacks instead if they are firmly connected. Reset the power by the HDMI/DVI input. 36 Chapter 4 TV turns off . TV picture keeps switching between screen formats abruptly • Switch the Automatic format feature off unexpectedly • Sleep timer may have a switch or a menu ...
...of your house may be locked (disabled). Volume buttons not adjusting volume louder • Check to choose mono sound. Go to change the picture quality output that will fix this happens frequently, the voltage in . • If you are tuned to appear, your HDMI or DVI...Pr jacks instead if they are firmly connected. Reset the power by the HDMI/DVI input. 36 Chapter 4 TV turns off . TV picture keeps switching between screen formats abruptly • Switch the Automatic format feature off unexpectedly • Sleep timer may have a switch or a menu ...

Spec Sheet
Page 1
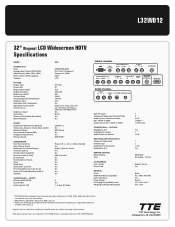
L32WD12 Product Size (H x W x D) with stand: 23.6 x 36.1 x 9.4 inches w/o stand: 21.3 x 36.1 x 4.5 inches 32" Diagonal LCD Widescreen HDTV Features and Benefits Built-in HDTV ATSC/QAM Tuner for Access to Digital Programming Off-Air or on Cable Better Picture with a High Contrast Display and 3D Digital Comb Filter Connections include HDMI™, VGA/PC & SYNCROSCAN™ PLUS Component Inputs Listen to TV Audio in PC Mode with MultiTask Audio™
L32WD12 Product Size (H x W x D) with stand: 23.6 x 36.1 x 9.4 inches w/o stand: 21.3 x 36.1 x 4.5 inches 32" Diagonal LCD Widescreen HDTV Features and Benefits Built-in HDTV ATSC/QAM Tuner for Access to Digital Programming Off-Air or on Cable Better Picture with a High Contrast Display and 3D Digital Comb Filter Connections include HDMI™, VGA/PC & SYNCROSCAN™ PLUS Component Inputs Listen to TV Audio in PC Mode with MultiTask Audio™
Spec Sheet
Page 2
...L/R 1 HDMI *** 1 L/R for Component Video DVI - L32WD12 32" Diagonal LCD Widescreen HDTV Specifications BRAND TECHNOLOGY Tuner Analog Video Formats (NTSC/480i) Video Formats (480p, 720p, 1080i) SDTV / EDTV / HDTV Capability Category PICTURE Display Type Screen Size Display Aspect Ratio Display Resolution Brightness (...English, French Yes Black Yes (200 x 400, M6) Yes Built-in PC mode (Multitask Audio™) Calendar CONNECTIONS - RCA and associate marks are trademarks or registered trademarks of THOMSON S.A. Indianapolis, IN USA 46290 used under license by TTE CORPORATION. HDCP...
...L/R 1 HDMI *** 1 L/R for Component Video DVI - L32WD12 32" Diagonal LCD Widescreen HDTV Specifications BRAND TECHNOLOGY Tuner Analog Video Formats (NTSC/480i) Video Formats (480p, 720p, 1080i) SDTV / EDTV / HDTV Capability Category PICTURE Display Type Screen Size Display Aspect Ratio Display Resolution Brightness (...English, French Yes Black Yes (200 x 400, M6) Yes Built-in PC mode (Multitask Audio™) Calendar CONNECTIONS - RCA and associate marks are trademarks or registered trademarks of THOMSON S.A. Indianapolis, IN USA 46290 used under license by TTE CORPORATION. HDCP...


