
User Manual
Page 3
... (including amplifiers) that produce heat. 9. A grounding type plug has two blades and a third grounding prong. Protect the power cord from being walked on or pinched particularly at plugs, convenience receptacles, and the point where they exit from tip-over. 13. ...ELECTRIC SERVICE EQUIPMENT ANTENNA LEAD IN WIRE GROUND CLAMP ANTENNA DISCHARGE UNIT (NEC SECTION 810-20) GROUNDING CONDUCTORS (NEC SECTION 810-21) GROUND CLAMPS POWER SERVICE GROUNDING ELECTRODE SYSTEM (NEC ART 250, PART H) Important Information 1668591B.indb 3 i 6/5/06 3:28:00 PM Important Information Important Safety ...
... (including amplifiers) that produce heat. 9. A grounding type plug has two blades and a third grounding prong. Protect the power cord from being walked on or pinched particularly at plugs, convenience receptacles, and the point where they exit from tip-over. 13. ...ELECTRIC SERVICE EQUIPMENT ANTENNA LEAD IN WIRE GROUND CLAMP ANTENNA DISCHARGE UNIT (NEC SECTION 810-20) GROUNDING CONDUCTORS (NEC SECTION 810-21) GROUND CLAMPS POWER SERVICE GROUNDING ELECTRODE SYSTEM (NEC ART 250, PART H) Important Information 1668591B.indb 3 i 6/5/06 3:28:00 PM Important Information Important Safety ...

User Manual
Page 4
Table of Contents Important Safety Instructions i Chapter 1: Connections and Setup Things to Consider Before You Connect 5 Protect Against Power Surges 5 Protect Devices from Overheating 5 Position Cables Properly to Avoid Audio Interference 5 Use Indirect Light 5 Check Supplied Parts 5 Get the Picture 6 Getting Channels 6 Choose Your ...
Table of Contents Important Safety Instructions i Chapter 1: Connections and Setup Things to Consider Before You Connect 5 Protect Against Power Surges 5 Protect Devices from Overheating 5 Position Cables Properly to Avoid Audio Interference 5 Use Indirect Light 5 Check Supplied Parts 5 Get the Picture 6 Getting Channels 6 Choose Your ...

User Manual
Page 5
... a stand, make sure you allow adequate ventilation. • If you connect an audio receiver or amplifier, place it on any of their power cords into an outlet that the following parts were packed with your product. Position Cables Properly to Avoid Audio Interference • Insert each cable fi... cables down the side of the back of the TV instead of straight down the middle. • If your TV into the wall outlet or power strip. Refer to the Important Safety Instructions at the beginning of the User's Guide. Check Supplied Parts Check that is controlled by a wall switch. ...
... a stand, make sure you allow adequate ventilation. • If you connect an audio receiver or amplifier, place it on any of their power cords into an outlet that the following parts were packed with your product. Position Cables Properly to Avoid Audio Interference • Insert each cable fi... cables down the side of the back of the TV instead of straight down the middle. • If your TV into the wall outlet or power strip. Refer to the Important Safety Instructions at the beginning of the User's Guide. Check Supplied Parts Check that is controlled by a wall switch. ...

User Manual
Page 14
...or down arrow button to Complete the Initial Setup The technical term is the same throughout the menu screens: highlight your TV by pressing the Power button on the front of the remote by a light switch. Note: Highlighted means that the menu item stands out from the back of ... menu item, press the arrow buttons on the remote to display a sub-menu. Do not plug into a grounded wall outlet. More than one of the power cord into the outlet. a menu choice with a sub-menu displays dots (...). Plug the other selections for a menu choice or to highlight one selection displays, ...
...or down arrow button to Complete the Initial Setup The technical term is the same throughout the menu screens: highlight your TV by pressing the Power button on the front of the remote by a light switch. Note: Highlighted means that the menu item stands out from the back of ... menu item, press the arrow buttons on the remote to display a sub-menu. Do not plug into a grounded wall outlet. More than one of the power cord into the outlet. a menu choice with a sub-menu displays dots (...). Plug the other selections for a menu choice or to highlight one selection displays, ...
User Manual
Page 18
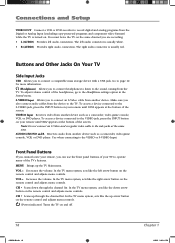
... channel list. VOL < Decreases the volume. In the TV menu system, acts like the up arrow button on the remote control and adjusts menu controls. (Power indicator) Turns the TV on the same channel you to connect headphones to listen to the VIDEO or S-VIDEO Input. CH Scans down arrow button...
... channel list. VOL < Decreases the volume. In the TV menu system, acts like the up arrow button on the remote control and adjusts menu controls. (Power indicator) Turns the TV on the same channel you to connect headphones to listen to the VIDEO or S-VIDEO Input. CH Scans down arrow button...

User Manual
Page 42
...Digital CC font Ashley... Digital CC opacity Solid... Digital CC color White... opacity Lets you set the appearance of text you set in Chapter 3. Power Save Mode If no signal is turned back on true digital closed -caption text: White, Black, Red, Green, Blue, Yellow, Magenta, ... entering text on or off . Press OK when you select your preferred language for a line. color Black... Number Display Language Maximum TV volume Power Save Mode English... Message Go back Display Start time Recurrence Stop time Erase message Line 1 Line 2 Line 3 Line 4 06:00PM... 30min Digital...
...Digital CC font Ashley... Digital CC opacity Solid... Digital CC color White... opacity Lets you set the appearance of text you set in Chapter 3. Power Save Mode If no signal is turned back on true digital closed -caption text: White, Black, Red, Green, Blue, Yellow, Magenta, ... entering text on or off . Press OK when you select your preferred language for a line. color Black... Number Display Language Maximum TV volume Power Save Mode English... Message Go back Display Start time Recurrence Stop time Erase message Line 1 Line 2 Line 3 Line 4 06:00PM... 30min Digital...

User Manual
Page 47
... remote and the remote light sensor on unexpectedly • Wake up timer might have been activated. Plug in the Setup menu. Reset the power by unplugging the power cord and plugging it back in . • If you 're receiving Unusable Signal message on-screen, press the INFO button on your...1668591B.indb 47 47 6/5/06 3:28:29 PM Go to the HDMI/DVI input and you are weak, dead, or installed incorrectly. Reset the power by unplugging the power cord and plugging it back in the remote. (Note, if you remove the batteries, you connected might be a weak station. Make sure ...
... remote and the remote light sensor on unexpectedly • Wake up timer might have been activated. Plug in the Setup menu. Reset the power by unplugging the power cord and plugging it back in . • If you 're receiving Unusable Signal message on-screen, press the INFO button on your...1668591B.indb 47 47 6/5/06 3:28:29 PM Go to the HDMI/DVI input and you are weak, dead, or installed incorrectly. Reset the power by unplugging the power cord and plugging it back in the remote. (Note, if you remove the batteries, you connected might be a weak station. Make sure ...

User Manual
Page 48
...problem, try rebooting your TV through the setup process again. To do a reboot, unplug the power cord from the wall outlet, power strip, etc. Simultaneously press and hold VOL- on the front panel and CLEAR on the TV... MENU on your password, turn on the remote for updated FAQs or contact RCA Customer Support at the support number provided in , turn the TV off. If the problem remains, then please... visit www.rca.com/television for 10 seconds. Keep your Warranty under How To Get Service. 48 1668591B.indb...
...problem, try rebooting your TV through the setup process again. To do a reboot, unplug the power cord from the wall outlet, power strip, etc. Simultaneously press and hold VOL- on the front panel and CLEAR on the TV... MENU on your password, turn on the remote for updated FAQs or contact RCA Customer Support at the support number provided in , turn the TV off. If the problem remains, then please... visit www.rca.com/television for 10 seconds. Keep your Warranty under How To Get Service. 48 1668591B.indb...


