
User Guide & Warranty
Page 2
...damage to the wall. Registering this product allows us to qualified service personnel. Refer servicing to contact you if needed. Refer to prevent the TV from being accidentally tipped over, pushed off, or pulled off. Also, make sure the stand or base you need them. CLASS 1 ... with liquids, such as practical. FCC regulations state that unauthorized changes or modifications to this product contains mercury. For US customers: Your RCA Consumer Electronics product may Hg be connected to the grounding system of the building as close to the point of electric shock, do not...
...damage to the wall. Registering this product allows us to qualified service personnel. Refer servicing to contact you if needed. Refer to prevent the TV from being accidentally tipped over, pushed off, or pulled off. Also, make sure the stand or base you need them. CLASS 1 ... with liquids, such as practical. FCC regulations state that unauthorized changes or modifications to this product contains mercury. For US customers: Your RCA Consumer Electronics product may Hg be connected to the grounding system of the building as close to the point of electric shock, do not...

User Guide & Warranty
Page 3
.... 7. Do not negate the safety purpose of time. 11. Use only with the cart, stand, tripod, bracket, or table specified by the manufacturer. 8. When the TV is provided for your outlet, consult an electrician for replacement of Canadian Electrical Code, Part 1) provides information with one wider than the other apparatus (including...
.... 7. Do not negate the safety purpose of time. 11. Use only with the cart, stand, tripod, bracket, or table specified by the manufacturer. 8. When the TV is provided for your outlet, consult an electrician for replacement of Canadian Electrical Code, Part 1) provides information with one wider than the other apparatus (including...

User Guide & Warranty
Page 4
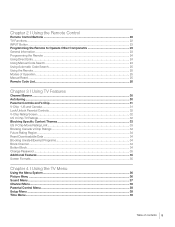
... & Setup Before Initial Setup...7 Protect Against Power Surges...7 Safety...7 Avoid Audio Interference...7 Avoid Direct Light...7 Check Supplied Parts...7 Attaching Your TV to the Table Stand 8 Mounting Your TV to the Wall 12 Obtain the Signal...12 What You Need...12 What You Need to Know...12 Choose Your Connections...13...15 PC Connection...16 Viewing the Picture from the Connected Component 16 Viewing a PC...16 Plug in the TV...17 Put Batteries in the Remote...17 Turn on the TV...17 Using the Remote Control to Complete the Initial Setup 17 Complete the Initial Setup...18 Set the ...
... & Setup Before Initial Setup...7 Protect Against Power Surges...7 Safety...7 Avoid Audio Interference...7 Avoid Direct Light...7 Check Supplied Parts...7 Attaching Your TV to the Table Stand 8 Mounting Your TV to the Wall 12 Obtain the Signal...12 What You Need...12 What You Need to Know...12 Choose Your Connections...13...15 PC Connection...16 Viewing the Picture from the Connected Component 16 Viewing a PC...16 Plug in the TV...17 Put Batteries in the Remote...17 Turn on the TV...17 Using the Remote Control to Complete the Initial Setup 17 Complete the Initial Setup...18 Set the ...
User Guide & Warranty
Page 5
...Blocking Unrated/Exempt Programs 34 Block Channel...34 Button Block...34 Change Password...35 Additional Features...35 Screen Formats...35 Chapter 4 I Using TV Features Channel Banner...30 Autotuning...30 Parental Controls and V-Chip 31 V-Chip - Chapter 2 I Using the Remote Control Remote Control Buttons...22...Code Search...24 Using Automatic Code Search 25 Using the Remote...25 Modes of Operation...25 Manual Reset...25 Remote Code List...26 Chapter 3 I Using the TV Menu Using the Menu System...36 Picture Menu...36 Sound Menu...37 Channel Menu...38 Parental Control Menu...38 Setup Menu...38...
...Blocking Unrated/Exempt Programs 34 Block Channel...34 Button Block...34 Change Password...35 Additional Features...35 Screen Formats...35 Chapter 4 I Using TV Features Channel Banner...30 Autotuning...30 Parental Controls and V-Chip 31 V-Chip - Chapter 2 I Using the Remote Control Remote Control Buttons...22...Code Search...24 Using Automatic Code Search 25 Using the Remote...25 Modes of Operation...25 Manual Reset...25 Remote Code List...26 Chapter 3 I Using the TV Menu Using the Menu System...36 Picture Menu...36 Sound Menu...37 Channel Menu...38 Parental Control Menu...38 Setup Menu...38...

User Guide & Warranty
Page 7
... and Setup Chapter 1 7 Refer to see the parts list for the table stand. Avoid Direct Light Don't place the TV where sunlight or room lighting is controlled by a wall switch. • Turn off the TV before you plug any power cords into the wall outlet or power strip. • NEVER plug your... Surges • Connect all components before you connect or disconnect any cables. • Make sure all cables down one side of the back of the TV instead of the components. Replacing your remote If you need to replace your Visa, MasterCard, or Discover Card ready.
... and Setup Chapter 1 7 Refer to see the parts list for the table stand. Avoid Direct Light Don't place the TV where sunlight or room lighting is controlled by a wall switch. • Turn off the TV before you plug any power cords into the wall outlet or power strip. • NEVER plug your... Surges • Connect all components before you connect or disconnect any cables. • Make sure all cables down one side of the back of the TV instead of the components. Replacing your remote If you need to replace your Visa, MasterCard, or Discover Card ready.

User Guide & Warranty
Page 8
..., using a screwdriver to remove the screw and pulling out the cap. Fixed Table Stand Assembly for Models L26HD31 and L26HD31S Parts List Step 1 Remove the TV bag and place it on the following pages for assembling the stand and attaching it face down to avoid scratching the screen. Attach the table ...
..., using a screwdriver to remove the screw and pulling out the cap. Fixed Table Stand Assembly for Models L26HD31 and L26HD31S Parts List Step 1 Remove the TV bag and place it on the following pages for assembling the stand and attaching it face down to avoid scratching the screen. Attach the table ...

User Guide & Warranty
Page 9
...place it on the following pages for assembling the stand and attaching it face down to the TV. 1 Post Support 3 Size M4 ST-Screws 1 Size M8 Screw Step 2 1. Secure the table stand to the TV cabinet by inserting the M8 screw into the cabinet while aligning the post support guide and ...to avoid scratching the screen. Remove the base and the assembly parts from the top and tightening with a screwdriver. Attach the post support to the TV cabinet by inserting the three M4 ST-screws from the box. 2. Table Stand Assembly Step 3 Attach the table stand to the stand base by ...
...place it on the following pages for assembling the stand and attaching it face down to the TV. 1 Post Support 3 Size M4 ST-Screws 1 Size M8 Screw Step 2 1. Secure the table stand to the TV cabinet by inserting the M8 screw into the cabinet while aligning the post support guide and ...to avoid scratching the screen. Remove the base and the assembly parts from the top and tightening with a screwdriver. Attach the post support to the TV cabinet by inserting the three M4 ST-screws from the box. 2. Table Stand Assembly Step 3 Attach the table stand to the stand base by ...

User Guide & Warranty
Page 10
... the directions on the following pages for the stand assembly: Option 1: Your TV has been packed upside down . Using a Phillips head screwdriver, attach the hinge to... it face down on the TV bag (see Figure 1) so you can attach the TV stand assembly before removing the TV from the box. 2. Remove the TV from the carton and place it to the TV. Remove the base and the... parts from the box. This minimizes the risk of scratching the screen. After removing the bag covering the TV, follow the directions on the following pages for assembling the stand and attaching it on a large, flat ...
... the directions on the following pages for the stand assembly: Option 1: Your TV has been packed upside down . Using a Phillips head screwdriver, attach the hinge to... it face down on the TV bag (see Figure 1) so you can attach the TV stand assembly before removing the TV from the box. 2. Remove the TV from the carton and place it to the TV. Remove the base and the... parts from the box. This minimizes the risk of scratching the screen. After removing the bag covering the TV, follow the directions on the following pages for assembling the stand and attaching it on a large, flat ...

User Guide & Warranty
Page 11
..., aligning the triple pronged tab with a Philips head screwdriver. Fastener Slot Step 4 Remove the stand cap from the TV cabinet by pushing on the back (narrowest) part of the TV. The stand is now securely in place and the TV is in place. Step 5 Attach the fully assembled table stand to the...firmly in place, the hinge threads are visible through the small hole on the back of the stand. 3. Step 3 1. Secure the table stand to the TV cabinet by inserting the hinge into this hole and tightening with the slot on the small tab and pulling out the cap. Step 6 When the...
..., aligning the triple pronged tab with a Philips head screwdriver. Fastener Slot Step 4 Remove the stand cap from the TV cabinet by pushing on the back (narrowest) part of the TV. The stand is now securely in place and the TV is in place. Step 5 Attach the fully assembled table stand to the...firmly in place, the hinge threads are visible through the small hole on the back of the stand. 3. Step 3 1. Secure the table stand to the TV cabinet by inserting the hinge into this hole and tightening with the slot on the small tab and pulling out the cap. Step 6 When the...
User Guide & Warranty
Page 12
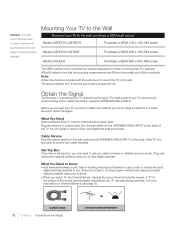
... satellite service provider. Model L26HD31/L26HD31S Purchase a VESA 100 x 100, M4 screw Model L32HD31/L32HD36 Purchase a VESA 200 x 100, M4 screw Model L40HD36 Purchase a VESA 600 x 400, M6 screw The VESA number is obtaining the signal. For example, 600x400 refers to the wall. The back panel of your TV allows you to call...
... satellite service provider. Model L26HD31/L26HD31S Purchase a VESA 100 x 100, M4 screw Model L32HD31/L32HD36 Purchase a VESA 200 x 100, M4 screw Model L40HD36 Purchase a VESA 600 x 400, M6 screw The VESA number is obtaining the signal. For example, 600x400 refers to the wall. The back panel of your TV allows you to call...

User Guide & Warranty
Page 13
... to determine which connections are best for you in using your RCA product, please visit www.rca.com/customersupport. For details about this service, call 1-888-206-3359. Connections and Setup Chapter 1 13 Proceed to the appropriate pages to connect your TV. Choose Your Connections There are several ways to connect components, such...
... to determine which connections are best for you in using your RCA product, please visit www.rca.com/customersupport. For details about this service, call 1-888-206-3359. Connections and Setup Chapter 1 13 Proceed to the appropriate pages to connect your TV. Choose Your Connections There are several ways to connect components, such...
User Guide & Warranty
Page 14
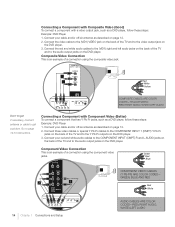
...special Y Pb Pr cables to the COMPONENT INPUT 1 (CMPT) Y Pb Pr jacks on the back of the TV and to the Y Pb Pr outputs on the DVD player. Connecting a Component with Composite Video (Good) To... red and white audio cables to the (VID1) right and left audio jacks on the back of the TV and to the audio output jacks on the DVD player. 3. RED=RIGHT AUDIO; WHITE=LEFT AUDIO Don't... red and white audio cables to the COMPONENT INPUT (CMPT) R and L AUDIO jacks on the back of the TV and to the audio output jacks on the DVD player. 3. Composite Video Connection This is an example of a connection...
...special Y Pb Pr cables to the COMPONENT INPUT 1 (CMPT) Y Pb Pr jacks on the back of the TV and to the Y Pb Pr outputs on the DVD player. Connecting a Component with Composite Video (Good) To... red and white audio cables to the (VID1) right and left audio jacks on the back of the TV and to the audio output jacks on the DVD player. 3. RED=RIGHT AUDIO; WHITE=LEFT AUDIO Don't... red and white audio cables to the COMPONENT INPUT (CMPT) R and L AUDIO jacks on the back of the TV and to the audio output jacks on the DVD player. 3. Composite Video Connection This is an example of a connection...

User Guide & Warranty
Page 15
... need to connect separate audio cables to the DVI AUDIO INPUT right and left jacks on the back of the TV and to the right and left audio Connections and Setup Chapter 1 15 then connect the adapter to the DVI ...output jack on the back of the TV. 2. white=left audio jacks on the back of the set -top box. 3. Since HDMI technology is based on Digital...HDMI2/DVI INPUT jack or the HDMI1/DVI INPUT jack on the back of the TV and to the HDMI2/DVI INPUT jack or the HSMI1/DVI INPUT jack on the set -top box.
... need to connect separate audio cables to the DVI AUDIO INPUT right and left jacks on the back of the TV and to the right and left audio Connections and Setup Chapter 1 15 then connect the adapter to the DVI ...output jack on the back of the TV. 2. white=left audio jacks on the back of the set -top box. 3. Since HDMI technology is based on Digital...HDMI2/DVI INPUT jack or the HDMI1/DVI INPUT jack on the back of the TV and to the HDMI2/DVI INPUT jack or the HSMI1/DVI INPUT jack on the set -top box.

User Guide & Warranty
Page 16
... monitor cable to the PC INPUT VIDEO jack on the PC. To go back to viewing TV channels, use your TV as described on the remote control until you have connected all additional components to your TV, go to page 18 for initial Setup Instructions. 16 Chapter 1 Connections and Setup Viewing a... PC 1. Turn on the TV and the computer. 3. Note: If the picture from the DVD player appears black and white and your TV, go to page 18 for initial Setup Instructions. Note: When you want to view. 3. Turn...
... monitor cable to the PC INPUT VIDEO jack on the PC. To go back to viewing TV channels, use your TV as described on the remote control until you have connected all additional components to your TV, go to page 18 for initial Setup Instructions. 16 Chapter 1 Connections and Setup Viewing a... PC 1. Turn on the TV and the computer. 3. Note: If the picture from the DVD player appears black and white and your TV, go to page 18 for initial Setup Instructions. Note: When you want to view. 3. Turn...
User Guide & Warranty
Page 17
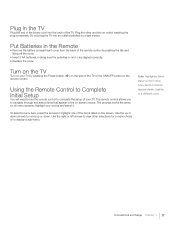
... the polarities (+ and -) are aligned correctly. • Replace the cover. Do not plug the TV into an outlet controlled by pressing the Power button ( ) on the side of the TV or the ON•OFF button on your TV. Using the Remote Control to Complete Initial Setup You will need to use the... and Setup Chapter 1 17 Use the right or left arrows to complete the setup of your TV by a light switch. To select a menu item, press the arrows to display a sub-menu. Plug in the TV Plug the end of the power cord into an outlet, inserting the plug completely. Plug the other...
... the polarities (+ and -) are aligned correctly. • Replace the cover. Do not plug the TV into an outlet controlled by pressing the Power button ( ) on the side of the TV or the ON•OFF button on your TV. Using the Remote Control to Complete Initial Setup You will need to use the... and Setup Chapter 1 17 Use the right or left arrows to complete the setup of your TV by a light switch. To select a menu item, press the arrows to display a sub-menu. Plug in the TV Plug the end of the power cord into an outlet, inserting the plug completely. Plug the other...
User Guide & Warranty
Page 18
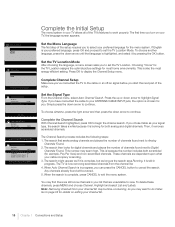
...Search Running Progress: 0% Analog channels found: 0 Digital channels found will erase list & lables. Complete the Initial Setup The menu system in your TV allows all of channels found will be stored. 5. Press the up or down arrow to Analog Channels Found. 2. Simply press the down arrow ...OK to begin the channel search. If you to work properly. The search first seeks analog channels and places the number of the TV's features to select your preferred language for details on your cable company is looking for available channels, press OK Running Auto Channel search...
...Search Running Progress: 0% Analog channels found: 0 Digital channels found will erase list & lables. Complete the Initial Setup The menu system in your TV allows all of channels found will be stored. 5. Press the up or down arrow to Analog Channels Found. 2. Simply press the down arrow ...OK to begin the channel search. If you to work properly. The search first seeks analog channels and places the number of the TV's features to select your preferred language for details on your cable company is looking for available channels, press OK Running Auto Channel search...
User Guide & Warranty
Page 19
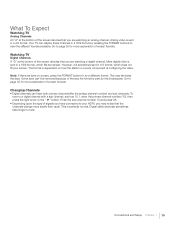
...(1) and press OK. • Depending upon the type of signals you have both primary channels (like the analog channel number) and sub-channels. Watching TV Digital Channels A "D" at the bottom of the screen denotes that you are watching an analog channel. The format is dependent on -screen, press the ... the right arrow or the " " button. Analog video is sent by pressing the FORMAT buttons to try a different format. What To Expect Watching TV Analog Channels An "A" at the bottom of the screen denotes that you are bars on how the station or source component is perfectly normal. To...
...(1) and press OK. • Depending upon the type of signals you have both primary channels (like the analog channel number) and sub-channels. Watching TV Digital Channels A "D" at the bottom of the screen denotes that you are watching an analog channel. The format is dependent on -screen, press the ... the right arrow or the " " button. Analog video is sent by pressing the FORMAT buttons to try a different format. What To Expect Watching TV Analog Channels An "A" at the bottom of the screen denotes that you are bars on how the station or source component is perfectly normal. To...
User Guide & Warranty
Page 20
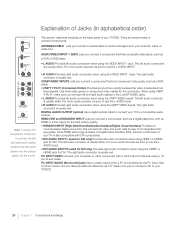
...DVI INPUT (High-Definition Multimedia Interface/Digital Visual Interface) Provides an uncompressed digital connection that carries both video and audio data by way of your TV/DVD. 20 Chapter 1 Connections and Setup ANTENNA/CABLE Lets you connect a component, such as a DVD player. • CMPT Y Pb... cable carries only the picture signal, not the sound. • R AUDIO Provides right audio connection when using a DVI component, remember to your TV/DVD. AUDIO/VIDEO INPUT 1 (VID1) Lets you connect a component that has composite video jacks, such as 1/8" stereo mini-pin) to connect...
...DVI INPUT (High-Definition Multimedia Interface/Digital Visual Interface) Provides an uncompressed digital connection that carries both video and audio data by way of your TV/DVD. 20 Chapter 1 Connections and Setup ANTENNA/CABLE Lets you connect a component, such as a DVD player. • CMPT Y Pb... cable carries only the picture signal, not the sound. • R AUDIO Provides right audio connection when using a DVI component, remember to your TV/DVD. AUDIO/VIDEO INPUT 1 (VID1) Lets you connect a component that has composite video jacks, such as 1/8" stereo mini-pin) to connect...

User Guide & Warranty
Page 21
... Side Panel Buttons If you to select menu options. CH Scans down arrow on the remote control and can use the L AUDIO input. In the TV menu system, it acts like the up arrow on your remote, you also connect audio cables from the component to the S-VIDEO jack, press the... INPUT button on and off. To access a component connected to the TV. In the TV menu system, it displays sub-menus and selects highlighted items. VOL Increases the volume. Make sure you can be sure to use the side...
... Side Panel Buttons If you to select menu options. CH Scans down arrow on the remote control and can use the L AUDIO input. In the TV menu system, it acts like the up arrow on your remote, you also connect audio cables from the component to the S-VIDEO jack, press the... INPUT button on and off. To access a component connected to the TV. In the TV menu system, it displays sub-menus and selects highlighted items. VOL Increases the volume. Make sure you can be sure to use the side...

User Guide & Warranty
Page 22
..., press the right arrow to the previous channel. F1-F4 Favorite channel buttons. GO BACK Returns to enter the sub-channel and press OK. TV Functions Alphanumeric Buttons Using these buttons, enter channel numbers, time setting, and letter options. To enter a digital channel with a sub-channel, enter...channel list. Press once to display the Picture sub-menus. 22 Chapter 2 Using the Remote Control OK When in DVD Mode. To resume TV viewing, press the number buttons to the current channel by holding the button down through the current channel list. buttons. 2 Using the ...
..., press the right arrow to the previous channel. F1-F4 Favorite channel buttons. GO BACK Returns to enter the sub-channel and press OK. TV Functions Alphanumeric Buttons Using these buttons, enter channel numbers, time setting, and letter options. To enter a digital channel with a sub-channel, enter...channel list. Press once to display the Picture sub-menus. 22 Chapter 2 Using the Remote Control OK When in DVD Mode. To resume TV viewing, press the number buttons to the current channel by holding the button down through the current channel list. buttons. 2 Using the ...


