Warranty Card
Page 1
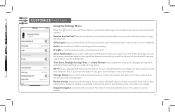
... TECHNICAL SUPPORT IF REQUIRED. The warranty does not extend to the elimination of externally generated static, noise, or loss of range or audio/video quality due to external factors, to costs incurred for the installation, removal or reinstallation of the product, or to damage to part 15... radio/TV technician for help. Symbol Conventions The symbols that may not cause harmful interference. 2. NOTE Make sure the power voltage across the doorbell should be between the equipment and receiver. -Connect the equipment into an outlet on a circuit different from the device, turn off and on...
... TECHNICAL SUPPORT IF REQUIRED. The warranty does not extend to the elimination of externally generated static, noise, or loss of range or audio/video quality due to external factors, to costs incurred for the installation, removal or reinstallation of the product, or to damage to part 15... radio/TV technician for help. Symbol Conventions The symbols that may not cause harmful interference. 2. NOTE Make sure the power voltage across the doorbell should be between the equipment and receiver. -Connect the equipment into an outlet on a circuit different from the device, turn off and on...
Quick Start Guide
Page 2
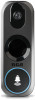
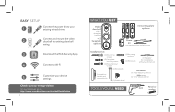
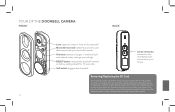
... to your existing wired chime 2 Connect and mount the video doorbell to existing doorbell wiring 3 Download the RCA Security App 4 Connect to Wi-Fi 5 Customize your device settings Check out our setup videos On your computer, go to http://www.rcaaudiovideo.com/doorbell2installvideo 2 WHAT YOU GET Video doorbell with 1 faceplate installed + 2 faceplate options 3 mounting plate options Power...
... to your existing wired chime 2 Connect and mount the video doorbell to existing doorbell wiring 3 Download the RCA Security App 4 Connect to Wi-Fi 5 Customize your device settings Check out our setup videos On your computer, go to http://www.rcaaudiovideo.com/doorbell2installvideo 2 WHAT YOU GET Video doorbell with 1 faceplate installed + 2 faceplate options 3 mounting plate options Power...
Quick Start Guide
Page 5
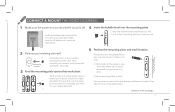
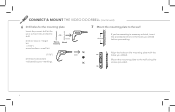
... mounting plate option that works best Try the three mounting plate options where you want to mount the video doorbell. Then take the mounting plate down. CONNECT & MOUNT THE VIDEO DOORBELL 1 Make sure the power to your doorbell's circuit is off before you continue installation. 4 Insert the bubble level into the mounting plate Snap the...
... mounting plate option that works best Try the three mounting plate options where you want to mount the video doorbell. Then take the mounting plate down. CONNECT & MOUNT THE VIDEO DOORBELL 1 Make sure the power to your doorbell's circuit is off before you continue installation. 4 Insert the bubble level into the mounting plate Snap the...
Quick Start Guide
Page 6
CONNECT & MOUNT THE VIDEO DOORBELL (continued) 6 Drill holes for the mounting plate Insert the correct drill bit for your markings. 7 Mount the mounting plate to the wall Anchors If you'...
CONNECT & MOUNT THE VIDEO DOORBELL (continued) 6 Drill holes for the mounting plate Insert the correct drill bit for your markings. 7 Mount the mounting plate to the wall Anchors If you'...
Quick Start Guide
Page 7
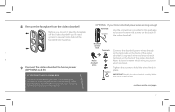
...nsert illed th the ng the 8 Remove the faceplate from the video doorbell Before you mount it, take the faceplate off the video doorbell-you put on the back of the video doorbell. Doorbell camera back Terminals Home doorbell wires Tighten Connect the doorbell power wires directly to the terminals on which wire you 'll...BOX You must use the resistor provided in this package to hold the wires firmly in the red box. Handle the video doorbell carefully! Loop each wire end around each terminal on the next page... 7 OPTION A: If your home's wiring. continues on the back of the...
...nsert illed th the ng the 8 Remove the faceplate from the video doorbell Before you mount it, take the faceplate off the video doorbell-you put on the back of the video doorbell. Doorbell camera back Terminals Home doorbell wires Tighten Connect the doorbell power wires directly to the terminals on which wire you 'll...BOX You must use the resistor provided in this package to hold the wires firmly in the red box. Handle the video doorbell carefully! Loop each wire end around each terminal on the next page... 7 OPTION A: If your home's wiring. continues on the back of the...
Quick Start Guide
Page 8
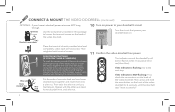
... the connections on the back of the video doorbell. 10 Turn on power to twist these ends together. Doorbell camera back Wire nut Home doorbell wire Twist Wire lead Place the terminal of the video doorbell for 4 seconds, until you feel tension. CONNECT & MOUNT THE VIDEO DOORBELL (continued) OPTION B: If your doorbell back on. Then, press and hold the...
... the connections on the back of the video doorbell. 10 Turn on power to twist these ends together. Doorbell camera back Wire nut Home doorbell wire Twist Wire lead Place the terminal of the video doorbell for 4 seconds, until you feel tension. CONNECT & MOUNT THE VIDEO DOORBELL (continued) OPTION B: If your doorbell back on. Then, press and hold the...

Quick Start Guide
Page 9
...Route the power wires and/or wire leads into the mounting plate. 12 Install the video doorbell on the video doorbell's body with the holes in a safe place- Insert the 2 provided set screws into the bottom of the video doorbell to complete setup! 14 Install the faceplate of your choice Place the faceplate of your.... you put it in a safe place Gently peel off 9 QR code sticker Peel off the QR code sticker from the front of the video doorbell and store it in the mounting plate. Tighten these screws completely. 13 Peel off the QR code sticker from the front of the...
...Route the power wires and/or wire leads into the mounting plate. 12 Install the video doorbell on the video doorbell's body with the holes in a safe place- Insert the 2 provided set screws into the bottom of the video doorbell to complete setup! 14 Install the faceplate of your choice Place the faceplate of your.... you put it in a safe place Gently peel off 9 QR code sticker Peel off the QR code sticker from the front of the video doorbell and store it in the mounting plate. Tighten these screws completely. 13 Peel off the QR code sticker from the front of the...
Quick Start Guide
Page 11
... camera with your WiFi network and home. Certain parts of the WiFi setup, like connecting to your network, could take up your video doorbell with your WiFi network In the RCA Security App, tap the + symbol in the App. +Make sure that your WiFi network in the middle of the screen. IMPORTANT:...in the App. Find the QR code and serial number you through the steps to your doorbell's serial number, the App asks you y. NOTE: The QR code is getting a good signal from the front of the video doorbell. For additional assistance, please call 1-833-236-6561. 11 Once the App recognizes your...
... camera with your WiFi network and home. Certain parts of the WiFi setup, like connecting to your network, could take up your video doorbell with your WiFi network In the RCA Security App, tap the + symbol in the App. +Make sure that your WiFi network in the middle of the screen. IMPORTANT:...in the App. Find the QR code and serial number you through the steps to your doorbell's serial number, the App asks you y. NOTE: The QR code is getting a good signal from the front of the video doorbell. For additional assistance, please call 1-833-236-6561. 11 Once the App recognizes your...

Quick Start Guide
Page 12
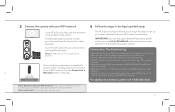
... settings, and more. and standard-definition video on the live video. (Sound On/Off) turns the sound from your smartphone or tablet. (Record) starts/stops recording video. Call log shows you to your Doorbell Camera. Video History accesses the doorbell camera's timeline, allowing you a history ...of the times when someone has rung the doorbell. TOUR OF THE SYSTEM: LIVE VIEW SCREEN (Back)...
... settings, and more. and standard-definition video on the live video. (Sound On/Off) turns the sound from your smartphone or tablet. (Record) starts/stops recording video. Call log shows you to your Doorbell Camera. Video History accesses the doorbell camera's timeline, allowing you a history ...of the times when someone has rung the doorbell. TOUR OF THE SYSTEM: LIVE VIEW SCREEN (Back)...
Quick Start Guide
Page 13
...item in the Live View screen to access the following the instructions to update. the Image Encryption increases the security of your doorbell Receive doorbell call lets you set notification schedules for when you get a new wireless router, for recording and live viewing. CUSTOMIZE AND USE...a firmware update is on the new network. Storage Status lets you want to this option and following customizable parameters of the video from the doorbell camera. IR Light turns the camera's night vision feature on /off . Alarm Notification lets you set whether you format the ...
...item in the Live View screen to access the following the instructions to update. the Image Encryption increases the security of your doorbell Receive doorbell call lets you set notification schedules for when you get a new wireless router, for recording and live viewing. CUSTOMIZE AND USE...a firmware update is on the new network. Storage Status lets you want to this option and following customizable parameters of the video from the doorbell camera. IR Light turns the camera's night vision feature on /off . Alarm Notification lets you set whether you format the ...
Quick Start Guide
Page 14
...doorbell camera to the doorbell power source from your doorbell camera. Removing/Replacing the SD Card Your doorbell camera comes with your home. IR sensor detects changes in front of the doorbell. Place the new SD card in place. 14 Then place the SD card cover back on and put the doorbell camera's faceplate over the doorbell... camera. Call button triggers the doorbell. Screw terminals connect to factory settings (hold ... the doorbell camera's faceplate by unlocking its set screw and screw it off. TOUR...
...doorbell camera to the doorbell power source from your doorbell camera. Removing/Replacing the SD Card Your doorbell camera comes with your home. IR sensor detects changes in front of the doorbell. Place the new SD card in place. 14 Then place the SD card cover back on and put the doorbell camera's faceplate over the doorbell... camera. Call button triggers the doorbell. Screw terminals connect to factory settings (hold ... the doorbell camera's faceplate by unlocking its set screw and screw it off. TOUR...
WIFI Troubleshooting Manual
Page 1
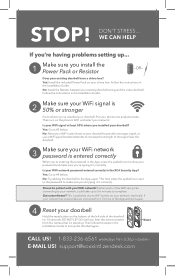
... the announcement from the camera that it in the RCA Security App? No: Try adding the doorbell to complete. Please be patient with your existing doorbell wiring and the video doorbell. This is 50% or stronger Go to WiFi activity on your doorbell. Then follow the steps in the Installation Guide.... of the left side of the WiFi setup, like connecting to your password and make sure you 're having problems setting up the doorbell again. [email protected] DON'T STRESS... Got screen freeze? STOP! Yes: Install the included Power Pack on your network, especially...
... the announcement from the camera that it in the RCA Security App? No: Try adding the doorbell to complete. Please be patient with your existing doorbell wiring and the video doorbell. This is 50% or stronger Go to WiFi activity on your doorbell. Then follow the steps in the Installation Guide.... of the left side of the WiFi setup, like connecting to your password and make sure you 're having problems setting up the doorbell again. [email protected] DON'T STRESS... Got screen freeze? STOP! Yes: Install the included Power Pack on your network, especially...
