
Warranty Card
Page 1
..., other express warranties or liabilities. To obtain repair or replacement within 12 months from state to state. Warranty information 12 Month Limited Warranty Applies to RCA Camcorders AUDIOVOX ACCESSORIES CORP. (the Company) warrants to the original retail purchaser of this product that should this product or any part thereof, under normal...
..., other express warranties or liabilities. To obtain repair or replacement within 12 months from state to state. Warranty information 12 Month Limited Warranty Applies to RCA Camcorders AUDIOVOX ACCESSORIES CORP. (the Company) warrants to the original retail purchaser of this product that should this product or any part thereof, under normal...
Warranty Card
Page 2
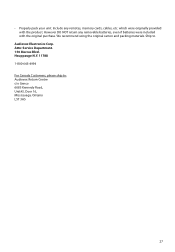
Attn: Service Department. 150 Marcus Blvd. We recommend using the original carton and packing materials. Hauppauge N.Y. 11788 1-800-645-4994 For Canada Customers, please ship to Audiovox Electronics Corp. which were originally provided with the original purchase. • Properly pack your unit. Include any removable batteries, even if batteries were included with the product. Ship to : Audiovox Return Centre c/o Genco 6685 Kennedy Road, Unit#3, Door 16, Mississuaga, Ontario L5T 3A5 27 However DO NOT return any remotes, memory cards, cables, etc.
Attn: Service Department. 150 Marcus Blvd. We recommend using the original carton and packing materials. Hauppauge N.Y. 11788 1-800-645-4994 For Canada Customers, please ship to Audiovox Electronics Corp. which were originally provided with the original purchase. • Properly pack your unit. Include any removable batteries, even if batteries were included with the product. Ship to : Audiovox Return Centre c/o Genco 6685 Kennedy Road, Unit#3, Door 16, Mississuaga, Ontario L5T 3A5 27 However DO NOT return any remotes, memory cards, cables, etc.

Owner/User Manual
Page 1
user manual EZ2110 series It is important to read this user manual prior to using your new product for the first time.
user manual EZ2110 series It is important to read this user manual prior to using your new product for the first time.

Owner/User Manual
Page 2
however, as with dry cloth. • Do not install near any heat sources such as radiators, heat registers, stoves, or other apparatus (including amplifiers) that produce heat. • Only use this apparatus near water. • Clean only with any way, such as vases, shall be observed during handling and use. • Read these instructions. • Keep these instructions. • Heed all warnings. • Follow all instructions. • Do not use attachments/accessories specified by the manufacturer. • Refer all servicing to disassemble the cabinet. This product does not ...
however, as with dry cloth. • Do not install near any heat sources such as radiators, heat registers, stoves, or other apparatus (including amplifiers) that produce heat. • Only use this apparatus near water. • Clean only with any way, such as vases, shall be observed during handling and use. • Read these instructions. • Keep these instructions. • Heed all warnings. • Follow all instructions. • Do not use attachments/accessories specified by the manufacturer. • Refer all servicing to disassemble the cabinet. This product does not ...
Owner/User Manual
Page 3
Because this product in the trunk of separately from the automobile when you exit, do not place your product in a closed automobile or the trunk of properly according to direct sunlight or extreme heat (such as inside a parked car) may exceed 50°C. Ecology Your product must be opened by qualified personnel. 2 Exposure to local laws and regulations. Never use the unit immediately after transportation from a cold place to work in temperatures that do not leave your product in permanent battery damage, fire, or explosion. Important battery information Warning: Your ...
Because this product in the trunk of separately from the automobile when you exit, do not place your product in a closed automobile or the trunk of properly according to direct sunlight or extreme heat (such as inside a parked car) may exceed 50°C. Ecology Your product must be opened by qualified personnel. 2 Exposure to local laws and regulations. Never use the unit immediately after transportation from a cold place to work in temperatures that do not leave your product in permanent battery damage, fire, or explosion. Important battery information Warning: Your ...
Owner/User Manual
Page 4
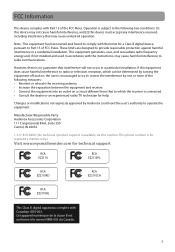
... interference to radio or television reception, which the receiver is connected. • Consult the dealer or an experienced radio/TV technician for technical support RCA EZ2110 RCA EZ2110PL RCA EZ2110RD RCA EZ2110CH RCA EZ2110BL This Class B digital apparatus complies with Part 15 of the FCC Rules. Cet appareil numérique de la classe B est conforme...
... interference to radio or television reception, which the receiver is connected. • Consult the dealer or an experienced radio/TV technician for technical support RCA EZ2110 RCA EZ2110PL RCA EZ2110RD RCA EZ2110CH RCA EZ2110BL This Class B digital apparatus complies with Part 15 of the FCC Rules. Cet appareil numérique de la classe B est conforme...
Owner/User Manual
Page 5
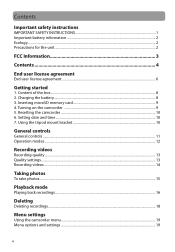
Turning on the camcorder ...9 5. Resetting the camcorder ...10 6. Charging the battery...8 3. Inserting microSD memory card 9 4. Setting date and time ...10 7. Contents Important safety instructions IMPORTANT SAFETY INSTRUCTIONS 1 Important battery information ...2 Ecology...2 Precautions for the unit ...2 FCC Information 3 Contents 4 End user license agreement End user license agreement...6 Getting started 1. Using the tripod mount bracket 10 General controls General controls ...11 Operation modes ...12 Recording videos Recording quality...13 Quality settings...13 Recording ...
Turning on the camcorder ...9 5. Resetting the camcorder ...10 6. Charging the battery...8 3. Inserting microSD memory card 9 4. Setting date and time ...10 7. Contents Important safety instructions IMPORTANT SAFETY INSTRUCTIONS 1 Important battery information ...2 Ecology...2 Precautions for the unit ...2 FCC Information 3 Contents 4 End user license agreement End user license agreement...6 Getting started 1. Using the tripod mount bracket 10 General controls General controls ...11 Operation modes ...12 Recording videos Recording quality...13 Quality settings...13 Recording ...
Owner/User Manual
Page 6
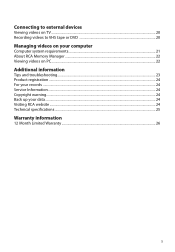
Connecting to external devices Viewing videos on TV ...20 Recording videos to VHS tape or DVD 20 Managing videos on your computer Computer system requirements...21 About RCA Memory Manager ...22 Viewing videos on PC ...22 Additional information Tips and troubleshooting...23 Product registration ...24 For your records ...24 Service Information...24 Copyright warning...24 Back up your data ...24 Visiting RCA website ...24 Technical specifications ...25 Warranty information 12 Month Limited Warranty ...26 5
Connecting to external devices Viewing videos on TV ...20 Recording videos to VHS tape or DVD 20 Managing videos on your computer Computer system requirements...21 About RCA Memory Manager ...22 Viewing videos on PC ...22 Additional information Tips and troubleshooting...23 Product registration ...24 For your records ...24 Service Information...24 Copyright warning...24 Back up your data ...24 Visiting RCA website ...24 Technical specifications ...25 Warranty information 12 Month Limited Warranty ...26 5
Owner/User Manual
Page 7
... AGREEMENT BETWEEN YOU AND AUDIOVOX CORPORATION AND, AS APPLICABLE, ANY AUDIOVOX SUBSIDIARY, AS DEFINED BELOW (COLLECTIVELY "AUDIOVOX"), FOR THE RCA BRANDED PORTABLE DIGITAL AUDIO/VIDEO DEVICE APPLICATION/DRIVER SOFTWARE PROGRAM WHICH MAY INCLUDE ASSOCIATED SOFTWARE COMPONENTS, SOFTWARE LICENSED BY AUDIOVOX FROM THIRD...) modify, translate, reverse engineer, decompile, disassemble (except to the extent that does not perform at the level of the RCA branded Portable Digital Audio/Video Device ("A/V Device"), and only if the other intellectual property rights. (c) The Program may automatically ...
... AGREEMENT BETWEEN YOU AND AUDIOVOX CORPORATION AND, AS APPLICABLE, ANY AUDIOVOX SUBSIDIARY, AS DEFINED BELOW (COLLECTIVELY "AUDIOVOX"), FOR THE RCA BRANDED PORTABLE DIGITAL AUDIO/VIDEO DEVICE APPLICATION/DRIVER SOFTWARE PROGRAM WHICH MAY INCLUDE ASSOCIATED SOFTWARE COMPONENTS, SOFTWARE LICENSED BY AUDIOVOX FROM THIRD...) modify, translate, reverse engineer, decompile, disassemble (except to the extent that does not perform at the level of the RCA branded Portable Digital Audio/Video Device ("A/V Device"), and only if the other intellectual property rights. (c) The Program may automatically ...

Owner/User Manual
Page 8
This exclusion of this Agreement and shall have other rights depending on the law that is directly or indirectly controlled by AUDIOVOX or its suppliers. IF YOU CHOOSE TO USE SUCH THIRD PARTY SOFTWARE, THEN SUCH USE SHALL BE GOVERNED BY SUCH THIRD PARTY'S LICENSE AGREEMENT, AN ELECTRONIC COPY OF WHICH WILL BE INSTALLED IN THE APPROPRIATE FOLDER ON YOUR COMPUTER UPON INSTALLATION OF THE SOFTWARE. AUDIOVOX IS NOT RESPONSIBLE FOR ANY THIRD PARTY'S SOFTWARE AND SHALL HAVE NO LIABILITY FOR YOUR USE OF THIRD PARTY SOFTWARE. 8. If any portion of this EULA shall be governed and construed in...
This exclusion of this Agreement and shall have other rights depending on the law that is directly or indirectly controlled by AUDIOVOX or its suppliers. IF YOU CHOOSE TO USE SUCH THIRD PARTY SOFTWARE, THEN SUCH USE SHALL BE GOVERNED BY SUCH THIRD PARTY'S LICENSE AGREEMENT, AN ELECTRONIC COPY OF WHICH WILL BE INSTALLED IN THE APPROPRIATE FOLDER ON YOUR COMPUTER UPON INSTALLATION OF THE SOFTWARE. AUDIOVOX IS NOT RESPONSIBLE FOR ANY THIRD PARTY'S SOFTWARE AND SHALL HAVE NO LIABILITY FOR YOUR USE OF THIRD PARTY SOFTWARE. 8. If any portion of this EULA shall be governed and construed in...
Owner/User Manual
Page 9
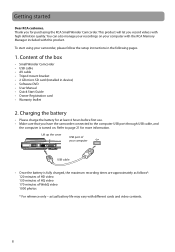
... • Quick Start Guide • Owner Registration card • Warranty leaflet 2. Getting started Dear RCA customer, Thank you have the camcorder connected to page 21 for purchasing the RCA Small Wonder Camcorder. actual battery life may vary with high definition quality. Charging the battery • .... • Make sure that you for more information. You can also manage your recordings on . To start using your computer with the RCA Memory Manager included with this product. Content of the box • Small Wonder Camcorder • USB cable • AV cable •...
... • Quick Start Guide • Owner Registration card • Warranty leaflet 2. Getting started Dear RCA customer, Thank you have the camcorder connected to page 21 for purchasing the RCA Small Wonder Camcorder. actual battery life may vary with high definition quality. Charging the battery • .... • Make sure that you for more information. You can also manage your recordings on . To start using your computer with the RCA Memory Manager included with this product. Content of the box • Small Wonder Camcorder • USB cable • AV cable •...
Owner/User Manual
Page 10
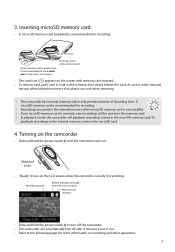
3. Lift up the cover Push the card in until a click is heard As the memory card is small in size, it . • The card icon ( ) appears on the memory card. • In playback mode, the camcorder will playback recordings stored in the microSD memory card. A microSD memory card is recommended to use a small coin to the following pages for recording. To playback recordings in use care when removing. • The camcorder has internal memory which only permits minutes of recording time. Turning on the camcorder • Slide and hold the power switch until a click is recommended ...
3. Lift up the cover Push the card in until a click is heard As the memory card is small in size, it . • The card icon ( ) appears on the memory card. • In playback mode, the camcorder will playback recordings stored in the microSD memory card. A microSD memory card is recommended to use a small coin to the following pages for recording. To playback recordings in use care when removing. • The camcorder has internal memory which only permits minutes of recording time. Turning on the camcorder • Slide and hold the power switch until a click is recommended ...
Owner/User Manual
Page 11
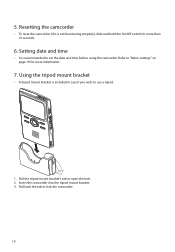
Using the tripod mount bracket • A tripod mount bracket is included in case if you wish to set the date and time before using the camcorder. Insert the camcorder into the tripod mount bracket. 3. 5. Setting date and time • It is not functioning properly), slide and hold the On/Off switch for more than 10 seconds. 6. Pull back the tab to open the lock. 2. Pull the tripod mount bracket's tab to lock the camcorder. 10 Refer to "Menu settings" on page 19 for more information. 7. Resetting the camcorder • To reset the camcorder (if it is recommended to use ...
Using the tripod mount bracket • A tripod mount bracket is included in case if you wish to set the date and time before using the camcorder. Insert the camcorder into the tripod mount bracket. 3. 5. Setting date and time • It is not functioning properly), slide and hold the On/Off switch for more than 10 seconds. 6. Pull back the tab to open the lock. 2. Pull the tripod mount bracket's tab to lock the camcorder. 10 Refer to "Menu settings" on page 19 for more information. 7. Resetting the camcorder • To reset the camcorder (if it is recommended to use ...
Owner/User Manual
Page 12
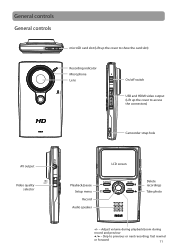
fast rewind or forward 11 Skip to access the connectors) Camcorder strap hole AV output Video quality selector Playback/pause Setup menu Record Audio speaker LCD screen Delete recordings Take photo +/- - Adjust volume during playback/zoom during record and preview / - General controls General controls microSD card slot (Lift up the cover to show the card slot) Recording indicator Microphone Lens On/off switch USB and HDMI video output (Lift up the cover to previous or next recording;
fast rewind or forward 11 Skip to access the connectors) Camcorder strap hole AV output Video quality selector Playback/pause Setup menu Record Audio speaker LCD screen Delete recordings Take photo +/- - Adjust volume during playback/zoom during record and preview / - General controls General controls microSD card slot (Lift up the cover to show the card slot) Recording indicator Microphone Lens On/off switch USB and HDMI video output (Lift up the cover to previous or next recording;
Owner/User Manual
Page 13
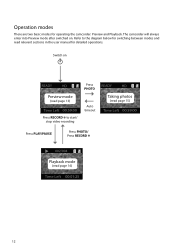
Refer to start/ stop video recording Press PHOTO Auto timeout Press PLAY/PAUSE Press PHOTO/ Press RECORD Taking photos (read page 15) Playback mode (read relevant sections in the user manual for detailed operations. Switch on . Operation modes There are two basic modes for switching between modes and read page 16) 12 The camcorder will always enter into Preview mode after switched on Preview mode (read page 13) Press RECORD to the diagram below for operating the camcorder: Preview and Playback.
Refer to start/ stop video recording Press PHOTO Auto timeout Press PLAY/PAUSE Press PHOTO/ Press RECORD Taking photos (read page 15) Playback mode (read relevant sections in the user manual for detailed operations. Switch on . Operation modes There are two basic modes for switching between modes and read page 16) 12 The camcorder will always enter into Preview mode after switched on Preview mode (read page 13) Press RECORD to the diagram below for operating the camcorder: Preview and Playback.

Owner/User Manual
Page 14
recording durations on a 2GB memory card* HD (High Viewing on TV & Best video 1280 x 720 @ 30fps Definition mode) quality 1 hours HQ (High Quality Viewing on TV & Capturing 720 x 480 @ 30fps mode) fast movements 1.7 hours WebQ (Web Quality mode) Uploading to "Menu settings" for : Resolutions (pixel) and Frame Rate (FPS) Approx. Light conditions can set to select the recording quality. The selected setting (HD, HQ or WebQ) appears on type of video content being recorded, system requirements, and other factors. Refer to and viewing 320 x 240 @ 30fps on the web 5 ...
recording durations on a 2GB memory card* HD (High Viewing on TV & Best video 1280 x 720 @ 30fps Definition mode) quality 1 hours HQ (High Quality Viewing on TV & Capturing 720 x 480 @ 30fps mode) fast movements 1.7 hours WebQ (Web Quality mode) Uploading to "Menu settings" for : Resolutions (pixel) and Frame Rate (FPS) Approx. Light conditions can set to select the recording quality. The selected setting (HD, HQ or WebQ) appears on type of video content being recorded, system requirements, and other factors. Refer to and viewing 320 x 240 @ 30fps on the web 5 ...

Owner/User Manual
Page 15
Video recording indicator Elapsed time • While recording, the red recording light on the camcorder front turns on. 2. Recording videos 1. Press the red RECORD button to begin recording. In Preview mode, press the red RECORD button to stop recording. 14 Press + or - Press PLAY/PAUSE to zoom in or out before or during recording. 4. to pause a recording. • A pause indicator II replaces the red at the top left corner of the screen. • To resume recording, press PLAY/PAUSE. 3.
Video recording indicator Elapsed time • While recording, the red recording light on the camcorder front turns on. 2. Recording videos 1. Press the red RECORD button to begin recording. In Preview mode, press the red RECORD button to stop recording. 14 Press + or - Press PLAY/PAUSE to zoom in or out before or during recording. 4. to pause a recording. • A pause indicator II replaces the red at the top left corner of the screen. • To resume recording, press PLAY/PAUSE. 3.
Owner/User Manual
Page 16
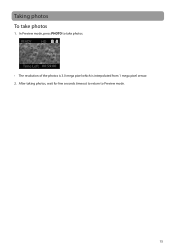
After taking photos, wait for few seconds timeout to return to take photos 1. Taking photos To take photos. • The resolution of the photos is 3.0 mega pixel which is interpolated from 1 mega pixel sensor. 2. In Preview mode, press PHOTO to Preview mode. 15
After taking photos, wait for few seconds timeout to return to take photos 1. Taking photos To take photos. • The resolution of the photos is 3.0 mega pixel which is interpolated from 1 mega pixel sensor. 2. In Preview mode, press PHOTO to Preview mode. 15

Owner/User Manual
Page 17
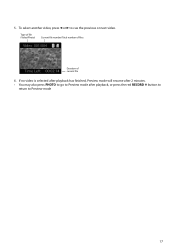
Press PLAY/PAUSE to resume playback. Hold down or to fast rewind or forward the selected video during playback to play all recordings. 16 Press + or - Press PLAY/PAUSE to pause playback. • Press PLAY/PAUSE again to enter Playback mode and start playback of files Elapsed playback time 2. Playback indicator Current file number/Total number of the most recent recording (video/ photo). during playback. Pause indicator Remaining playback time Press and hold PLAY/PAUSE for three seconds to adjust volume (video only). 3. Playback mode Playing back recordings 1. Fast ...
Press PLAY/PAUSE to resume playback. Hold down or to fast rewind or forward the selected video during playback to play all recordings. 16 Press + or - Press PLAY/PAUSE to pause playback. • Press PLAY/PAUSE again to enter Playback mode and start playback of files Elapsed playback time 2. Playback indicator Current file number/Total number of the most recent recording (video/ photo). during playback. Pause indicator Remaining playback time Press and hold PLAY/PAUSE for three seconds to adjust volume (video only). 3. Playback mode Playing back recordings 1. Fast ...
Owner/User Manual
Page 18
5. Type of file (Video/Photo) Current file number/Total number of files Duration of current file 6. To select another video, press or to Preview mode 17 If no video is selected after playback has finished, Preview mode will resume after 2 minutes. • You may also press PHOTO to go to Preview mode after playback, or press the red RECORD button to return to cue the previous or next video.
5. Type of file (Video/Photo) Current file number/Total number of files Duration of current file 6. To select another video, press or to Preview mode 17 If no video is selected after playback has finished, Preview mode will resume after 2 minutes. • You may also press PHOTO to go to Preview mode after playback, or press the red RECORD button to return to cue the previous or next video.