
User Guide & Warranty
Page 2
...this equipment may void the user's authority to wide slot, fully insert. These numbers are located on the picture tube (or projection TV picture tubes). OR GEMSTAR BE LIABLE FOR ANY AMOUNT REPRESENTING LOSS OF PROFITS, LOSS OF BUSINESS, OR INDIRECT, SPECIAL, OR CONSEQUENTIAL ...it. Product Information Keep your product for proper grounding and, in particular, specifies that the cable ground shall be registered at www.rca.com/ productregistration. Product Registration Please fill out the product registration card (packed separately) and return it here and record the serial...
...this equipment may void the user's authority to wide slot, fully insert. These numbers are located on the picture tube (or projection TV picture tubes). OR GEMSTAR BE LIABLE FOR ANY AMOUNT REPRESENTING LOSS OF PROFITS, LOSS OF BUSINESS, OR INDIRECT, SPECIAL, OR CONSEQUENTIAL ...it. Product Information Keep your product for proper grounding and, in particular, specifies that the cable ground shall be registered at www.rca.com/ productregistration. Product Registration Please fill out the product registration card (packed separately) and return it here and record the serial...
User Guide & Warranty
Page 3
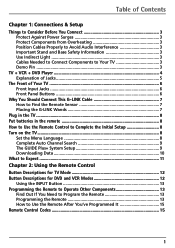
...Interference 3 Important Stand and Base Safety Information 3 Use Indirect Light 3 Cables Needed to Connect Components to Your TV 3 Demo Pin ...3 TV + VCR + DVD Player 4 Explanation of Jacks 5 The Front of Your TV 6 Front Input Jacks 6 Front Panel Buttons 6 Why You Should Connect This G-LINK Cable 7 How to... 9 The GUIDE Plus+ System Setup 9 Downloading Data 10 What to Expect ...11 Chapter 2: Using the Remote Control Button Descriptions for TV Mode 12 Button Descriptions for DVD and VCR Modes 12 Using the INPUT Button 13 Programming the Remote to Operate Other Components 13 Find ...
...Interference 3 Important Stand and Base Safety Information 3 Use Indirect Light 3 Cables Needed to Connect Components to Your TV 3 Demo Pin ...3 TV + VCR + DVD Player 4 Explanation of Jacks 5 The Front of Your TV 6 Front Input Jacks 6 Front Panel Buttons 6 Why You Should Connect This G-LINK Cable 7 How to... 9 The GUIDE Plus+ System Setup 9 Downloading Data 10 What to Expect ...11 Chapter 2: Using the Remote Control Button Descriptions for TV Mode 12 Button Descriptions for DVD and VCR Modes 12 Using the INPUT Button 13 Programming the Remote to Operate Other Components 13 Find ...
User Guide & Warranty
Page 4
Table of Contents Chapter 3: Using the TV's Features About the GUIDE Plus+ System 17 Using the GUIDE Plus+ System 17 ... to Set Up the Auto Tuning Feature 21 Parental Controls and V-Chip 23 How V-Chip Works 23 V-Chip TV Rating Limit 24 Blocking Specific Content Themes 26 Viewing Specific Content Themes 26 V-Chip Movie Rating Limit 26 V-Chip... Unrated Program Block 27 Channel Block 27 Front Panel Block 27 Lock/Unlock Parental Controls 27 Chapter 4: Using the TV's Menu System Audio Menu ...28 Picture Quality Menu 29 Screen Menu ...30 Using Closed Captioning 30 Closed-Caption Modes...
Table of Contents Chapter 3: Using the TV's Features About the GUIDE Plus+ System 17 Using the GUIDE Plus+ System 17 ... to Set Up the Auto Tuning Feature 21 Parental Controls and V-Chip 23 How V-Chip Works 23 V-Chip TV Rating Limit 24 Blocking Specific Content Themes 26 Viewing Specific Content Themes 26 V-Chip Movie Rating Limit 26 V-Chip... Unrated Program Block 27 Channel Block 27 Front Panel Block 27 Lock/Unlock Parental Controls 27 Chapter 4: Using the TV's Menu System Audio Menu ...28 Picture Quality Menu 29 Screen Menu ...30 Using Closed Captioning 30 Closed-Caption Modes...
User Guide & Warranty
Page 5
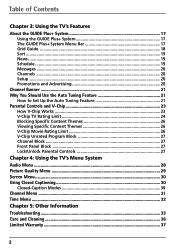
... Avoid Audio Interference • Insert each cable firmly into the wall outlet. • Turn off . You need to connect this cable to your TV, and to your antenna uses 300-ohm twin lead cables, do not coil the cables. Chapter 1: Connections & Setup Things to Consider Before You ...Connect Protect Against Power Surges • Connect all components before you connect or disconnect any of the TV. • If your VCR and/or cable box in this book. Protect Components from it won't flow around other components. Arrange the components so...
... Avoid Audio Interference • Insert each cable firmly into the wall outlet. • Turn off . You need to connect this cable to your TV, and to your antenna uses 300-ohm twin lead cables, do not coil the cables. Chapter 1: Connections & Setup Things to Consider Before You ...Connect Protect Against Power Surges • Connect all components before you connect or disconnect any of the TV. • If your VCR and/or cable box in this book. Protect Components from it won't flow around other components. Arrange the components so...
User Guide & Warranty
Page 6
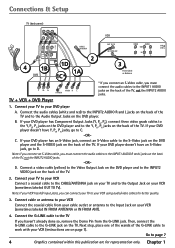
... cable or antenna to your VCR (sometimes labeled IN FROM ANTENNA or IN FROM ANT). 4. Go to the Input Jack on the back of the TV. B. C. Then, connect the G-LINK cable to the INPUT1 AUDIO R and L jacks on your VCR Connect the coaxial cable from the G-LINK jack. Note: If you... work with your DVD player doesn't have an S-Video jack, go to the Audio Output Jacks on the back of the TV. Next step, place one of the wands of the TV. 2. If your VCR (instructions are for better quality. 3. Connect the audio cables (white and red) to the INPUT2 AUDIO R and...
... cable or antenna to your VCR (sometimes labeled IN FROM ANTENNA or IN FROM ANT). 4. Go to the Input Jack on the back of the TV. B. C. Then, connect the G-LINK cable to the INPUT1 AUDIO R and L jacks on your VCR Connect the coaxial cable from the G-LINK jack. Note: If you... work with your DVD player doesn't have an S-Video jack, go to the Audio Output Jacks on the back of the TV. Next step, place one of the wands of the TV. 2. If your VCR (instructions are for better quality. 3. Connect the audio cables (white and red) to the INPUT2 AUDIO R and...
User Guide & Warranty
Page 7
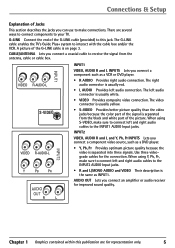
... Input jacks. Connections & Setup Explanation of Jacks This section describes the jacks you connect a component such as INPUT1. The G-LINK cable enables the TV's Guide Plus+ system to connect left audio connection. CABLE/ANTENNA Lets you connect a component video source, such as a DVD player. • ...this jack. G-LINK Connect the end of the signal is usually red. • L AUDIO Provides left and right audio cables to your TV. The video connector is usually yellow. • S-VIDEO Provides better picture quality than the video jacks because the color part of the G-...
... Input jacks. Connections & Setup Explanation of Jacks This section describes the jacks you connect a component such as INPUT1. The G-LINK cable enables the TV's Guide Plus+ system to connect left audio connection. CABLE/ANTENNA Lets you connect a component video source, such as a DVD player. • ...this jack. G-LINK Connect the end of the signal is usually red. • L AUDIO Provides left and right audio cables to your TV. The video connector is usually yellow. • S-VIDEO Provides better picture quality than the video jacks because the color part of the G-...
User Guide & Warranty
Page 8
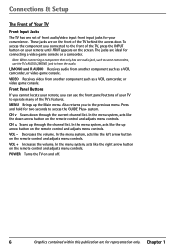
... connecting a component that only has one set of front audio/video input front input jacks for representation only. The jacks are for your TV to access the GUIDE Plus+ system. VIDEO Receives video from another component such as a VCR, camcorder, or video game console. POWER Turns the... the Main menu. VOL - These jacks are on the remote control and adjusts menu controls. Connections & Setup The Front of Your TV Front Input Jacks The TV has one audio jack, such as some camcorders, use the front panel buttons of your convenience. In the menu system, acts like...
... connecting a component that only has one set of front audio/video input front input jacks for representation only. The jacks are for your TV to access the GUIDE Plus+ system. VIDEO Receives video from another component such as a VCR, camcorder, or video game console. POWER Turns the... the Main menu. VOL - These jacks are on the remote control and adjusts menu controls. Connections & Setup The Front of Your TV Front Input Jacks The TV has one audio jack, such as some camcorders, use the front panel buttons of your convenience. In the menu system, acts like...
User Guide & Warranty
Page 9
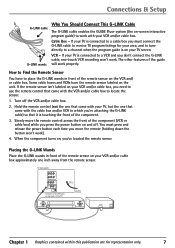
...and you must press and release the power button each time you 've located the remote sensor. You must connect the G-LINK cable to receive TV program listings for representation only. 7 Some cable boxes and VCRs have to place the G-LINK wands in front of the remote sensor on , ... a channel when the program guide is on your VCR and/or cable box. Cable Box - Slowly move the remote (holding down the button won 't work. TV (back panel) INPUT2 VIDEO R-AUDIO-L Y PB PR INPUT1 VIDEO R-AUDIO-L AUDIO OUT R G-LINK L S-VIDEO Connect to G-LINK jack on the VCR and/ or ...
...and you must press and release the power button each time you 've located the remote sensor. You must connect the G-LINK cable to receive TV program listings for representation only. 7 Some cable boxes and VCRs have to place the G-LINK wands in front of the remote sensor on , ... a channel when the program guide is on your VCR and/or cable box. Cable Box - Slowly move the remote (holding down the button won 't work. TV (back panel) INPUT2 VIDEO R-AUDIO-L Y PB PR INPUT1 VIDEO R-AUDIO-L AUDIO OUT R G-LINK L S-VIDEO Connect to G-LINK jack on the VCR and/ or ...
User Guide & Warranty
Page 10
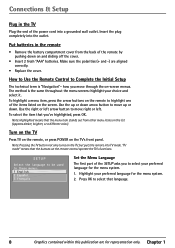
...: highlight your preferred language for representation only. Turn on the TV Press TV on the remote, or press POWER on the TV, but puts the remote into TV mode. "TV mode" means that the menu item stands out from the back...arrow button to highlight one of the remote by pushing down . Note: Pressing the TV button not only turns on the TV's front panel. SETUP Select the language to move up or down on the remote control operate... the TV's functions. Use the up or down arrow button to be used in the remote ...
...: highlight your preferred language for representation only. Turn on the TV Press TV on the remote, or press POWER on the TV, but puts the remote into TV mode. "TV mode" means that the menu item stands out from the back...arrow button to highlight one of the remote by pushing down . Note: Pressing the TV button not only turns on the TV's front panel. SETUP Select the language to move up or down on the remote control operate... the TV's functions. Use the up or down arrow button to be used in the remote ...
User Guide & Warranty
Page 11
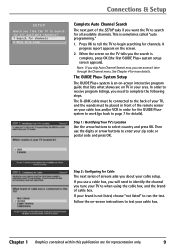
...is an on-screen interactive program guide that lists what shows are for all available channels? 1 Search for channels 2 Skip this publication are on TV in order for details). When the screen on -screen instructions to begin searching for channels. Step 2: Configuring for more details. If you use... search for representation only. 9 In order to receive program listings, you need to identify the channel you tune your TV to enter your area. Chapter 1 Graphics contained within this step Complete Auto Channel Search The next part of the remote sensor on the screen....
...is an on-screen interactive program guide that lists what shows are for all available channels? 1 Search for channels 2 Skip this publication are on TV in order for details). When the screen on -screen instructions to begin searching for channels. Step 2: Configuring for more details. If you use... search for representation only. 9 In order to receive program listings, you need to identify the channel you tune your TV to enter your area. Chapter 1 Graphics contained within this step Complete Auto Channel Search The next part of the remote sensor on the screen....
User Guide & Warranty
Page 12
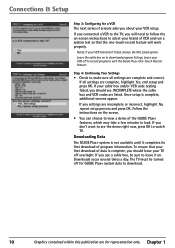
..., highlight No, repeat setup process and press OK. Notes: If your VCR off overnight. Step 4: Confirming Your Settings • Check to download program listings. The TV must be sure to select your brand of VCR and run a system test so that your first download of data is complete, you will work...+ system data to see INCOMPLETE where the cable box and VCR codes are for a VCR The next series of screens asks you should leave your TV off to load. If you don't want to download. 10 Graphics contained within this publication are listed. Chapter 1 If your cable box and/or VCR...
..., highlight No, repeat setup process and press OK. Notes: If your VCR off overnight. Step 4: Confirming Your Settings • Check to download program listings. The TV must be sure to select your brand of VCR and run a system test so that your first download of data is complete, you will work...+ system data to see INCOMPLETE where the cable box and VCR codes are for a VCR The next series of screens asks you should leave your TV off to load. If you don't want to download. 10 Graphics contained within this publication are listed. Chapter 1 If your cable box and/or VCR...
User Guide & Warranty
Page 13
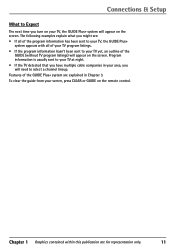
... that you will appear on the screen. Connections & Setup What to Expect The next time you turn on your TV, the GUIDE Plus+ system will appear on the screen. Program information is usually sent to select a channel lineup. The following examples explain what you might ...see: • If all of the program information has been sent to your TV, the GUIDE Plus+ system appears with all of your TV program listings. • If the program information hasn't been sent to your TV yet, an outline of the GUIDE Plus+ system are for representation only. 11 Chapter...
... that you will appear on the screen. Connections & Setup What to Expect The next time you turn on your TV, the GUIDE Plus+ system will appear on the screen. Program information is usually sent to select a channel lineup. The following examples explain what you might ...see: • If all of the program information has been sent to your TV, the GUIDE Plus+ system appears with all of your TV program listings. • If the program information hasn't been sent to your TV yet, an outline of the GUIDE Plus+ system are for representation only. 11 Chapter...
User Guide & Warranty
Page 14
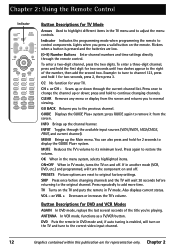
... tune to the correct video input channel. 12 Graphics contained within this publication are reset to continue changing channels. TV Turns on the TV and puts the remote in TV mode, turns the TV on and off . VOL - DVD Puts the remote in DVD mode and, if auto tuning is pressed and... DVD and VCR Modes AGAIN In DVD mode, replays the last several seconds of the number, then add the second two. Button Descriptions for your TV. Flickers when a button is enabled, will turn on the remote. Chapter 2 Lights when you to adjust the menu controls. To enter a three-digit ...
... tune to the correct video input channel. 12 Graphics contained within this publication are reset to continue changing channels. TV Turns on the TV and puts the remote in TV mode, turns the TV on and off . VOL - DVD Puts the remote in DVD mode and, if auto tuning is pressed and... DVD and VCR Modes AGAIN In DVD mode, replays the last several seconds of the number, then add the second two. Button Descriptions for your TV. Flickers when a button is enabled, will turn on the remote. Chapter 2 Lights when you to adjust the menu controls. To enter a three-digit ...
User Guide & Warranty
Page 15
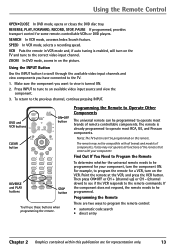
...to Program the Remote To determine whether the universal remote needs to be programmed for a VCR, turn the component ON. Programming the Remote to the TV. 1. If the component does not respond, the remote needs to be programmed. Press INPUT to tune to the previous channel, continue pressing INPUT.... button to scroll through the available video input channels and view components you want to operate most RCA, GE, and Proscan components. DVD and VCR buttons VOL DVD ON OFF VCR TV ON•OFF button CH MUTE GO BACK CLEAR button REVERSE and PLAY buttons CLEAR MENU OK ...
...to Program the Remote To determine whether the universal remote needs to be programmed for a VCR, turn the component ON. Programming the Remote to the TV. 1. If the component does not respond, the remote needs to be programmed. Press INPUT to tune to the previous channel, continue pressing INPUT.... button to scroll through the available video input channels and view components you want to operate most RCA, GE, and Proscan components. DVD and VCR buttons VOL DVD ON OFF VCR TV ON•OFF button CH MUTE GO BACK CLEAR button REVERSE and PLAY buttons CLEAR MENU OK ...

User Guide & Warranty
Page 17
...VCR, press VCR on the remote control to put the remote into TV mode before you could operate the TV. 1. Note: If you would press the TV button to put the remote in the wrong mode. You must ... It Because this publication are for VCR button. Press the appropriate component button (DVD, TV, VCR) to set the remote to that matches the component you want to operate (i.e., if you want... the remote to operate the TV, you keep pressing buttons and nothing happens, the remote is probably in VCR mode.) Remote Control...
...VCR, press VCR on the remote control to put the remote into TV mode before you could operate the TV. 1. Note: If you would press the TV button to put the remote in the wrong mode. You must ... It Because this publication are for VCR button. Press the appropriate component button (DVD, TV, VCR) to set the remote to that matches the component you want to operate (i.e., if you want... the remote to operate the TV, you keep pressing buttons and nothing happens, the remote is probably in VCR mode.) Remote Control...
User Guide & Warranty
Page 19
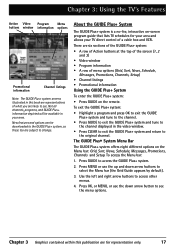
... by default). 3. Press MENU or use the down arrow buttons to access the GUIDE Plus+ system. 2. Chapter 3: Using the TV's Features Action Video Program Menu buttons window information options Promotional information Channel listings Note: The GUIDE Plus+ system screens illustrated in this ... system and tune to the channel. • Press GUIDE to exit the GUIDE Plus+ system and tune to the channel displayed in your TV direct control of menu options (Grid, Sort, News, Schedule, Messages, Promotions, Channels, Setup) • Channel listings • Promotional information...
... by default). 3. Press MENU or use the down arrow buttons to access the GUIDE Plus+ system. 2. Chapter 3: Using the TV's Features Action Video Program Menu buttons window information options Promotional information Channel listings Note: The GUIDE Plus+ system screens illustrated in this ... system and tune to the channel. • Press GUIDE to exit the GUIDE Plus+ system and tune to the channel displayed in your TV direct control of menu options (Grid, Sort, News, Schedule, Messages, Promotions, Channels, Setup) • Channel listings • Promotional information...
User Guide & Warranty
Page 20
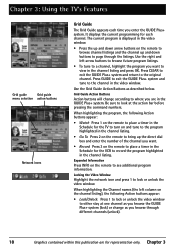
... GUIDE Plus+ system (lock) or change according to where you want. • Record Press 3 on the remote to place a timer in the Schedule for the TV to turn on and tune to the program highlighted in the channel listing. • Go To Press 2 on the remote to bring up and down...; Lock/Unlock Press 1 to lock or unlock the video window to either stay at the action bar before pressing the command numbers. Chapter 3: Using the TV's Features Grid guide Grid guide menu selection action buttons Network icons Grid Guide The Grid Guide appears each channel. The current program is displayed in...
... GUIDE Plus+ system (lock) or change according to where you want. • Record Press 3 on the remote to place a timer in the Schedule for the TV to turn on and tune to the program highlighted in the channel listing. • Go To Press 2 on the remote to bring up and down...; Lock/Unlock Press 1 to lock or unlock the video window to either stay at the action bar before pressing the command numbers. Chapter 3: Using the TV's Features Grid guide Grid guide menu selection action buttons Network icons Grid Guide The Grid Guide appears each channel. The current program is displayed in...
User Guide & Warranty
Page 21
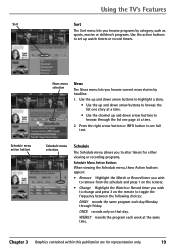
... Action buttons appear: • Remove Highlight the Watch or Record timer you wish to remove from the schedule and press 1 on that day. Using the TV's Features Sort Sort The Sort menu lets you browse current news stories by category, such as sports, movies or children's programs. Use the action buttons...
... Action buttons appear: • Remove Highlight the Watch or Record timer you wish to remove from the schedule and press 1 on that day. Using the TV's Features Sort Sort The Sort menu lets you browse current news stories by category, such as sports, movies or children's programs. Use the action buttons...
User Guide & Warranty
Page 22
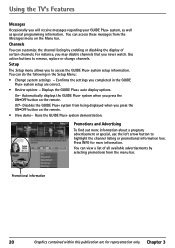
...- You can customize the channel listing by enabling or disabling the display of all available advertisements by selecting promotions from the menu bar. Using the TV's Features Messages Occasionally you to access the GUIDE Plus+ system setup information. Disables the GUIDE Plus+ system from the Messages menu on the remote. •...
...- You can customize the channel listing by enabling or disabling the display of all available advertisements by selecting promotions from the menu bar. Using the TV's Features Messages Occasionally you to access the GUIDE Plus+ system setup information. Disables the GUIDE Plus+ system from the Messages menu on the remote. •...
User Guide & Warranty
Page 23
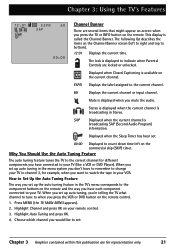
...3 Graphics contained within this publication are for representation only. 21 Why You Should Use the Auto Tuning Feature The auto tuning feature tunes the TV to the correct channel for example, when you want to watch the tape in Stereo. SAP Displayed when the current channel is broadcasting in... when the Sleep Timer has been set up the auto tuning feature in the menu system you don't have to remember to change your TV to channel 3, for different components you would like a VCR or DVD Player). This display is displayed to indicate when Parental Controls are locked...
...3 Graphics contained within this publication are for representation only. 21 Why You Should Use the Auto Tuning Feature The auto tuning feature tunes the TV to the correct channel for example, when you want to watch the tape in Stereo. SAP Displayed when the current channel is broadcasting in... when the Sleep Timer has been set up the auto tuning feature in the menu system you don't have to remember to change your TV to channel 3, for different components you would like a VCR or DVD Player). This display is displayed to indicate when Parental Controls are locked...


