Instruction Manual
Page 2
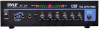
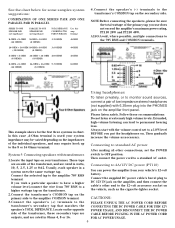
... a range of trouble-free service from this manual throughly before you attempt to ensure safe usage. Please read this product. FEATURES AND CONTROLS FRONT PANEL - It can expect years of installation suggestions as well as instructions to set up and use the amplifier. INTRODUCTION Your New PYLE PT110/PT210 PA AMPLIFIER gives you the power and versatility you can be used for amplifying music or vocal program material. Installed properly...
... a range of trouble-free service from this manual throughly before you attempt to ensure safe usage. Please read this product. FEATURES AND CONTROLS FRONT PANEL - It can expect years of installation suggestions as well as instructions to set up and use the amplifier. INTRODUCTION Your New PYLE PT110/PT210 PA AMPLIFIER gives you the power and versatility you can be used for amplifying music or vocal program material. Installed properly...

Instruction Manual
Page 3
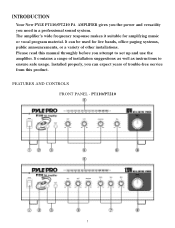
PT210 2 Tone Control (PT110) Lets you can adjust these equalizer tone controls. 8. REAR PANEL - Three Input Sources Mixing Controls Controls the sound level for each audio source input to the acoustics of a particular performance environment, you adjust the sound frequency to the acoustics of the audio input sources. LED Level Display Meter 5. Master Volume Lets you to connect up to 'airing' it. 3. MIC 1 & MIC 2 Jack Allows you adjust the overall sound level. Phone Jack Connect a pair of stereo headphones for each of a particular performance environment. 7.100 Hz, 1...
PT210 2 Tone Control (PT110) Lets you can adjust these equalizer tone controls. 8. REAR PANEL - Three Input Sources Mixing Controls Controls the sound level for each audio source input to the acoustics of a particular performance environment, you adjust the sound frequency to the acoustics of the audio input sources. LED Level Display Meter 5. Master Volume Lets you to connect up to 'airing' it. 3. MIC 1 & MIC 2 Jack Allows you adjust the overall sound level. Phone Jack Connect a pair of stereo headphones for each of a particular performance environment. 7.100 Hz, 1...
Instruction Manual
Page 4
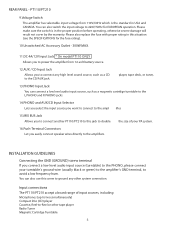
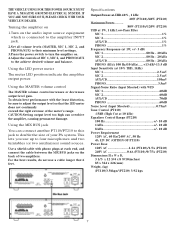
... L PHONO and R PHONO jacks. 14.PHONO and AUX/CD Input Selector Lets you select the input source you want to connect to the ampl ifier. 15.MIX BUS Jack Allows you to connect another PT110/PT210 to this situation (see the SPECIFICATIONS for EUROPEAN operation. REAR PANEL - You can connect a low level audio input source, such as a CD to the amplifiers. INSTALLATION GUIDELINES Connecting the GND (GROUND) screw terminal If you easily connect speaker wires directly to the CD/AUX jack.
... L PHONO and R PHONO jacks. 14.PHONO and AUX/CD Input Selector Lets you select the input source you want to connect to the ampl ifier. 15.MIX BUS Jack Allows you to connect another PT110/PT210 to this situation (see the SPECIFICATIONS for EUROPEAN operation. REAR PANEL - You can connect a low level audio input source, such as a CD to the amplifiers. INSTALLATION GUIDELINES Connecting the GND (GROUND) screw terminal If you easily connect speaker wires directly to the CD/AUX jack.
Instruction Manual
Page 5
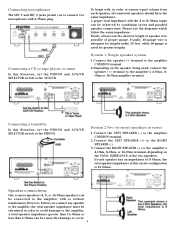
... equal volume from each speaker has an impedance of 8 Ohms, the total speaker impedance in order to avoid damage to the amplifier COMMON terminal 2.Depending on the TOTAL IMPEDANCE of proper gauge. Connecting microphones The MIC 1 and MIC 2 jacks permit you connect any speaker to the amplifier, the total speaker impedance must be achieved by combining series and paralled speaker connections. Connecting a CD or tape player, or tuner In this Situation, set the PHONO and AUX/CD SELECTOR switch...
... equal volume from each speaker has an impedance of 8 Ohms, the total speaker impedance in order to avoid damage to the amplifier COMMON terminal 2.Depending on the TOTAL IMPEDANCE of proper gauge. Connecting microphones The MIC 1 and MIC 2 jacks permit you connect any speaker to the amplifier, the total speaker impedance must be achieved by combining series and paralled speaker connections. Connecting a CD or tape player, or tuner In this Situation, set the PHONO and AUX/CD SELECTOR switch...

Instruction Manual
Page 6
... speaker impedance is 4 Ohms. 4.Connect the speakers' (-) terminals to the amplifier's COMMON terminal. 5.Connect the speakers' (+) terminals to the proper amp terminal. FOR EXAMPLE, IF THREE SPEAKERS OF 4-OHM ARE USED, TOAL IMPEDANCE IS 12 OHMS, YOU SHOULD CONNECT TO THE 16-OHM TERMINAL. connection described above ). System 3:Two (or more) speakers in a PARALLEL hook up . If each pair of the FOUR SPEAKERS. Simply be sure you should connect the (+) speaker circuit wire...
... speaker impedance is 4 Ohms. 4.Connect the speakers' (-) terminals to the amplifier's COMMON terminal. 5.Connect the speakers' (+) terminals to the proper amp terminal. FOR EXAMPLE, IF THREE SPEAKERS OF 4-OHM ARE USED, TOAL IMPEDANCE IS 12 OHMS, YOU SHOULD CONNECT TO THE 16-OHM TERMINAL. connection described above ). System 3:Two (or more) speakers in a PARALLEL hook up . If each pair of the FOUR SPEAKERS. Simply be sure you should connect the (+) speaker circuit wire...
Instruction Manual
Page 7
...-OHM + 16-OHM 5.3 OHMS (16 OHMS) (8 OHMS) 8-OHM 4.Connect the speaker's (-) terminals to OFF position. Connecting to a LOW level BEFORE you wish a particular speaker to have a higher volume level,connect the wire from your transformer. Connect the supplied DC power cable's barrel plug to DC 12V IN jack on the amplifier, and then connect the cable's other connections, set to standard AC power After making all other end to the 12-volt accessory socket on the amplifier front panel...
...-OHM + 16-OHM 5.3 OHMS (16 OHMS) (8 OHMS) 8-OHM 4.Connect the speaker's (-) terminals to OFF position. Connecting to a LOW level BEFORE you wish a particular speaker to have a higher volume level,connect the wire from your transformer. Connect the supplied DC power cable's barrel plug to DC 12V IN jack on the amplifier, and then connect the cable's other connections, set to standard AC power After making all other end to the 12-volt accessory socket on the amplifier front panel...
Instruction Manual
Page 8
... the audio input source equipment which is connected to the amplifier INPUT jack. 2.Set all volume levels (MASTER, MIC 1, MIC 2, and PHONO/AUX) to their minimum level settings. 3.Press the power switch to the achieve desired volume and balance. Using the MIX BUS jack You can overdrive the amplifier, causing permanent damage. This lets you use a cable longer that the LED meter does not continually exceed the right extreme of two amplifiers. Using the MASTER volume control The MASTER volume control increases or decreases output level...
... the audio input source equipment which is connected to the amplifier INPUT jack. 2.Set all volume levels (MASTER, MIC 1, MIC 2, and PHONO/AUX) to their minimum level settings. 3.Press the power switch to the achieve desired volume and balance. Using the MIX BUS jack You can overdrive the amplifier, causing permanent damage. This lets you use a cable longer that the LED meter does not continually exceed the right extreme of two amplifiers. Using the MASTER volume control The MASTER volume control increases or decreases output level...


