User Manual
Page 1
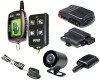
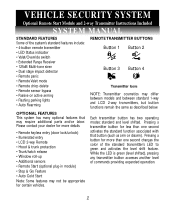
...). VEHICLE SECURITY SYSTEM Optional Remote Start Module and 2-way Transmitter Instructions Included SYSTEM MANUAL STANDARD FEATURES Some of commands providing expanded operation. 1 Each transmitter button has two operating modes: standard and level shifted. While the LED is green (level shifted), pressing any transmitter button accesses another level of the system's standard features include: • 4-button remote transmitter • LED Status indicator • Valet/Override switch •...
...). VEHICLE SECURITY SYSTEM Optional Remote Start Module and 2-way Transmitter Instructions Included SYSTEM MANUAL STANDARD FEATURES Some of commands providing expanded operation. 1 Each transmitter button has two operating modes: standard and level shifted. While the LED is green (level shifted), pressing any transmitter button accesses another level of the system's standard features include: • 4-button remote transmitter • LED Status indicator • Valet/Override switch •...
User Manual
Page 2
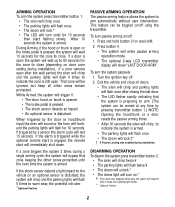
..., and the parking lights will flash for 30 seconds. That zone will be toggled on door zone setting during installation). If the alarm is triggered while the optional remote start is armed. • The parking lights will flash once...zone to indicate the zone is armed. If a door is pressed, the system will wait 10 seconds for the zone to arm automatically without user intervention. Turn the ignition key off using the transmitter. Press button 4. • The system will enter passive arming operation mode. • The optional 2-way LCD transmitter display will flash 5 times...
..., and the parking lights will flash for 30 seconds. That zone will be toggled on door zone setting during installation). If the alarm is triggered while the optional remote start is armed. • The parking lights will flash once...zone to indicate the zone is armed. If a door is pressed, the system will wait 10 seconds for the zone to arm automatically without user intervention. Turn the ignition key off using the transmitter. Press button 4. • The system will enter passive arming operation mode. • The optional 2-way LCD transmitter display will flash 5 times...
User Manual
Page 3
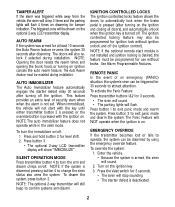
... programmed for 3 seconds. • The siren will NOT operate when the ignition is turned off : 1. The triggered zone will still beep to exit panic mode and rearm the system. The ignition controlled locking feature may also be disarmed by using the emergency override feature. REMOTE PANIC In the event of security even when when the alarm is disarmed, pressing button 4 to exit panic mode...
... programmed for 3 seconds. • The siren will NOT operate when the ignition is turned off : 1. The triggered zone will still beep to exit panic mode and rearm the system. The ignition controlled locking feature may also be disarmed by using the emergency override feature. REMOTE PANIC In the event of security even when when the alarm is disarmed, pressing button 4 to exit panic mode...

User Manual
Page 4
... 1 Complete Bypass If an optional dual-zone sensor is opened, the anticarjacking feature will show "zzz" for 3 seconds. • The siren will flash 6 times. If a door is connected to the alarm, the optional 2way LCD transmitter will trigger, with either the valet switch or a remote transmitter. To enter or exit valet mode using the switch: 1. If the vehicle's trunk pin...
... 1 Complete Bypass If an optional dual-zone sensor is opened, the anticarjacking feature will show "zzz" for 3 seconds. • The siren will flash 6 times. If a door is connected to the alarm, the optional 2way LCD transmitter will trigger, with either the valet switch or a remote transmitter. To enter or exit valet mode using the switch: 1. If the vehicle's trunk pin...

User Manual
Page 5
... enter 1st digit PIN programming. 5. SECURE PIN CODE The system may be selected during installation or PIN code mode will not disarm the system. 5 Turn ignition off . Press the valet switch once. • The siren will activate after Warn Trigger: Press the valet switch for PIN code override mode, the default code is deactivated . or Enter PIN if programmed for 5 seconds. - Example: PIN=2,3 Press valet switch two times, turn on...
... enter 1st digit PIN programming. 5. SECURE PIN CODE The system may be selected during installation or PIN code mode will not disarm the system. 5 Turn ignition off . Press the valet switch once. • The siren will activate after Warn Trigger: Press the valet switch for PIN code override mode, the default code is deactivated . or Enter PIN if programmed for 5 seconds. - Example: PIN=2,3 Press valet switch two times, turn on...
User Manual
Page 6
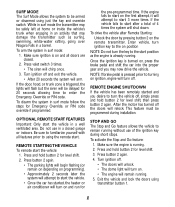
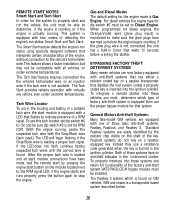
... time to start on and run for level shift. 2. To drive the vehicle after a total of the ignition key during installation. REMOTE ENGINE SHUTDOWN If the vehicle has been remotely started , the heater or air conditioner will attempt to enter the Emergency Override or PIN code. This feature must be armed or disarmed using just the key and override switch. Turn...
... time to start on and run for level shift. 2. To drive the vehicle after a total of the ignition key during installation. REMOTE ENGINE SHUTDOWN If the vehicle has been remotely started , the heater or air conditioner will attempt to enter the Emergency Override or PIN code. This feature must be armed or disarmed using just the key and override switch. Turn...
User Manual
Page 7
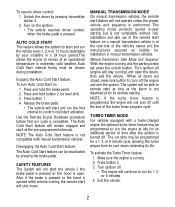
... or the hood is opened while remote running, the remote start feature on a manual transmission vehicle is running and the parking brake set, press the unlock button. This operating mode protects against in-gear starting . Press button 1. 4. TURBO TIMER MODE For vehicles equipped with manual transmission vehicles. Turn on : 1. Press button 2. 3. To resume driver control: 1. Auto Cold Start interval timing must be deactivated by pressing transmitter...
... or the hood is opened while remote running, the remote start feature on a manual transmission vehicle is running and the parking brake set, press the unlock button. This operating mode protects against in-gear starting . Press button 1. 4. TURBO TIMER MODE For vehicles equipped with manual transmission vehicles. Turn on : 1. Press button 2. 3. To resume driver control: 1. Auto Cold Start interval timing must be deactivated by pressing transmitter...
User Manual
Page 8
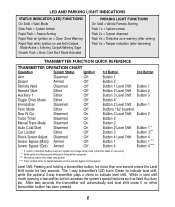
... zone warning (after arming) Flash 4x = Tamper indication (after disarming) TRANSMITTER FUNCTION QUICK REFERENCE TRANSMITTER OPERATION CHART Operation System Status Ignition Arm Disarmed Off Disarm Armed Off Remote Valet Disarmed Off Remote Start Either Off Auxiliary 1 Either Off Toggle Chirp Mode Either Off Immobilizer Disarmed Off Panic Mode Either Off Stop N Go Disarmed On Turbo Timer Disarmed On Manual Trans Mode...
... zone warning (after arming) Flash 4x = Tamper indication (after disarming) TRANSMITTER FUNCTION QUICK REFERENCE TRANSMITTER OPERATION CHART Operation System Status Ignition Arm Disarmed Off Disarm Armed Off Remote Valet Disarmed Off Remote Start Either Off Auxiliary 1 Either Off Toggle Chirp Mode Either Off Immobilizer Disarmed Off Panic Mode Either Off Stop N Go Disarmed On Turbo Timer Disarmed On Manual Trans Mode...

User Manual
Page 9
... alkaline battery. Button 2 Button 1 5-Button 2-way LCD Transmitter Each LCD transmitter button has two operating modes: standard and level shifted. LOW BATTERY When the transmitter battery is level shifted, pressing transmitter buttons 1-4 accesses another level of commands providing expanded operation. OPTIONAL 2-WAY TRANSMITTER WITH LCD DISPLAY OPERATING INSTRUCTIONS REMOTE TRANSMITTER LAYOUT Button 3 Button 4 Button 5 the 2-way transmitter also provides audible and vibration alert in LCD display provides visual confirmation of system operations...
... alkaline battery. Button 2 Button 1 5-Button 2-way LCD Transmitter Each LCD transmitter button has two operating modes: standard and level shifted. LOW BATTERY When the transmitter battery is level shifted, pressing transmitter buttons 1-4 accesses another level of commands providing expanded operation. OPTIONAL 2-WAY TRANSMITTER WITH LCD DISPLAY OPERATING INSTRUCTIONS REMOTE TRANSMITTER LAYOUT Button 3 Button 4 Button 5 the 2-way transmitter also provides audible and vibration alert in LCD display provides visual confirmation of system operations...
User Manual
Page 12
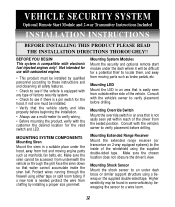
... transceiver on 2-way equipped systems) to an under dash brace or similar support structure using either side of the driver from hot and moving parts such as manifolds, fan belts, etc. VEHICLE SECURITY SYSTEM Optional Remote Start Module and 2-way Transmitter Instructions Included INSTALLATION INSTRUCTIONS BEFORE INSTALLING THIS PRODUCT PLEASE READ THE INSTALLATION DIRECTIONS THOROUGHLY!! BEFORE YOU BEGIN This system is not easily seen...
... transceiver on 2-way equipped systems) to an under dash brace or similar support structure using either side of the driver from hot and moving parts such as manifolds, fan belts, etc. VEHICLE SECURITY SYSTEM Optional Remote Start Module and 2-way Transmitter Instructions Included INSTALLATION INSTRUCTIONS BEFORE INSTALLING THIS PRODUCT PLEASE READ THE INSTALLATION DIRECTIONS THOROUGHLY!! BEFORE YOU BEGIN This system is not easily seen...
User Manual
Page 13
... negative lock systems. • BLUE WIRE - See Alarm Programmable Features Dome Light (default): Connect to a relay to activate the vehicle's dome light.The dome light relay output is not connected, leave this wire disconnected and set Alarm Programmable Feature #3 to the vehicle's parking light wire. Connect the relay socket for normally open or normally closed operation. See Starter Defeat Relay Diagrams and Alarm Programmable...
... negative lock systems. • BLUE WIRE - See Alarm Programmable Features Dome Light (default): Connect to a relay to activate the vehicle's dome light.The dome light relay output is not connected, leave this wire disconnected and set Alarm Programmable Feature #3 to the vehicle's parking light wire. Connect the relay socket for normally open or normally closed operation. See Starter Defeat Relay Diagrams and Alarm Programmable...
User Manual
Page 14
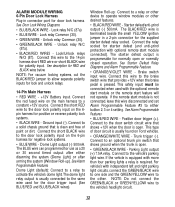
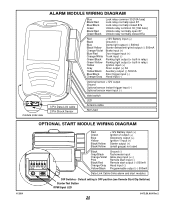
... WIRE - See Alarm Programmable Features • YELLOW/BLACK WIRE - Negative door trigger (-). See Alarm Programmable Features Alarm Module Connectors 4-Pin Connector: Plug-in connector for optional dual-zone sensor. See Alarm Module Wiring Diagram for pin descriptions. 2-Pin Connector: Plug-in connector for valet/override switch. Second ignition output (+). The voltage must be set to Horn mode. Connect to the main ignition wire that shows...
... WIRE - See Alarm Programmable Features • YELLOW/BLACK WIRE - Negative door trigger (-). See Alarm Programmable Features Alarm Module Connectors 4-Pin Connector: Plug-in connector for optional dual-zone sensor. See Alarm Module Wiring Diagram for pin descriptions. 2-Pin Connector: Plug-in connector for valet/override switch. Second ignition output (+). The voltage must be set to Horn mode. Connect to the main ignition wire that shows...

User Manual
Page 15
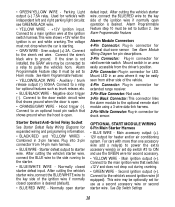
.... • YELLOW/BLACK WIRE - Hood trigger (-). Factory disarm output (-). Factory Disarm (default): Connect to the glow plug wire. Start output (+). NOTE: If using the glow plug input, program Remote Start Programmable Feature #8 with a 3rd ignition circuit, the YELLOW/BLACK wire may be connected directly to the wire that is unavailable, leave the GRAY/BLACK wire disconnected, and set dip switch #2 to disarm the factory alarm. Connect to a solid...
.... • YELLOW/BLACK WIRE - Hood trigger (-). Factory disarm output (-). Factory Disarm (default): Connect to the glow plug wire. Start output (+). NOTE: If using the glow plug input, program Remote Start Programmable Feature #8 with a 3rd ignition circuit, the YELLOW/BLACK wire may be connected directly to the wire that is unavailable, leave the GRAY/BLACK wire disconnected, and set dip switch #2 to disarm the factory alarm. Connect to a solid...
User Manual
Page 16
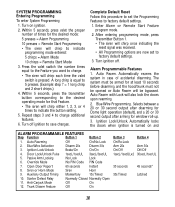
... 4. Press the valet switch the number times equal to the Feature you want to 5 presses. (Example: step 7 = 1 long chirp and 2 short chirps.) 4. Repeat steps 3 and 4 to save changes. Blue Wire Activation Disarm 20s Disarm 30s 3. Starter Defeat Relay Normally Closed Normally Open 11. Turn on and ALARM PROGRAMMABLE FEATURES Step Function Button 1 Button 2 1. Enter Alarm or Remote Start Feature program mode. 2. Turn ignition off ignition...
... 4. Press the valet switch the number times equal to the Feature you want to 5 presses. (Example: step 7 = 1 long chirp and 2 short chirps.) 4. Repeat steps 3 and 4 to save changes. Blue Wire Activation Disarm 20s Disarm 30s 3. Starter Defeat Relay Normally Closed Normally Open 11. Turn on and ALARM PROGRAMMABLE FEATURES Step Function Button 1 Button 2 1. Enter Alarm or Remote Start Feature program mode. 2. Turn ignition off ignition...

User Manual
Page 17
... for 3 seconds to indicate full trigger. 5. Timed operation provides an output that turns on ; Selects between siren or horn programming for 10 /30 seconds or each time the transmitter button is turned off. Press and hold button 4 for some European cars). 5. Press button 4 again to enter adjust mode. • The siren will chirp a number of times to indicate the current sensitivity level...
... for 3 seconds to indicate full trigger. 5. Timed operation provides an output that turns on ; Selects between siren or horn programming for 10 /30 seconds or each time the transmitter button is turned off. Press and hold button 4 for some European cars). 5. Press button 4 again to enter adjust mode. • The siren will chirp a number of times to indicate the current sensitivity level...
User Manual
Page 18
... turbo has time to turn on . Transmission Mode. ON= manual transmission. 5. Sets the crank delay after ignition turns on until after the remote start to cool down . 7. ON= diesel engine. See Orange/Violet (Glow Plug) wire description and Remote Start Programmable Features step#8 6. RPM Signal LED. Cold Start Timer 1 hour 2 hours 4 hours 4. Lock on disarm and remote start is turned off a factory alarm. Yellow/Black Wire Program Factory Disarm...
... turbo has time to turn on . Transmission Mode. ON= manual transmission. 5. Sets the crank delay after ignition turns on until after the remote start to cool down . 7. ON= diesel engine. See Orange/Violet (Glow Plug) wire description and Remote Start Programmable Features step#8 6. RPM Signal LED. Cold Start Timer 1 hour 2 hours 4 hours 4. Lock on disarm and remote start is turned off a factory alarm. Yellow/Black Wire Program Factory Disarm...
User Manual
Page 19
.../Black wire is equipped, then use a resistance code generated when the key is found on the shaft of the key. For diesel vehicles, the engine type for dip switch #5 must be installed. To integrate a remote starter into these systems and retain full functionality of the factory anti-theft system, VATS/PASSLOCK bypass module must be set for RPM (Off). Instead they use the...
.../Black wire is equipped, then use a resistance code generated when the key is found on the shaft of the key. For diesel vehicles, the engine type for dip switch #5 must be installed. To integrate a remote starter into these systems and retain full functionality of the factory anti-theft system, VATS/PASSLOCK bypass module must be set for RPM (Off). Instead they use the...

User Manual
Page 20
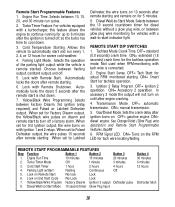
... not detected. ADDING TRANSMITTERS To add a new transmitter to remove any previously programmed transmitters.) 20 To enter Code Learning Mode: 1. Release the Override switch. 4. The starter will usually crank but the fuel system will chirp an additional time for each added transmitter. 6. Press the Lock Button on . • The siren will chirp once. 5. Turn off and leave on the transmitter...
... not detected. ADDING TRANSMITTERS To add a new transmitter to remove any previously programmed transmitters.) 20 To enter Code Learning Mode: 1. Release the Override switch. 4. The starter will usually crank but the fuel system will chirp an additional time for each added transmitter. 6. Press the Lock Button on . • The siren will chirp once. 5. Turn off and leave on the transmitter...
User Manual
Page 21
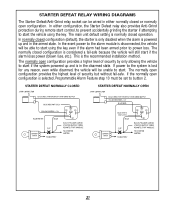
... open configuration provides a higher level of security but without fail-safe. The main unit default setting is selected, Programmable Alarm Feature step 10 must be set to button 2. In either normally closed configuration is disconnected, the vehicle will still start if the alarm loses power (blown fuse, etc.). STARTER DEFEAT RELAY WIRING DIAGRAMS The Starter Defeat/Anti-Grind relay socket...
... open configuration provides a higher level of security but without fail-safe. The main unit default setting is selected, Programmable Alarm Feature step 10 must be set to button 2. In either normally closed configuration is disconnected, the vehicle will still start if the alarm loses power (blown fuse, etc.). STARTER DEFEAT RELAY WIRING DIAGRAMS The Starter Defeat/Anti-Grind relay socket...
User Manual
Page 24
Default setting is OFF position (see Remote Start Dip Switches) Starter Test Button RPM Signal LED 64-72.50, 9/04 Rev. 2 24 module side view ALARM MODULE WIRING DIAGRAM 3-Pin Data-Link cable 2-Pin Shock Sensor Blue Black/Red Blue/Black Green Black/Red Green/Black Lock relay common 30 [10A fuse] Lock relay normally open ...
Default setting is OFF position (see Remote Start Dip Switches) Starter Test Button RPM Signal LED 64-72.50, 9/04 Rev. 2 24 module side view ALARM MODULE WIRING DIAGRAM 3-Pin Data-Link cable 2-Pin Shock Sensor Blue Black/Red Blue/Black Green Black/Red Green/Black Lock relay common 30 [10A fuse] Lock relay normally open ...


