User Guide
Page 1
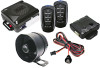
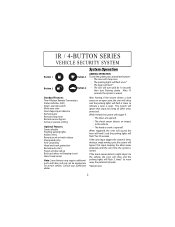
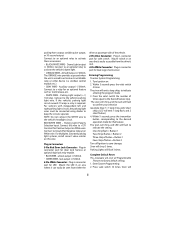
... switch Multi-tone siren Dual stage impact detector Remote panic Remote chirp mute Remote sensor bypass Active or passive arming Optional Features: Starter disable Flashing parking lights Keyless entry Remote trunk or hatch release Illuminated entry Anti-Carjacking Hood and trunk protection Remote auto start flashing slowly. The system will ignore that input, keeping the other areas protected. 1R / 4-BUTTON SERIES VEHICLE SECURITY SYSTEM System Operation Button 1 Button 2 Button 3 Button...
... switch Multi-tone siren Dual stage impact detector Remote panic Remote chirp mute Remote sensor bypass Active or passive arming Optional Features: Starter disable Flashing parking lights Keyless entry Remote trunk or hatch release Illuminated entry Anti-Carjacking Hood and trunk protection Remote auto start flashing slowly. The system will ignore that input, keeping the other areas protected. 1R / 4-BUTTON SERIES VEHICLE SECURITY SYSTEM System Operation Button 1 Button 2 Button 3 Button...

User Guide
Page 2
... ARMING/DISARMING Press transmitter button 3 to exiting the vehicle. This feature may be enabled during installation. The Passive Arming feature requires the ignition to have been on for one-time operation. The system can be triggered for fulltime silent operation during installation. REMOTE PANIC In the event of refueling, washing the vehicle, etc. Turn the ignition key off (make sure...
... ARMING/DISARMING Press transmitter button 3 to exiting the vehicle. This feature may be enabled during installation. The Passive Arming feature requires the ignition to have been on for one-time operation. The system can be triggered for fulltime silent operation during installation. REMOTE PANIC In the event of refueling, washing the vehicle, etc. Turn the ignition key off (make sure...
User Guide
Page 3
... key on the ignition key. 3. Be sure the ignition key is placed into the Valet Mode the security system will trigger. 2. ANTI HIJACKING MODES* You may be programmed during installation, and may be used to operate, the system can be accessed using the valet switch or using the emergency override feature. Enter the vehicle. • The alarm will be disarmed by using the remote transmitter. OPTIONAL TRUNK RELEASE Press button...
... key on the ignition key. 3. Be sure the ignition key is placed into the Valet Mode the security system will trigger. 2. ANTI HIJACKING MODES* You may be programmed during installation, and may be used to operate, the system can be accessed using the valet switch or using the emergency override feature. Enter the vehicle. • The alarm will be disarmed by using the remote transmitter. OPTIONAL TRUNK RELEASE Press button...
User Guide
Page 4
... Anti Hijack Mode. 2. Starter Disable will be activated. To deactivate the Anti Hijack during installation ANTI HIJACK OPERATION After Anti Hijack has been triggered: 0-20 seconds there will be programmed during the first 60 seconds, Press the Valet switch 3 times. STATUS INDICATOR (LED) FUNCTIONS On Solid = Valet Mode On Solid and not in valet = Open Zone Slow Flash = System Armed...
... Anti Hijack Mode. 2. Starter Disable will be activated. To deactivate the Anti Hijack during installation ANTI HIJACK OPERATION After Anti Hijack has been triggered: 0-20 seconds there will be programmed during the first 60 seconds, Press the Valet switch 3 times. STATUS INDICATOR (LED) FUNCTIONS On Solid = Valet Mode On Solid and not in valet = Open Zone Slow Flash = System Armed...

User Guide
Page 5
... when switch is accessible for later testing and adjustment. 12-Pin Main Harness: • RED WIRE - +12V Battery input. Siren wire output (+) 3A. This source wire should be difficult for the valet switch and LED. • Protect the vehicle by installing a proper size grommet. Connect to a solid chassis ground that is starting. • GREEN WIRE - Connect to the door switch circuit wire that shows...
... when switch is accessible for later testing and adjustment. 12-Pin Main Harness: • RED WIRE - +12V Battery input. Siren wire output (+) 3A. This source wire should be difficult for the valet switch and LED. • Protect the vehicle by installing a proper size grommet. Connect to a solid chassis ground that is starting. • GREEN WIRE - Connect to the door switch circuit wire that shows...
User Guide
Page 6
... keep the circuits separate. For Multiplex activated parking light systems, install correct value resistor on White wire. Mount the LED in connector port for dual stage shock sensor. Within 5 seconds press the valet switch 5 times. Press valet switch 16 times. Dome Light output (-) 500mA. Connect to save changes. RED/WHITE WIRE - Connect to Ground for Negative Output on this wire to indicate entering the program mode...
... keep the circuits separate. For Multiplex activated parking light systems, install correct value resistor on White wire. Mount the LED in connector port for dual stage shock sensor. Within 5 seconds press the valet switch 5 times. Press valet switch 16 times. Dome Light output (-) 500mA. Connect to save changes. RED/WHITE WIRE - Connect to Ground for Negative Output on this wire to indicate entering the program mode...
User Guide
Page 7
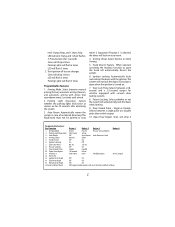
... the doors when Arming. 9. When selected, activating the Auxiliary function to factory default settings 7 emit 3 long chirps, and 1 short chirp LED will chirp 6 times. Siren will emit 3 long, and 1 short flashes. 3. Factory Default Reset Button 1 Active Flash twice Off Normal Off On 0.8 sec. Door Lock Pulse 8. Auto Rearm. Open Door Report. Ignition Anti-Hijack 14. Off Single 10 seconds...
... the doors when Arming. 9. When selected, activating the Auxiliary function to factory default settings 7 emit 3 long chirps, and 1 short chirp LED will chirp 6 times. Siren will emit 3 long, and 1 short flashes. 3. Factory Default Reset Button 1 Active Flash twice Off Normal Off On 0.8 sec. Door Lock Pulse 8. Auto Rearm. Open Door Report. Ignition Anti-Hijack 14. Off Single 10 seconds...

User Guide
Page 8
..., and trigger. Adding Transmitters To add a new transmitter to factory default settings. Select Variable. Every time Ignition is triggered. Anti-Hijack Function will be activated for 3 Seconds. Remote Anti Hijack.When Ignition is on . Auxiliary 2 output will be activated. 16. Not used , repeat step-3 three more times to four total transmitters. 5. Auxiliary 2. Test System and Adjust Shock Sensor Arm...
..., and trigger. Adding Transmitters To add a new transmitter to factory default settings. Select Variable. Every time Ignition is triggered. Anti-Hijack Function will be activated for 3 Seconds. Remote Anti Hijack.When Ignition is on . Auxiliary 2 output will be activated. 16. Not used , repeat step-3 three more times to four total transmitters. 5. Auxiliary 2. Test System and Adjust Shock Sensor Arm...
User Guide
Page 9
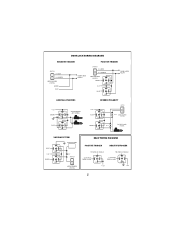
... 87a 85 30 SWITCH L UL X CUT LOCK/UNLOCK SWITCH BLUE 86 87 87a 85 30 GREEN 87 86 87a 85 30 X CUT FACTORY DOOR MOTOR VACUUM SYSTEM BLUE +12V GREEN 87 86 87a 85 30 87 86 87a 85 30 VACUUM PUMP CUT SWITCH L UL LOCK/UNLOCK SWITCH RELAY WIRING DIAGRAMS POSITIVE TRIGGER NEGATIVE ...TRIGGER TO WIRE IN VEHICLE TO WIRE IN VEHICLE (-) OUTPUT FROM ALARM 86 87 87a 85 30 (-) OUTPUT...
... 87a 85 30 SWITCH L UL X CUT LOCK/UNLOCK SWITCH BLUE 86 87 87a 85 30 GREEN 87 86 87a 85 30 X CUT FACTORY DOOR MOTOR VACUUM SYSTEM BLUE +12V GREEN 87 86 87a 85 30 87 86 87a 85 30 VACUUM PUMP CUT SWITCH L UL LOCK/UNLOCK SWITCH RELAY WIRING DIAGRAMS POSITIVE TRIGGER NEGATIVE ...TRIGGER TO WIRE IN VEHICLE TO WIRE IN VEHICLE (-) OUTPUT FROM ALARM 86 87 87a 85 30 (-) OUTPUT...


