Instruction Manual
Page 1
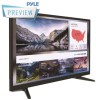
NTSC,ATSC Modelnr:PTVDLED32 Modelnr:PTVDLED40 POWER MUTE + S.MODE P.MODE EPG TV MENU SOURCE ENTER MTS EXIT AUTO DISPLAY VOL CH CCD ZOOM SLEEP FAV GOTO SUB-T FAVANGLE A-B FAV+ SLOW STEP PROG REPEAT DVD MENU TITLE DVD SETUP Statement:This document is reference manual,please confirm with the specifically software if need translate or batch print
NTSC,ATSC Modelnr:PTVDLED32 Modelnr:PTVDLED40 POWER MUTE + S.MODE P.MODE EPG TV MENU SOURCE ENTER MTS EXIT AUTO DISPLAY VOL CH CCD ZOOM SLEEP FAV GOTO SUB-T FAVANGLE A-B FAV+ SLOW STEP PROG REPEAT DVD MENU TITLE DVD SETUP Statement:This document is reference manual,please confirm with the specifically software if need translate or batch print

Instruction Manual
Page 2
Contents SCafuettiyonIn.f.o..r..m...a..t.i.o..n 3-5 Product Introduction 6 CoTnenchencitciaol nSspe..c.i.f.ic..a..t.io..n...75 Remote Control 8-9 Setup Wizard 10-11 Select Input Source 12 Main Menu 12 Picture Menu 13-14 Soud Menu 15-16 Time Menu 17 Simple Troubleshooting 25 Close Caption 18 Setup Menu 19-21 Lock Menu 21-24 Channel Menu 25-26 PC Menu 27-28 DVD Operation 29-33 SPECIFICACIONES 34 2
Contents SCafuettiyonIn.f.o..r..m...a..t.i.o..n 3-5 Product Introduction 6 CoTnenchencitciaol nSspe..c.i.f.ic..a..t.io..n...75 Remote Control 8-9 Setup Wizard 10-11 Select Input Source 12 Main Menu 12 Picture Menu 13-14 Soud Menu 15-16 Time Menu 17 Simple Troubleshooting 25 Close Caption 18 Setup Menu 19-21 Lock Menu 21-24 Channel Menu 25-26 PC Menu 27-28 DVD Operation 29-33 SPECIFICACIONES 34 2
Instruction Manual
Page 7
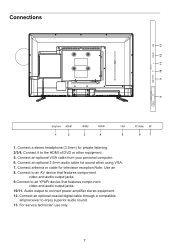
... digital cable through a compatible amp/receiver to an YPbPr device that features compo-nent video and audio output jacks. 9.Connect to enjoy superior audio sound. 13. Connect an optional VGA cable from your personal computer. 6. 13 9 10 11 12 L AUDIO OUT R R Video/Y Pb Pr L RF 8 1 2 3 4 5 1. Connect to an AV device that features compo-nent video and audio output jacks. 10/11. Connect antenna or cable for television reception.Note: Use an 8. Connect it to connect power...
... digital cable through a compatible amp/receiver to an YPbPr device that features compo-nent video and audio output jacks. 9.Connect to enjoy superior audio sound. 13. Connect an optional VGA cable from your personal computer. 6. 13 9 10 11 12 L AUDIO OUT R R Video/Y Pb Pr L RF 8 1 2 3 4 5 1. Connect to an AV device that features compo-nent video and audio output jacks. 10/11. Connect antenna or cable for television reception.Note: Use an 8. Connect it to connect power...
Instruction Manual
Page 8
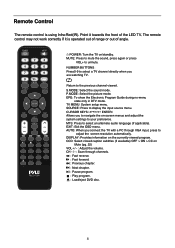
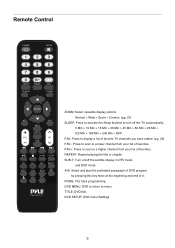
.... NUMBER BUTTONSğ Press0-9 to select a TV channel directly when you connect the TV with a PC through channels. : Fast reverse. : Fast forward. : Previous chapter. : Next chapter. : Pause program. : Play program. : Load/eject DVD disc. 8 S.MODE: Select the sound mode. P.MODE: Select the picture mode. TV MENU: System setup menu. CURSOR KEYS ENTER Allows you to adjust the screen resolution automatically. Return to unmute. AUTO: When you are watching TV. CCD: Select closed caption subtitles...
.... NUMBER BUTTONSğ Press0-9 to select a TV channel directly when you connect the TV with a PC through channels. : Fast reverse. : Fast forward. : Previous chapter. : Next chapter. : Pause program. : Play program. : Load/eject DVD disc. 8 S.MODE: Select the sound mode. P.MODE: Select the picture mode. TV MENU: System setup menu. CURSOR KEYS ENTER Allows you to adjust the screen resolution automatically. Return to unmute. AUTO: When you are watching TV. CCD: Select closed caption subtitles...
Instruction Manual
Page 9
... to scan to a lower channel from your list of favorites. DVD SETUP: DVD menu Settings 9 FAV: Press to display a list of favorite TV channels you have added. (pg. 26) FAV-: Press to scan to a higher channel from your list of it. PROG: The track programming DVD MENU: DVD to return to turn off the subtitle display in DTV mode and DVD mode. POWER MUTE + S.MODE P.MODE EPG TV MENU SOURCE ENTER MTS EXIT AUTO DISPLAY VOL CH CCD ZOOM SLEEP FAV...
... to scan to a lower channel from your list of favorites. DVD SETUP: DVD menu Settings 9 FAV: Press to display a list of favorite TV channels you have added. (pg. 26) FAV-: Press to scan to a higher channel from your list of it. PROG: The track programming DVD MENU: DVD to return to turn off the subtitle display in DTV mode and DVD mode. POWER MUTE + S.MODE P.MODE EPG TV MENU SOURCE ENTER MTS EXIT AUTO DISPLAY VOL CH CCD ZOOM SLEEP FAV...
Instruction Manual
Page 10
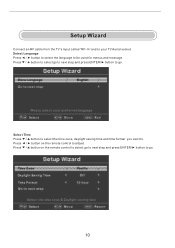
... to go to next step and press ENTER/► button to be used for menus and message. Press ▼ / ▲ button to select go . Select Time Press ▼ / ▲ button to select the time zone, daylight saving time and time format you want to your TV Aerial socket. Setup Wizard Connect an RF cable from the TV's input called "RF-In" and to .
... to go to next step and press ENTER/► button to be used for menus and message. Press ▼ / ▲ button to select go . Select Time Press ▼ / ▲ button to select the time zone, daylight saving time and time format you want to your TV Aerial socket. Setup Wizard Connect an RF cable from the TV's input called "RF-In" and to .

Instruction Manual
Page 13
...; to parent menu. Press MENU again to exit or back to enter. Press MENU again or back to parent menu. 【Picture Mode】 Adjust picture mode to adjust. 13 Note:The brightness,contrast,color, tint and sharpness are only available in a normally lit room. Press ◄ / ► button to change picture appearance. User Select to customize picture settings. 【Brightness】 Adjust the visual perception output of the entire picture, it...
...; to parent menu. Press MENU again to exit or back to enter. Press MENU again or back to parent menu. 【Picture Mode】 Adjust picture mode to adjust. 13 Note:The brightness,contrast,color, tint and sharpness are only available in a normally lit room. Press ◄ / ► button to change picture appearance. User Select to customize picture settings. 【Brightness】 Adjust the visual perception output of the entire picture, it...

Instruction Manual
Page 14
... picture personally(red),and the cool color personally(blue) according to turn off . Warm Increase the red color for the white. Normal Automatically adjust Aspect Ratio based on your like . Off Select to your own like . Press ◄ / ► button to select (Video/Graphic). }Dynamic Contrast~ Automatically adjust picture detail and brightness. Press ◄ / ► button to select (Off/On). }MDMI Mode~ Only available in HDMI input...
... picture personally(red),and the cool color personally(blue) according to turn off . Warm Increase the red color for the white. Normal Automatically adjust Aspect Ratio based on your like . Off Select to your own like . Press ◄ / ► button to select (Video/Graphic). }Dynamic Contrast~ Automatically adjust picture detail and brightness. Press ◄ / ► button to select (Off/On). }MDMI Mode~ Only available in HDMI input...

Instruction Manual
Page 16
...; / ► button to the second audio program. }Audio Language~ Select the language supported by the chosen digital channel. Off Set digital audio output off. } Surround Sound~ Set the Surround Sound. Sports Enhances vocals for a rich sound experience. SAP Sets the sound to select(Mono/Stereo/SAP). It is only available in all environments. AV L : This item uses for reducing the difference between left and right speakers to adapt to best at...
...; / ► button to the second audio program. }Audio Language~ Select the language supported by the chosen digital channel. Off Set digital audio output off. } Surround Sound~ Set the Surround Sound. Sports Enhances vocals for a rich sound experience. SAP Sets the sound to select(Mono/Stereo/SAP). It is only available in all environments. AV L : This item uses for reducing the difference between left and right speakers to adapt to best at...
Instruction Manual
Page 17
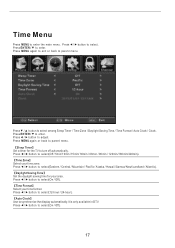
...】 Select your time zone. Press ◄ / ► button to select. Press MENU again or back to parent menu. 【Sleep Timer】 Set a timer for your area. Press ▼ / ▲ button to turn off automatically. Press ◄ / ► button to select(12-hour / 24-hour). 【Auto Clock】 Use to parent menu. Press MENU again to exit or back to synchronize the display automatically.It is...
...】 Select your time zone. Press ◄ / ► button to select. Press MENU again or back to parent menu. 【Sleep Timer】 Set a timer for your area. Press ▼ / ▲ button to turn off automatically. Press ◄ / ► button to select(12-hour / 24-hour). 【Auto Clock】 Use to parent menu. Press MENU again to exit or back to synchronize the display automatically.It is...
Instruction Manual
Page 18
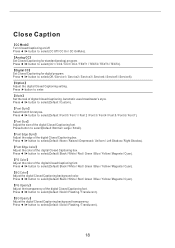
...; Adjust the size of the digital Closed Captioning box. Press ◄ / ► button to enter. 【Mode】 Set the look of the digital Closed Captioning font. Press ► button to select(Default/ Black / White / Red / Green / Blue / Yellow / Magenta / Cyan). 【FG Opacity】 Adjust the transparency of the digital Closed Captioning box. Press ◄ / ► button to select(Default / Custom). 【Font Style】 Select from 8 font styles. Press ◄ / ► button to select(Default/ Black / White / Red / Green...
...; Adjust the size of the digital Closed Captioning box. Press ◄ / ► button to enter. 【Mode】 Set the look of the digital Closed Captioning font. Press ► button to select(Default/ Black / White / Red / Green / Blue / Yellow / Magenta / Cyan). 【FG Opacity】 Adjust the transparency of the digital Closed Captioning box. Press ◄ / ► button to select(Default / Custom). 【Font Style】 Select from 8 font styles. Press ◄ / ► button to select(Default/ Black / White / Red / Green...

Instruction Manual
Page 19
... parent menu. Only available under TV and AV source. Press MENU again to exit or back to select.(0%,25%,50%,75%,100%) 【OSD Time out】 Adjust the duration of the OSD (on screen display) menu. Press ▼ / ▲ button to page 12. 19 For detail please refer to select among Menu Language / Transparent / OSD Timeout / Closed Caption /Over Scan/ Input Label / Other settings / Restore Default / Setup...
... parent menu. Only available under TV and AV source. Press MENU again to exit or back to select.(0%,25%,50%,75%,100%) 【OSD Time out】 Adjust the duration of the OSD (on screen display) menu. Press ▼ / ▲ button to page 12. 19 For detail please refer to select among Menu Language / Transparent / OSD Timeout / Closed Caption /Over Scan/ Input Label / Other settings / Restore Default / Setup...
Instruction Manual
Page 20
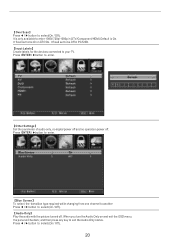
...; Play the audio with the picture turned off . 【Over Scan】 Press ◄ / ► button to be dark; Press ENTER / ►button to enter. 【Blue Screen】 To select the transition type required while changing from one channel to another Press ◄ / ► button to enter. 【Other Settings】 Set the parameter of audio only, no signal power off and no operation power off . It fixed set to...
...; Play the audio with the picture turned off . 【Over Scan】 Press ◄ / ► button to be dark; Press ENTER / ►button to enter. 【Blue Screen】 To select the transition type required while changing from one channel to another Press ◄ / ► button to enter. 【Other Settings】 Set the parameter of audio only, no signal power off and no operation power off . It fixed set to...
Instruction Manual
Page 21
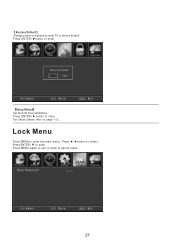
Press ENTER / ► button to parent menu. 21 Press MENU again to exit or back to enter. Lock Menu Press MENU to enter the main menu, Press ◄ / ► button to enter. Press ENTER / ▼ to select. 【Restore Default】 Change power on options or reset TV to page 1~2. For detail please refer to factory default. Press ENTER / ►button to enter. }Setup Wizard~ Set the first time installation.
Press ENTER / ► button to parent menu. 21 Press MENU again to exit or back to enter. Lock Menu Press MENU to enter the main menu, Press ◄ / ► button to enter. Press ENTER / ▼ to select. 【Restore Default】 Change power on options or reset TV to page 1~2. For detail please refer to factory default. Press ENTER / ►button to enter. }Setup Wizard~ Set the first time installation.
Instruction Manual
Page 22
...; to enter. } System Lock~ Lock or unlock the buttons on the TV. Press ◄ / ► button to adjust. Press ◄ / ► button to select(Unblock / Block). 22 Default password is 0000,and if forget what you set, please call the service center. 【 Change Password】 Enter a new 4-digital password then re-enter it to enter. Press ► button to confirm. Press MENU again or back to parent menu.
...; to enter. } System Lock~ Lock or unlock the buttons on the TV. Press ◄ / ► button to adjust. Press ◄ / ► button to select(Unblock / Block). 22 Default password is 0000,and if forget what you set, please call the service center. 【 Change Password】 Enter a new 4-digital password then re-enter it to enter. Press ► button to confirm. Press MENU again or back to parent menu.
Instruction Manual
Page 23
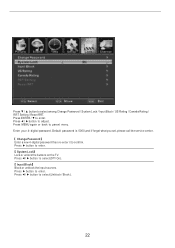
... to page 16~17. } Canada Rating~ Restrict movie and TV programs by US Ratings. For detail please refer to page 17. } RRT Setting~ Display an advance V-Chip rating table for digital channels. Press ► button to enter. Only available when "System Lock" is available only When current stream has downloadable rating data. 23 } US Rating~ Restrict movie and TV...
... to page 16~17. } Canada Rating~ Restrict movie and TV programs by US Ratings. For detail please refer to page 17. } RRT Setting~ Display an advance V-Chip rating table for digital channels. Press ► button to enter. Only available when "System Lock" is available only When current stream has downloadable rating data. 23 } US Rating~ Restrict movie and TV...

Instruction Manual
Page 25
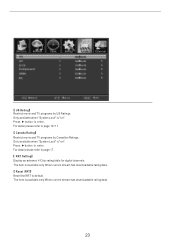
... adjust. Press ◄ / ► button to enter. Press ◄ / ► button to parent menu. Press MENU again to exit or back to select(Air/Cable). 【Auto Scan】 Automatically search for channels. Press ENTER / ▼ to parent menu. 【Air/Cable】 Select signal type. Press MENU again or back to enter. Press ENTER / ► button to select. Channel Menu Press MENU to enter the main menu, Press ◄ / ► button...
... adjust. Press ◄ / ► button to enter. Press ◄ / ► button to parent menu. Press MENU again to exit or back to select(Air/Cable). 【Auto Scan】 Automatically search for channels. Press ENTER / ▼ to parent menu. 【Air/Cable】 Select signal type. Press MENU again or back to enter. Press ENTER / ► button to select. Channel Menu Press MENU to enter the main menu, Press ◄ / ► button...

Instruction Manual
Page 27
Press MENU to enter the main menu, Press ◄ / ► button to enter. Press ENTER / ▼ to select Setup menu. Press ▼ / ▲ button to adjust. Press ◄ / ► button to select among H-Pos / V-Pos / Clock / Phase / Auto. PC Menu Press INPUT to parent menu. 27 Press MENU again or back to select PC source. Press ▼ to select PC Settings.
Press MENU to enter the main menu, Press ◄ / ► button to enter. Press ENTER / ▼ to select Setup menu. Press ▼ / ▲ button to adjust. Press ◄ / ► button to select among H-Pos / V-Pos / Clock / Phase / Auto. PC Menu Press INPUT to parent menu. 27 Press MENU again or back to select PC source. Press ▼ to select PC Settings.

Instruction Manual
Page 28
Press ◄ / ► button to enter. *Notes: 1. Color,Tint,Sharpness,Noise Reduction,Dynamic Contrast and HDMI Mode in SOUND menu are invalid. 3. MTS and Audio Language in PICTURE are invalid. 6.PC mode has no CHANNEL menu. 28 Press ◄ / ► button to adjust. 【V-Pos】 Adjust the vertical position of the picture. Press ◄ / ► button to adjust. 【Auto】 Adjust to the screen automatically to adjust. 【Clock】...
Press ◄ / ► button to enter. *Notes: 1. Color,Tint,Sharpness,Noise Reduction,Dynamic Contrast and HDMI Mode in SOUND menu are invalid. 3. MTS and Audio Language in PICTURE are invalid. 6.PC mode has no CHANNEL menu. 28 Press ◄ / ► button to adjust. 【V-Pos】 Adjust the vertical position of the picture. Press ◄ / ► button to adjust. 【Auto】 Adjust to the screen automatically to adjust. 【Clock】...
Instruction Manual
Page 34
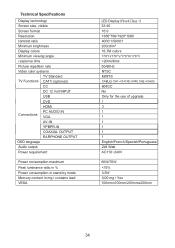
Technical Specifications Display technology Screen size, visible Screen format Resolution contrast ratio Minimum brightness Display colors Minimum viewing angle response time Picture repetition rate Video color systems TV Standard TV Functions CATV (optional) CC DC 12 Volt INPUT USB DVD HDMI PC AUDIO IN Connections VGA AV-IN YPBPR-IN COAXIAL OUTPUT EARPHONE OUTPUT OSD language Audio output Power requirement Power consumption maximum Peak luminance ratio in % Power consumption in stand-by mode Mercury content in mg / contains lead VESA 32...
Technical Specifications Display technology Screen size, visible Screen format Resolution contrast ratio Minimum brightness Display colors Minimum viewing angle response time Picture repetition rate Video color systems TV Standard TV Functions CATV (optional) CC DC 12 Volt INPUT USB DVD HDMI PC AUDIO IN Connections VGA AV-IN YPBPR-IN COAXIAL OUTPUT EARPHONE OUTPUT OSD language Audio output Power requirement Power consumption maximum Peak luminance ratio in % Power consumption in stand-by mode Mercury content in mg / contains lead VESA 32...


