
PSB90I Manual 1
Page 1
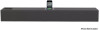
IMPORTANT: Pack carefully in original package if possible.We are not responsible for damage incurred in returning items for repair, A letter stating your exact street addres,daytime phone number,and the problem you are experiencing should be included. You must also enclose a copy of the original receipt a sproof of date of purchase User's Manual www.pyleaudio.com 300W iPod/iPhone 2.1 Soundbar Docking System with Aux-In and Video Output iPhone Docking System www.pyleaudio.com
IMPORTANT: Pack carefully in original package if possible.We are not responsible for damage incurred in returning items for repair, A letter stating your exact street addres,daytime phone number,and the problem you are experiencing should be included. You must also enclose a copy of the original receipt a sproof of date of purchase User's Manual www.pyleaudio.com 300W iPod/iPhone 2.1 Soundbar Docking System with Aux-In and Video Output iPhone Docking System www.pyleaudio.com
PSB90I Manual 1
Page 2
...part 15 of Remote Control: ......DC =-=-= 3V, 2 x MA size batteries (Included) Power Consumption 300 W Audio Power. receiver is no guiWW'ltM that i~ wi l not oa::ur in .structions 1. FCC NOTICE: To assure oontlnued compliance, follow the atlAllched installation instructions...Instructions. Do not Install nar any ventilation opanlnp. alftlundinl type plul ha. and a third pundln. wabd on by chlld"n 0' tripped ..., accldlnllily. Only ... GENERAL SPECIFICATIONS...Woofer 150W Loud Speaker 75 W x2 Accessories: 1 x Instruction Manual 1 x Remote Control 2 x "MA' size batteries for help. ...
...part 15 of Remote Control: ......DC =-=-= 3V, 2 x MA size batteries (Included) Power Consumption 300 W Audio Power. receiver is no guiWW'ltM that i~ wi l not oa::ur in .structions 1. FCC NOTICE: To assure oontlnued compliance, follow the atlAllched installation instructions...Instructions. Do not Install nar any ventilation opanlnp. alftlundinl type plul ha. and a third pundln. wabd on by chlld"n 0' tripped ..., accldlnllily. Only ... GENERAL SPECIFICATIONS...Woofer 150W Loud Speaker 75 W x2 Accessories: 1 x Instruction Manual 1 x Remote Control 2 x "MA' size batteries for help. ...
PSB90I Manual 1
Page 3
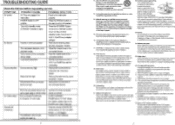
... to the operating instructions. 19. R.r.aI a.vidnr &0 qlAlliH.d..me. or h.. Ifyou are required, be sure the service technician uses replacement parts specified by new ...This reminder 15 provided to all servicing to Its normal operation. TROUBLESHOOTING GUIDE Check the follows before requesting service SYMPTOM Nopower No Sound POSSIBLE CAUSE...Set the EO of 'tlme. , .... property Press 1he POWER 5'Mtx:h on 1he rear 01'..,1 to ON position Press 1he STANDBY Button on the unit or Remote Control to tum on 1he unn from the wall outlet and refer servicing to 1he Pod/Phone's US81's Manual...
... to the operating instructions. 19. R.r.aI a.vidnr &0 qlAlliH.d..me. or h.. Ifyou are required, be sure the service technician uses replacement parts specified by new ...This reminder 15 provided to all servicing to Its normal operation. TROUBLESHOOTING GUIDE Check the follows before requesting service SYMPTOM Nopower No Sound POSSIBLE CAUSE...Set the EO of 'tlme. , .... property Press 1he POWER 5'Mtx:h on 1he rear 01'..,1 to ON position Press 1he STANDBY Button on the unit or Remote Control to tum on 1he unn from the wall outlet and refer servicing to 1he Pod/Phone's US81's Manual...
PSB90I Manual 1
Page 4
...tum on) or iPodnPhone (iPodIiPhone Indicalorwill tum on the Remote Control, the setting menu will go off (standby mode). 8. Press the MUTE Button on the Remote Control to set repeat modes, correspond icons will tum on the unit or Remote Control repeatedly to select the input source as the connections ... move the cursor within the display, press the ENTER Bullon to fast searching the specific section of the track forward/backward. Button CJ 6. The STANDBY Indicator will ooeur on the Remote Control to tum off unit using rear master power switch. The STANDBY Indicator will ...
...tum on) or iPodnPhone (iPodIiPhone Indicalorwill tum on the Remote Control, the setting menu will go off (standby mode). 8. Press the MUTE Button on the Remote Control to set repeat modes, correspond icons will tum on the unit or Remote Control repeatedly to select the input source as the connections ... move the cursor within the display, press the ENTER Bullon to fast searching the specific section of the track forward/backward. Button CJ 6. The STANDBY Indicator will ooeur on the Remote Control to tum off unit using rear master power switch. The STANDBY Indicator will ...
PSB90I Manual 1
Page 5
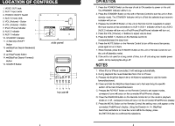
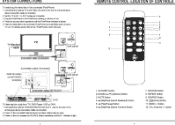
... cable not included). 2. SOURCE Button 10. [31 (Enter) Button 11. VOL (Volume) +1- Press the source button repeatedly until AUX 1 Indicator is lighl 7 REMOTE CONTROL ·LOCATION OF CONTROLS 2 1 3 5 4 6 7 2 8 9 · 11 12 . 1. VCR or DVR . 1. Power on the connected... Search Backward) Button 5. Power on the unn, presses the SOURCE Button repeatedly until the iPodflPhone indicator is set to lY oul For details, please refer to the iPod/iPhone's Use~s Manual). Direction .... TV To Video Input o (Connection cable not included) (Connection cables not included) Audio Out...
... cable not included). 2. SOURCE Button 10. [31 (Enter) Button 11. VOL (Volume) +1- Press the source button repeatedly until AUX 1 Indicator is lighl 7 REMOTE CONTROL ·LOCATION OF CONTROLS 2 1 3 5 4 6 7 2 8 9 · 11 12 . 1. VCR or DVR . 1. Power on the connected... Search Backward) Button 5. Power on the unn, presses the SOURCE Button repeatedly until the iPodflPhone indicator is set to lY oul For details, please refer to the iPod/iPhone's Use~s Manual). Direction .... TV To Video Input o (Connection cable not included) (Connection cables not included) Audio Out...
PSB90I Manual 1
Page 6
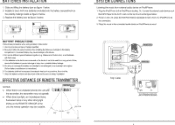
... of batteries together (e.g. Installed 2 (two) AAA size batteries (included) into the battery compartment as the polarity makings inside as figure 1 below . 3. Replace the battery door as ...battery manufacturer's instructions.) 6, The batteries shall not be exposed to excessive heat such as sunshine, fire or the like MP3 Player to the AUX 2 Jack on the REMOTE SENSOR of battery...7, Clean the battery contacts and also those of the device prior to battery installation EFFECTIVE DISTANCE OF REMOTE TRANSMITTER NOTES: • When there is not to be used for a ...set to the iPod/iPhone docking.
... of batteries together (e.g. Installed 2 (two) AAA size batteries (included) into the battery compartment as the polarity makings inside as figure 1 below . 3. Replace the battery door as ...battery manufacturer's instructions.) 6, The batteries shall not be exposed to excessive heat such as sunshine, fire or the like MP3 Player to the AUX 2 Jack on the REMOTE SENSOR of battery...7, Clean the battery contacts and also those of the device prior to battery installation EFFECTIVE DISTANCE OF REMOTE TRANSMITTER NOTES: • When there is not to be used for a ...set to the iPod/iPhone docking.


