
User Manual
Page 1
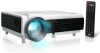
HD LED PROJECTOR 182version:01(Android&2USB) User Manual MODEL: PRJD903
HD LED PROJECTOR 182version:01(Android&2USB) User Manual MODEL: PRJD903
User Manual
Page 3
...: Repair Record: Service Station: Test Date: Signature: Test Date: Signature: Test Date: Signature: Test Date: Signature: Contents Warning 1 Safety Precautions 2 Caution 3 Introductions 4 Installation 7 full setting 7 standard setting(front projection 8 installation method 9 input terminals 10 Remote control 12 Panel instruction 14 Turn on/shut down 15 turn on 15 shut down 15 Image adjustment 16 focus adjustment 16 keystone adjustment 16 Menu settings 17 1.Menu setting method...
...: Repair Record: Service Station: Test Date: Signature: Test Date: Signature: Test Date: Signature: Test Date: Signature: Contents Warning 1 Safety Precautions 2 Caution 3 Introductions 4 Installation 7 full setting 7 standard setting(front projection 8 installation method 9 input terminals 10 Remote control 12 Panel instruction 14 Turn on/shut down 15 turn on 15 shut down 15 Image adjustment 16 focus adjustment 16 keystone adjustment 16 Menu settings 17 1.Menu setting method...

User Manual
Page 4
... Users shall take effective measures to place the projector in wet condition in case of the electric shock danger. Warning: High brightness lamp! Warning Warning: Please remember the model and series number of the projector in case of lost. About the remote control battery • The remote control battery should be damaged for children. Please carefully check all accessories with it will be fixed...
... Users shall take effective measures to place the projector in wet condition in case of the electric shock danger. Warning: High brightness lamp! Warning Warning: Please remember the model and series number of the projector in case of lost. About the remote control battery • The remote control battery should be damaged for children. Please carefully check all accessories with it will be fixed...

User Manual
Page 5
... the projector. 4,Use environment Donot place the projector in wet environment 5,installation and'fix please place this projector in stable table . 6, Ventilation the ventilation in the projector 1able 3)user do not operate the projector accroding to this manual instruction 2,Clear when clear this projector has earthing wire . Safety precautions Warning; when use , please pull the power cable out ofprojector. 11 ,Repairment As the high voltage inside ,please donot open or...
... the projector. 4,Use environment Donot place the projector in wet environment 5,installation and'fix please place this projector in stable table . 6, Ventilation the ventilation in the projector 1able 3)user do not operate the projector accroding to this manual instruction 2,Clear when clear this projector has earthing wire . Safety precautions Warning; when use , please pull the power cable out ofprojector. 11 ,Repairment As the high voltage inside ,please donot open or...
User Manual
Page 6
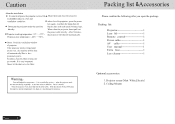
Caution 35 Page 3 Packing list &Accessories Please confirm the following after you open the package Packing list: Projector 1 Lens lid 1 Remote control 1 Power cable 1 AV cable 1 User manual 1 Extra fuse 1 Len cleaner 1 Optional accessories: 1.Projector screen(Matt White,Electric) 2.Ceiling Mounts
Caution 35 Page 3 Packing list &Accessories Please confirm the following after you open the package Packing list: Projector 1 Lens lid 1 Remote control 1 Power cable 1 AV cable 1 User manual 1 Extra fuse 1 Len cleaner 1 Optional accessories: 1.Projector screen(Matt White,Electric) 2.Ceiling Mounts

User Manual
Page 7
Specification LCD Type 5.8"TFT Matrix RGB Input signal video Component video(Ypbpr),VGA,HDMI USB, Audio Stereo Output signal Audio 2W*2 Speaker LCD Native resolution 1280X800 support 1080P Contrast ratio 2000∶1 Lens Aperture Focus 3.8 190mm Lamp Image LED Color-temputure Life Continuous working time Size Brightness Keystone 180W 9300K > 20000hours < 24hours 60~120inch 3000 Lumens ±15 degree Power Voltage Power consumption 110-220V~ 50-60Hz 200W Working condition Temperature Humidity Store condition Temperature Humidity +5℃~+35...
Specification LCD Type 5.8"TFT Matrix RGB Input signal video Component video(Ypbpr),VGA,HDMI USB, Audio Stereo Output signal Audio 2W*2 Speaker LCD Native resolution 1280X800 support 1080P Contrast ratio 2000∶1 Lens Aperture Focus 3.8 190mm Lamp Image LED Color-temputure Life Continuous working time Size Brightness Keystone 180W 9300K > 20000hours < 24hours 60~120inch 3000 Lumens ±15 degree Power Voltage Power consumption 110-220V~ 50-60Hz 200W Working condition Temperature Humidity Store condition Temperature Humidity +5℃~+35...

User Manual
Page 8
... In VGA mode,The PC contrast ratio is >1024* 768 ④ Q:Can't find devices when pluged with on Mute ③ Q:Audio right,no sound? Instructions Right 1 1 Right channel speaker Left 2 3 2 Cool wind input ventilation 3 Left channel speaker Page 5 FAQ FAQ: ① Q:Blue screen,no picture,no sound A:Input cables connected right? ② Q:Picture right,no sound A:Input cables connected...
... In VGA mode,The PC contrast ratio is >1024* 768 ④ Q:Can't find devices when pluged with on Mute ③ Q:Audio right,no sound? Instructions Right 1 1 Right channel speaker Left 2 3 2 Cool wind input ventilation 3 Left channel speaker Page 5 FAQ FAQ: ① Q:Blue screen,no picture,no sound A:Input cables connected right? ② Q:Picture right,no sound A:Input cables connected...

User Manual
Page 9
... turn on the power switch, the indicator light do not work ◎The power can does not connect well ◎The power switch fuse is burned ◎Check the over -heat protection system Page 21 Introductions TOP 1 1 Control panel Details at page 14 Bottom 23 45 2 Hight-feet adjustment 3 Projector mount hole(4holes) Fix with the notebook, set -up correct? ◎Is there an input signal?...
... turn on the power switch, the indicator light do not work ◎The power can does not connect well ◎The power switch fuse is burned ◎Check the over -heat protection system Page 21 Introductions TOP 1 1 Control panel Details at page 14 Bottom 23 45 2 Hight-feet adjustment 3 Projector mount hole(4holes) Fix with the notebook, set -up correct? ◎Is there an input signal?...

User Manual
Page 10
Installation Projector Installation Please install in reference to the instruction below Speaker L Subwoofer Screen Speaker C Speaker R Projector DVD Amplifier Appreciate seats Speaker LS Speaker RS In order to get a good image quality, do not expose the projector to the sunshine or other strong light, close the curtain if you use the projector in daytime Page 7 Page 20
Installation Projector Installation Please install in reference to the instruction below Speaker L Subwoofer Screen Speaker C Speaker R Projector DVD Amplifier Appreciate seats Speaker LS Speaker RS In order to get a good image quality, do not expose the projector to the sunshine or other strong light, close the curtain if you use the projector in daytime Page 7 Page 20

User Manual
Page 11
... MPEG-1 RealMedia,video 3)The system format supported: FAT16、FAT32、NTFS 4)The usb interface can operate on USB2 interface disk; Please make sure the projector is rectangular Incorrect installation Page 8 Page 19 Projector Installation Standard setting(Front projection) Please refer to the projector and screen. The signal source multimedia 2 mode, you can support most drives but is not universal, any unknown device problem is caused...
... MPEG-1 RealMedia,video 3)The system format supported: FAT16、FAT32、NTFS 4)The usb interface can operate on USB2 interface disk; Please make sure the projector is rectangular Incorrect installation Page 8 Page 19 Projector Installation Standard setting(Front projection) Please refer to the projector and screen. The signal source multimedia 2 mode, you can support most drives but is not universal, any unknown device problem is caused...

User Manual
Page 12
... Time On Time Sleep Timer O F F / O nce/ Ever y d ay/ M o nday~/ S unday O F F / O nce/ Ever y d ay/ M o nday~/ S unday OFF/10Mins/20Mins/30Mins/60Mins/90Mins Page 18 Otherwise this projector to a ceiling Follow the instruction below for help Page 9 Menu Setting 3.Picture Menu Picture Menu Picture 7 Picture mode standard Color temperature Aspect ratio 4:3 Noise reduction middle PC setup Color Range 0-255 Flip horizon Flip vertical Picture Mode Standard/warm/user(Appendix 1)/Dynamic Color temperature Standard/warm/cool Aspect Auto/4:3/16...
... Time On Time Sleep Timer O F F / O nce/ Ever y d ay/ M o nday~/ S unday O F F / O nce/ Ever y d ay/ M o nday~/ S unday OFF/10Mins/20Mins/30Mins/60Mins/90Mins Page 18 Otherwise this projector to a ceiling Follow the instruction below for help Page 9 Menu Setting 3.Picture Menu Picture Menu Picture 7 Picture mode standard Color temperature Aspect ratio 4:3 Noise reduction middle PC setup Color Range 0-255 Flip horizon Flip vertical Picture Mode Standard/warm/user(Appendix 1)/Dynamic Color temperature Standard/warm/cool Aspect Auto/4:3/16...

User Manual
Page 13
... input Audio output Audio input VGA input HDMI 1、HDMI 2 HDMI Signal input USB1、USB2 USB signal input CAUTION ☆Turn off the power of projector and the device before connecting, Either on screen to adjust the item parameter. 5. Repeat operating step 2~5,till you finished all the parameters, press"exit" exit the menu page, otherwise, the menu page will auto exit after a period time 2. Press"OK"key,use "▲/▼" key to adjust c. The picture display...
... input Audio output Audio input VGA input HDMI 1、HDMI 2 HDMI Signal input USB1、USB2 USB signal input CAUTION ☆Turn off the power of projector and the device before connecting, Either on screen to adjust the item parameter. 5. Repeat operating step 2~5,till you finished all the parameters, press"exit" exit the menu page, otherwise, the menu page will auto exit after a period time 2. Press"OK"key,use "▲/▼" key to adjust c. The picture display...
User Manual
Page 14
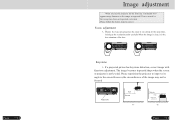
... lens Keystone 1、If a projected picture has keystone distortion, correct image with Keystone adjustment. Please reposition the projector to improve its angle to correct: Focus adjustment 1、Rotate the lens into projector, the rotate it out slowly.At the same time, looking at the resolution point carefully.When the image is clear, it is not leveled. Page 11 Image adjustment When you use the projector for the first time .It normally will appear image...
... lens Keystone 1、If a projected picture has keystone distortion, correct image with Keystone adjustment. Please reposition the projector to improve its angle to correct: Focus adjustment 1、Rotate the lens into projector, the rotate it out slowly.At the same time, looking at the resolution point carefully.When the image is clear, it is not leveled. Page 11 Image adjustment When you use the projector for the first time .It normally will appear image...

User Manual
Page 15
... read "image adjustment" chapter 6.After the image is clear ,you may enjoy the program, in the meantime ,you can still setup the system or adjust the parameters Turn off 1.Press the power button during using will lead the projector to standby mode 2.when the projector switch into standby mode ,the light will turn green from red Page 15 Remote control Remote control instruction Multimedia Mode R e d 【Sub Menu】→【Delete】 Green Yellow 【Confirm】Delete Blue Manual channel...
... read "image adjustment" chapter 6.After the image is clear ,you may enjoy the program, in the meantime ,you can still setup the system or adjust the parameters Turn off 1.Press the power button during using will lead the projector to standby mode 2.when the projector switch into standby mode ,the light will turn green from red Page 15 Remote control Remote control instruction Multimedia Mode R e d 【Sub Menu】→【Delete】 Green Yellow 【Confirm】Delete Blue Manual channel...

User Manual
Page 16
Page 13 Panel instruction 1 M 2 3 4 4 SOU 5 6 4 4 1 Indicator light Red: Standby mode Green: Working mode 3 Menu open or close the Menu 2 Power KEY This button can lead the projector to working/standby mode 4 Direction key Adjust with parameters, the same function with the remote control 5 SOU-KEY Source key (VGA,HDMI,etc.) 6 OK KEY Confirm Page 14
Page 13 Panel instruction 1 M 2 3 4 4 SOU 5 6 4 4 1 Indicator light Red: Standby mode Green: Working mode 3 Menu open or close the Menu 2 Power KEY This button can lead the projector to working/standby mode 4 Direction key Adjust with parameters, the same function with the remote control 5 SOU-KEY Source key (VGA,HDMI,etc.) 6 OK KEY Confirm Page 14


