Owners Manual
Page 2
Content Precaution 2 Basic Operation 25 Safety Information 3 Selecting Play Mode 25 Disc Note 4 On-Screen Display Function 27 Installation 5 Digital Video Special Function 28 Electric Connection 9 Multi-Subtitle Language function 28 Remote Control 10 Multi-audio language Function 28 Basic Operation 13 Title menu ...
Content Precaution 2 Basic Operation 25 Safety Information 3 Selecting Play Mode 25 Disc Note 4 On-Screen Display Function 27 Installation 5 Digital Video Special Function 28 Electric Connection 9 Multi-Subtitle Language function 28 Remote Control 10 Multi-audio language Function 28 Basic Operation 13 Title menu ...
Owners Manual
Page 3
... soft cloth. -Do not use alcohol to look ahead carefully or you may result in locations where; - The picture will be clear . ON INSTALLATION • DO NOT install any receiver while manipulating the steering wheel, as this manual thoroughly and keep it may lead to carelessness and cause an accident. • IF... damaged . The monitor is not engaged." Precaution THANK YOU FOR PURCHASING THIS CAR DIGITAL VIDEO PLAYER . Before operating the unit, read the following precautions before installing and operating the unit . If your car becomes normal . -2-
... soft cloth. -Do not use alcohol to look ahead carefully or you may result in locations where; - The picture will be clear . ON INSTALLATION • DO NOT install any receiver while manipulating the steering wheel, as this manual thoroughly and keep it may lead to carelessness and cause an accident. • IF... damaged . The monitor is not engaged." Precaution THANK YOU FOR PURCHASING THIS CAR DIGITAL VIDEO PLAYER . Before operating the unit, read the following precautions before installing and operating the unit . If your car becomes normal . -2-
Owners Manual
Page 6
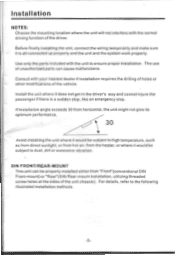
... driving function of the vehicle. Consult with the unit to the following illustrated installation methods. If installation angle exceeds 30 from horizontal, the unit might not give its optimum performance. \ 30 Avoid installing the unit where it would be subject to high temperature, such as from ...drilling of holes or other modifications of the driver. For details, refer to ensure proper installation. Install the unit where it is a sudden stop, like an emergency stop. Before finally installing the unit, connect the wiring temporarily and make sure it does not get in the driver...
... driving function of the vehicle. Consult with the unit to the following illustrated installation methods. If installation angle exceeds 30 from horizontal, the unit might not give its optimum performance. \ 30 Avoid installing the unit where it would be subject to high temperature, such as from ...drilling of holes or other modifications of the driver. For details, refer to ensure proper installation. Install the unit where it is a sudden stop, like an emergency stop. Before finally installing the unit, connect the wiring temporarily and make sure it does not get in the driver...
Owners Manual
Page 7
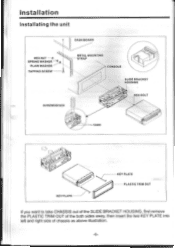
Installation Installating the unit DASH BOARD HEX NUT -SPRING WASHER- STRAP CONSOLE SLIDE BRACKET HOUSING SCREWDRIVER HEX BOLT TABS KEY PLATE KEY PLATE PLASTIC TRIM OUT If you want to take CHASSIS out of the SLIDE BRACKET HOUSING, first remove the PLASTIC TRIM OUT of the both sides away, then insert the two KEY PLATE into left and right side of chassis as above illustration. -6- a PLAIN WASHER TAPPING SCREW I METAL MOUNTING c;;ISS-
Installation Installating the unit DASH BOARD HEX NUT -SPRING WASHER- STRAP CONSOLE SLIDE BRACKET HOUSING SCREWDRIVER HEX BOLT TABS KEY PLATE KEY PLATE PLASTIC TRIM OUT If you want to take CHASSIS out of the SLIDE BRACKET HOUSING, first remove the PLASTIC TRIM OUT of the both sides away, then insert the two KEY PLATE into left and right side of chassis as above illustration. -6- a PLAIN WASHER TAPPING SCREW I METAL MOUNTING c;;ISS-

Owners Manual
Page 8
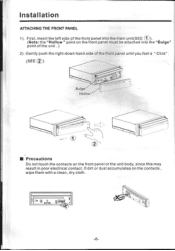
... turn off the power. 1). Press the "REL" release button and the right hand side of the control panel and on the panel holder. Installation How To Remove And Install The Front Panel When detaching or attaching the control panel, be sure to damage the connectors on the back of front pane will...
... turn off the power. 1). Press the "REL" release button and the right hand side of the control panel and on the panel holder. Installation How To Remove And Install The Front Panel When detaching or attaching the control panel, be sure to damage the connectors on the back of front pane will...
Owners Manual
Page 9
If dirt or dust accumulates on the front panel must be attached into the main unit(SEE (1)). (Note: the "Hollow " point on the contacts , wipe them with a clean, dry cloth . fa II z Installation ATTACHING THE FRONT PANEL 1). First, insert the left side of the front panel into the "Bulge" point of the front panel until you feel a ' Click" . (SEE (g)) Bulge' .7,-Hollow"- (I) ■ Precautions Do not touch the contacts on the front panel or the unit body, since this may result in poor electrical contact. Gently push the right-down hand side of the unit . ) 2).
If dirt or dust accumulates on the front panel must be attached into the main unit(SEE (1)). (Note: the "Hollow " point on the contacts , wipe them with a clean, dry cloth . fa II z Installation ATTACHING THE FRONT PANEL 1). First, insert the left side of the front panel into the "Bulge" point of the front panel until you feel a ' Click" . (SEE (g)) Bulge' .7,-Hollow"- (I) ■ Precautions Do not touch the contacts on the front panel or the unit body, since this may result in poor electrical contact. Gently push the right-down hand side of the unit . ) 2).
Owners Manual
Page 17
... C WU 61 SIVE .✓ tat I 88.50 2 90.00 3 98.00 • aid° 4 106.00 5 103.00 6 80.50 Pri r; Via the loudspeakers. 1). Initial installation of the preset sound modes: ROCK/POP/ JAZZ/CLASSIC/USER .
... C WU 61 SIVE .✓ tat I 88.50 2 90.00 3 98.00 • aid° 4 106.00 5 103.00 6 80.50 Pri r; Via the loudspeakers. 1). Initial installation of the preset sound modes: ROCK/POP/ JAZZ/CLASSIC/USER .


