User Manual
Page 1
Marine Grade In-Dash AM/FM Receiver with MP3 Playback & USB/SD/AUX Inputs USER'S MANUAL Receiver Models: PLRMR23BTW, PLRMR27BTB, PLMRKT36WT, PLMRKT46BK, PLMRKT38W, PLMRKT48BK - 0 -
Marine Grade In-Dash AM/FM Receiver with MP3 Playback & USB/SD/AUX Inputs USER'S MANUAL Receiver Models: PLRMR23BTW, PLRMR27BTB, PLMRKT36WT, PLMRKT46BK, PLMRKT38W, PLMRKT48BK - 0 -
User Manual
Page 2
... ...3 To Install the Receiver ...3 Wiring Connections...4 Removal of the Main Unit ...4 CONTROL PANEL BUTTONS ...5 GENERAL OPERATION ...6 Turn Unit On/Off...6 Adjust Volume (VOL) ...6 Adjust Menu Options (SEL) ...6 Set the Clock (CLK) ...6 Change the Source (MODE)...7 Mute on/off ...7 Loudness on/off ...7 Preset Equalizer(EQ) ...7 USB port, Micro SD Card Slot ...7 Built-in Microphone ...7 Aux input connector ...7 Reset System (RESET) ...7 RADIO OPERATION ...8 Switch Between USA area and Europe area Frequency 8 Change Bands (BAND)...8 Manual Tuning ( / ) ...8 Auto Seek Tuning ( / )...8 To...
... ...3 To Install the Receiver ...3 Wiring Connections...4 Removal of the Main Unit ...4 CONTROL PANEL BUTTONS ...5 GENERAL OPERATION ...6 Turn Unit On/Off...6 Adjust Volume (VOL) ...6 Adjust Menu Options (SEL) ...6 Set the Clock (CLK) ...6 Change the Source (MODE)...7 Mute on/off ...7 Loudness on/off ...7 Preset Equalizer(EQ) ...7 USB port, Micro SD Card Slot ...7 Built-in Microphone ...7 Aux input connector ...7 Reset System (RESET) ...7 RADIO OPERATION ...8 Switch Between USA area and Europe area Frequency 8 Change Bands (BAND)...8 Manual Tuning ( / ) ...8 Auto Seek Tuning ( / )...8 To...
User Manual
Page 3
... preset memory of the ship/car receiver (USB jack, card slot, AUX IN connection) as this will require re-programming. Handle the display and the buttons gently so as this unit yourself. Lithium Battery Cell Warnings y Cell leakage may cause an explosion. Refer all service to avoid damage. For optimal performance, avoid installing the unit at a reasonable level to reduce the temperature inside the ship/car before turning...
... preset memory of the ship/car receiver (USB jack, card slot, AUX IN connection) as this will require re-programming. Handle the display and the buttons gently so as this unit yourself. Lithium Battery Cell Warnings y Cell leakage may cause an explosion. Refer all service to avoid damage. For optimal performance, avoid installing the unit at a reasonable level to reduce the temperature inside the ship/car before turning...
User Manual
Page 4
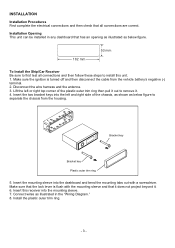
... ring. - 3 - Disconnect the wire harness and the antenna. 3. Bracket key Bracket key Plastic outer trim ring 5. Make sure that the lock lever is turned off and then disconnect the cable from the housing. Connect wires as below figure. 182 mm 53 mm To Install the Ship/Car Receiver Be sure to first test all connections are correct. Insert the mounting sleeve into the...
... ring. - 3 - Disconnect the wire harness and the antenna. 3. Bracket key Bracket key Plastic outer trim ring 5. Make sure that the lock lever is turned off and then disconnect the cable from the housing. Connect wires as below figure. 182 mm 53 mm To Install the Ship/Car Receiver Be sure to first test all connections are correct. Insert the mounting sleeve into the...

User Manual
Page 5
.... Only use speakers with 4 ohms impedance. - The maximum current of the mounting sleeve. - 4 - Remove the plastic trim from the main unit. 2. Removal of the Main Unit 1. Wiring Connections WIRING DIAGRAM Radio Antenna Socket White: Front Left CH RCA Audio Output Red: Front Right CH RCA Audio Output Red: Rear Right CH RCA Audio Output White: Rear Left CH RCA Audio Output CAUTION +12V DC NEGATIVE GROUND FUSE 15A GND(Black) ACC (Red) Power B+(Yellow) ANT(Blue...
.... Only use speakers with 4 ohms impedance. - The maximum current of the mounting sleeve. - 4 - Remove the plastic trim from the main unit. 2. Removal of the Main Unit 1. Wiring Connections WIRING DIAGRAM Radio Antenna Socket White: Front Left CH RCA Audio Output Red: Front Right CH RCA Audio Output Red: Rear Right CH RCA Audio Output White: Rear Left CH RCA Audio Output CAUTION +12V DC NEGATIVE GROUND FUSE 15A GND(Black) ACC (Red) Power B+(Yellow) ANT(Blue...
User Manual
Page 6
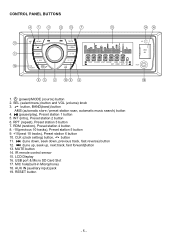
...) 18. CLK (clock setting) button, button 11. (tune down, seek down, previous track, fast reverse) button 12. (tune up, seek up, next track, fast forward)button 13. USB port & Micro SD Card Slot 17. SEL (select/menu) button and VOL (volume) knob 3. button, BAND(band) button AMS (automatic store / preset station scan, automatic music search) button 4. (pause/play), Preset station 1 button 5. CONTROL PANEL BUTTONS MIC /MD 1 2 INT 3 RPT RESET BND AMS MUTE 4 RDM 5 -10 6 +10 CLK IR USB SD 1. (power)/MODE (source) button 2.
...) 18. CLK (clock setting) button, button 11. (tune down, seek down, previous track, fast reverse) button 12. (tune up, seek up, next track, fast forward)button 13. USB port & Micro SD Card Slot 17. SEL (select/menu) button and VOL (volume) knob 3. button, BAND(band) button AMS (automatic store / preset station scan, automatic music search) button 4. (pause/play), Preset station 1 button 5. CONTROL PANEL BUTTONS MIC /MD 1 2 INT 3 RPT RESET BND AMS MUTE 4 RDM 5 -10 6 +10 CLK IR USB SD 1. (power)/MODE (source) button 2.
User Manual
Page 7
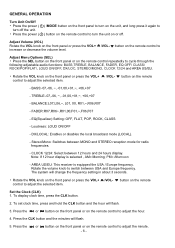
.... Stereo/Mono: Switches between 12 hours and 24 hours display. The system will change the frequency setting in about 3 seconds. 噝 Rotate the VOL knob on the remote - EQ(Equalizer) Setting: OFF, FLAT, POP, ROCK, CLASS - button on the front panel or press the VOL+ /VOLcontrol to adjust the minute. - 6 - Adjust Volume (VOL) Rotate the VOL knob on or off the unit. 噝 Press the power ( ) /MODE button...
.... Stereo/Mono: Switches between 12 hours and 24 hours display. The system will change the frequency setting in about 3 seconds. 噝 Rotate the VOL knob on the remote - EQ(Equalizer) Setting: OFF, FLAT, POP, ROCK, CLASS - button on the front panel or press the VOL+ /VOLcontrol to adjust the minute. - 6 - Adjust Volume (VOL) Rotate the VOL knob on or off the unit. 噝 Press the power ( ) /MODE button...
User Manual
Page 8
... of this Bluetooth hands-free system. This function may be also released when the volume knob is distorted, or when any of bass frequencies, press again to turn on the remote control to toggle between RADIO, BT(Bluetooth), USB(with USB device inserted), CARD(with SD card inserted) and AUX-IN(auxiliary input) modes. The muted state will be used to reset all parameters to factory default settings. Preset Equalizer(EQ) Press the EQ button on...
... of this Bluetooth hands-free system. This function may be also released when the volume knob is distorted, or when any of bass frequencies, press again to turn on the remote control to toggle between RADIO, BT(Bluetooth), USB(with USB device inserted), CARD(with SD card inserted) and AUX-IN(auxiliary input) modes. The muted state will be used to reset all parameters to factory default settings. Preset Equalizer(EQ) Press the EQ button on...
User Manual
Page 9
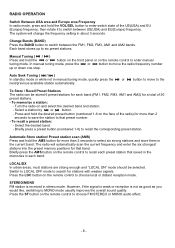
... enter manual tuning mode. Automatic Store station/ Preset station scan (AMS) Press and hold the or button on the front panel or on the face of the radio) for more than 2 seconds to recall the corresponding preset station. Select a station by or button. - Briefly press a preset button (numbered 1-6) to select six strong stations and store them in the current band. The radio will change the frequency setting in stereo mode. Briefly press the AMS button on the remote control...
... enter manual tuning mode. Automatic Store station/ Preset station scan (AMS) Press and hold the or button on the front panel or on the face of the radio) for more than 2 seconds to recall the corresponding preset station. Select a station by or button. - Briefly press a preset button (numbered 1-6) to select six strong stations and store them in the current band. The radio will change the frequency setting in stereo mode. Briefly press the AMS button on the remote control...

User Manual
Page 10
... current track. Turn the volume control to the left and enter the next number. USB / SD CARD OPERATION To insert USB / SD CARD 噝 To play files on a USB device, open the USB port cover and insert the USB storage device into the AUX IN jack with a 3.5mm stereo audio cable and press the MODE button to switch to AUX input mode. To fast backward, press and hold the AMS button to direct select a music file...
... current track. Turn the volume control to the left and enter the next number. USB / SD CARD OPERATION To insert USB / SD CARD 噝 To play files on a USB device, open the USB port cover and insert the USB storage device into the AUX IN jack with a 3.5mm stereo audio cable and press the MODE button to switch to AUX input mode. To fast backward, press and hold the AMS button to direct select a music file...
User Manual
Page 11
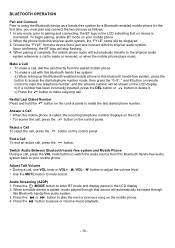
... VOL+ 噝 Use the MUTE button to adjust the volume level. Adjust Talk Volume 噝 During a call , press the button on your mobile phone. When a mobile device is paired, music played through this ship/car audio system. Press the button to make a call , press the button. c) Press the button to pause or resume music playback. - 10 - To begin pairing, enable BT mode on the control panel. b) If a number has been incorrectly inputted, press the DEL button or button to your...
... VOL+ 噝 Use the MUTE button to adjust the volume level. Adjust Talk Volume 噝 During a call , press the button on your mobile phone. When a mobile device is paired, music played through this ship/car audio system. Press the button to make a call , press the button. c) Press the button to pause or resume music playback. - 10 - To begin pairing, enable BT mode on the control panel. b) If a number has been incorrectly inputted, press the DEL button or button to your...
User Manual
Page 12
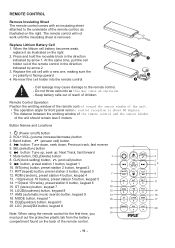
...CLK(clock setting) button, (end call ) button 4. INT(intro) button, preset station 2 button, keypad 2 11. ST (stereo) button, keypad 7 16. EQ(Equalizer) button, keypad 0 20. Mute button, DEL(Delete) button 8. AMS (automatic music search) button, keypad 9 18. Do not throw cells into the remote control. 2 1 3 4 - SEL(selection) button 6. button: Tune up, seek up; Press and hold the movable block in the direction indicated by arrow 1. VOL+/VOL-(volume increase/decrease) button 3. button, preset station 1 button, keypad 1 10. Band button, (answer call ) button 9. button: Tune...
...CLK(clock setting) button, (end call ) button 4. INT(intro) button, preset station 2 button, keypad 2 11. ST (stereo) button, keypad 7 16. EQ(Equalizer) button, keypad 0 20. Mute button, DEL(Delete) button 8. AMS (automatic music search) button, keypad 9 18. Do not throw cells into the remote control. 2 1 3 4 - SEL(selection) button 6. button: Tune up, seek up; Press and hold the movable block in the direction indicated by arrow 1. VOL+/VOL-(volume increase/decrease) button 3. button, preset station 1 button, keypad 1 10. Band button, (answer call ) button 9. button: Tune...
User Manual
Page 14
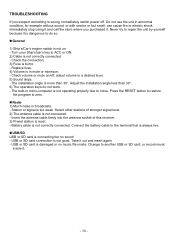
... correctly connected. - Turn your Ship's/car's key to ACC or ON. 2) Cable is not correctly connected. Check volume or mute on . - Press the RESET button to restore the program to the terminal that is always live. „ USB/SD USB or SD card is burnt. - Check the connection. 3) Fuse is connecting but no music file inside it is dangerous to do not work. - Connect the battery cable to zero. . „ Radio...
... correctly connected. - Turn your Ship's/car's key to ACC or ON. 2) Cable is not correctly connected. Check volume or mute on . - Press the RESET button to restore the program to the terminal that is always live. „ USB/SD USB or SD card is burnt. - Check the connection. 3) Fuse is connecting but no music file inside it is dangerous to do not work. - Connect the battery cable to zero. . „ Radio...


