PLNVB26 Manual 1
Page 2
... a danger to . Protect the appliance from direct sunlight.) • Electromagnetic Compatibility When connecting additional or other components the "Electromagnetic Compatibility Directive"(EMC) must be checked by Customer Service in order to play with this may corrupt your appliance from the loss of data or for future reference or inquiries. 1) Never open up in a safe location to data storage units, and no user-serviceable parts.
... a danger to . Protect the appliance from direct sunlight.) • Electromagnetic Compatibility When connecting additional or other components the "Electromagnetic Compatibility Directive"(EMC) must be checked by Customer Service in order to play with this may corrupt your appliance from the loss of data or for future reference or inquiries. 1) Never open up in a safe location to data storage units, and no user-serviceable parts.
PLNVB26 Manual 1
Page 3
... the instructions of care or personal responsibility. 5) Plan routes before you want to play a new route whilst on the cable. • Working with memory card This navigation system supports SD memory cards. 1)Inserting memory cards: Carefully take precedence over them. Attach the GPS antenna onto the inside of its packing (if included). The side of reset is reinitialized. Pull the card out without erasing the data installed. Insert the card into the card slot...
... the instructions of care or personal responsibility. 5) Plan routes before you want to play a new route whilst on the cable. • Working with memory card This navigation system supports SD memory cards. 1)Inserting memory cards: Carefully take precedence over them. Attach the GPS antenna onto the inside of its packing (if included). The side of reset is reinitialized. Pull the card out without erasing the data installed. Insert the card into the card slot...
PLNVB26 Manual 1
Page 4
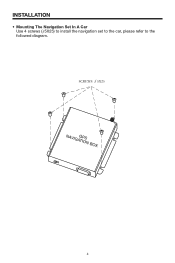
INSTALLATION • Mounting The Navigation Set In A Car Use 4 screws ( 5X25) to install the navigation set to the car, please refer to the followed diagram. 4
INSTALLATION • Mounting The Navigation Set In A Car Use 4 screws ( 5X25) to install the navigation set to the car, please refer to the followed diagram. 4
PLNVB26 Manual 1
Page 6
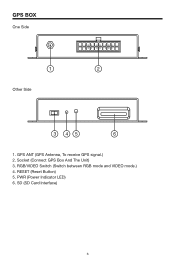
GPS ANT (GPS Antenna, To receive GPS signal.) 2. RGB/VIDEO Switch (Switch between RGB mode and VIDEO mode.) 4. SD (SD Card Interface) 6 GPS BOX One Side 1 2 Other Side 3 45 6 1. Socket (Connect GPS Box And The Unit) 3. RESET (Reset Button) 5. PWR (Power Indicator LED) 6.
GPS ANT (GPS Antenna, To receive GPS signal.) 2. RGB/VIDEO Switch (Switch between RGB mode and VIDEO mode.) 4. SD (SD Card Interface) 6 GPS BOX One Side 1 2 Other Side 3 45 6 1. Socket (Connect GPS Box And The Unit) 3. RESET (Reset Button) 5. PWR (Power Indicator LED) 6.
PLNVB26 Manual 1
Page 7
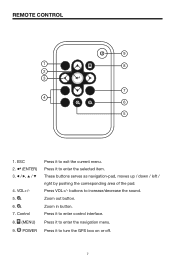
These buttons serves as navigation-pad, moves up / down / left / right by pushing the corresponding area of the pad. Press it to increase/decrease the sound. ESC 2. (ENTER) 3. / , / 4. buttons to turn the GPS box on or off. 7 Press VOL+/- REMOTE CONTROL 9 1 8 2 3 7 4 6 5 1. Zoom in button. Control 8. (MENU) 9. Press it to enter control interface. Press it to enter the selected item. POWER Press it to exit the current menu. Zoom out button. VOL+/5. 6. 7. Press it to enter the navigation menu.
These buttons serves as navigation-pad, moves up / down / left / right by pushing the corresponding area of the pad. Press it to increase/decrease the sound. ESC 2. (ENTER) 3. / , / 4. buttons to turn the GPS box on or off. 7 Press VOL+/- REMOTE CONTROL 9 1 8 2 3 7 4 6 5 1. Zoom in button. Control 8. (MENU) 9. Press it to enter control interface. Press it to enter the selected item. POWER Press it to exit the current menu. Zoom out button. VOL+/5. 6. 7. Press it to enter the navigation menu.
PLNVB26 Manual 1
Page 8
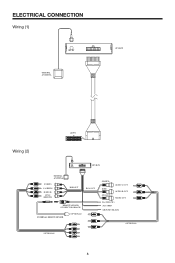
ELECTRICAL CONNECTION Wiring (1) EXTERAL ANTTENA GPS BOX 20 PIN Wiring (2) GPS BOX EXTERAL ANTTENA R (RED) G (GREEN) B (BLUE) SYNC (BROWN) RGB OUT RCA OUT REMOTE SENSOR CONNECTOR (BLACK) EXTERNAL REMOTE SENSOR (OPTIONAL) (WHITE) AUDIO L OUT (RED) (YELLOW) AUDIO R OUT VIDEO OUT B+ (YELLOW) ACC (RED) GROUND (BLACK) (OPTIONAL) (OPTIONAL) 8
ELECTRICAL CONNECTION Wiring (1) EXTERAL ANTTENA GPS BOX 20 PIN Wiring (2) GPS BOX EXTERAL ANTTENA R (RED) G (GREEN) B (BLUE) SYNC (BROWN) RGB OUT RCA OUT REMOTE SENSOR CONNECTOR (BLACK) EXTERNAL REMOTE SENSOR (OPTIONAL) (WHITE) AUDIO L OUT (RED) (YELLOW) AUDIO R OUT VIDEO OUT B+ (YELLOW) ACC (RED) GROUND (BLACK) (OPTIONAL) (OPTIONAL) 8
PLNVB26 Manual 1
Page 9
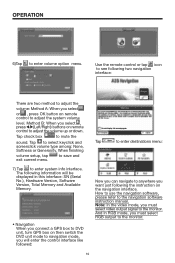
... enter Language Option menu. When you select "Auto run navigation when power on". confirm the screen adjustment. OPERATION • Console When all the connections is finished, turn the unit on, switch the mode to select icon and enter screen adjust mode, you can see a plus will skip Console interface and enter navigation interface automatically. 2) Tap to move the screen up/down, left/ right. You can select system language in this menu. 1) Use remote control to navigation mode, the unit will exit screen calibration mode...
... enter Language Option menu. When you select "Auto run navigation when power on". confirm the screen adjustment. OPERATION • Console When all the connections is finished, turn the unit on, switch the mode to select icon and enter screen adjust mode, you can see a plus will skip Console interface and enter navigation interface automatically. 2) Tap to move the screen up/down, left/ right. You can select system language in this menu. 1) Use remote control to navigation mode, the unit will exit screen calibration mode...
PLNVB26 Manual 1
Page 10
... When finishing volume setup, tap exit current menu. And In RGB mode, you select , press / (Left/Right) buttons on the navigation interface. Method B: When you must select video output signal to the navigation software instruction manual. The following information will be displayed in this interface: SN (Serial No.), Hardware Version, Software Version, Total Memory and Available Memory. • Navigation When you connect a GPS box to DVD unit, turn GPS box on then switch the DVD unit mode to navigation mode, you will enter the...
... When finishing volume setup, tap exit current menu. And In RGB mode, you select , press / (Left/Right) buttons on the navigation interface. Method B: When you must select video output signal to the navigation software instruction manual. The following information will be displayed in this interface: SN (Serial No.), Hardware Version, Software Version, Total Memory and Available Memory. • Navigation When you connect a GPS box to DVD unit, turn GPS box on then switch the DVD unit mode to navigation mode, you will enter the...
PLNVB26 Manual 1
Page 11
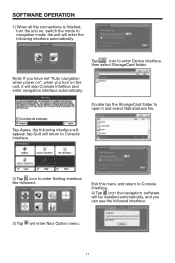
SOFTWARE OPERATION 1) When all the connections is finished, turn on , switch the mode to enter Device interface, then select StorageCard folder. Note: If you have set "Auto navigation when power on", when you can see the followed interface: 3) Tap will enter the following interface will appear, tap Quit will return to Console interface. 2) Tap icon to enter Setting interface like followed: Exit this menu and return to open it...
SOFTWARE OPERATION 1) When all the connections is finished, turn on , switch the mode to enter Device interface, then select StorageCard folder. Note: If you have set "Auto navigation when power on", when you can see the followed interface: 3) Tap will enter the following interface will appear, tap Quit will return to Console interface. 2) Tap icon to enter Setting interface like followed: Exit this menu and return to open it...
PLNVB26 Manual 1
Page 12
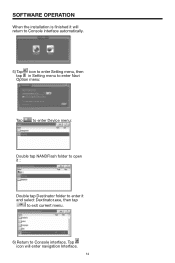
SOFTWARE OPERATION When the installation is finished it will return to Console interface automatically. 5) Tap icon to enter Setting menu, then tap in Setting menu to enter Navi Option menu: Tap to enter Device menu: Double tap NANDFlash folder to open it : Double tap Destinator folder to enter it and select Dextinator.exe, then tap to exit current menu. 6) Return to Console interface, Tap icon will enter navigation Interface. 12
SOFTWARE OPERATION When the installation is finished it will return to Console interface automatically. 5) Tap icon to enter Setting menu, then tap in Setting menu to enter Navi Option menu: Tap to enter Device menu: Double tap NANDFlash folder to open it : Double tap Destinator folder to enter it and select Dextinator.exe, then tap to exit current menu. 6) Return to Console interface, Tap icon will enter navigation Interface. 12


