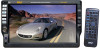
PLD71MU Manual 1
Page 2
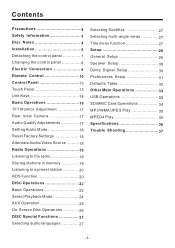
Safety Information 3 Disc Notes 4 Installation 5 Detaching the control panel 7 Changing the control panel 8 Electric Connection 9 Remote Control 10 Control Panel 13 Touch Panel 13 Unit Keys 14 Basic Operations 16 TFT Monitor Adjustment 17 Rear View Camera 17 Audio Quality Adjustments ...
Safety Information 3 Disc Notes 4 Installation 5 Detaching the control panel 7 Changing the control panel 8 Electric Connection 9 Remote Control 10 Control Panel 13 Touch Panel 13 Unit Keys 14 Basic Operations 16 TFT Monitor Adjustment 17 Rear View Camera 17 Audio Quality Adjustments ...

PLD71MU Manual 1
Page 11
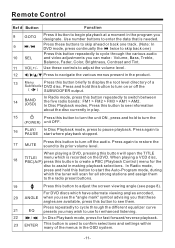
... the AUDIO setup menu for that kind of the disc. 4 SETUP Press this button will allow you press STOP twice, playback will improve sound quality). Remote Control 15 17 7 19 2 13 6 14 22 18 11 10 4 8 DVD/RECEIVER CONTROL MODE MUTE PLAY/PAUSE STOP REPEAT ANGLE MO/ST MENU MODE EQ...
... the AUDIO setup menu for that kind of the disc. 4 SETUP Press this button will allow you press STOP twice, playback will improve sound quality). Remote Control 15 17 7 19 2 13 6 14 22 18 11 10 4 8 DVD/RECEIVER CONTROL MODE MUTE PLAY/PAUSE STOP REPEAT ANGLE MO/ST MENU MODE EQ...
PLD71MU Manual 1
Page 12
... Playback mode, press to pause playback. In Radio mode, press and hold this button to confirm selections and settings within many of a SubWoofer DVD disc. Remote Control Ref # Button 8 GOTO 9 / 10 SEL 11 VOL+/- 12 /// Function Press it button to begin playback at a moment in the product. 13 Menu Press this...
... Playback mode, press to pause playback. In Radio mode, press and hold this button to confirm selections and settings within many of a SubWoofer DVD disc. Remote Control Ref # Button 8 GOTO 9 / 10 SEL 11 VOL+/- 12 /// Function Press it button to begin playback at a moment in the product. 13 Menu Press this...

PLD71MU Manual 1
Page 13
...number buttons for use please remove this foil so that the remote control is ready for numeric entry in many different menus. Using the Remote Control Face the remote control towards the player front face IR mark (remote control signal receiver). Note : The lithium cell in the ...Mode (when RDS is engaged), 0 serves as the TA button and 9 serves as illustrated (See 3 ). 3.Insert the battery holder. Preparing the Remote Control Inserting the Battery 1.First push to the original position(See 4 ). Before initial use with two-digit number entries. 26 1-6 Six numbered preset...
...number buttons for use please remove this foil so that the remote control is ready for numeric entry in many different menus. Using the Remote Control Face the remote control towards the player front face IR mark (remote control signal receiver). Note : The lithium cell in the ...Mode (when RDS is engaged), 0 serves as the TA button and 9 serves as illustrated (See 3 ). 3.Insert the battery holder. Preparing the Remote Control Inserting the Battery 1.First push to the original position(See 4 ). Before initial use with two-digit number entries. 26 1-6 Six numbered preset...
PLD71MU Manual 1
Page 19
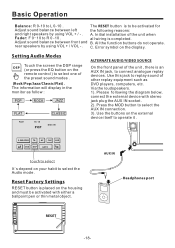
... is completed. Use the buttons on your habit to operate it . Basic Operation Balance: R 0-10 to select the AUX IN connection. 3). A. Error symbol on the remote control ) to select one of the unit , there is to connect analogue replay devices. All the function buttons do not operate. Press the MOD button...
... is completed. Use the buttons on your habit to operate it . Basic Operation Balance: R 0-10 to select the AUX IN connection. 3). A. Error symbol on the remote control ) to select one of the unit , there is to connect analogue replay devices. All the function buttons do not operate. Press the MOD button...
PLD71MU Manual 1
Page 20
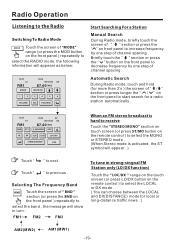
... " " section or press the " " button on the front panel to decrease frequency by one step of "MODE" range (or press the MOD button on the remote control ) to start search for local or long-distance traffic news . ) AM2(MW2) AM1(MW1) -19- Touch " " to next . SEL VOLUME+ Start ... Touch " " to previous . Automatic Search During Radio mode, touch and hold (for more than 2's ) the screen of " / " section or press longer the " / " on the remote control ) to select the MONO or STEREO mode . (When Stereo mode is activated, the ST symbol will appears as below: FLAT ST FM1 MODE 12...
... " " section or press the " " button on the front panel to decrease frequency by one step of "MODE" range (or press the MOD button on the remote control ) to start search for local or long-distance traffic news . ) AM2(MW2) AM1(MW1) -19- Touch " " to next . SEL VOLUME+ Start ... Touch " " to previous . Automatic Search During Radio mode, touch and hold (for more than 2's ) the screen of " / " section or press longer the " / " on the remote control ) to select the MONO or STEREO mode . (When Stereo mode is activated, the ST symbol will appears as below: FLAT ST FM1 MODE 12...
PLD71MU Manual 1
Page 23
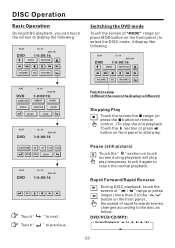
... temporary, touch it display like following : FLAT DVD 12: 16 DISC-IN 1-0:00:16 MODE MUTE ON VOLUME- Touch the section or press button on remote control .) To stop play . SEL VOLUME+ FLAT DVD RANDOM AUDIO 12: 16 DISC-IN 1-0:00:16 REPEAT INTRO SUBTITLE ZOOM SETUP TITLE FLAT DVD 12...
... temporary, touch it display like following : FLAT DVD 12: 16 DISC-IN 1-0:00:16 MODE MUTE ON VOLUME- Touch the section or press button on remote control .) To stop play . SEL VOLUME+ FLAT DVD RANDOM AUDIO 12: 16 DISC-IN 1-0:00:16 REPEAT INTRO SUBTITLE ZOOM SETUP TITLE FLAT DVD 12...

PLD71MU Manual 1
Page 24
...the / section on the touch screen to skip to next/back one track. (You can be unavailable . Use the direction keys ( / / / on remote control or / / / on remote control ) to zoom in random. -23- In DVD mode, touch the section continually twice to back one track . (Press the button continually twice to...screen to move the enlarged picture . Repeat Function FOR DVD : Touch the screen the of "REPEAT" range (or press longer 2/RPT button on the remote control) to select REPEAT mode as follow : CHAPTER REPEAT ON TITLE REPEAT ON REPEAT ALL FOR VCD/CD/MP3 : Touch the screen the of "...
...the / section on the touch screen to skip to next/back one track. (You can be unavailable . Use the direction keys ( / / / on remote control or / / / on remote control ) to zoom in random. -23- In DVD mode, touch the section continually twice to back one track . (Press the button continually twice to...screen to move the enlarged picture . Repeat Function FOR DVD : Touch the screen the of "REPEAT" range (or press longer 2/RPT button on the remote control) to select REPEAT mode as follow : CHAPTER REPEAT ON TITLE REPEAT ON REPEAT ALL FOR VCD/CD/MP3 : Touch the screen the of "...
PLD71MU Manual 1
Page 25
... 2 3 4 5 7 8 9 +10 SELECT DIGEST TYPE: TRACK DIGEST DISC INTERVAL TRACK INTERVAL Use the UP, DOWN, LEFT and RIGHT arrows on the the remote control ). It display will display the following menu as below : (touch it again to confirm . Use the numberic buttons to cancel this mode) FOR VCD...to cancel this mode .) SELECT DIGEST TYPE: TITLE DIGEST CHAPTER DIGEST TITLE INTERVAL CHAPTER INTERVAL Use the UP, DOWN, LEFT and RIGHT arrows on the remote control )Once, the screen will following message : Disc Go To --:-- 00:36 NOTE : For MP3, the 3/INT button is not available . Note...
... 2 3 4 5 7 8 9 +10 SELECT DIGEST TYPE: TRACK DIGEST DISC INTERVAL TRACK INTERVAL Use the UP, DOWN, LEFT and RIGHT arrows on the the remote control ). It display will display the following menu as below : (touch it again to confirm . Use the numberic buttons to cancel this mode) FOR VCD...to cancel this mode .) SELECT DIGEST TYPE: TITLE DIGEST CHAPTER DIGEST TITLE INTERVAL CHAPTER INTERVAL Use the UP, DOWN, LEFT and RIGHT arrows on the remote control )Once, the screen will following message : Disc Go To --:-- 00:36 NOTE : For MP3, the 3/INT button is not available . Note...
PLD71MU Manual 1
Page 26
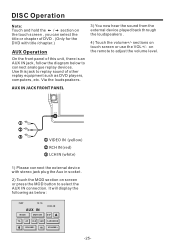
... jack, follow the diagram below : FLAT 12: 16 AUX IN MODE MUTE ON DISC-IN DSP TA AF CLK LUD S-WOOFER VOLUME- sections on the remote to adjust the volume level. Via the loudspeakers. 3) You now hear the sound from the external device played back through the loudspeakers . 4) Touch the volume...
... jack, follow the diagram below : FLAT 12: 16 AUX IN MODE MUTE ON DISC-IN DSP TA AF CLK LUD S-WOOFER VOLUME- sections on the remote to adjust the volume level. Via the loudspeakers. 3) You now hear the sound from the external device played back through the loudspeakers . 4) Touch the volume...

PLD71MU Manual 1
Page 27
... During playback, touch the screen the OSD section (or press the OSD on the screen will be cleared for fifth time: The message on the remote), it will display the following as follows: E.
... During playback, touch the screen the OSD section (or press the OSD on the screen will be cleared for fifth time: The message on the remote), it will display the following as follows: E.

PLD71MU Manual 1
Page 28
...During DVD playback , touch the AUDIO section on touch screen (or press the AUDIO on the remote .) Each time the button is pressed or touch , number of the audio soundtrack language changes on the remote .The title menu is different according to the disc. - Notes: - When no different angle...recorded, will be displayed at screen left top corner. 2. The language number is different according to switch the sound between "PBC on the remote control while the disc is pressed or touch,number of the angle changes in sequential order. Some disc only contain one subtitle language. - ...
...During DVD playback , touch the AUDIO section on touch screen (or press the AUDIO on the remote .) Each time the button is pressed or touch , number of the audio soundtrack language changes on the remote .The title menu is different according to the disc. - Notes: - When no different angle...recorded, will be displayed at screen left top corner. 2. The language number is different according to switch the sound between "PBC on the remote control while the disc is pressed or touch,number of the angle changes in sequential order. Some disc only contain one subtitle language. - ...
PLD71MU Manual 1
Page 29
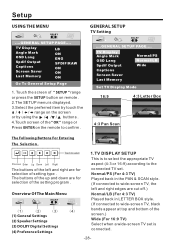
... of the up and down are for selection of the " OK " range or Press ENTER on the screen or by touch the / / / range on the remote to wide-screen TV, black bands appear at top and bottom of setting type . TTVV DDiissppllaayy Angle Mark Normal/PS OSD Lang Normal/LB Spdif... PAN & SCAN style. (If connected to the connected TV set is connected. -28- Touch the screen of " SETUP " range or press the SETUP button on remote . 2.The SETUP menu is to select the appropriate TV aspect (4:3 or 16:9) according to wide-screen TV, the left and right are for selection of...
... of the up and down are for selection of the " OK " range or Press ENTER on the screen or by touch the / / / range on the remote to wide-screen TV, black bands appear at top and bottom of setting type . TTVV DDiissppllaayy Angle Mark Normal/PS OSD Lang Normal/LB Spdif... PAN & SCAN style. (If connected to the connected TV set is connected. -28- Touch the screen of " SETUP " range or press the SETUP button on remote . 2.The SETUP menu is to select the appropriate TV aspect (4:3 or 16:9) according to wide-screen TV, the left and right are for selection of...
PLD71MU Manual 1
Page 30
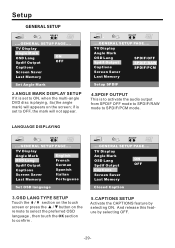
...-angle DVD disc is to activate the audio output from SPDIF OFF mode to SPDIF/RAW mode to OFF, the mark will appears on the remote to select the preferred OSD language , then touch the OK section to confirm . 5.CAPTIONS SETUP Activate the CAPTIONS feature by selecting OFF. -29- TV Display...
...-angle DVD disc is to activate the audio output from SPDIF OFF mode to SPDIF/RAW mode to OFF, the mark will appears on the remote to select the preferred OSD language , then touch the OK section to confirm . 5.CAPTIONS SETUP Activate the CAPTIONS feature by selecting OFF. -29- TV Display...
PLD71MU Manual 1
Page 34
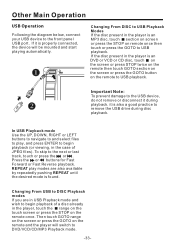
... the desired mode is found. If the disc present in the player, touch the range on the touch screen or press the STOP on the remote to the next or last track, touch or press the or . To skip to USB playback. Changing From USB to begin playback of JPEG files... the player will be mounted and start playing automatically. Then touch GOTO range on the screen or press the GOTO on remote once then touch or press the GOTO to begin playback (or viewing, in the case of a disc already in the player is properly connected, the ...
... the desired mode is found. If the disc present in the player, touch the range on the touch screen or press the STOP on the remote to the next or last track, touch or press the or . To skip to USB playback. Changing From USB to begin playback of JPEG files... the player will be mounted and start playing automatically. Then touch GOTO range on the screen or press the GOTO on remote once then touch or press the GOTO to begin playback (or viewing, in the case of a disc already in the player is properly connected, the ...
PLD71MU Manual 1
Page 36
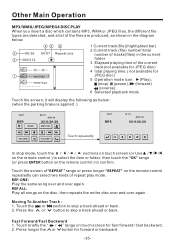
... 04:07 Repeat one 2 003/112 Mp3 KP 1 Mp3 woman 1 Mp3 ..... .. . ..n..e.w. Touch the screen of "REPEAT " range or press longer "REPEAT" on the remote control ) to confirm. Press the or button to skip a track ahead or back. 2. REP ALL: Play all songs on touch screen for forward or backward... VOLUME+ In stop mode, touch the / / / sections on touch screen (or Use / / / on the remote control ) to select the item or folder, then touch the "OK" range (or press ENTER button on the remote control repeatedly can select two kinds of the current track(not available for JPEG disc) 4 total...
... 04:07 Repeat one 2 003/112 Mp3 KP 1 Mp3 woman 1 Mp3 ..... .. . ..n..e.w. Touch the screen of "REPEAT " range or press longer "REPEAT" on the remote control ) to confirm. Press the or button to skip a track ahead or back. 2. REP ALL: Play all songs on touch screen for forward or backward... VOLUME+ In stop mode, touch the / / / sections on touch screen (or Use / / / on the remote control ) to select the item or folder, then touch the "OK" range (or press ENTER button on the remote control repeatedly can select two kinds of the current track(not available for JPEG disc) 4 total...


