PLD71MU Manual 1
Page 2
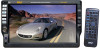
Contents Precautions 2. Safety Information 3 Disc Notes 4 Installation 5 Detaching the control panel 7 Changing the control panel 8 Electric Connection 9 Remote Control 10 Control Panel 13 Touch Panel 13 Unit Keys 14 Basic Operations 16 ...
Contents Precautions 2. Safety Information 3 Disc Notes 4 Installation 5 Detaching the control panel 7 Changing the control panel 8 Electric Connection 9 Remote Control 10 Control Panel 13 Touch Panel 13 Unit Keys 14 Basic Operations 16 ...
PLD71MU Manual 1
Page 3
...was parked in a cold or hot place, the picture may result in locations where; - Before operating the unit, read the following precautions before installing and operating the unit . it may be clear . Precautions THANK YOU FOR PURCHASING THIS CAR DVD PLAYER . To avoid injury or accident , ...devices such as air bags, as this may result in a traffic accident. The driver must not watch the monitor while driving. ON INSTALLATION DO NOT install any receiver while manipulating the steering wheel, as this may not be involved in a traffic accident. it handy for future reference . ...
...was parked in a cold or hot place, the picture may result in locations where; - Before operating the unit, read the following precautions before installing and operating the unit . it may be clear . Precautions THANK YOU FOR PURCHASING THIS CAR DVD PLAYER . To avoid injury or accident , ...devices such as air bags, as this may result in a traffic accident. The driver must not watch the monitor while driving. ON INSTALLATION DO NOT install any receiver while manipulating the steering wheel, as this may not be involved in a traffic accident. it handy for future reference . ...
PLD71MU Manual 1
Page 6
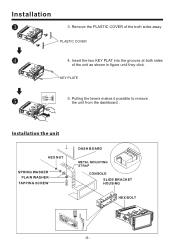
...not give its optimum performance. 30 DIN FRONT/REAR-MOUNT This unit can cause malfunctions. 4. For details, refer to ensure proper installation. Before finally installing the unit, connect the wiring temporarily and make sure it does not get in the driver's way and cannot injure the passenger ...work properly. 3. The use of the vehicle. 5. Choose the mounting location where the unit will not interfere with your nearest dealer if installation requires the drilling of holes or other modifications of unauthorized parts can be subject to release the front panel . 2. Press the REL ...
...not give its optimum performance. 30 DIN FRONT/REAR-MOUNT This unit can cause malfunctions. 4. For details, refer to ensure proper installation. Before finally installing the unit, connect the wiring temporarily and make sure it does not get in the driver's way and cannot injure the passenger ...work properly. 3. The use of the vehicle. 5. Choose the mounting location where the unit will not interfere with your nearest dealer if installation requires the drilling of holes or other modifications of unauthorized parts can be subject to release the front panel . 2. Press the REL ...
PLD71MU Manual 1
Page 7
KEY PLATE 5. Insert the two KEY PLAT into the grooves at both sides away PLASTIC COVER 4. Installation 3. Pulling the levers makes it possible to remove the unit from the dashboard . Installation the unit HEX NUT SPRING WASHER PLAIN WASHER TAPPING SCREW DASH BOARD METAL MOUNTING STRAP CONSOLE SLIDE BRACKET HOUSING HEX BOLT -6- Remove the PLASTIC COVER of the both sides of the unit as shown in figure until they click .
KEY PLATE 5. Insert the two KEY PLAT into the grooves at both sides away PLASTIC COVER 4. Installation 3. Pulling the levers makes it possible to remove the unit from the dashboard . Installation the unit HEX NUT SPRING WASHER PLAIN WASHER TAPPING SCREW DASH BOARD METAL MOUNTING STRAP CONSOLE SLIDE BRACKET HOUSING HEX BOLT -6- Remove the PLASTIC COVER of the both sides of the unit as shown in figure until they click .
PLD71MU Manual 1
Page 8
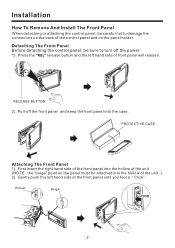
... the case . Detaching The Front Panel Before detaching the control panel, be sure to damage the connectors on the back of the unit .) 2). Installation How To Remove And Install The Front Panel When detaching or attaching the control panel, be careful not to turn off the front panel and keep the front...
... the case . Detaching The Front Panel Before detaching the control panel, be sure to damage the connectors on the back of the unit .) 2). Installation How To Remove And Install The Front Panel When detaching or attaching the control panel, be careful not to turn off the front panel and keep the front...
PLD71MU Manual 1
Page 19
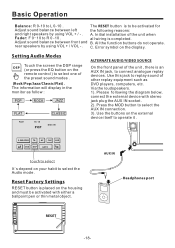
... Operation Balance: R 0-10 to R 0 -10 . The RESET button is placed on the housing and must be activated for Adjust sound balance between front and B. Initial installation of the unit , there is completed. The information will display in the monitor as DVD players, computers, etc.
... Operation Balance: R 0-10 to R 0 -10 . The RESET button is placed on the housing and must be activated for Adjust sound balance between front and B. Initial installation of the unit , there is completed. The information will display in the monitor as DVD players, computers, etc.


