
Instruction Manual
Page 1
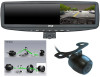
Mirror Mount Video Monitor/Recorder with Front and Rear View Night Cameras PLCMDVR5 www.pyleaudio.com Instruction Manual
Mirror Mount Video Monitor/Recorder with Front and Rear View Night Cameras PLCMDVR5 www.pyleaudio.com Instruction Manual
Instruction Manual
Page 2
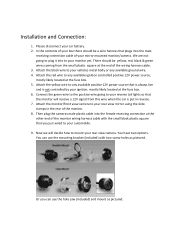
... available ground wire. 4. Installation and Connection: 1. We are not going to your reverse tail lights so that plugs into to your mirror mounted monitor/camera. You have two options. Attach the red wire to mount your vehicles metal body or any available ignition controlled positive 12V power source, mostly likely located at the other end of the wiring harness cable. 3. Connect the green wire to the positive wire going to your rear view camera...
... available ground wire. 4. Installation and Connection: 1. We are not going to your reverse tail lights so that plugs into to your mirror mounted monitor/camera. You have two options. Attach the red wire to mount your vehicles metal body or any available ignition controlled positive 12V power source, mostly likely located at the other end of the wiring harness cable. 3. Connect the green wire to the positive wire going to your rear view camera...

Instruction Manual
Page 3
... cable with one red wire and one end to the yellow RCA plug on your camera and the other end to the yellow RCA plug on the small power plug to your vehicles rear reverse light's positive wire so that it receives a 12V electrical flow when the car is in reverse. 13. Attach the black wire to the vehicles metal body or any available ground wire. 12. Take the electric DC plug black wire...
... cable with one red wire and one end to the yellow RCA plug on your camera and the other end to the yellow RCA plug on the small power plug to your vehicles rear reverse light's positive wire so that it receives a 12V electrical flow when the car is in reverse. 13. Attach the black wire to the vehicles metal body or any available ground wire. 12. Take the electric DC plug black wire...
Instruction Manual
Page 4
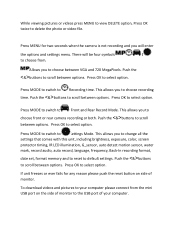
... same time. When in STILL CAMERA mode press OK to stop recording. You can press V1/V2 to power the unit on and off. When in the side of monitor before using. When in PLAYBACK mode press view and scroll between pictures and videos, press OK to insert SD card in MOVING VIDEO mode press OK to begin recording (The Video icon will flash red...
... same time. When in STILL CAMERA mode press OK to stop recording. You can press V1/V2 to power the unit on and off. When in the side of monitor before using. When in PLAYBACK mode press view and scroll between pictures and videos, press OK to insert SD card in MOVING VIDEO mode press OK to begin recording (The Video icon will flash red...
Instruction Manual
Page 5
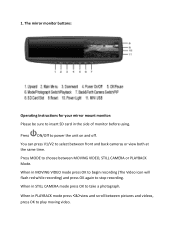
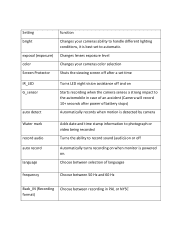
There will enter the options and settings menu. Push the > time. Push the date set, format memory and to reset to choose between VGA and 720 MegaPixels. Press MENU for two seconds when the camera is not recording and you to default settings. Allows you will be four symbols & to delete the photo or video file. Push the Push the choose front or rear camera recording or both. While viewing pictures or videos press MENU to view DELETE option, Press OK twice to choose from.
There will enter the options and settings menu. Push the > time. Push the date set, format memory and to reset to choose between VGA and 720 MegaPixels. Press MENU for two seconds when the camera is not recording and you to default settings. Allows you will be four symbols & to delete the photo or video file. Push the Push the choose front or rear camera recording or both. While viewing pictures or videos press MENU to view DELETE option, Press OK twice to choose from.
Instruction Manual
Page 6
Setting bright exposal (exposure) color Screen Protector function Changes your cameras color selection Shuts the viewing screen off after a set to automatic. Changes lenses exposure level Changes your cameras ability to the automobile in case of an accident (Camera will record 10+ seconds after power of languages frequency Choose between 50 Hz and 60 Hz Back_IN (Recording Choose between recording in PAL or NYSC format) Choose between selection...
Setting bright exposal (exposure) color Screen Protector function Changes your cameras color selection Shuts the viewing screen off after a set to automatic. Changes lenses exposure level Changes your cameras ability to the automobile in case of an accident (Camera will record 10+ seconds after power of languages frequency Choose between 50 Hz and 60 Hz Back_IN (Recording Choose between recording in PAL or NYSC format) Choose between selection...
Instruction Manual
Page 7
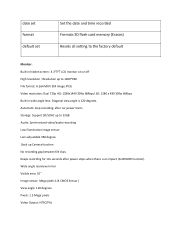
... : Resolution up Camera function No recording gap between file clips. date set format default set Set the date and time recorded Formats SD flash card memory (Erases) Resets all setting to the factory default Monitor: Built-in wide angle lens: Diagonal view angle is an impact (G-SENSOR function). Automatic loop recording: after power stops when there is 120 degrees. Audio: Synchronized video/audio recording Low illumination image sensor Lens adjustable 360 degree...
... : Resolution up Camera function No recording gap between file clips. date set format default set Set the date and time recorded Formats SD flash card memory (Erases) Resets all setting to the factory default Monitor: Built-in wide angle lens: Diagonal view angle is an impact (G-SENSOR function). Automatic loop recording: after power stops when there is 120 degrees. Audio: Synchronized video/audio recording Low illumination image sensor Lens adjustable 360 degree...
Instruction Manual
Page 8
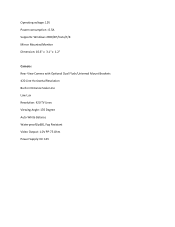
Operating voltage: 12V Power consumption : 0.5A Supports: Windows 2000/XP/Vista/7/8 Mirror Mounted Monitor Dimension: 10.6" x 3.1" x 1.2" Camera: Rear View Camera with Optional Dual Flush/Universal Mount Brackets 420 Line Horizontal Resolution Built-in Distance Scale Line Low Lux Resolution: 420 TV Lines Viewing Angle: 170 Degree Auto White Balance Waterproof (Ip68), Fog Resistant Video Output: 1.0V PP-75 Ohm Power Supply: DC 12V
Operating voltage: 12V Power consumption : 0.5A Supports: Windows 2000/XP/Vista/7/8 Mirror Mounted Monitor Dimension: 10.6" x 3.1" x 1.2" Camera: Rear View Camera with Optional Dual Flush/Universal Mount Brackets 420 Line Horizontal Resolution Built-in Distance Scale Line Low Lux Resolution: 420 TV Lines Viewing Angle: 170 Degree Auto White Balance Waterproof (Ip68), Fog Resistant Video Output: 1.0V PP-75 Ohm Power Supply: DC 12V

