Owners Manual
Page 1
PLCD6MRKT OWNER'S MANUAL Mobile Audio System PLL Synthesizer Stereo Radio CD/MP3/WMA Player Automatic Memory Storing Full Detachable Panel Preset Equalization Electronic Shockproof (ESP) Function USB Interface SD Interface www.pyleaudio.com 1
PLCD6MRKT OWNER'S MANUAL Mobile Audio System PLL Synthesizer Stereo Radio CD/MP3/WMA Player Automatic Memory Storing Full Detachable Panel Preset Equalization Electronic Shockproof (ESP) Function USB Interface SD Interface www.pyleaudio.com 1
Owners Manual
Page 2
... before installation ......... 3 DIN Front-Mount (Method A 3 Installing the unit 3 Removing the unit 4 DIN Rear-Mount (Method B 5 Using the detachable front panel ...... 6 Wiring Connection 7 Operation 8 Location of keys 8 Switching on/off the unit 9 Faceplate release 9 Sound adjustment 9 Loudness 9 Display information 9 Liquid crystal display 9 ESP function 9 Reset function 9 Radio operation 10 Switching to radio mode 10... Display information 12 WMA operation 12 USB play operation 12 SD operation 13 Disc notes 13 Remote control 15 Specification 16 Trouble shooting 17 2
... before installation ......... 3 DIN Front-Mount (Method A 3 Installing the unit 3 Removing the unit 4 DIN Rear-Mount (Method B 5 Using the detachable front panel ...... 6 Wiring Connection 7 Operation 8 Location of keys 8 Switching on/off the unit 9 Faceplate release 9 Sound adjustment 9 Loudness 9 Display information 9 Liquid crystal display 9 ESP function 9 Reset function 9 Radio operation 10 Switching to radio mode 10... Display information 12 WMA operation 12 USB play operation 12 SD operation 13 Disc notes 13 Remote control 15 Specification 16 Trouble shooting 17 2

Owners Manual
Page 3
... top of "removing the front panel"). 4. INSTALLATION Notes: Choose the mounting location where the unit will not interfere with the normal driving function of the driver. Before finally installing the unit, connect the wiring temporarily and make sure it is turned off, and then disconnect the cable from the vehicle battery's negative (-) terminal. 2. Press the release...
... top of "removing the front panel"). 4. INSTALLATION Notes: Choose the mounting location where the unit will not interfere with the normal driving function of the driver. Before finally installing the unit, connect the wiring temporarily and make sure it is turned off, and then disconnect the cable from the vehicle battery's negative (-) terminal. 2. Press the release...

Owners Manual
Page 4
...strap to the vehicle battery's negative (-) terminal. Reconnect the cable to the mounting bolt on the back of the vehicle under the dashboard. Then use the supplied metal strap to a solid metal part of the unit. To further secure the unit, use the supplied hardware (Tapping...any wires or cables. 8. INSTALLATION they will be most effective. This strap also helps ensure proper electrical grounding of "installing the front panel"). Reconnect the wire harness and the antenna and be careful not to remove the front panel. 4 Then replace the outer trim ring and install the...
...strap to the vehicle battery's negative (-) terminal. Reconnect the cable to the mounting bolt on the back of the vehicle under the dashboard. Then use the supplied metal strap to a solid metal part of the unit. To further secure the unit, use the supplied hardware (Tapping...any wires or cables. 8. INSTALLATION they will be most effective. This strap also helps ensure proper electrical grounding of "installing the front panel"). Reconnect the wire harness and the antenna and be careful not to remove the front panel. 4 Then replace the outer trim ring and install the...

Owners Manual
Page 5
...Screw Holes marked T, N Screw Dashboard or Console 5 To fasten the unit to remove it out to the factory radio mounting brackets. DIN REAR-MOUNT (Method B) If your vehicle. Use the screw holes marked T (Toyota), N (Nissan) located on both of the supplied keys into the slots ...the factory radio mounting brackets supplied with the screw holes on the unit, and then tighten the screws (5x5mm) on the bracket with your vehicle is a Nissan, Toyota, follow these mounting instructions. Note: the outer trim ring, sleeve and the metal strap are not used for method B installation. INSTALLATION 4. ...
...Screw Holes marked T, N Screw Dashboard or Console 5 To fasten the unit to remove it out to the factory radio mounting brackets. DIN REAR-MOUNT (Method B) If your vehicle. Use the screw holes marked T (Toyota), N (Nissan) located on both of the supplied keys into the slots ...the factory radio mounting brackets supplied with the screw holes on the unit, and then tighten the screws (5x5mm) on the bracket with your vehicle is a Nissan, Toyota, follow these mounting instructions. Note: the outer trim ring, sleeve and the metal strap are not used for method B installation. INSTALLATION 4. ...

Owners Manual
Page 6
USING THE DETACHABLE FRONT PANEL REMOVING THE FRONT PANEL 1. Do not touch the contacts on the front panel or on the display or control buttons when removing or installing the front panel. 3. Keep away any dirt or foreign substances adhered on the contacts, they can be removed with a clean and ... to high temperatures or direct sunlight in poor electrical contact. 4. Do not expose the front panel to disassemble the front panel. INSTALLING THE FRONT PANEL To install the front panel, insert the panel into the case. Keep front panel into the housing and make sure the panel is properly...
USING THE DETACHABLE FRONT PANEL REMOVING THE FRONT PANEL 1. Do not touch the contacts on the front panel or on the display or control buttons when removing or installing the front panel. 3. Keep away any dirt or foreign substances adhered on the contacts, they can be removed with a clean and ... to high temperatures or direct sunlight in poor electrical contact. 4. Do not expose the front panel to disassemble the front panel. INSTALLING THE FRONT PANEL To install the front panel, insert the panel into the case. Keep front panel into the housing and make sure the panel is properly...

Owners Manual
Page 7
WIRING CONNECTION ISO CONNECTION 7
WIRING CONNECTION ISO CONNECTION 7

Owners Manual
Page 8
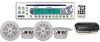
BAND/LOUD 23. SEL/VOL 24. disc slot 6. SD interface 27. LCD 7.EQ 8.8/ 9.9/ 10. (eject button) 11. AS/PS/SCH 15.7/MODE 16.6 DIR+ 17.5 DIR18. 4 RDM 19. 3 RPT 20. 2 INT 21.1 22. MUTE 25.IR 26. Reset button 8 LOC 4.MON 5. USB interface 12. OPERATION LOCATION OF KEYS 1. 2. (release button) 3. AUX IN 13.0 DSP 14.
BAND/LOUD 23. SEL/VOL 24. disc slot 6. SD interface 27. LCD 7.EQ 8.8/ 9.9/ 10. (eject button) 11. AS/PS/SCH 15.7/MODE 16.6 DIR+ 17.5 DIR18. 4 RDM 19. 3 RPT 20. 2 INT 21.1 22. MUTE 25.IR 26. Reset button 8 LOC 4.MON 5. USB interface 12. OPERATION LOCATION OF KEYS 1. 2. (release button) 3. AUX IN 13.0 DSP 14.
Owners Manual
Page 9
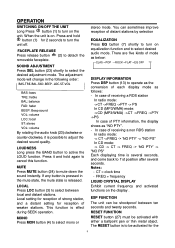
... local ST: stereo VOL: volume By rotating the audio knob (23) clockwise or counter-clockwise, it and hold button (1) for the 9 MONO Press MON button (4) to detach the removable faceplate. In case of weaker stations. The RESET button is several seconds, and come back to cancel... instantly. Local setting for reception of strong station, and a distant setting for reception of receiving a non RDS station In radio mode: -> CT ->FREQ -> 'NO PTY' -> "NO PS" In CD mode: -> CD -> CT -> FREQ -> 'NO PTY' -> "NO PS" Each displaying time is to be activated for 2 seconds to turn on the unit...
... local ST: stereo VOL: volume By rotating the audio knob (23) clockwise or counter-clockwise, it and hold button (1) for the 9 MONO Press MON button (4) to detach the removable faceplate. In case of weaker stations. The RESET button is several seconds, and come back to cancel... instantly. Local setting for reception of strong station, and a distant setting for reception of receiving a non RDS station In radio mode: -> CT ->FREQ -> 'NO PTY' -> "NO PS" In CD mode: -> CD -> CT -> FREQ -> 'NO PTY' -> "NO PS" Each displaying time is to be activated for 2 seconds to turn on the unit...
Owners Manual
Page 10
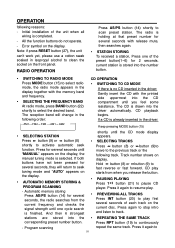
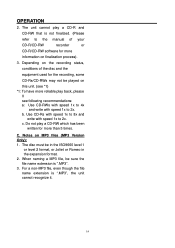
.... SELECTING THE FREQUENCY BAND At radio mode, press BAND button (22) shortly to seek tuning mode and "AUTO" appears on the current disc. Program scanning repeat the same track. Error symbol on display. The CD is completed....RESET button (27), the unit can't work yet, please use a cotton swab soaked in the display together with release mute, then searches again. STATION STORING To received a station, Press one cycle search is no CD inserted in the driver: Keep pressing MODE button (15) shortly until "MANUAL" appears on the front panel. The radio...
.... SELECTING THE FREQUENCY BAND At radio mode, press BAND button (22) shortly to seek tuning mode and "AUTO" appears on the current disc. Program scanning repeat the same track. Error symbol on display. The CD is completed....RESET button (27), the unit can't work yet, please use a cotton swab soaked in the display together with release mute, then searches again. STATION STORING To received a station, Press one cycle search is no CD inserted in the driver: Keep pressing MODE button (15) shortly until "MANUAL" appears on the front panel. The radio...
Owners Manual
Page 11
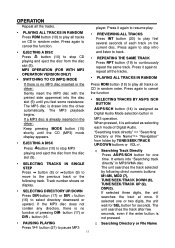
.../SEEK/TRACK UP (9), DSP(0). If selected three digits, the unit searches the tract at once. The MP3 disc is activated as Digital Audio Mode selection button in the driver: Keep pressing MODE button (15) shortly until you feel some resistance. Press again to cancel the function SELECTING TRACKS BY AS/PS /SCH BUTTON...
.../SEEK/TRACK UP (9), DSP(0). If selected three digits, the unit searches the tract at once. The MP3 disc is activated as Digital Audio Mode selection button in the driver: Keep pressing MODE button (15) shortly until you feel some resistance. Press again to cancel the function SELECTING TRACKS BY AS/PS /SCH BUTTON...
Owners Manual
Page 12
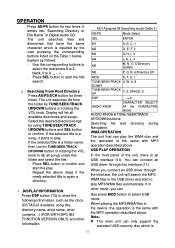
...VERSION ONLY) and other mode, you connect an USB driver through this folder and select the title. - The unit searches file from the folder by using TUNE/SEEK/TRACK UP/... is inputted by the user pressing the corresponding buttons listed on the Table 1 below. When playing the MP3/WMA files in the USB driver and start the play .... If the selected title is an USB interface (11). WMA OPERATION The unit that have the same character which is the same with MP3 operation described above . The unit searches files and directories that can only support...
...VERSION ONLY) and other mode, you connect an USB driver through this folder and select the title. - The unit searches file from the folder by using TUNE/SEEK/TRACK UP/... is inputted by the user pressing the corresponding buttons listed on the Table 1 below. When playing the MP3/WMA files in the USB driver and start the play .... If the selected title is an USB interface (11). WMA OPERATION The unit that have the same character which is the same with MP3 operation described above . The unit searches files and directories that can only support...
Owners Manual
Page 13
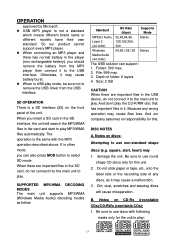
... USB driver from the MP3 player then connect it to the main unit to use discs with the MP3 operation described above. damage the unit. The operation is not a standard which means different brand name or different models have their own standard. SUPPORTED MP3/WMA DECODING MODES The main unit supports MP3/WMA (Windows Media Audio) decoding modes...
... USB driver from the MP3 player then connect it to the main unit to use discs with the MP3 operation described above. damage the unit. The operation is not a standard which means different brand name or different models have their own standard. SUPPORTED MP3/WMA DECODING MODES The main unit supports MP3/WMA (Windows Media Audio) decoding modes...
Owners Manual
Page 14
... with speed 1x to 2x. b. C. For a non-MP3 file, even though the file name extension is not finalized. (Please refer to the manual of the disc and the equipment used for the recording, some CD-Rs/CD-RWs may not be played on this unit. (see *1) *1: To have more than 5 times. Notes...-R/CD-RW recorder or CD-R/CD-RW software for more reliable play a CD-R and CD-RW that is ".MP3", the unit cannot recognize it. 14 Use CD-Rs with speed 1x to 8x and write with speed 1x to 2x. When naming a MP3 file, be in the ISO9660 level 1 or level...
... with speed 1x to 2x. b. C. For a non-MP3 file, even though the file name extension is not finalized. (Please refer to the manual of the disc and the equipment used for the recording, some CD-Rs/CD-RWs may not be played on this unit. (see *1) *1: To have more than 5 times. Notes...-R/CD-RW recorder or CD-R/CD-RW software for more reliable play a CD-R and CD-RW that is ".MP3", the unit cannot recognize it. 14 Use CD-Rs with speed 1x to 8x and write with speed 1x to 2x. When naming a MP3 file, be in the ISO9660 level 1 or level...
Owners Manual
Page 15
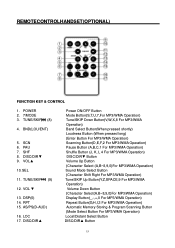
TUNE/SKIP (8) 4. BND(LOU/ENT) 5. SHF 8. RPT 15. DISC/DIR▲ Power ON/OFF Button Mode Botton(S,T,U,7,For MP3/WMA Operation) Tune/SKIP Down Button(V,W,X,8 For MP3/WMA Operation) Band Select Button(When pressed shortly) Loudness Button (When pressed ...MP3/WMA Operation) Shuffle Button (J, K, L 4 For MP3/WMA Operation) DISC/DIR▼ Button Volume Up Button (Character Select (A,B~8,9,0)For MP3/WMA Operation) Sound Mode Select Button (Character Shift Right For MP3/WMA Operation) Tune/SKIP Up Button(Y,Z,SPACE,9 For MP3/WMA Operation) Volume Down Button (Character Select(A,B~8,9,0)For MP3...
TUNE/SKIP (8) 4. BND(LOU/ENT) 5. SHF 8. RPT 15. DISC/DIR▲ Power ON/OFF Button Mode Botton(S,T,U,7,For MP3/WMA Operation) Tune/SKIP Down Button(V,W,X,8 For MP3/WMA Operation) Band Select Button(When pressed shortly) Loudness Button (When pressed ...MP3/WMA Operation) Shuffle Button (J, K, L 4 For MP3/WMA Operation) DISC/DIR▼ Button Volume Up Button (Character Select (A,B~8,9,0)For MP3/WMA Operation) Sound Mode Select Button (Character Shift Right For MP3/WMA Operation) Tune/SKIP Up Button(Y,Z,SPACE,9 For MP3/WMA Operation) Volume Down Button (Character Select(A,B~8,9,0)For MP3...
Owners Manual
Page 16
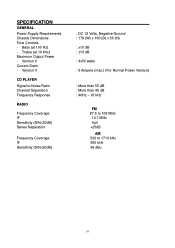
...Noise Ratio Channel Separation Frequency Response RADIO Frequency Coverage IF Sensitivity (S/N=30dB) Stereo Separation Frequency Coverage IF Sensitivity (S/N=20dB) : DC 12 Volts, Negative Ground : 178 (W) x 160 (D) x 50 (H) : ±10 dB : ±10 dB : 4x50 watts : 5 Ampere (max.) (For Normal Power Version) : More than 55 dB... : More than 45 dB : 40Hz - 18 kHz FM 87.5 to 108 MHz 10.7 MHz 4μV >25dB AM 520 to 1710 kHz 450 kHz 36 dBu 16 Treble (at 100 Hz) - Bass (at 10 kHz) Maximum Output Power - SPECIFICATION GENERAL Power Supply Requirements...
...Noise Ratio Channel Separation Frequency Response RADIO Frequency Coverage IF Sensitivity (S/N=30dB) Stereo Separation Frequency Coverage IF Sensitivity (S/N=20dB) : DC 12 Volts, Negative Ground : 178 (W) x 160 (D) x 50 (H) : ±10 dB : ±10 dB : 4x50 watts : 5 Ampere (max.) (For Normal Power Version) : More than 55 dB... : More than 45 dB : 40Hz - 18 kHz FM 87.5 to 108 MHz 10.7 MHz 4μV >25dB AM 520 to 1710 kHz 450 kHz 36 dBu 16 Treble (at 100 Hz) - Bass (at 10 kHz) Maximum Output Power - SPECIFICATION GENERAL Power Supply Requirements...
Owners Manual
Page 17
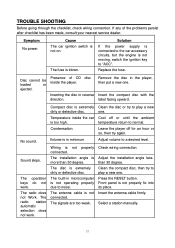
... new dirty or detective disc. The radio station automatic selection does not work . temperature return to play a new one. Check wiring connection. Presence of the problems persist after checklist has been made, consult your nearest service dealer. Inserting the disc in the... . Press the RESET button. Insert the antenna cable firmly. TROUBLE SHOOTING Before going through the checklist, check wiring connection. Front panel is extremely dirty or defective disc. The fuse is not operating properly due to a desired level. Select a station manually. 17 Temperature inside...
... new dirty or detective disc. The radio station automatic selection does not work . temperature return to play a new one. Check wiring connection. Presence of the problems persist after checklist has been made, consult your nearest service dealer. Inserting the disc in the... . Press the RESET button. Insert the antenna cable firmly. TROUBLE SHOOTING Before going through the checklist, check wiring connection. Front panel is extremely dirty or defective disc. The fuse is not operating properly due to a desired level. Select a station manually. 17 Temperature inside...


